If you plan to service your car yourself - in your garage, then you cannot do without auxiliary devices.
To repair a car, you may need a variety of tools, ranging from a reverse hammer to straighten dents on the body and ending with a universal wrench for an oil filter.
We want to talk about another useful device for the garage, which is a puller
external
CV joint
grenade .
You can buy such a device in a store, but it will be much cheaper to make it yourself - from what you have on hand.
Using homemade
With a puller, you can dismantle not only the CV joint body itself, but also its individual elements - for example,
the outer boot
.
In general, the design of this device is quite simple, and making it yourself will not pose any problems. Dimensions
in most cases the same.
In this article we will take a closer look at two different options for a homemade device. But which one to give preference to is up to you to decide.
Types of CV joints, their design and operating principle
CV joint device: 1. Right front wheel drive;
2. Gearbox; 3. Left front wheel drive; 4. External joint housing; 5. Retaining ring of the hinge cage; 6. 18. Hinge cage; 7. 19. Hinge separator; 8. 17. Hinge ball; 9. Outer clamp of the cover; 10. 15. Protective cover for the hinge; 11. Thrust ring; 12. 14. Left wheel drive shaft; 13. Inner clamp of the cover; 14. Internal hinge lock; 15. 20. Retaining ring of the inner joint cage; 16. 21. Shaft buffer; 17. 22. Internal hinge housing; 18. 23. Axle gear retaining ring. There are several types of CV joints, but only two are widespread in passenger cars:
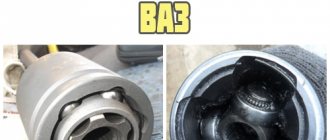
The design of a ball CV joint includes two cages - an internal one, in the form of a spherical fist (fitted onto the shaft), and an external one (made integral with the shaft end, which is inserted into the hub or gearbox). Between them there are balls placed in special grooves, which are kept from falling out of the hinge by a separator. It is the balls and the grooves along which they move that are the main working elements of the CV joint, since they transmit rotation and allow you to change the angle of one race relative to the other.
To prevent the inner race from coming off the shaft, it is secured with a retaining spring ring located in a special groove on the shaft. The locking ring is also used on the shaft ends of the outer race of the internal joint.
The tripoid joint does not have an internal race; instead, a three-pin fork mounted on the shaft is used. Each cleat on this fork has spherical rollers on needle bearings. Thanks to these rollers, rotation is transmitted, the shaft with the fork can change the angle relative to the cage, and also move longitudinally relative to the outer cage (enter into it), which makes it possible to change the length of the drive.
The connection between the fork and the shaft is splined, but at the same time it fits onto the shaft quite tightly. Additionally, the fork is secured with a retaining ring to prevent it from jumping off.
It is noteworthy that tripoidal CV joints are used only on the gearbox side, but they are not used on the hub side.
Ball joints can be located on both sides. That is, you can find drive shafts on cars with two ball joints, internal tripoid joints and external ball joints, but never with two tripoid CV joints. This is due to the peculiarities of the operation of each of these types of hinges.
It is interesting that some cars (for example, Volkswagen Golf 2) use an internal ball joint of an interesting design - the outer race with the shaft end is not made at the same time, but they are connected to each other by bolts. We'll touch on them a little later.
Basic hinge malfunctions and their symptoms
The comparative simplicity of the design and the small number of components makes this unit quite reliable and capable of working for a very long time without any intervention. But this hinge also has a drawback - it is very sensitive to contamination.
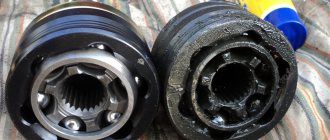
The working elements of the unit - balls, rollers, grooves along which they move, and needle bearings - have a high degree of surface treatment. And sand and dust have a fairly strong abrasive effect, so when they get inside, they lead to intense wear of the surfaces, which ultimately causes the destruction of the unit.
Rubber boots are used to prevent contamination from entering. So they are the “weak point” of the angular velocity hinge. During the operation of the car, the rubber, constantly in contact with the environment, gradually “ages”, and cracks appear in the boot, through which sand gets into the joint.
In general, this is the only reason why these nodes can break. And since they cannot be repaired, they are replaced.
Note that the appearance of a crunch indicates that the hinge has already received damage that cannot be repaired. There are some measures you can take early on. First of all, you should wash the hinge, apply new grease and replace the boot. Then you can change the sides of the installation (that is, for example, swap the left inner hinge with the right one). Another option is to add small shavings of soft plastic to the lubricant.
But since the component parts have already been damaged, all of the above measures only slightly extend the service life and ultimately the unit will have to be replaced, and it is better to do this before it completely collapses, which usually happens along the way.
From the above, it can be understood that the only way to preserve the hinge is to periodically check the condition of the boot and, if even the slightest damage is detected, immediately replace it. After all, a rubber element will cost much less than a CV joint.
Replacing a CV joint is a relatively simple operation to perform, but there are a number of nuances when carrying out an operation with an external and internal unit. Also, the specifics of the work depend on the design of the hinge.
Next, let's look at how to replace external and internal CV joints using the example of several cars that use different types of drive shafts.
Replacing the inner CV joint with your own hands
Oil filter puller: factory and home-made varieties
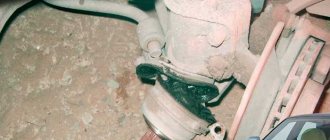
» alt=»»> The procedure for replacing the “grenade” is the same for the entire front-wheel drive VAZ line, starting with 2108 and ending with the VAZ-2115, “Kalina”, “Priora”, “Granta”. Before removing the inner CV joint, the oil is drained from the gearbox. Then proceed according to the following algorithm:
- Unlock and unscrew the hub nut. To make the work easier, a piece of pipe about 1 meter long should be put on the key.
- The desired side of the car is hung on a jack or lift.
- Remove the wheel.
- Remove the washer located under the hub nut installation site.
- Disconnect the steering tip.
- The CV joint is removed from the hub.
- Using a pry bar, remove the drive and internal joint from the gearbox.
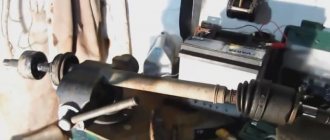
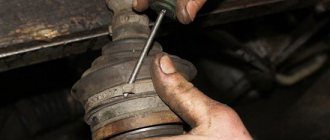
How to change the “grenade” with the drive removed? To do this, clamp the shaft in a vice, loosen the clamps and remove the boot. After this, the hinge is knocked off the splines with hammer blows.
Varieties
Pullers are distinguished by the method of removing the CV joint from the car suspension. The following 3 types are common:
- universal;
- with steel cable;
- with a reverse hammer.
A universal puller is needed to remove grenades from most front-wheel drive and all-wheel drive vehicles. The tool consists of 2 clamps with an eye in the center. They are fixed on the shaft. When tightened with the hub nut, the hinge is released from the stopper.
A steel cable puller is designed to quickly remove the CV joint. The loop is placed at the base of the hinge and with a sharp grab the grenade is pulled out of the hub.
CV joint puller with steel cable
A tool with a reverse hammer is an inertial device for safely dismantling the chassis suspension using a moving “weight”.
CV joint puller: principle of operation and its necessity
Replacing the CV joint boot: how to change the boot yourself
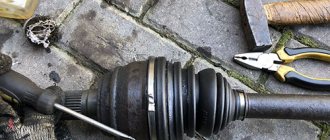
It happens that it is necessary to replace not the entire CV joint, but its front part or the outer boot. In this case, the rationale for completely dismantling the “grenade” drive is called into question. Most experienced motorists in such situations choose partial disassembly of the CV joint, that is, removal of its outer part. Sometimes such an event is quite difficult to carry out without special devices - pullers, which greatly facilitate the process, making it less labor-intensive and chaotic.
The CV joint puller is a squeezing and pulling mechanism. With the help of some bolts, the device is fixed on the open part of the shaft, and with the help of others, the inside of the grenade is pushed out. For a clearer understanding of the operating principle of the puller, study the image below.
A few movements with a wrench when using a removable CV joint device help, as they say, to kill several birds with one stone:
- reduce the risk of breakage of the “grenade” and its surrounding elements to zero, which can happen when using handicraft repair methods (hammer, pry bar, etc.);
- facilitate the repair process;
- do the procedure without getting particularly dirty;
- carry out replacement quickly and efficiently.
As you can see, a device for removing constant velocity joints is very effective for partial repair of a part (replacing the outer part or boot, for example). Purchased accessories
It is worth noting that in addition to pullers for the outer part of the CV joint, there are similar devices for the internal “grenade” and universal ones (suitable for both repair options). If for the first case it is quite possible to make the device yourself, then for removing the internal hinge it is very difficult. In this case, it is easier to resort to buying a ready-made device from a car store.
To be fair, we note that there will definitely be no problems in this aspect. Almost every auto shop has CV joint pullers in its assortment. The price category of these products varies widely, since the cost of the device depends on the quality of the metals used and its reliability. Moreover, if you wish, you can find not only a puller for removing the CV joint (its various parts), but also a puller for CV joint clamps, which is sometimes simply necessary during repairs.
When choosing and purchasing a removable device for grenades, you should follow simple recommendations:
- By first studying reviews about certain pullers or manufacturers on the Internet, you can quickly and without risks make the right choice.
- Do not buy the cheapest devices (100-300 rubles), as they are often made of low-quality metals and are “disposable”. Often such pullers break during the repair process.
- However, you shouldn’t take too expensive devices, because in most cases the markup is for the brand (excluding multifunctional universal pullers).
By following the tips above, you are guaranteed not to make a mistake and make the right choice.
puller for outer CV joints without dismantling.
Replacement of outer CV joint for Ford Focus 2
Now I'll know what he's for)))
I took this one a long time ago. I’ve never used ska before))) ska in Fig. 7
Now I'll know what he's for)))
100 rubles maybe even less
why buy it? there are enough drills and monkeys to do it.
It is often faster to buy if it costs little than to waste time searching for pieces of iron and processing them. and yes, everything is primitive.
Googled it. This is the type of design that is commonly found.
what's the point there? that it is necessary to push it out of the shaft using the inner race. (if you change the boot) because with the puller that you dug, the load will be on the balls and working surfaces of the CV joint. but this half of the puller will leave a half ring (6), and sharpen the part at the bottom in your photo for the wedge.
Hello everyone interested in the topic. The tuning studio “From Matches and Acorns” is with you, and today I will tell you how I made an external CV joint puller from junk, for free, without SMS and registration. Perhaps my experience will be useful to someone and give them some ideas.
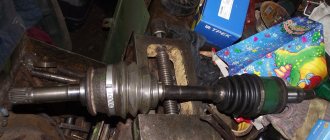
In the process of a large-scale repair of the basin, I needed to bring the drive shafts into decent shape, namely, perform a full range of maintenance work: assess the wear of the hinges and their suitability for further use, replace cracked boots, lubricant, clean everything and paint. For all these operations, the hinges must be removed from the shafts. And this is where things get interesting. You can use a sledgehammer to knock it down through the extension the old fashioned way; you can use various types of pullers. Due to the fact that there are no assistants or a powerful workbench with yews available, the first method disappeared by itself. Three of the four hinges were removed normally using a traditional and simple expanding puller made of two split rings, but the fourth decided to put up desperate resistance. The clamping force of the stop on the shaft was not enough - instead of a clip, as it should have been, the force moved the stop along the shaft. Twice I tore off the clamping bolts, even the protrusion under the boot did not stop it - instead of resting against it, the puller crawled onto it, crushing the stronger bolts and pulling the threads already in the piece of iron. After organizing a more reliable stop, the threads of the spacer bolts eventually broke due to wild force. The CV joint remained unshaken and seemed to grin.
There are universal outer CV joint pullers on sale that tighten the joint with its own nut or bolt. This design and principle of operation formed the basis of the homemade product, and with the money saved you can buy more spare parts.
Features of replacing a tripod CV joint
Finally, let’s look at how the internal tripod joint of angular velocity changes using the example of the Ford Focus 2. The tools you will need are the same as those indicated above, as well as a universal three-legged puller and pliers for removing the retaining rings.
The difficulty of replacement is that you will have to completely remove the drive shaft. Everything is done like this:
- We take out the external hinge from the hub (identical to the VAZ-2110).
- We climb under the car, cut off the large clamp of the inner CV joint, and tighten the boot.
- We remove the shaft (there remains an assembled outer joint on one side and a three-pin fork on the other, while the outer race remains in the gearbox).
- We remove the outer race (push out the limit switch using a pry bar driven between the race and the gearbox);
- Using pliers, remove the retaining ring holding the fork.
- We pull the fork itself from the shaft with a puller.
- We place the boot and the new element on the shaft and install the retaining ring back.
- We put the outer ring in place (you can carefully hammer it in with a hammer with an adapter).
- Install the drive shaft.
- Apply grease, pull the boot onto the outer race and secure it with clamps.
- We collect everything removed in reverse order.
As you can see, there is no particular difficulty in replacing CV joints, and all work can be done independently in a garage.
Renault Logan 2007 - DIY repair
You may need the help of a second person. Don't forget about the role of clamps.
Considering that the hinge itself will not be removed, the boot will have to be thoroughly coated with oil in order for it to slide properly. This will help to avoid difficulties at the final stage of work. First of all, unscrew the steering rod from the hub.
To do this, unscrew the nut 16 and unscrew the bolt. The steering tip can be pressed out, or it can be knocked out.
Since knocking it out is much easier and faster, use this method. For clarity, watch this video on removing the tie rod to 1. If you decide to use a puller, this is what a homemade one looks like: And these are sold in car dealerships: After you have removed the tie rod, remove the ball joint.
This will happen in the same way as in the first method: When you have removed the ball, move the hub to the side and remove it from the splines. It is held on by three bolts. It is important to remember that there are differences in the sizes of the protective covers themselves - the left one is 2 cm shorter and 1.5 cm larger in diameter. Accordingly, they are not interchangeable. Despite the fact that the CV joints on cars before the restyling were non-separable, their design has not fundamentally changed, so the technology for replacing CV joint boots is similar.
If there is no CV joint puller If there is no puller for dismantling the retaining ring of the inner joint race, you must use a hammer and chisel carefully so as not to break it. After the hinge is washed, new grease is added, the boot is put on, and the clamps are on it, you can reassemble everything in the reverse order. It’s also not difficult here, although it’s worth considering that the left and right internal hinge have some differences.
Their anthers are also different. First, we’ll tell you how to disassemble the left CV joint with a shorter axle shaft. Therefore, it makes sense to first apply a thin layer of CV joint grease to the shaft and the hinge itself. This will greatly simplify the task.
Along with the outer boot, it is strongly recommended to replace the plastic boot, along with the oil seal and bearing. As can be seen from this article, a worn outer boot entails wear on the CV joint, replacing which is a long and labor-intensive task.
Replacing ball joint boots for Renault Logan with boots from a VAZ 2108 with your own hands
The CV joint is crunching - how to determine which one, and what to do?
Hello, dear motorists! A car enthusiast can only consider himself a real car owner when he is truly concerned about the condition of the car’s components and assemblies, and every new knock, creaking and other signs of car breakdowns haunt him.
Driving a car can be called comfortable only if all elements are in good working order.
However, each part, especially those that operate under load and friction like a CV joint, has its own working life.
Sooner or later, the material wears out and loses its properties, which leads to failure of the part. This is objective. And a “hint” about an impending breakdown from the part itself must be taken seriously. It’s better not to wait for the car to stop on a long journey, but to immediately begin troubleshooting and fixing it.
Owners of front-wheel drive cars are familiar with such an unpleasant phenomenon as a CV joint crunching. Considering that the front suspension of the car, in addition to its main functions, must also ensure the transmission of rotation from the differential gears to the drive wheels, it is equipped with unique devices: constant velocity joints, which in its abbreviated version sounds like “CV joint”.
This part is very important and quite complex in design; therefore, it is expensive and requires increased attention. If the CV joint crunches, then without any hesitation you need to take the car in for repairs and change it.
Why does the CV joint crunch?
Video of replacing the outer left CV joint
Experienced drivers are able to determine the location of a car breakdown by ear. Such skills are acquired over time, but the crunch of a CV joint cannot be confused with anything.
In order to understand the nature of this characteristic noise, you should remember how the CV joint is designed. The task of the CV joint is the transmission of rotation from one axle shaft to another, provided that the angle between them continuously changes.
This property is due to the need not only to rotate the drive wheel, but also to give it the ability to turn and move up and down on a spring.
The CV joint consists of the following main elements:
- outer body in the form of a bowl with six semicircular grooves inside and a semi-axis outside;
- the inner race is in the form of a spherical fist and also has six grooves and a splined connection for the axle shaft;
- Between the inner walls of the bowl and the holder there are 6 balls in the separator.
All elements are made so precisely that they have no play when assembled. The cage transmits force through the balls to the body and rotates it, and moving the balls along the grooves makes it possible to change the angle between the axle shafts.
Over time, a hole forms at the point where the balls come into contact with other elements and a backlash appears. The free movement of the balls (rolling) generates a sound that is very similar to crunching.
Considering that CV joints are installed two on each wheel, when alarming symptoms appear, it becomes difficult to find out which CV joint is crunching: inner or outer, right or left.
How to determine which CV joint is crunching: external or internal, right or left?
As you know, each drive wheel of a front-wheel drive car has two equal angular velocity joints: the inner one transmits rotation from the differential gears to the axle, and the outer one directly from the axle to the wheel hub. The outer and inner CV joints have the same design, but different sizes. The outer one wears out more intensively and fails faster.
You can determine for yourself which CV joint is crunching in two ways:
- on a stationary car, trying to pull the axle one by one at the hinges. In a working CV joint there should be no play. If it knocks, it means the output is already large enough;
- in motion, performing various maneuvers and listening to the sounds made.
First you should try to diagnose the outer CV joints. To do this, turn the steering wheel as much as possible while moving on a flat surface in one direction, and then in the other.
If the CV joint knocks when turning to the right, then, accordingly, the right one is faulty, and when turning to the left, the left one is faulty.
The wear of the inner CV joint is determined during straight-line movement, but it is necessary to deliberately select an uneven section of the road, where there will be a ditch or hole, so that the wheel drops as low as possible while moving.
By driving the right and left wheels alternately into the recess, you can determine which side of the CV joint requires replacement. And of course, after you diagnose which one is crunching, immediately begin replacing the CV joint.
Reverse hammer for CV joints: TOP 8 best models
A constant velocity joint performs the function of a universal joint, but its design is much more complex. In fact, this is a powerful ball bearing with a floating cage, to the cages of which the hub and axle shaft of the car's front suspension are attached. The hinge body is called a grenade due to its external similarity. The design is created as non-demountable.
Many manufacturers of spare parts offer to replace the entire worn joint. This is not an economical solution, since play appears only in one half - most often in the outer grenade.
The hinge body contains a cage with balls, into which the axle shaft is inserted using a spline connection. Inside the so-called There are mechanical stoppers located on the glass, the size of which does not allow the assembly of the holder to be removed. The axle shaft is secured with a retaining ring, which is not accessible. This is not a power element; the stopper is designed to prevent the grenade from falling apart during transportation. However, using conventional tools, it is impossible to separate the splines without special pullers.
How to make a CV joint puller yourself
There are a huge number of ways to make removable devices for grenades. Each of them is good and convenient in its own way, but the general principle of their construction is simple. To make most pullers, you will need the help of a turner, who can make the device within half an hour.
To understand how to make a CV joint puller with your own hands, check out the diagrams/images and videos below:
CV joint (constant velocity joint) is a mechanism that allows you to transmit torque between misaligned shafts. The device is actively used on front-wheel drive vehicles. On each shaft coming out of the gearbox there are two of them - internal and external. Repair is impossible; if the unit breaks down, it is replaced as an assembly.
In what cases should a puller be used?
For timely repair of the car chassis and replacement of the CV joint, it is important to pay attention to the characteristic signs:
- rhythmic knocking, creaking and grinding when accelerating and turning;
- vibration and jolting when trying to change gear;
- strong play in steering.
The cause of the defects may be water and dirt getting into the grenade due to a torn boot. Such malfunctions occur during aggressive driving, especially if you sharply accelerate with the wheels fully turned out.
There is no need to go to a service station to troubleshoot problems. You can replace the boot and hinge yourself and for free if you make a universal CV joint puller with your own hands. Making this device will not be difficult if you have a welding machine and basic skills in working with an angle grinder.
Source
How to make a CV joint puller yourself
There are a huge number of ways to make removable devices for grenades. Each of them is good and convenient in its own way, but the general principle of their construction is simple. To make most pullers, you will need the help of a turner, who can make the device within half an hour.
To understand how to make a CV joint puller with your own hands, check out the diagrams/images and videos below:
https://youtube.com/watch?v=JwzIAu7h5Jc
CV joint (constant velocity joint) is a mechanism that allows you to transmit torque between misaligned shafts. The device is actively used on front-wheel drive vehicles. On each shaft coming out of the gearbox there are two of them - internal and external. Repair is impossible; if the unit breaks down, it is replaced as an assembly.
Drive Features
Making a car with driving front wheels allows constant velocity joints (CV joints), which are used in the drive design. The peculiarity of this type of hinge is the ability to transmit torque without loss when rotating one component of the drive relative to another at an angle of up to 70 degrees.
Car front wheel drive shaft
The drive shaft of a vehicle with a front drive axle must perform several functions, and simultaneously. It must transmit torque to the wheel hub from the gearbox, provide the ability for the wheel to move relative to the body (when driving over uneven surfaces), and also allow changing the angle of the wheel, that is, making turns (which is accompanied by the need to change the length of the shaft). And all this is done thanks to constant velocity joints.
In general, the design of the drive shaft of a front-wheel drive car consists of three elements:
- shaft (with splines at the ends for connection with hinges);
- internal CV joint (which connects the drive to the gearbox);
- external CV joint (for connection to the wheel hub).
There are two such drive shafts in a front-wheel drive car, one for each drive wheel.
Replacing the internal hinge
Next, we’ll look at how to change the internal CV joint (ball joint) on the same VAZ-2110. An additional tool will require a mount.
Some of the work does not differ from those described above, so they will be listed briefly. The replacement is done like this:
- We park the car, jack it up, remove the wheel (no need to loosen the nut).
- Disconnect the ball joint and steering tip.
- We climb under the car. We take a pry bar and drive it between the inner hinge and the gearbox. Using it as a lever, we push the limit switch out of the box, while asking an assistant to pull the hub towards himself.
After the limit switch comes out of the gearbox, we carry out the replacement identically to that described above - cut off the boot, knock down the hinge. Then we put a new boot on the shaft, use a hammer with an adjuster to seat the new CV joint, add grease, put on the boot and secure it with clamps. Next, we install the shaft end in the gearbox and push it into the hub into the box until it stops (you cannot seat it with hammer blows on the hinge, so as not to damage the new boot).
Now a few words about replacing the internal CV joint on a Volkswagen Golf 2, in which the hinge is bolted to the end switch. This design makes disassembly even easier because it does not require disconnecting the suspension arms from the hub.
To remove the hinge, you just need to unscrew 6 bolts, after which the shaft together with the hinge can be lowered down to remove (knock down) the CV joint; you do not need to remove the limit switch at all. And then we install a new boot, seat the assembly on the shaft, lubricate and secure the clamps. We place the shaft with the new hinge to the end switch and connect them with bolts.
Puller drawings. Repair equipment. Tool
This topic will provide drawings of pullers and devices for car repairs, as well as drawings of special tools.
The following drawings are currently available:
Drawing of the front suspension strut rod nut remover.
Drawing of a universal screw puller for steering rod pins.
Drawing of spring ties for front and rear suspensions.
Drawing of a puller for pressing out the silent block of the rear suspension shock absorber.
Drawing of a puller for pressing in the silent block of the rear suspension shock absorber.
Drawing of a wheel bearing puller for the front and rear wheels.
Drills for knocking out wheel bearings
Photo of drifts for knocking out a wheel bearing
Mandrels for pressing in wheel bearings
Photo of mandrels for pressing in the wheel bearing of the front and rear wheels of VAZ-2108, VAZ-2109, VAZ-21099, VAZ-2113, VAZ-2114, VAZ-2115. The photo also shows rings from old wheel bearings, they also help with pressing.
Drawing of a puller for replacing rubber-metal hinges of the rear beam.
Replacement of rubber-metal hinges of the rear beam
Drawing of a puller for replacing the silent blocks of the front suspension arm.
Puller for replacing silent blocks of the front suspension arm
Device for compressing brake cylinders.
The brake cylinder compressor is made from old brake pads. Everything seems to be visible in the photo.
Photo of a device for compressing brake cylinders.
Drawing of brake cylinder compression device
Source
CV joint repair
As mentioned above, the hinge cannot be repaired. Conventionally, one of the repair measures includes washing the “grenade” after driving with a damaged boot.
Washing is carried out at the same time when the damaged boot on the pomegranate is replaced. The hinge is carefully knocked off the shaft, inspected for damage and thoroughly washed to remove any dirt and grease in gasoline or kerosene.
After washing, the assembly is filled with lubricant and mounted in place, having previously installed the boot. The procedure makes sense only if there are no obvious signs of a joint malfunction.
A crunchy or knocking part definitely needs to be replaced, since wear forms on the working surfaces of the inner race, and it is no longer possible to stop the destruction. Continued operation of the vehicle may be dangerous for the driver and other road users.
Most modern cars use front-wheel drive. Its main advantage lies in the fact that the design of the transmission is less massive and metal-intensive compared to rear-wheel drive cars, since it does not require an axle with a gearbox and a cardan drive.
Boot replacement and repair
The boot can be changed without removing the grenade if you have special equipment. His work is demonstrated on video. » alt=»»> If you do not have such a device, to remove and replace it, you must perform the above-described procedure for removing the drive and dismantling the hinge. The procedure is necessary if there is even minor through damage on the boot.
Temporary repairs to the CV joint boot can be made without removing it from the vehicle. To do this, you need to thoroughly clean and degrease the damage, then seal it with a piece of rubber and cyanoacrylate-based glue (superglue).
An alternative repair method is to seal the holes with silicone caulk. It should be remembered that it takes a day to completely polymerize.
Note: express repair is a temporary measure. Replacing the inner joint boot may be delayed for a short time, but not completely cancelled. Typically, these types of repair methods are used to get to the point of repair.
CV joint puller: principle of operation and its necessity
It happens that it is necessary to replace not the entire CV joint, but its front part or the outer boot. In this case, the rationale for completely dismantling the “grenade” drive is called into question. Most experienced motorists in such situations choose partial disassembly of the CV joint, that is, removal of its outer part. Sometimes such an event is quite difficult to carry out without special devices - pullers, which greatly facilitate the process, making it less labor-intensive and chaotic.
The CV joint puller is a squeezing and pulling mechanism. With the help of some bolts, the device is fixed on the open part of the shaft, and with the help of others, the inside of the grenade is pushed out. For a clearer understanding of the operating principle of the puller, study the image below.
A few movements with a wrench when using a removable CV joint device help, as they say, to kill several birds with one stone:
- reduce the risk of breakage of the “grenade” and its surrounding elements to zero, which can happen when using handicraft repair methods (hammer, pry bar, etc.);
- facilitate the repair process;
- do the procedure without getting particularly dirty;
- carry out replacement quickly and efficiently.
As you can see, a device for removing constant velocity joints is very effective for partial repair of a part (replacing the outer part or boot, for example). Purchased accessories
It is worth noting that in addition to pullers for the outer part of the CV joint, there are similar devices for the internal “grenade” and universal ones (suitable for both repair options). If for the first case it is quite possible to make the device yourself, then for removing the internal hinge it is very difficult. In this case, it is easier to resort to buying a ready-made device from a car store.
To be fair, we note that there will definitely be no problems in this aspect. Almost every auto shop has CV joint pullers in its assortment. The price category of these products varies widely, since the cost of the device depends on the quality of the metals used and its reliability. Moreover, if you wish, you can find not only a puller for removing the CV joint (its various parts), but also a puller for CV joint clamps, which is sometimes simply necessary during repairs.
When choosing and purchasing a removable device for grenades, you should follow simple recommendations:
- By first studying reviews about certain pullers or manufacturers on the Internet, you can quickly and without risks make the right choice.
- Do not buy the cheapest devices (100-300 rubles), as they are often made of low-quality metals and are “disposable”. Often such pullers break during the repair process.
- However, you shouldn’t take too expensive devices, because in most cases the markup is for the brand (excluding multifunctional universal pullers).
By following the tips above, you are guaranteed not to make a mistake and make the right choice.
Operating principle of the puller
The tool is a mechanism that is attached with some bolts to the axle shaft, and with others it squeezes the inside of the grenade out. Depending on the type of device, the methods of use vary.
The inertial CV joint puller works on the principle of a reverse hammer. One part of the tool is mounted to the shank, the other, with a sliding weight, is fixed on the axle shaft using an eye. By a sharp movement of the cylindrical weight in the opposite direction from the part, the hinge is removed from the spline joint without damage.
To dismantle a grenade using the wedge method, you will need a tool with 2 support platforms. One consists of clamps that are put on the axial connection. The other is a split ring for the joint cage. Between them on the sides, wedges are driven in with hammers. After a couple of blows, the axle shaft moves a few millimeters, releasing the part from the stopper.
CV joint puller in action
The screw puller is suitable for working with fastening units of any size. Consists of 2 sliding platforms. They are connected to each other by longitudinal plates. Each has holes that are needed to adjust the working distance. One platform is fixed with a clamp, the second is fastened to the spline joint of the shaft with a jaw. Then twist the hub nut until the locking ring clicks. After which the hinge can be removed without effort.
CV joint puller: principle of operation and its necessity
It happens that it is necessary to replace not the entire CV joint, but its front part or the outer boot. In this case, the rationale for completely dismantling the “grenade” drive is called into question. Most experienced motorists in such situations choose partial disassembly of the CV joint, that is, removal of its outer part. Sometimes such an event is quite difficult to carry out without special devices - pullers, which greatly facilitate the process, making it less labor-intensive and chaotic.
The CV joint puller is a squeezing and pulling mechanism. With the help of some bolts, the device is fixed on the open part of the shaft, and with the help of others, the inside of the grenade is pushed out. For a clearer understanding of the operating principle of the puller, study the image below.
A few movements with a wrench when using a removable CV joint device help, as they say, to kill several birds with one stone:
- reduce the risk of breakage of the “grenade” and its surrounding elements to zero, which can happen when using handicraft repair methods (hammer, pry bar, etc.);
- facilitate the repair process;
- do the procedure without getting particularly dirty;
- carry out replacement quickly and efficiently.
As you can see, a device for removing constant velocity joints is very effective for partial repair of a part (replacing the outer part or boot, for example). Purchased accessories
It is worth noting that in addition to pullers for the outer part of the CV joint, there are similar devices for the internal “grenade” and universal ones (suitable for both repair options). If for the first case it is quite possible to make the device yourself, then for removing the internal hinge it is very difficult. In this case, it is easier to resort to buying a ready-made device from a car store.
To be fair, we note that there will definitely be no problems in this aspect. Almost every auto shop has CV joint pullers in its assortment. The price category of these products varies widely, since the cost of the device depends on the quality of the metals used and its reliability. Moreover, if you wish, you can find not only a puller for removing the CV joint (its various parts), but also a puller for CV joint clamps, which is sometimes simply necessary during repairs.
When choosing and purchasing a removable device for grenades, you should follow simple recommendations:
- By first studying reviews about certain pullers or manufacturers on the Internet, you can quickly and without risks make the right choice.
- Do not buy the cheapest devices (100-300 rubles), as they are often made of low-quality metals and are “disposable”. Often such pullers break during the repair process.
- However, you shouldn’t take too expensive devices, because in most cases the markup is for the brand (excluding multifunctional universal pullers).
By following the tips above, you are guaranteed not to make a mistake and make the right choice.
How to make a puller from scrap materials?
The wedge-shaped design is the most complex (in terms of independent operation); industrial equipment will be required to manufacture the main elements. Let's look at the other options:
- Reverse hammer. A transverse eye is welded onto a piece of flat pipe (or fittings). The diameter of the hole corresponds to the hub axle shaft. Any heavy blank with a through hole is used as a hammer. You can take a metal part from a sledgehammer. At the opposite end we weld the impact stopper (this is a critical unit, it must be strong).
- The screw puller is literally made from metal waste that is present in every garage (home workshop). The most difficult thing to make is a clamp clamp. Usually, with the help of a grinder, they cut the old race from a suitable CV joint, and weld the support pad to it. It is better to use hardened steel as power rods; simple reinforcement can bend.