02/04/2022 12 245 VAZ Niva
Author: Ivan Baranov
The generator is the source of electrical energy for the vehicle. The article discusses the 21214 generator, its design features, possible problems and troubleshooting methods, and provides step-by-step instructions on how to remove and connect the device.
[Hide]
Device Description
On Niva 21214 cars there is a generator of type 9412.3701, on VAZ 21213 - type 371.3701, on Niva Chevrolet there is a generator 2123. All of them are alternating current electric machines with electromagnetic excitation, having a built-in rectifier unit with silicon diodes and an electronic voltage regulator. The maximum current produced by the generator unit type 9412.3701 is 80 A, voltage - 13.2 - 14.7 V, rotation - right.
Design of unit 21214
The unit covers are attached to the stator using 4 bolts. The covers have bearings installed. They rotate the rotor shaft. In the front bearing, the inner race is clamped with a nut along with a thrust ring and washer. The 2nd bearing is also pressed into the back cover.
The stator has a 3-phase winding, one of the ends of which is connected to a rectifier unit consisting of 6 diodes. Of these, 3 diodes are negative, 3 are positive. According to the polarity, they are pressed into the plates. The entire structure consists of a rectifier unit, which is located on the back cover of the generator unit covered with a protective casing.
The design of the unit also includes contact rings and brushes. On the back side of the back cover there is a brush holder, which is structurally connected to the voltage regulator. The rectifier contains a capacitor that protects the electrical network from power surges.
The “B” terminal of the generator set must be connected to the positive terminal of the battery, and the negative terminal of the battery to the vehicle ground. If the connection is incorrect, this will lead to breakdown of the diodes.
VAZ specialists answer
VAZ SPECIALISTS ANSWER
VAZ:
EVGENY BAIBORIN - engine development department
ALEXEY KLIMENKO – transmission development department
YURY PROKHOROV – after-sales service department
ALEXANDER GUSEV – transmission development department
On my Niva VAZ-21214, the plastic chain guide broke more than once, once every 10-12 thousand km. I changed the chain, sprockets, tensioner shoe and the hydraulic chain tensioner itself, the oil line - I can’t find the reason!
The dampers used in the factory configuration, produced by JSC "Plastik" from Chelyabinsk, have proven to be quite reliable. In your case, the reasons for the breakdown of the original, factory damper could be factors such as an error in the initial installation, a deviation in the location of the damper mounting on the cylinder head, or the dimensions of the damper itself from the requirements of the drawing. In these cases, the damper may become distorted, ultimately leading to its destruction.
A serious threat of breakage of the damper also arises when shock loads are applied to it due to insufficient tension of the operating chain - usually this is due to a malfunction of the hydraulic tensioner, but in some cases the cause of this is excessive wear of the sprockets and chain, its significant elongation and sagging.
Calcifiers bought in a store may be inferior in strength to the original ones due to the low quality of their material - plastic.
I want to remake the VAZ-21214 timing drive according to the 21213 model. What is the difference between sprockets, chains, etc.?
The 21213 engine has a 21213 camshaft, which is driven by the long-established traditional double-row bushing chain 2103 (116 links). Here is the original kit - tensioner, shoe, chain guide. The stars are, accordingly, double-row. The number of teeth for all engine options is the same: 19 on the crankshaft nose, 38 on the camshaft and oil pump drive. Valve lever supports are mechanical. These details are well known to many from VAZ classic cars.
On the 21214 engine, to reduce noise and at the same time increase reliability, they used a single-row, but bush-roller chain 21214 (116 links), single-row sprockets, a camshaft 21214, hydraulic supports for valve levers, an original set - a hydraulic tensioner, a shoe, and a damper.
Conversion of the timing drive 21214 to 21213 is possible provided that the above parts are completely replaced, but the meaning of the event is questionable.
Is it true that in the 21124 engine (1.6 l, 16 valves), in the event of a timing belt break, the collision of the valves with the pistons is completely excluded?
Theoretically, the probability of valves contacting the pistons on the 21124 engine still exists, but compared to its predecessor 2112, it is small. For such an event to occur, the following factors must confluence:
— unfavorable combination of the true dimensions of parts within tolerances;
— high engine operating temperature;
- camshaft stop when the valve is fully open.
Neither during factory tests nor in operation (starting from October 2004) were there any cases of contact of valves with pistons on VAZ-21124 engines.
Is it true that you should end your trip by “blowing through” the engine at high speeds (about 3000 rpm) for one minute so that there is no carbon left on the spark plugs?
In the summer this makes no sense. In winter, at frosts of 20 degrees and below, if before this the engine was slightly warmed up or was idling, the “operation” can be useful. At the same time, such techniques do not eliminate problems caused by low-quality gasoline, malfunctions of the power supply and ignition systems. Difficulty starting the engine - and not only in winter conditions - is often explained by precisely these reasons.
Is it possible to install an intermediate shaft with a CV joint from a VAZ-21213 between the gearbox and transfer case on a VAZ-2121?
Intermediate shaft 21213 can be installed instead of unit 2121 on Niva cars with any gearbox - an outdated four-speed or a modern five-speed. This is justified by the fact that it allows one to somewhat reduce the requirements for the alignment of the gearbox and transfer case shafts. An additional advantage is in the very “ideology” of the CV joint, which ensures much more uniform rotation of the “drive shaft - driven shaft” pair than with conventional universal joints, and, accordingly, a reduction in vibrations in the transmission.
In the 21214 engine, the hydraulic valve compensators are knocking. This is not the first set I have replaced! Is it possible to replace them with “cups”, like on the VAZ-2108?
Take an interest - at least in books - about the design features of the cylinder heads of both engines! They differ so radically that the alteration you propose is out of the question. This is tantamount to developing a different engine.
Nuances of moving a generator
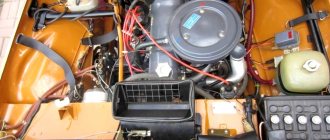
The disadvantage of domestic Niva SUVs is the location of the generator unit - at the bottom of the engine compartment. It constantly gets contaminated when driving off-road, and coolant constantly drips. The problem is solved by moving the generator upstairs (the author of the video is SARTANETS).
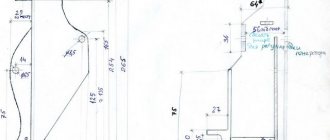
To transfer, you will need a set of keys, a bracket, mounting bolts, and a V-belt. You can make a generator transfer bracket with your own hands according to the drawing below.
Drawing of a homemade bracket
Sequence of actions during transfer:
- We dismantle the propeller, pump and remove the belt.
- By unscrewing the standard bracket, you can remove the generator.
- We cut off the bead around the side of the cylinder head and on the cylinder block.
- Then you should unscrew the two bolts and two studs.
- Next, the assembly is installed on a new bracket and final assembly is performed.
Thus, moving the generator unit upstairs is not difficult.
A) Belt break.
Carefully examine the presence of a belt on the water pump and generator pulleys. To return it to its destination, you will need socket wrenches 17 or 13, depending on the year of manufacture of the car, as well as a strong flat-head screwdriver.
Disconnect the HF position sensor (for example, at 21213,21214).
Loosen the nuts securing the tension bar and slide it to the side towards the cylinder block.
Put a belt on your professionalism landing place.
After installation is complete, adjust the tension, controlling the deflection when pressing with a huge finger on the clearance of the belt between the generator and pump pulleys - 10-15 mm, pump and crankshaft - 12-17 mm. Failure to comply with this requirement may result in the belt slipping with subsequent damage and rupture.
Guide to removing and connecting the generator
To remove the unit, you need to prepare a set of tools: keys “10” and “19”, ratchets with heads, a hammer and a small extension.
The process consists of the following steps:
- First of all, remove the negative terminal from the battery.
- Next, you need to remove the engine protection and the right mudguard.
- Then, using a hammer, carefully knock out the mounting bolt and remove it.
- At the next stage, you need to disconnect all the wires going to the generator: the plug and the wires secured with a nut.
- Then the fastening on which the belt tensioner is located is unscrewed.
- By removing the belt, the assembly can be dismantled through the hole that was formed after removing the protection.
- After replacement or repair, install the unit in reverse order.
The generator is connected according to the diagram.
Price issue
The VAZ 21214 generator has good repairability, which allows you to significantly save money if worn or broken parts are replaced in a timely manner.
Generator for VAZ 21214 injector, its purpose and operating principle - Auto mechanic
Every motorist knows that a generator is a fairly important element in the design of any car, thanks to which it is possible to set the engine in motion and provide all vehicle systems with the necessary energy.
The Russian-made Niva car in modifications 21214, 2121, 21213 are vehicles that almost every second car enthusiast in Russia has encountered.
Despite the release of several models, the contents of the Niva are practically no different. Thus, manufacturers used units with article numbers 9412.3701, 371.3701 as a generator in cars.
What is a generator
A generator is an alternating current device that produces electromagnetic excitation during operation. The generator design has a built-in rectifier unit, equipped with diodes made of silicon, as well as an electronic voltage regulator.
Thus, the unit creates electrical energy from mechanical energy and energizes the car’s battery, and also provides energy to its devices and systems. The connection diagram for the generator on Niva-2121, 21213, 21214 is shown in the figure.
Characteristics of the standard generator
The main characteristics of the generator installed by the manufacturer in Niva 21214, 21213, 2121 will be considered using the example of generator type 9412.3701:
- current – 80A;
- voltage – 13.2 V,
- rotation is right.
The cost of standard models of electric generators is 5-7 thousand rubles. If the unit breaks down, it is possible to replace its components or completely replace it with the original or analogues. The prices of the most common ones are presented in the table.
AnalogArticleCost, in rubles
| Generator VAZ-2104-21073,21214 | 9412.3701-03 | 5900 |
| Generator VAZ-2104-21073,21214 | 372.3701-03/05 | 3800 |
| Generator VAZ 2121-21213,21214 | 9412.3701 | 5450 |
The table shows that in the process of replacing a generator on a Niva, you can give preference to a cheaper universal analogue.
Generator faults
During the operation of any car, unpleasant situations often arise in the form of failure of one or another element. Niva is no exception, and most often the generator suffers.
If the generator seems to be faulty, it is recommended to check its functionality using a multimeter. To do this, you will need to start the engine and check the voltage at the battery terminals. The standard value that a multimeter should read is 13.6 V.
If the readings during measurement are higher, it means that a break or short circuit in the windings has occurred in the structure. The same can be said about the case when the voltage is below the specified number. This procedure is carried out regardless of the engine: injector or carburetor.
The generator unit may fail due to low belt tension or its breakage due to wear. If such problems occur, it is recommended to tighten the belt or replace it with a new one.
Also, if the breakdown is caused by another reason, you can replace the generator itself. Usually, for replacement, they turn to special service stations, but if necessary, the work can be done with your own hands.
Generator replacement
To repair or replace the generator, the car owner will have to remove the unit completely from the car or turn to professionals for work. If you still want to carry out the replacement yourself, then first you will need to prepare all the necessary tools:
- hammer;
- extension;
- keys to "10" and "19".
The procedure consists of the following sequence of actions:
- First, you will need to park the car in a place designated for inspection and repair. The car will also need to be secured using special wheel chocks. Finally, in order for the work to be carried out safely, you should disconnect the battery by disconnecting the terminals from it.
- After this, you need to remove the engine protection. It is attached to several bolts, and they must be unscrewed to get to the lowest bolt of the generator.
- After this, you will need to knock out the mounting bolt using a hammer. It is recommended to knock carefully so as not to damage the thread and to prevent the bolt from coming out in the opposite direction. A hammer is necessary, since a wrench or any other tool simply cannot handle a bolt.
- Next, you need to remove the bolt, swinging the generator from side to side. It is necessary to bolt in any case, as this makes it easier to remove the rod.
- The fourth step involves disconnecting the wiring. To do this, the power wires connected to the housing are disconnected from the unit. In this case, you can first disconnect the plug from the wires.
- Wires are also attached to the generator, tightened with a nut or bracket. In this case, the nuts must be unscrewed with a wrench, and then the loose wires must be pulled out.
- Finally, after disconnecting the wires, you can begin to unscrew the upper fastening element with the belt tensioner. For this you will also need a wrench, as well as a small extension cord.
- Disconnecting the fastener will allow you to remove the belt and alternator. Then you can start cleaning the vacated space with a brush and installing a new unit.
The structure is assembled in the reverse order; the entire procedure will take about two hours if you have all the necessary tools.
Additionally, it is worth noting that when everything is assembled, you will need to adjust the position of the generator using the tensioner. To do this, you need to unscrew the tensioner nut and tighten or loosen the belt, while observing the battery charge.
If the indicator returns to normal, then the selected tension is sufficient. There is no need to tighten the structure, as the generator bearing may fail. If the tension is insufficient, the generator will work intermittently, and this can also lead to breakdown.
Video “Step-by-step instructions for replacing the generator on Niva 2121”
The video shows a step-by-step replacement of a generator set on a Niva (video author - Ivan Matieshin).
A week ago the diode bridge on my original gene flooded, I decided not to suffer - buy a new one, but for 80A. I've wanted it for a long time. Now this device is on the car)
What we needed to install generator 21214: Generator mounting bracket 21214-3701650 Compensating bushing for mounting generator 2110 complete with counter-shaped washer 2110-3701638 Generator mounting bolt 2110-3701376 with nut 2110-3701686 Additionally bolt M10×1.2 5×20 tension bar 21214-3701635 Bolt M8×25 with nut 2110-3701686 (like the lower mounting of the generator)
The charging lamp does not light up.
Since the indicator on the instrument panel
is a link in the excitation circuit of the generator; the absence of flashing when the ignition is turned on leads to loss of its functionality.
Whether the lamp is to blame or the reason lies elsewhere (voltage regulator relay, lock contact group), can be understood by disconnecting terminal 61 from the generator with the ignition on, followed by shorting the wire from the instrument panel to the car body. If it catches fire, check the serviceability of the rotor winding, brushes and “chocolate”. If the circumstances are otherwise, examine the performance of fuse No. 2 (8A) and the light bulb by replacing the ones mentioned with known good ones.
Alternator bracket diagram for VAZ 21213 (carburetor)
The author of the drawing made a bracket from a piece of metal 80x80 mm, 4 mm thick. The upper adjustment bar for the generator is borrowed from the Volga. It was cut in place and a new 8.5 mm mounting hole was drilled.
VAZ 2110 crankshaft pulley, GAZ 3110 pump pulley, 6RK1290 belt. A standard cooling fan is installed on the pump pulley. The location of the generator is top left. The lower mounting point of the fuel pump, at the front we attach it to a standard stud and bolt, and at the top there is an M8 cylinder head bolt. The lower long generator mounting bolt with an engraver and an additional locknut.
Another bracket drawing provides for a belt measuring 1375 mm. You will need to modify the plane on the head in the area of the M8 bolt with an angle grinder, and also change the studs and bolts securing the front cover.
Belt 1220 mm profile “A” (ZIL157), wedge angle 40 degrees. High pressure pressure hoses have a length at the centers of the fitting holes of 1450 mm. Return sleeve - 1115 mm. You will have to cut a hole for the hoses in the right protective casing. The belt is 710 mm long, other dimensions are the same. The photo on the left shows the hydraulic pump bracket, on the right - the power steering in the new place.
There are ready-made kits for moving the Lada 4×4 generator upwards on sale, but the price for a piece of iron can be greatly inflated. Thus, by making such a bracket ourselves, we extend the service life of the generator and save money.
Have you ever encountered such a modification? How did you solve a similar problem? Let us remind you that in another article we determine whether the Lada 4×4 needs a more powerful generator.
Found an error? Select it and press Ctrl Enter..
