Print this article Font size 16
For the VAZ 2114 car, it is planned to install a windshield with dimensions of 1400 by 662 millimeters. But this is a standard front cover for all VAZ models from 2108 to 2115. This aspect greatly facilitates the search for spare parts.
Today we will talk in more detail about the features of the windshields used on the fourteenth model, understand the types of damage and discuss the most important issue - glass replacement.
Standard lobovushka
Design and dimensions
Consumables that do not match in size are one of the reasons for rapid breakdown. To prevent troubles, take the choice of a new part more seriously.
Head-on
The dimensions of the windshield of the VAZ 2115 are 1400×662 mm. The dimensions of the windshield on the VAZ 2114 and 2113 have the same dimensions, which makes it easier to find a new spare part.
It is multi-component: two glass layers and a film between them, the so-called triplex. This structure prevents fragments from scattering when damaged.
Rear
Cracks or chips on parts are rare. The size of the rear window of the VAZ 2114 is 1210x656 mm.
The parameters need to be known if the driver wants to tint the car.
Lateral
The front left side glass is 858 mm wide and 528 mm long. Consult with a salesperson at your auto store before purchasing.
Removing damaged glass
To remove the windshield on a VAZ-2113, 2114, 2115 and install a new one, you will need:
- rubber seal (it is better to change it, but you can leave the old one if it is not damaged during dismantling);
- crosshead screwdriver;
- a wooden or plastic spatula, or a slotted screwdriver wrapped in masking tape;
- a thick nylon cord about 5 m long (any flexible rope with a diameter of 3-5 mm will do);
- silicone grease, CIATIM, Vaseline (the use of Litol is undesirable, in order to avoid softening of the seal).
Dismantling procedure:
- Before starting work, cover the hood with thick fabric so as not to accidentally damage the paintwork.
- Remove the alarm elements and antenna (if any) from the windshield.
- Use a Phillips screwdriver to unscrew the bolts and remove the plastic pillars, sun visors, and rear view mirror.
Strut cover mounting bolts
- Starting from the upper corners, use a non-metal spatula to pry up the edge of the seal and bring it out beyond the edges of the body. Repeat the operation until the top and sides are free, and the glass comes out of its seat with gentle pressure.
Removing the windshield seal
- If the old seal is not needed, carefully trim the rubber with a knife and squeeze out the glass.
Removing old glass
- Clean the seat from dirt, check the drainage holes, and carefully inspect the edges for pockets of corrosion.
Important! If necessary, treat with a rust converter and restore the paintwork. Immediately before installation, go through Movil, which will serve as additional protection for the body from moisture.
How to choose
Don't buy cheap copies. Products with a suspiciously low price are either made of low-quality materials or are sold as disassembled parts. An inexpensive consumable will require replacement after just six months of use.
It is advisable to find an original spare part. It will definitely fit the car, and the quality will be higher than that of its analogue.
Inspect the part carefully. The surface must be smooth, without scratches, even and transparent. The reflection must be clear and clear. If it is cloudy, do not rush to shell out money.
Check markings, manufacturer and type. Information must be clearly written. Blurred markings are one of the main signs of a fake.
The price of consumables ranges from 1000 to 3000 rubles.
Economy segment
Xyg (China) - the best Chinese parts on the market. Pass ultraviolet rays. The material is not of the best quality: poor visibility, the image is distorted. Weak structure. This consumable will have to be changed twice a year. Overall, the price is reasonable.
Windshield
YearNameManufacturerPriceBuy1997/2012Windshield VAZ (Lada) 2115 1st generationSedanEconomy?2,256Buy1997/2012Windshield VAZ (Lada) 2115 1st generationSedanEconomy?2,772Buy1997/2012Windshield VAZ (Lada) 211 5 1st generationSedanBusiness?2,632Buy1997/2012Windshield VAZ (Lada) 2115 1st generationSedanBusiness ?3,234Buy1997/2012Windshield VAZ (Lada) 2115 1st generationSedanPremium?3,760Buy1997/2012Windshield VAZ (Lada) 2115 1st generationSedanPremium?4,620BuyCauses and consequences of damage
Driving on poor quality roads in Russia forces car owners to look for a new windshield at least once every year and a half. Even a very small pebble flying from under the wheels of a car can lead to damage to the part.
There are two types of damage:
- Chips. If only a chip appears on the surface, the driver is lucky. This means that the first layer is damaged; it is not necessary to install a new spare part.
- Cracks. You can't hesitate. At any moment, glass can crumble into pieces due to a hole in the road, and this will lead to an accident.
What can you do
If the driver fails to change it in time, there are several popular tips:
- Using a glass cutter, make perpendicular cuts 0.5 cm long along the edges of the “web”.
- Drill small holes with a thin diamond drill bit. The work requires accuracy, patience and attention.
- “Weld” the crack. It's better to contact specialists. Without experience it will be difficult.
Replacement
There are two options for replacing the windshield on a VAZ 2114:
Contact a car service. Fast, simple, but expensive. On one's own. If you have experience in repair work of this kind, time, patience, and an assistant, then dismantling is possible in your own garage.
How to remove
The work begins with the fact that we remove all unnecessary things. Side trims, wipers - this interferes with dismantling. Now we remove the old glass: starting from the top corner, squeeze it out along with the rubber. It is advisable to have someone help. If you pry the seal with a flat screwdriver from the inside, it will be easier to remove the headband.
You need to work with gloves, taking safety precautions.
Clean the grooves. The replacement now needs to be replaced with a seal. If the rubber is cracked, it is also advisable to replace it.
Types of damage that require replacing the windshield on a VAZ-2113, 2114, 2115
According to GOST 33997-2016 and 32565-2013, the windshield should be replaced with a new one if:
- the defect is located in the wiper area on the driver's side;
- the crack interferes with visibility when driving, regardless of location;
- the light transmittance of the element decreased by more than 30%.
Replacing the windshield of a VAZ Lada Samara family does not require the use of any special devices and can be done at home or in the field by two people. On such models, the windshield is mounted in the body opening through a rubber seal.
How to put
During installation you will have to resort to outside help. The glass is inserted into the lower groove, and only then carefully around the entire perimeter. As you insert the windshield, pull out the cord to fit the seal tightly and efficiently.
Be careful when pulling the rope at bends! In the side parts it slides with difficulty and can tear; press harder from the outside of the car.
It is advisable to fix the rubber with glue-sealant, and attach the glass to the roof and sides with tape overnight.
Replacing the rear window of a VAZ is carried out in the same way. If you installed a windshield, you can install this, although removing the rear window is a more difficult task. To insert the rear window, ask a friend for help, as you will have to pull the rope and press on the consumable at the same time.
Replacing the windshield (windshield) of VAZ 2113, 2114, 2115
I decided to publish this entry for those who are used to or want to repair their car with their own hands, without resorting to the services of car repair shops. In order to learn something yourself and save some money.
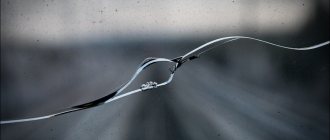
The glass is tired... Tired.
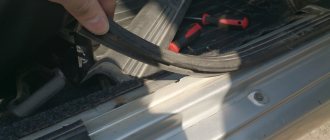
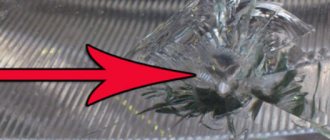
So. The time has come to replace the windshield on my TAZ, the last time I changed it was in 2008, everything was already cracked and stoned. Somehow I found real factory glass in my city. Everywhere there is one “cooperative” type a la Bor glass. The price tags are also jacked up for consumer goods glass as for factory ones. I called, made an appointment, drove up, checked, looked - for sure, they sell factory glass. I also liked the price tag - 1500 rubles. for factory glass with silkscreen edging and sun strip. Yesterday, I went out of town for the weekend, drove the car into the garage and got down to business. Since there were no assistants nearby, and, in principle, I didn’t need them to replace the glass, I took up this process on my own. The first thing I did was remove the rearview mirror bracket, the signaling antenna and the A-pillar trims. Then, using a flat-head screwdriver, I pressed the inner edge of the glass seal outward, past the edge of the metal. At the same time, pressing on the glass with force periodically so that the seal does not return to its original state. In this case, the glass can burst, as in my case, you can see in the photo, but if it is no longer dear to you, then you don’t really care about it.
Using a screwdriver, I bend the seal and squeeze the glass out little by little.
It is better to bend it from some upper corner, along both posts and the upper edge, but there is no need to bend the bottom - the glass will then easily be removed. Took off the glass
It has already served its purpose.
Wipe the edges of the metal from dirt
Removed old glass
Then he removed the seal and thoroughly wiped all its grooves with a cloth soaked in gasoline to ensure that there was no dirt.
Wipe all the grooves of the seal thoroughly
I put the seal on the new glass. I took a piece of ordinary rope of suitable diameter. I filled the inner groove of the seal, the one located inside the car, with WD-40 lubricant and put this very rope into it.
Lubricated the groove with Ve-Dashka
Lubricant is needed so that the rope easily comes out of the groove of the seal when you pull it out, otherwise the seal may break. The rope is needed so that when it is pulled out of the seal, it will lift the edge of the seal above the edge of the body, after which the edge of the seal will lie behind the edge and thereby hold the glass in the arch. It's simple. You can also use soapy water instead of Ve-Dashki. You cannot smear the seal with machine oil or lithol and similar things - then it will be destroyed.
Put in a rope
The rope needs to be inserted from the top edge of the glass, in different directions, to the bottom of the glass and so that in the center of the bottom of the glass both ends of the rope intersect slightly with each other
We slightly cross the ends of the rope at the bottom of the glass
After putting the rope into the groove of the seal, I put the glass in its rightful place in the arch
Put the glass back in place
He climbed into the cabin and began to slowly, slowly, pull both ends of the rope out of the seal.
The pulling process has begun
I pulled it out a little, came out of the cabin, tapped the seal in the places where I pulled out the rope. So that the seal sits properly in its place and the glass seems to sink a little into the arch.
Here you can see how the rope lifts the edge of the seal, which then lies behind the edge of the arch and holds the glass.
Tap the seal a little
And we do this around the entire perimeter of the seal - pull out the cord a little, tap and press the seal from the outside.
We pull out...
Let's tap...
Done =)
Glass in place
And now I would like to present a photo of the markings of real glass from the Bor Glass Factory:
Real marking of factory glass BOR
Also, on the original glass there is a sticker with all the data about the manufacturer and the security secret code.
Sticker of original BOR glass
And here I present a photo of the original glass, namely BOR glass, with silk-screen printing and with a sun protection strip!
Glass with silk-screen printing and stripes. And it is not cooperative, but original, factory-made!
And then there are people here who don’t know that the Borsky plant also produces windshields with silk-screen printing on the edges and a sun strip. And not only do they not know, but they also argue that there are no such factories, but only cooperative collective farms. As they say - “GET AWAY! They exist! Why did I install the factory glass and not the analogue one: the fake one - because my eyes will still be useful to me, and the original glass is stronger, it doesn’t break with stones as intensely as the fake one. They do not have forward eye distortions like many fake glasses. I once had a similar glass - after driving for a day, my eyes hurt because there were waves of distortion inside the glass and I had to look through them all day at the road, and it got stoned very quickly within a year, it looked like this five-year-old in the first photo ( By the way, it was also factory installed until yesterday’s replacement).
Well, that's basically it. If you have an assistant, then of course it’s more convenient to put him with him, so as not to jump back and forth alone, but if not, then it’s not scary - and it’s very easy to replace the glass alone.
In our country, replacing glass costs 500 rubles, as for me, I’d rather buy flowers for my wife than give it to someone else for such a simple procedure =)
I assembled the racks, the mirror antenna and the signaling system in place, removed the sticker, washed the glass and everything was in order.
Ready
https://www.drive2.ru/l/3886002/
next article:
Installation of windshields (deflectors) on a VAZ 2114
The decision to install windshields (deflectors) on the VAZ 2114 came to me a long time ago. There is a small child in the family and when
Rating 5.00 [1 Vote]