Engine overheating is a terrible phenomenon that promises its owner major repairs and serious cash injections. In order to prevent engine overheating, it is necessary to regularly monitor the coolant level, proper operation of the thermostat, and the condition of the engine cooling radiator. If you find a coolant leak or puddles after a long period of parking, check the engine radiator for coolant leaks. A wet mark or hole in the radiator is a signal for immediate action. If the crack or breakdown is small, you can try to solder the cooling radiator. In addition to cracks and holes in the radiator, leaks can be caused by faulty connections or loose clamps. If the reason is not the clamps, and repairing the radiator is impossible or unprofitable, the radiator will need to be replaced.
How you will make the replacement is up to you, there are two options: entrust the work to service station specialists or carry out the repair yourself. For those who have chosen the second option, my article today on how to replace a VAZ 2115 radiator will be an excellent guide and assistant in performing this work.
What aspects to pay attention to
In what cases does the heating system of a car interior fail? What aspects should you pay special attention to?
Insufficient opening of the heating tap
The real problem in most cases occurs in VAZ cars with front-wheel drive. To check, it is necessary to compare the temperature conditions of the two pipes, namely the inlet and outlet. If there is a difference in temperature, the valve is not open enough. In order to carry out the adjustment, it is necessary to tighten the cable designed to control the valve to the maximum open state. In this case, you should carefully monitor the condition of the entire structure, since the valve is a weak point and sooner or later its switching will no longer be possible. A drastic solution may be to remove the valve from the system or install a ball valve, but in both cases there will be a problem with the easy adjustment of the fluid used to cool the interior.
Insufficient tightness of air ducts
The air that is pumped by the fan of the stove used can partially escape into the cracks. At the same time, the temperature in the car interior decreases. It is imperative to seal the connections of the entire structure, since only in this case will the optimal air temperature be maintained.
Air pockets in the radiator
Another reason why the heating regulator cannot work at full capacity is the presence of air pockets. A manifestation of the problem may be cold air coming from the deflectors. In this case, the vehicle must be placed on a hill with its front wheels, then the heater tap must be fully opened and gassed.
In 99% of cases, the switch that controls the operation of the stove can be successfully adjusted
The most important thing is to understand what principles need to be followed and how you can increase the efficiency of heating equipment in a VAZ car
Main reasons for replacement
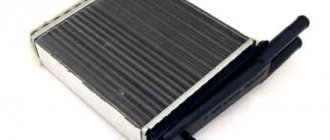
There are not many reasons why it may be necessary to replace the radiator of the interior heating system. One of them is the appearance of a leak.
Heat exchangers are made of non-ferrous metals - copper or aluminum.
Gradually, these metals oxidize due to exposure to liquid, which leads to the appearance of cracks through which coolant flows out.
The second reason for replacing the heater radiator is clogging of the tubes with contaminants. The coolant, circulating through the cooling system, washes away corrosion products, small particles, etc.
Moreover, the liquid cannot contain them and these polluting elements settle on surfaces, including the stove radiator.
As a result, the heating system first loses efficiency, and later (if it is heavily contaminated) it simply stops working.
In some cases, radiator blockages can be eliminated by flushing using chemicals.
But if the blockage of the tubes is severe, then the plugs can only be removed from the dirt mechanically. And this can only be done with the radiator removed.
Before you start disassembling, you should first make sure that the problems arose with the radiator.
So, a leak of this element is manifested by the appearance of traces of antifreeze on the floor in the cabin.
But the same result can also be caused by damage to the radiator pipes or loss of tightness at the point of their connection with the heat exchanger.
Description
HEATER RADIATOR 2108 (SOLDERED COMFORT)
CODE LUZAR LRh 0108b
OEM NUMBER: 2108-8101060 2108-8101060-51P
CONSTRUCTION: COMFORT, aluminum non-assembled (brazed) tubular-tape
Heater radiators
Brand name – LRh – Luzar Radiator heater
Heating radiators (also known as heater radiators, also known as heater radiators) are heat exchangers that use the heat generated by the engine to heat the vehicle interior. They allow you to maintain a comfortable temperature and prevent the car windows from fogging up.
For reference: different names of this node have equal rights of use. For example, “heating radiator” and “stove” come from the function of this heat exchanger, “heater radiator” and “stove radiator” - from the installation location.
LUZAR manufactures hundreds of heater radiators for a wide range of cars presented on the Russian market. They can be purchased in partner stores throughout Russia or online.
Many models of heater radiators are supplied to car factories in Russia and Ukraine - both for passenger cars and for trucks and buses.
The production range of manufactured stoves is constantly increasing; New types are being developed for the most popular cars in Russia.
Powerful R&D allows us to conduct research in the field of improving heat exchangers and create new designs that provide increased performance properties of heater radiators. Main areas of research:
- use of different types of tubes
- changing the location of the tubes
- change in the “fillability” of the core
- use of turbulators-swirlers
- use of various aluminum alloys
- testing of solders with different characteristics
- improving the corrosion properties of metal
- ... and many other R&D areas.
Design of heating radiators from LUZAR
LUZAR heating radiators are available in three types:
- Tubular-plate, prefabricated, aluminum. It consists of aluminum plates through which aluminum tubes pass, inside which coolant runs. The tanks on such radiators are made of plastic. Heater radiators of this type are used for heating small-sized salons due to limited heat transfer; have the best rigidity and light weight, as well as the lowest price.
- Tubular-tape, non-assembled (brazed), aluminum. The corrugated aluminum tape in such a radiator is located between aluminum flat-oval tubes. Radiator tanks of this type can be made of either plastic or metal. The design of non-assembled (brazed) aluminum devices is the most universal, allowing the creation of heat exchangers with any specified characteristics. Aluminum stove radiators are lightweight and relatively high rigidity, as well as optimal prices.
- Tubular-tape, non-assembled (soldered), copper-brass. The design is very close to type 2 - between the copper flat-oval tubes there are copper strips folded in the form of an “accordion”. At the same time, the tanks on such heating radiators are made of brass - in order to increase the overall rigidity of the structure. Copper heating radiators - due to the high specific heat capacity of copper - have excellent heat transfer rates. However, due to the high softness of copper, heating radiators made of this metal are forced to have a narrow tube and a large interval (step) between the tubes, which imposes serious limitations on maximum efficiency. Also, copper heater radiators have the highest cost and the lowest rigidity to torsion, fracture and internal pressure. In this regard, copper heater radiators are “outdated” and are gradually falling out of use.
LUZAR: TESTED BY TIME AND ROADS
LUZAR radiators have been awarded the “Radiator of the Year” award several times
How to choose a really excellent radiator for the VAZ 2109 stove.
When I went to an auto parts store, I found out that there are several types: factory aluminum, non-factory aluminum and copper.
After consulting with friends who have been driving for several years and have encountered such a problem, I learned:
- A copper radiator costs 2 times more than an aluminum one, but the heat is not very hot.
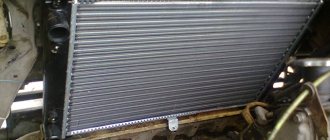
- A factory radiator costs around 1000 rubles and it’s worth taking this one, because... It is reliable and heats as expected. Its design is stronger than the original VAZ radiator and has swirlers that slow down the coolant, which contributes to more heating of the radiator. With such a radiator, you will begin to feel warmth in the car already at 60 degrees of the engine.
- A non-factory radiator costs 500 rubles, but it’s not worth buying. Firstly, it doesn’t heat up, and secondly, it can leak immediately after replacement. Thirdly, it doesn’t have swirlers, so the antifreeze flies through the radiator without having time to heat it up.
Having learned all this, I went to the store and bought an original DAAZ radiator, price 750 rubles. It looks like this:
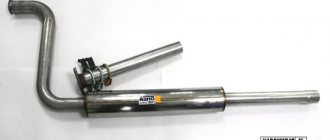
Radiator pipes VAZ 2114
Next comes the upper radiator inlet pipe, connecting the radiator to the engine block head.
This hose goes to injection engines. Its internal diameter is 32mm, see catalog number 21082-1303025.
The next one is the lower radiator outlet pipe, which connects the radiator to the engine cooling system thermostat.
Its catalog number is 21082 – 1303010, internal diameter is 32 mm.
“Angle” pipe for connecting the thermostat to the water pump (pump).
Catalog number – 2109-1303093-01. This pipe fits almost all front-wheel drive VAZ models.
The expansion tank pipe is popularly called the “filler pipe.”
It serves to connect the expansion tank to the thermostat. Through it, antifreeze enters the cooling system when the system is filled or topped up through the expansion barrel. See catalog number 21082-1303080 for its number.
Stove pipes VAZ 2114
The pipe that connects the heater to the block head is often called “big goose” in everyday life because of its resemblance to this bird.
The hose supplies coolant from the block head to the heater radiator. We look at the catalog number 2114 – 8101206.
These considered rubber hoses are reinforced, except for the throttle heating hoses and antifreeze steam exhaust hoses.
The goose curve hose is located under the hood of the car and serves to drain coolant from the heater radiator to the water pump.
Catalog number of the crooked goose 2114- 8101208, factory BRT.
The “short” pipe connects the thermostat to the engine block head.
Shorty catalog number 2108-1303082, BRT plant.
The “small” cabin pipe of the stove supplies coolant to the radiator of the stove, through the tap, from the “crooked goose”.
Its VAZ catalog number is 2114-8101200 from the BRT plant.
The cabin “large” outlet pipe is designed to drain coolant from the heater radiator through the “big goose” hose to the water pump.
Catalog number 2114-8101204 from the BRT plant.
Under the hood, the “big goose” supplies coolant to the heater radiator through a tap. And it takes the liquid to the pump from the radiator of the “goose curve” stove through the “large” cabin hose. For example, thanks to a set of rubber pipes, coolant circulates through the heater radiator.
The rubber pipe, the so-called injection “breather”, serves to connect the valve cover of the block head with the “snail” (2111) for supplying air to the engine.
The upper catalog number of the factory breather is 2111-1014058-10.
All connections presented in the video are located under the hood and in the interior of the VAZ 2114 car, related to the cooling system. In addition to the large breather pipes, small breather pipes and volutes, which serve for the passage of air.
The car also contains well-known gas supply hoses, brake hoses, a vacuum hose, as well as windshield washer fluid supply and others. They will also need to be viewed on video and described in the article.
All rubber hoses in a car need constant replacement, as they are exposed to aggressive liquids and gradually lose their properties. They lose their elasticity, become tanned, crack and sometimes break when used for a long time without replacement.
Therefore, it is recommended to periodically review their condition and replace them if any malfunction is detected.
This video ends the review; I hope that the video will be useful to someone both for information and when servicing their car.
Watch the video
Thank you for watching the video, subscribe to the channel, write comments and ask questions.
replacing the radiator of the cooling system on VAZ 2108, VAZ 2109, VAZ 21099 cars
The radiator must be replaced if a coolant leak is detected from it. In a workshop equipped with special equipment, the radiator can be checked and repaired.
WARNING Removal and installation of the radiator is carried out on a cold engine of VAZ 2108, VAZ 2109, VAZ 21099.
To check the tightness, plug the radiator pipes and lower the radiator into a bath of water, supplying air to the radiator at a pressure of 0.2 MPa (2 kgf/cm2). In this case, no air bubbles should appear from the radiator for at least 30 seconds. 1. Remove the battery. 2. Drain the coolant from the VAZ 2108, VAZ 2109, VAZ 21099 (see “Replacing the coolant on VAZ 2108, VAZ 2109, VAZ 21099”).
3. Disconnect the wires from the radiator fan switch.
4. Remove the two bolts and two nuts securing the radiator fan casing.
5. Unscrew the two fastening nuts and remove the bracket.
6. Disconnect the block with wires from the radiator fan motor.
7. Tilt the casing with the electric fan towards the engine and remove the radiator casing from the engine compartment.
8. Loosen the fastening clamps and disconnect the two upper hoses from the radiator.
9. Disconnect the lower hose from the radiator.
10. Tilt the radiator towards the engine and remove the radiator from the engine compartment.
11. Remove the two lower mounting pads from the radiator if they remain on the radiator mounting pins. Replace torn or loose cushions.
USEFUL ADVICE One of the possible reasons for engine overheating on VAZ 2108, VAZ 2109, VAZ 21099 cars may be a clogged radiator. If the engine overheats, flush the radiator with water.
Elements of the cooling system of a car VAZ 2108, VAZ 2109, VAZ 21099
1 - radiator; 2 — radiator drain plug; 3 - expansion tank; 4 — radiator supply hose; 5 — radiator outlet hose; 6 — steam removal hose (to the expansion tank); 7 — casing with fan
Source
How to remove the stove on a VAZ 2109
Have you ever heard of a stove radiator? Well, if you have a car, you've just heard. Personally, I learned about the stove radiator only after two years of operation of my VAZ 2109 in 2001
Almost all this time I noticed that when the heater in the car was turned on, it smelled of a special smell, but did not pay attention to it
It was summer and when I got my dampness. “After winter the water will dry up.” I thought, but I was wrong. Then I noticed that the antifreeze began to leave the coolant barrel, and that was the last straw of my patience. All this time I was afraid to realize that I had a radiator.
How to choose a truly excellent VAZ 2109 radiator stove
When I walked into an auto parts store, I learned that there are several types: aluminum factory, aluminum not factory, and copper.
After consulting with friends who had not ridden for several years and were faced with the same problem, I learned:
- A copper radiator costs 2 times more than an aluminum radiator, but it does not get very hot.
- The factory radiator costs about 1000 rubles, and is worth getting because it is reliable and stays warm as expected. Its design is stronger than the original VAZ radiator, and has swirlers that slow down the coolant, which contributes to more heating of the radiator. With this radiator, you will begin to feel the warmth in the car as early as 60 engine degrees.
- A non-factory radiator costs 500 rubles, but it’s not worth buying. First of all, it doesn't get hot; secondly, it may leak immediately after replacement. Thirdly, it does not have swirlers, so the antifreeze passes through the radiator.
Radiator replacement steps
To replace the radiator of the VAZ 2109 stove, you do not need to remove the entire panel, since it is written with many instructions, I will tell you how to do this hemorrhoids a lot and with little time. So, let's begin:
If you have a Vaz 2109
, you need:
- Drain the antifreeze.
- Remove the panel trim.
- Remove the panel part from the speedometer.
- Remove the furnace trim (which is located under the gear handle).
- Remove the panel mounting screws.
- Pull the panel with the help of the assistant from the left edge.
- Unscrew the clamps that secure the nozzles to the faucet (be careful so that any remaining antifreeze can flow)
- Remove the 3 screws holding the heater cover in place (3 screws will be the problem.) Have a helper pull the panel more firmly
- That's all. You just need to take out the old radiator, which just goes into the space between the glove box and the store shelf, put the new one in and put everything back together)
And finally, some tips:
- Don't wait until winter, it's better to do it this summer.
- Before installing the new stove radiator, glue it to the edge with foam rubber, since the old one was inserted.
- After replacing the heater core, it is better to go to the overpass and stand up. Thus, there is less chance of a gateway in the radiator.
Replacement
Replacing the cooling radiator in a VAZ 2109
This part must be replaced if a leak is detected. But still, first it’s better to check it to make sure where the leak is coming from.
Examination
To check the radiator, you need to remove it (how to do this will be described below), plug all the pipes and lower it into a bath of water. Work must be carried out in a specially designated place (workshop, garage, etc.). We supply air under pressure to the bath. If bubbles appear within 30 seconds of air entering, then there is a hole in the radiator and you can even find it if you watch carefully.
Removing the radiator
VAZ 2109 cooling radiator
Note. To quickly remove the air filter, press the latch with your finger or a screwdriver, disconnect the block with wires, loosen the clamp and remove the filter, first lifting its front part.
Note. It is worth noting that the same bolt secures the fan casing.
VAZ 2109 radiator cooling system diagram
Note. It is necessary to visually inspect the pillows and if they are torn or have lost their elasticity, replace them with new ones.
VAZ 21099 cooling radiator
Heating system elements
The stove diagram clearly shows the location of its main functional elements. It should be noted that the design of the stove on the VAZ-2108, 2109 and 21099 models is the same. Many car owners know that the heater in these models is not fully developed. As a result, the interior is not heated properly, so a decision is made to modify the stove with your own hands.
Just in this case, it is important to know the design of the heater so as not to confuse anything
Components:
The design of the stove of the VAZ-2109 car, whether it is a high panel or a low one, is absolutely identical. Therefore, the information presented will be useful to owners of this model with any instrument console.
Knowing the main points and what is located where, you can already try to independently deal with the problems that arise and fix the malfunctions that appear, while saving money and time on trips to the service station.
VAZ 2109: replacing the cooling radiator yourself
As a rule, a modern car, be it a domestic model such as the VAZ 2109 or a foreign car, is a complex system of parts interconnected with each other. If even one link in the chain breaks, it will ultimately lead to the breakdown of others. A car is like a living organism, and for a VAZ 2109, replacing a cooling radiator is a process that will help save not only some parts, but also the engine itself, because a faulty radiator will not cool it properly. Replacing the VAZ 2109 cooling radiator is a mandatory job that you can easily do with your own hands.
Injection system VAZ 21099
The main elements of the injection system are shown in the diagram:
Diagram of the injection system of a VAZ 21099 car
Positions on the diagram:
- 1 – air filter;
- 2 – air flow sensor;
- 3, 4,10, - system hoses;
- 11 – electronic control unit;
- 13 – fuel filter;
- 14 – fuel tank;
- 18 – pressure regulator;
- 20 – injector ramp;
- 21 – nozzle;
- 26 – cylinder head.
How to properly wash the injector on a VAZ 2109 car
To clean the fuel injectors from tarry deposits that appear due to poor quality fuel poured into the gas tank, it is sometimes enough to wash the injector on a VAZ 2109. This can be done in a specialized workshop or with your own hands. The work process is as follows:
Purchased: flushing fluid, syringe, set of new candles.
Advice: It is better to do the work with an assistant who will press the accelerator pedal to maintain the required engine speed.
- Mix 1.5 - 2 liters of gasoline, which is usually poured into the tank, and flushing liquid.
- The hood opens.
- On the hose connecting the intake manifold and the vacuum brake booster, the rubber adapter tube is disconnected.
- Using a syringe, the prepared mixture of washing liquid and gasoline is poured into it.
- About 20 minutes is enough for all the growths inside the device to come off.
- The assistant gets behind the wheel and the engine starts. The accelerator pedal must be held down, otherwise the engine will not maintain speed due to the tube being disconnected.
- The mixture is injected.
Tip: High pressure in the tube can cause the syringe to be pulled inward, so you need to gently press it, and the liquid will flow into the tube itself.
There is no need to pay attention to the black pieces of garbage flying out of it and the emanating puffs of white smoke. All this may be accompanied by various sounds, especially in VAZ 2109 cars, injector cleaning, which have not been carried out for more than three years
Tip: You need to pour in the washing mixture in small portions, this will wash the device better.
- When all the mixture is finished, the engine is turned off and time is given to cool down.
- A new set of spark plugs is installed.
- The engine workplace is wiped with a dry cloth.
- The hood closes.
For VAZ 21099, how to flush the injector is clearly shown in the video. If the injectors are covered with a crust of dark-colored varnish, it is difficult to clean by simple washing. Therefore, for prevention, it is necessary to fill the gas tank with cleaning additives after 5,000 - 6,000 kilometers. The price of the cleaning product is affordable; one bottle is enough for 60 - 89 liters of fuel. This method is more often used to clean injectors on new cars.
Tip: There is no need to clean a contaminated injector with solvent. Dirt deposits can travel through the fuel lines from the gas tank to the rail and injectors, which can completely clog the intake channels and settle on injector filters made of nylon. Solvent is ineffective for removing such deposits, so its use is not only dangerous, but also a wasteful exercise.
It is better to clean the injector using special equipment using adapters to the injector ramp. In this case, the instructions suggest:
- Disconnect: fuel filter, fuel lines, gas tank.
- Turn on the engine and let it run for 40 - 50 minutes with a special flushing mixture supplied under a pressure of approximately 6 atmospheres. This time is enough for the flushing agent to remove dirt from the injectors, ramp, valve and combustion chamber.
- Install new spark plugs.
- To remove any remaining flushing mixture from the engine fuel system, you need to drive the car for several kilometers at high speed.
Using this method, you can wash the injector on a VAZ 2109 car relatively inexpensively. It does not require much effort to dismantle the ramp and injectors, and the effect of the cleaning compounds is good. How to clean the injectors is shown in the photo.
Cleaning VAZ 2109 injector nozzles
Each car owner decides for himself when to flush the VAZ 2109 injector; the only condition is that the work is completed in a timely manner. Then the guarantee of proper operation of not only the engine, but also all components of the VAZ 2109 car increases.
Interior heating device
Designers of manufacturing plants have provided for the installation of a radiator for the heating system of the VAZ-2109 car interior. Under the panel of auxiliary devices, which is located between the two front seats, the design provides for the location of the interior heating stove. It contains a frame for installing a radiator. Plastic protective panels are installed on this panel on both sides (passenger and driver). They are attached to four self-tapping screws:
Note: before tightening the pipes, it is necessary to put fastening clamps on them.
Tip: Before installing, clean the clamps along the inner edges with sandpaper. This is necessary to remove sharp edges. Since sharp edges can damage the rubber surfaces of the pipes.
This is the structural procedure for attaching radiators to the VAZ-2109:
Advice: it should be taken into account that before fixing the upper part of the cooling radiator, it is necessary to install the upper pipes on it.
Note. The lower pipe can be easily installed from the inspection hole. First you need to remove the engine crankcase protection.
What is a stove fan
A car heater, which is popularly called a stove, is designed to perform a simple and at the same time important function - heating the interior. In addition, the device helps eliminate fogging of windows in cold and damp weather.
During normal operation of the heating system, the temperature in the interior of the “nine” should be maintained at +20 ˚С with the same indicators outside, but only with a minus sign. In the legs, with maximum heating mode, the value should be maintained at +25 ˚С. One of the important components of the stove, in addition to the radiator, is the fan. The purpose of this device, its malfunctions and repairs should be considered in more detail.
Purpose of the device
The purpose of the motor is to increase the efficiency of the heating system and air circulation in the car. Its operation is based on air intake from outside and its subsequent supply into the cabin through the radiator. As a result of the air flow passing through the heat exchanger, the air enters the cabin already warmed up.
Heater operation diagram: a - VAZ 2108; b - VAZ -2108–01: 1- fan impeller; 2 — air duct for heating the windshield; 3 — windshield heating flap; 4 — damper for heating the driver’s feet; 5 — central nozzle flap; 6 - central nozzle; 7- radiator; 8 — heater control damper; 9 — driver’s foot heating window; 10 - internal ventilation duct
Where is the motor located on the VAZ 2108/09
The heater motor on the VAZ 2108/09 is installed in a niche in the engine compartment in front of the windshield, which is radically different from the design of the heater of classic Zhiguli cars, which have a fan installed in the cabin. The unit is an electric motor with an impeller mounted on it, through which air is pumped into the cabin.
The heater motor on the VAZ 2108/09 is installed in a niche in the engine compartment in front of the windshield
Connection diagram
To make it easier to find possible faults with the fan, an installation diagram may sometimes be required, the main components of which are:
- fuse mounting block;
- egnition lock;
- additional resistor;
- fan motor;
- operating mode switch.
The heater motor connection diagram consists of a fuse mounting block, an ignition switch, an additional resistor, a fan motor, and an operating mode switch
How to get there?
There are two ways to get to the radiator. First
(it can be called classic) is carried out strictly in accordance with the manual for the operation, maintenance and repair of VAZ 2109 vehicles and involves draining the coolant from the engine cooling system and removing the instrument panel. Second
– belongs to the category of “folk” and does not require such complex manipulations. In this article, consider both methods, but you will decide for yourself which one to use.
The classic method of replacing a VAZ 2109 heater radiator
After this, the old radiator of the VAZ 2109 stove is directly replaced with a new one and all elements are installed in the reverse order. This is exactly how replacements should be made in auto repair shops and service centers. For those who decide to do this work on their own, it is necessary to take into account that the entire process will take from 4 to 6 hours.
"Folk" way
Folk craftsmen - brave and desperate craftsmen - offer a less labor-intensive method. Its essence is that the stove is replaced without draining the coolant and dismantling the dashboard.
In this case, in your VAZ 2109, replacing the heater radiator will be carried out according to the following scheme
Determining the causes of a windshield wiper malfunction on a VAZ car
wipers If suddenly the wipers on your car stop working, this is not a reason to panic. This device is quite simple and, if desired, anyone can independently eliminate the cause of the malfunction by following the further instructions. And so, let's find out why the wipers on your VAZ-2105 do not work.
How to independently replace CV joint boots on a VAZ 2109.
The CV joint boots are a front-wheel drive unit, which is popularly called a “grenade”. The reasons that lead to their damage can be different: aging of the material, hitting an obstacle, as well as careless operation of the car.
Learning to repair Lada Priora: dismantling and installing the main brake cylinder
In the current Lada Priora model, AvtoVAZ engineers were able to eliminate some errors that occurred in the tenth series.
Lada 110: techniques for removing and replacing the radiator Part 1
If the car owner notices an antifreeze leak, then the heater radiator installed on the VAZ 2110 should be replaced.
How to properly and quickly remove the gearbox of a VAZ 2109 - useful tips for beginners
Almost every car owner encounters such a problem as removing a VAZ 2109 gearbox.
What fluid is best to pour into a car's cooling system?
Before figuring out which is better - antifreeze or antifreeze, it is worth correctly deciphering the subject of the dispute.
Expansion tank and its plug
Well, it is impossible to single out the most important element of the system. Here every little thing plays almost a major role. Even the cooling system of the VAZ 2109, the carburetor if installed in the injection system, has one important part - an expansion tank and a plug. At the very beginning it was mentioned that constant pressure is maintained in the system, due to which circulation improves many times. But this is not the last advantage of the sealed type of cooling.
On a VAZ 2109 car, the cooling system works in such a way that the liquid at high pressure boils not at 100 degrees, but at a higher value. This means that it becomes more difficult to destroy the engine. And the expansion tank plug helps maintain pressure. It has two mechanical valves - for inlet and outlet. The first one is triggered when the pressure in the system drops to 0.13 Atm. And the second one opens when the pressure rises above 1.3 Atm. There are, of course, small errors; these are average values.
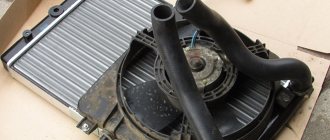
Radiator design and technical characteristics
The VAZ Nine has a liquid, sealed cooling system with forced circulation. Antifreeze is cooled in a radiator located in the front of the engine compartment. The tightness of the system is ensured by installing 2 valves in the cap of the expansion tank. When the pressure rises above 1.1 kg/cm², the outlet valve opens and thereby maintains the parameter value within the range of 1-1.1 kg/cm². This allows you to increase the boiling point of the coolant to 110 °C.
If the pressure in the CO drops to 0.03-0.13 kg/cm² below atmospheric on a cold engine, then the intake valve opens. When the parameters are aligned, the latter is closed. The cooling radiator of the VAZ-2109 is a CO element consisting of 2 vertical plastic tanks connected in height by 2 horizontal rows of aluminum tubes. To increase the heat removal area, cooling plates are pressed onto them. The left tank is divided by a horizontal partition to change the direction of flow.
The coolant is supplied through a pipe located at the top of the radiator and discharged through the bottom. A switch sensor is installed in the right tank, which controls the radiator fan. At a liquid temperature of about 100 °C, the electric motor turns on, and at 95 °C, it turns off. The radiator is installed in the frame. A casing with an installed fan is attached to it. The radiator frame of the VAZ-2109, in turn, is attached to the body structures of the car.
The coolant system is filled through the expansion tank. A design feature of the “nine” radiator is the absence of a filler neck. To avoid injury, do not open the reservoir cap and add fluid when the engine is hot.
How to make a car heater burn fiery in winter
Useful lifehacks
And, finally, a few useful life hacks to improve the operation of the stove in the Russian winter.
Closing the radiator
On some car models sold on the Russian market, electric cooling radiator shutters are installed as standard or plastic screens are applied, by installing which you can partially block the flow of incoming air to the cooling radiator. This is a simple and effective way to speed up the heating of the interior and improve the operation of the stove in extreme cold. If such devices are not available, you can make them yourself
However, it is important to take all precautions to prevent self-ignition of the screens - they should not come into contact with hot elements of the engine compartment
Reducing the air flow through the stove
In extreme cold, some car enthusiasts increase the air flow through the heater radiator to the maximum, and are surprised that the heater still does not warm up the interior well. The secret is simple: passing through the stove at high speed, impressive volumes of cold air simply do not have time to warm up. By reducing the speed of the motor, you will increase the heating of the interior.
Open the window slightly
In some cases, good heating of the interior is hindered by the design of the car itself, or more precisely, by an ill-conceived ventilation system. If the body ventilation valves are not working and the doors are well sealed, increased pressure is created in the cabin, and almost no air escapes outside. Every minute it becomes more and more difficult for the heater motor to pump oxygen into the car. By lowering one of the windows slightly, you will increase the flow of air through the heater and, possibly, improve the climate in your car.
Experiment and you will undoubtedly find the best way to improve the efficiency of the heater specifically for your car!
How to choose a really excellent radiator for the VAZ 2109 stove.
When I went to an auto parts store, I learned that there are several types. Aluminum factory. non-factory aluminum and copper.
After consulting with friends who have been driving for several years and have encountered such a problem. I found out :
- A copper radiator costs 2 times more. than aluminum. but it's not very hot.
- A factory radiator costs around 1000 rubles and is worth taking. because It is reliable and heats as expected. Its design is stronger than the original VAZ radiator and has swirlers that slow down the coolant, which contributes to more heating of the radiator. With such a radiator, you will begin to feel warmth in the car already at 60 degrees of the engine.
- A non-factory radiator costs 500 rubles, but it’s not worth buying. First of all, it doesn't heat up. secondly, it may leak immediately after replacement. Thirdly, it does not have swirlers, so the antifreeze flies through the radiator without having time to heat it up.
Having learned all this, I went to the store and bought an original DAAZ radiator, price 750 rubles. It looks like this:
Cooling system pipes VAZ 2114, 2115
Greetings, Lada VAZ car enthusiast on the RtiIVAZ website!
A YouTube channel subscriber came up with the idea to make a video about the rubber radiator pipes of the VAZ 2114 and the heater pipes of the VAZ 2114, just like his car. This video was filmed at the request of Boris Zverev, and the article was edited on the initiative of Albert Aukhadullin.
Let's start with the steam exhaust hose of the cooling system. This hose serves to remove steam from the radiator to the expansion tank. The length of this product is slightly more than one meter, the diameter of the internal hole is 8 mm.
This hose is installed on VAZ 2108, 2109, 21083, 2113, 2114 and VAZ 2115 models with injection and carburetor engines.
On models of the “ten” family, the same hose is installed as in the photo above, catalog number 2110-1303095.
Next we will consider the hoses installed to heat the throttle assembly.
These are inlet and outlet hoses for coolant. The diameter of the hose when measured with a school ruler is about 10 mm, and the length is 48 cm.
Methods for replacing a radiator
There are two ways to remove the heater radiator on a VAZ-2113, 2114, 2115. The first involves completely removing the front panel
, which is necessary to access the heat exchanger.
Note that complete dismantling is a relative concept, since the panel itself is not removed from the car, but is only disconnected from the body, which allows it to be moved and thereby allow access to the radiator.
You will also have to move the torpedo itself.
Second method - without removing the panel
. But it is not suitable for everyone, since to provide access it is necessary to make cuts in some places so that it is possible to tilt the lower part of the panel in the area where the heat exchanger is located.
The disadvantage of the first method is that it is labor-intensive, since you will have to unscrew a lot of fasteners and disconnect the wiring, of which there is a lot that goes to the panel.
As for the second method, the panel itself will essentially be damaged, although it is cut in places hidden from view.
Also, after completing the replacement, you will have to think about how to reattach and secure the cut parts.
But since the stove radiator can leak at any time, ease of access to it is very important, so the second method is preferable.
Stages of replacing a VAZ stove radiator
To replace the radiator of the VAZ 2109 stove, you do not need to remove the entire panel, as is written on many instructions; I will tell you how to do this without unnecessary hemorrhoids and with little time. So let's get started:
If you have a VAZ 2109, then you need:
- Drain the antifreeze.
- Remove the panel trim.
- Remove part of the speedometer panel.
- Remove the heater trim (which is located below near the gearshift lever).
- Unscrew the panel mounting screws.
- Pull the panel with the help of an assistant from the left edge.
- Unscrew the clamps that secure the pipes to the faucet (be careful, the remaining antifreeze may leak)
- Unscrew the 3 screws securing the heater radiator cover. (There will be problems with the 3rd screw. Ask an assistant to pull the panel harder)
- OK it's all over Now. All you have to do is take out the old radiator, which just fits into the space between the glove compartment and the magazine shelf, install a new one and assemble everything in reverse order (Be careful not to tear off the wires from the ignition and alarm switch)
Photo that will help you:
And finally, a couple of tips:
- Don't wait until winter, it's better to do it this summer.
- Before installing a new stove radiator, peel it off along the edge with foam rubber, just as the old one was covered.
- After replacing the heater radiator, it is better to go to an overpass and stand so that the front is much higher than the rear of the car and rev it up. This will reduce the likelihood of an air lock in the radiator.
Video, replacing the radiator of the VAZ 2109 stove, which will also help you:
https://youtube.com/watch?v=fv53bKWT06A
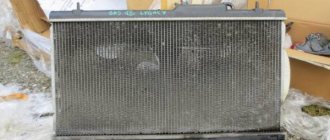
The radiator is a vulnerable car part
Replacing the cooling radiator VAZ 21093
The radiator itself is a rather vulnerable part of the machine, because it has a brass body that is subject to numerous loads. And this part is thin in design, and if you take into account the huge number of solder joints in it, then the quick failure of the cooling radiator becomes understandable. The radiator is located in front of the car and a pebble from the road or a tree branch that accidentally hits it can become a fatal bullet. Even the smallest foreign objects that get into the radiator can destroy soldering and resistance welding points.
VAZ 21099 replacement of cooling radiator
In addition, the mutual influence of the elements of the car in this case plays a cruel joke. Long-term use of chemicals, whether you like it or not, weakens the contact zone, disrupts the operating mode of the pump, increases the temperature of the coolant, etc. In addition, if the radiator cap valve gets stuck, it will not allow the pressure to be relieved in time, which will ultimately lead to set of flow points.
Note. There are many reasons why a radiator can fail or function unfairly. We will not dwell on them in this article. The purpose of this instruction is to familiarize the reader with how to easily remove the radiator and replace it with a new one.
Typical faults
As with any mechanism, problems can occur in the heating system (video author - Andrey Kuzemsky).
If the VAZ 2108 heater motor is broken, you can understand this by comparing some symptoms:
- If the motor does not work when switching operating modes, the cause of the breakdown may be hidden in the resistor. When repairing, you need to replace the resistor with a new one, because it cannot be repaired.
- If the fuse is blown, you need to check the insulation of the armature located on ground. There may be a short circuit.
- If, when switching modes, the VAZ 2108 heater fan rotates at the same speed, this may be a consequence of contamination or oxidation of the collector. In case of repair, it is worth cleaning the collector and, if nothing has changed and the fan continues to act up, you can replace the bearings.
If the VAZ 2108 stove motor does not even show signs of life, then the reason is not in its design, but in a broken circuit. To find out if this is true, you can use a voltmeter.
Replacing a VAZ 2115 radiator - detailed instructions
Engine overheating is a terrible phenomenon that promises its owner major repairs and serious cash injections.
In order to prevent engine overheating, it is necessary to regularly monitor the coolant level, proper operation of the thermostat, and the condition of the engine cooling radiator. If you find a coolant leak or puddles after a long period of parking, check the engine radiator for coolant leaks. A wet mark or hole in the radiator is a signal for immediate action. If the crack or breakdown is small, you can try to solder the cooling radiator. In addition to cracks and holes in the radiator, leaks can be caused by faulty connections or loose clamps. If the reason is not the clamps, and repairing the radiator is impossible or unprofitable, the radiator will need to be replaced.
How you will make the replacement is up to you, there are two options: entrust the work to service station specialists or carry out the repair yourself. For those who have chosen the second option, my article today on how to replace a VAZ 2115 radiator will be an excellent guide and assistant in performing this work.
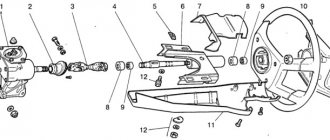
Features of the fan and thermostat VAZ 21093, 2109, 21099
The electric fan includes an electric motor and a four-blade impeller, the blades of which have a variable angle of inclination and pitch to reduce noise levels. To increase efficiency, the VAZ fan system is equipped with a casing attached to brackets.
The electric fan is mounted on rubber bushings. The fan is triggered by a signal from a sensor installed in the radiator tank. In this case, the contact closure temperature is approximately 99'C, and the fan shutdown temperature is 94'C.
The system thermostat provides priority warming up of the engine and regulates the thermal regime. The optimal coolant temperature is within 90-98'C. The thermostat includes a body and a cover, rolled together with the valve.
Replace without removing the panel
But no matter what method is used, you will first have to drain the coolant from the system. Therefore, you will have to stock up on antifreeze in the required quantity in advance.
First, let's look at the replacement method without removing the panel. As already mentioned, this will require making cuts in some places.
To complete the work you will need:
- Set of screwdrivers of different lengths;
- Hacksaw blade for metal;
- Flat container for draining residual coolant from the radiator;
- Rags.
Having prepared everything and drained the coolant from the cooling system, you can begin work:
- We remove the storage box (glove compartment) from the panel, for which it is necessary to unscrew 6 screws securing it;
- Remove the side trims on the center console;
- Use a metal blade to make the necessary cuts: The first cut is vertical
, we do it on the inner wall of the panel near the center console (behind the metal strip of the glove compartment). Moreover, here you will have to make two cuts.The second cut is horizontal
, running in the upper part along the rear wall of the opening under the glove compartment.
The third is also vertical
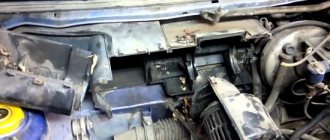
, but not end-to-end. It is done on the right on the rear wall of the lower storage shelf of the panel; - After all the cuts, part of the panel together with the wall can be bent down, which will provide access to the radiator. We bend this part and fix it;
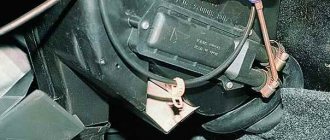
- Unscrew the near bracket for fastening the heating system flap control cable and move the cable to the side;
- Loosen the clamps of the coolant supply pipes to the radiator. In this case, you should place a prepared container under the connection points, since liquid will flow out of the heat exchanger. Remove the pipes;
- We unscrew the three screws securing the radiator, remove it and immediately inspect it.
Features of the VAZ injector cooling system
Cooling in cars 21093,2109,21099 is liquid, but you need to understand that the radiator is cooled by the flow of incoming air and a fan, which increases the cooling intensity. Also, part of the heat is removed by the car's interior heater radiator at low temperatures.
The expansion tank is designed to compensate for the volume of liquid when heating, to top up and control the level of antifreeze.
The temperature sensor provides control of the cooling system, allows you to monitor the engine temperature and regulate the operation of the fan.
The entire operating cycle of the cooling system is controlled using a power unit control system that takes into account all temperature parameters. It determines the optimal switching conditions and operating time of the structural elements of the system.