Until 2004, the VAZ 2109 was equipped with 1.1, 1.3, 1.5 liter carburetor engines, similar to the VAZ 2108 engines. In subsequent mass production, the installation of injectors was used. The excellent performance of the engine largely ensured the popularity of the VAZ 2109.
The VAZ 2109 engine is represented by 4 generations:
- Basic VAZ 2109 with a volume of 1.3 liters. The model was developed on the basis of 2108. The service life of the motor reaches 200 thousand kilometers with careful operation. The disadvantages of the model include rapid wear of the cooling system and problems with ignition.
- The 1.1-liter VAZ 2109 was used for the “nine” in 1984-1996. In this four-cylinder modification, the displacement is reduced due to the reduction in piston stroke. The weak engine did not contribute to the popularity of the model.
- The VAZ 21093 carburetor is designed for a working volume of 1.5 liters and is capable of producing a power of 73 liters. With. and has proven itself well among car owners due to its high reliability and wear resistance. VAZ 21093 became the prototype of modern Lada engines.
- The VAZ 21093i injector is also designed for a volume of 1.5 liters, but produces a power of 79 liters. With. The engine was installed on a large number of VAZ car models. Its advantages are a significant increase in power while reducing fuel consumption, and improved environmental performance. The disadvantages include the usual disadvantage of injectors - the almost complete impossibility of repair.
Malfunctions
- The engine does not start. There is no fuel supplied to the carburetor or not enough fuel is supplied. The following problems may be causing this problem:
| Causes | How to fix the problem |
| Foreign objects and debris got into the fuel line, which led to severe blockage. The fuel pump, carburetor filter, fuel line may be clogged. | Carry out a complete cleaning of the fuel supply systems to the engine. This can be done either with water pressure or with compressed air. |
| Failure of the pump supplying fuel to the engine. | Conduct a full diagnostics of the pump, identify the breakdown, and replace the faulty part with a working one. |
| Foreign objects or debris have entered the fuel filter. | Cleaning the filter yourself is quite difficult and time-consuming. It is much cheaper and faster to replace it with a new one. |
| Ignition problems. The engine starts poorly or does not start at all. | Conduct diagnostics of the ignition system, seek help from specialists. Partial or complete disassembly of the VAZ 2109 engine may help find the fault. |
- Problems and malfunctions during operation of the solenoid valve. This part is part of the carburetor and affects the ignition process, which is why its breakdown leads to the following troubles
| Causes | How to fix the problem |
| Broken or damaged wiring. This problem affects the operation of the valve control unit, which leads to faulty fuel supply and reduces the power of the VAZ 2109 engine. | Carry out a full check of each circuit, find the damaged wire, replace it with a intact one, and check the operation of the system. |
| The solenoid valve control unit does not work. | In this case, replacing or repairing it yourself is risky due to the complex structure of the device. It is advisable to entrust repairs to specialists. |
| During the initial operating cycle of the engine, the carburetor air damper does not operate, which should open at the first flashes in the engine cylinders. | The cause of this breakdown may be depressurization of the starting device in the carburetor. |
- Engine problems
| Causes | How to fix the problem |
| The idle speed of the engine is difficult to adjust and does not work properly. The engine is breathing. | In this case, you will need to carry out a complete setup and adjustment of the idle speed. Disassembling the VAZ 2109 engine also helps to identify the fault. |
| The system responsible for controlling the carburetor solenoid valve is faulty or partially broken. | Carry out a full check of each circuit, find the damaged wire, replace it with a intact one, and check the operation of the system. |
- Problems in the operation of the VAZ 2109 carburetor engine
| Causes | How to fix the problem |
| The carburetor does not work due to severe contamination of the channels or jet. | The mentioned parts of the carburetor are cleaned using compressed air. It is important to control the air supply to prevent damage. |
| Liquid has entered the carburetor or jet. | Also, use compressed air to clean carburetor systems from residual liquid. Check the fuel tank for sediment and drain if necessary. |
| The starting device does not work due to depressurization of the system. The trigger diaphragm is broken. This may reduce the productivity of the VAZ 2109 engine. | Check for damage to the diaphragm, replace if a malfunction is detected. |
| Problems with the ignition system. Complete or partial inoperability. | Carrying out diagnostics of the ignition system, replacing faulty parts with new ones. |
| Air entering the brake booster compartment. This usually happens due to a torn vacuum hose. Such a breakdown affects the performance of the econometer, ignition distributor and vacuum regulator-sensor. | Check the hose, find damage and repair it. You can also completely replace the hose. It is necessary to pay attention to the mounting clamps; if necessary, they should be tightened. |
| Damage to the gasket in the intake manifold connections. Such a breakdown leads to air leaks into the intake manifold. Affects the performance of the carburetor and engine of the VAZ 2109. | Check for damage to the intake pipe. Tighten all nuts. If this does not help, then most likely you will need to replace the gaskets with new ones. |
Specifications
| Engine | 1.3l, 8-cl. | 1.5l, 8-cl. | 1.5l, 8-cl. |
| Length, mm | 4006 | 4006 | 4006 |
| Width, mm | 1650 | 1620 | 1620 |
| Height, mm | 1402 | 1402 | 1402 |
| Base, mm | 2460 | 2460 | 2460 |
| Front wheel track, mm | 1400 | 1400 | 1400 |
| Rear wheel track, mm | 1370 | 1370 | 1370 |
| Weight in running order, kg | 925 | 925 | 945 |
| Gross vehicle weight, kg | 1350 | 1350 | 1370 |
| Permissible total weight of a towed trailer with brakes, kg | 900 | 900 | 900 |
| Ground clearance, mm | 160 | 160 | 160 |
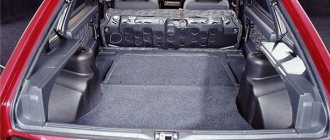
| Trunk volume min/max, l | 330/640 | 330/640 | 330/640 |
| Wheel formula/drive wheels | 4x2/front | ||
| Car layout diagram | Front-wheel drive, front engine, transverse | ||
| Body type/number of doors | Hatchback/5 | ||
| engine's type | Petrol | ||
| Supply system | Carburetor | Carburetor | Distributed injection |
| Cylinder diameter, mm | 76 | 82 | 82 |
| Piston stroke, mm | 71 | 71 | 71 |
| Compression ratio | 9,9 | 9,9 | 9,9 |
| Engine displacement, cm3 | 1288 | 1499 | 1499 |
| Maximum power, kW/rpm | 64/5600 | 68/5600 | 78/5400 |
| Maximum torque, Nm at rpm | 95 / 3400 | 100 / 3400 | 116 / 3000 |
| Fuel | AI-92 | AI-92 | AI-95 |
| Fuel consumption in the urban cycle, l/100km | — | 8,7 | 9,9 |
| Maximum speed, km/h | 148 | 154 | 155 |
| Acceleration to 100 km/h, s | 16 | 14 | 13 |
| Transmission | With manual control | ||
| Number of gears | 5 forward, 1 reverse | ||
| Steering | Rack type, without amplifier | ||
| Tires | 175/70R13 5Jx13; | ||
| Fuel tank capacity | 43 | 43 | 43 |
Tuning: basic description
Tuning a carburetor engine primarily involves boring the cylinder block. This is done in order to increase the combustion chamber, and, accordingly, the pressure inside it.
Also, lightweight parts are installed, which make it possible to reduce the weight of the motor, which will increase acceleration dynamics.
Alternative way
There is a simpler method for determining the correct position of the floats, which does not require measurements. Place the carburetor cover on a flat table and look at the stampings made on the side surfaces. When the floats are in a normally adjusted position, these strips are parallel to the lid.
Then we lift the floats up and look at their bottom, which after lifting should be parallel to the surface of the lid. If necessary, adjust the position of the floats by bending the tongue.
After adjustment work, we assemble the carburetor.
Replacement
Now we move on to replacing elements. Doing it yourself or contacting a car service is purely your personal decision.
For the VAZ 2109, the use of three supports is provided:
- Front;
- Rear;
- Left side.
The replacement of each of them should be discussed separately, since the processes differ from each other.
Replacing the rear cushion
- Find a suitable place to carry out repairs. You will need a pit or overpass.
- Place the car there, secure it with stops, and put the car on the handbrake.
- Disconnect the negative terminal from the car battery.
- Using a 17mm spanner, unscrew the nut that holds the cushion to the body.
- Using a 17 socket, remove the mounting nuts of the support bracket to the gearbox. There are 3 of them in total.
- Remove all the bolts and remove the old engine mount.
- Install a new motor element and reassemble the unit.
Dismantling works
Side left pillow
Left element
- Provide yourself with free access to the bottom of your VAZ 2109.
- Secure the vehicle with jack stands and the handbrake.
- Disconnect the minus from the battery.
- Remove the left engine splash guard.
- Using a 17mm spanner, remove the nut that holds the cushion to the body.
- Using a 17 socket, unscrew the 3 mounting nuts of the support bracket, removing them from the gearbox.
- After removing the mounting bolts, replace the worn engine mount with a new one.
- Carry out the reassembly procedure. Stick to strict consistency.
Replacing the front airbag
Here, follow all the same conditions that were relevant for previous works. That is, drive the car into a pit, place supports and turn off the power to the car by removing the negative terminal from the battery.
- Using a 17mm spanner, remove the nut holding the cushion to the body.
- Using a 17mm wrench, remove the 4 fastening nuts securing the airbag to the engine.
- Remove the rubber element from the eyelet.
- Place a new support in place of the old unit.
- Reassemble the unit.
When replacing engine mounts, be sure to make sure that the new mounts meet the quality and size requirements. It is also recommended to thoroughly clean the seats before installing a new element, which will extend the service life of the new motor mounts.
Replacement does not require special skills, special tools or special conditions. Therefore, VAZ 2109 owners often change the pillows with their own hands. But if you are not confident in your abilities, contact a trusted car service center.
Which of the VAZ 2109 airbags do you consider the most difficult to replace?
- Front support
- Back cushion
- Left (side) engine mount
- They are all very easy to change
Which option is best?
As you can see, there are a lot of ways to modify the “nine” engine. We recommend simply replacing the motor with another one. But not from a foreign car, but from an injection VAZ. This way you won’t have problems with installation (after all, the body design has not changed for decades) and queues at the traffic police. As a last resort, you can make the engine in the PTS numberless.
Well, in addition to the new engine, you can modify the old exhaust system, replace the manifold and muffler. By performing all these operations, you will increase the power of your car by 30-40 percent. After such tuning, the car will “take a hundred” in 10 or even less seconds. The main thing is to know the sequence of all tuning work.
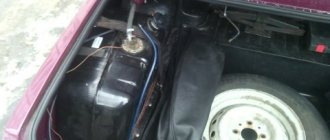
We install the finished engine
We put the 2112 engine on the “nine”, since the power units of the models are similar to each other. You will also need a fuel pipe of a suitable diameter (you can take a steel one, but copper is better) and a gas tank from the same 12th model. The following work is carried out:
- We dismantle the old power unit, disconnect all pipes and electronics. In order to remove and install the engine, a crane is needed for convenience, since the entire assembly is heavy. This is a major problem in the garage.
- When the engine is removed, you can install a new one in the seat. It is worth immediately checking the condition of the seals and gaskets if the unit is used. Also check the belt tension.
- Next you need to replace the entire fuel system: tank, fuel pump, fuel lines.
- An excellent replacement for the “nine” tank is the analogue from 2112. The parts are the same in size, but their design is different, which is not an obstacle to installation.
- For fuel lines you need to take copper tubes, which bend better.
- Now you can start wiring the injector. If the “nine” was produced in 2002 and younger, then there will be no special problems with connecting the wires, but for older models you will have to make new holes manually.
- You need to install an absorber and a gasoline filter. They are usually placed under the bottom and secured with studs.
- We install the sensors, change the wiring to one that is suitable in length.
- Installing the generator will have to work hard, since the original mounts do not fit. Find suitable ones, replace them and you can install them. If the gearbox is not changed, then it will have to be sharpened with a grinder.
- The starter will have to change the bendix from 12 to 9 teeth.
- The last modification is the exhaust system. The pipes will not fit, so they will need to be welded. Fitting helps put all the parts in place.
Relay and fuse box diagram 2109
The fuse blocks do not depend on the fuel injection system used - carburetor or injector. BP will differ only by year of manufacture of the car. That is, the mounting blocks for the carburetor and injector are the same. The VAZ 2109-099 fuse box (carburetor, injector) is located under the hood, in the compartment in front of the windshield on the left side.
Fuse block 2114-3722010-18
K1-relay for turning on headlight cleaners; K2-relay-breaker for direction indicators and hazard warning lights; K3 - windshield wiper relay; K4-relay for monitoring the health of lamps; K5-power window relay; K6 - relay for turning on sound signals; K7-relay for turning on the electric heating of the rear window; K8-relay for high beam headlights; K9-relay for low beam headlights; F1-F16 - fuses.
Fuse block 2114-3722010-60
K1 - Headlight wiper relay, K2 - Turn signal and hazard warning relay, K3 - Windshield wiper relay, K4 - Brake light and parking light relay, K5 - Power window relay, K6 - Horn relay , K7 - Rear window heating relay, K8 - Headlight high beam relay, K9 - Headlight low beam relay, F1 - F16 - Fuses, F1 - F20 - Spare fuses.
Attention! The power terminals on the generator often become loose, heat up, spark and melt the wiring. Pay attention to this point when searching for possible faults yourself.
Source
Exhaust system
Studies have shown that a car loses a significant part of its power precisely due to the exhaust gases leaving the system. Accordingly, if you modify the exhaust system, you can significantly increase engine power. This method is good because it does not require an experienced mechanic's hand. There is also no need to modify the motor itself. The engine remains in the same condition. But in order for gases to be released at a greater speed, you need to carefully calculate the design of the exhaust system of your car. The whole point of the modification is to increase the diameter of the pipes, change their profile and internal polishing. The method is less complicated than the previous two, but also very labor-intensive.
What can this do? Thanks to modifications to the exhaust system, engine power increases by 15 percent. If you consider that during the work you never disassembled the engine, but simply “tuned” the pipes, then this method can be considered one of the most effective among all others.
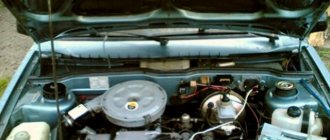
Cylinder block
All engine cylinders are combined together with the upper part of the crankcase into one common unit - a cylinder block cast from special high-strength cast iron. This arrangement ensures structural strength, rigidity, compactness and reduces engine weight. Coolant passages are made along the entire height of the cylinder block, which improves cooling of the pistons and piston rings and reduces deformation of the cylinder block from uneven heating.
The block cylinders are divided into five classes by diameter at 0.01 mm intervals. designated by the letters A, B, C, D, E:
| Class | Engine cylinder diameter 21081, 2108, mm | Engine cylinder diameter 21083, mm |
| A | 76,000-76,010 | 82,000-82,010 |
| IN | 76,010-76,020 | 82,010-82,020 |
| WITH | 76,020-76.030 | 82,020-82,030 |
| D | 76,030-76,040 | 82,030-82,040 |
| E | 76,040-76,050 | 82,040-82,050 |
The cylinder class is indicated on the bottom plane of the block opposite each cylinder. The cylinder and the piston mating to it must be of the same class. During repairs, the cylinders can be bored and honed to accommodate an increased piston diameter of 0.4 and 0.8 mm.
At the bottom of the cylinder block there are five crankshaft main bearing supports with thin-walled steel-aluminum liners. The upper and lower liners of the middle (3rd) main bearing are without a groove on the inner surface. The remaining supports have upper liners with a groove on the inner surface, and lower ones without a groove. Until 1988, the lower shells of these bearings also had grooves.
The bearings have removable covers 2, which are attached to the cylinder block with self-locking bolts. The holes for the crankshaft bearings in the cylinder block are processed together with covers, which ensures high accuracy, the correct geometric shape of the holes and their alignment. Therefore, the bearing caps are not interchangeable and, to distinguish them, have marks on the outer surface (see Fig. 6).
The middle support has slots for installing thrust half-rings 12 (see Fig. 6). holding the crankshaft from axial movements. A ceramic-metal half-ring (yellow) is placed on the back side of the middle support, and an aluminum-steel half-ring is placed on the front side.
The axial clearance of the crankshaft should be 0.06-0.026 mm. If the gap exceeds the maximum permissible (0.35 mm), it is necessary to replace the half rings with repair ones, increased by 0.127 mm. It should be borne in mind that the grooves located on one side of the half rings must face the thrust surfaces of the crankshaft.
From below, the cylinder block is closed with a stamped steel crankcase 37. The crankcase has a baffle to calm the oil. A gasket made of cork-rubber mixture is installed between the oil sump and the cylinder block.
The clutch housing is attached to the rear end of the cylinder block. The exact location of the crankcase relative to the cylinder block and the alignment of the crankshaft and the gearbox input shaft are ensured by two centering bushings pressed into the cylinder block.
Why install a new power unit?
Installing a new engine can be useful for those motorists who want to improve their outdated car. Many domestic car enthusiasts know that the “nine” has pretty good driving characteristics, requires little gasoline and is generally not as demanding to maintain as foreign cars, which is why it is often tuned. Replacing an engine from an 8 cl to a more advanced model has its advantages:
- Increased power.
- Improved driving characteristics at high speeds.
- Efficient use of fuel due to the injection system.
- More stable operation of the power unit.
- No constant valve adjustment required.
But there are also disadvantages:
- You need a lot of parts and tools to replace them in your garage.
- At low speeds the 16 cl engine is slightly worse than its 8 valve counterpart.
There are two replacement options here:
- Installation of the entire engine from the 2112 model. In this case, not many parts will need to be replaced, but the cost of the entire engine may discourage this idea.
- Modification of the cylinder head for new components. This is a more economical, but very labor-intensive process.
Preparation
At the preparatory stage, short but very important, it is worth completely de-energizing the car by disconnecting the battery. You also need to remove all hoses, speed and clutch sensors. Be sure to drain the oil from the engine crankcase and the liquid that cools the radiator. Removing the engine without removing the gearbox:
- first of all, you need to put a reliable support under the car, preferably wooden stumps;
- unscrew the left crab, move the stretcher to the side;
- remove the generator from the engine;
- remove the tensioner pin, pump, distributor and receiving pipe;
- do not forget to remove the head if you are planning a major overhaul;
- the motor must be removed from the box and lowered to the floor;
- in order to get the engine, you need to raise the front part higher (this is done using a jack);
- you can also just pull everything through the top.
We recommend: Window regulators for the VAZ 2107: diagram, design, repair, electrical installation, how to remove and install the mechanism, cable, handle, instructions How to remove the motor from the gearbox:
- The first thing you need to do is turn off the power to the car. To do this, disconnect the battery. It’s easy to check the lack of current, try turning on the wipers;
- Drain the oil from the engine crankcase. A warm engine will speed up the process;
- drain the coolant from the cooling system, here you need a cold engine;
- get rid of the engine crankcase and exhaust pipe protection;
- carefully disconnect all hoses;
- Next, you need to unscrew the ground wire fastening nut. Next, you can safely turn off the thermostat;
- disconnect the central high voltage from the ignition distributor. To do this, you need to release the pad lock and remove it;
- remove the drive cable from the clutch lever;
- next, you should disconnect the starter supply wires;
- turn off the generator;
- disconnect the wires from the coolant temperature and oil pressure sensors;
- further work will take place under the car. To make it as comfortable and safe as possible, it is worth acquiring an overpass;
- At this stage, unscrew the drive rod mounting nuts. Disconnect the speedometer drive rod, disconnect the power wires;
- disconnect the two braces, tie rods and ball joint from the lever;
- Move the upper tail of the drive a little and push it out with a pry bar. Insert the technological plug into the vacant space;
- Next comes the stage of dismantling the engine. We fix it with a strong rope using the eyelets (rings). It doesn't hurt if you take the time to check their strength first;
- It is best to remove it through the top, but you can also get it through the bottom. Then lower the engine to the floor and lift the front of the car using a jack;
- After you have secured the engine with ropes, you can reach it through the top.
Remember that you need to act extremely carefully so as not to lose the motor, scratch the body, or damage parts. As you can see, the process is very complex. Successful dismantling is possible only if all points of the instructions are followed, you have deep knowledge, extreme caution and no haste.
Cylinder head
Cylinder head 27 is common to four cylinders. cast from aluminum alloy, has wedge-shaped combustion chambers. Valve guides and seats made of cast iron are pressed into the head. The seats, pre-cooled in liquid nitrogen, are inserted into the sockets of the heated cylinder head. This ensures a reliable and durable fit of the seats in the head.
A special non-shrink gasket on a metal frame is installed between the head and the cylinder block. The head is centered on the cylinder block with two bushings and secured to it with ten bolts.
To uniformly compress the entire surface of the cylinder head gasket, to ensure a reliable seal and eliminate subsequent tightening of the bolts during vehicle maintenance, the cylinder head bolts are tightened evenly without jerking in four steps and in a strictly defined sequence (see Fig. 7):
- 1st step - tighten the bolts with a torque of 2 kg cm;
- Step 2 - tighten the bolts to a torque of 7.08-8.74 kg cm,
- Step 3 - turn the bolts 90°;
- Step 4 - turn the bolts again by 90°.
Installing a motor from a foreign car
What engine can be installed on a VAZ-2109 from a foreign car? This question is very difficult, since there is no single answer to it. Some motorists advise installing an engine from German Audis and Volkswagens from the 90s. But one of the most suitable options is to install an engine from an Opel Vectra.
However, no matter what this engine is, it is better to mount it with the original gearbox. And these are additional costs, and to a greater extent from the financial side. Plus, you will have to enter the new motor into the registration certificate.