Fuel filters for the VAZ 2113/2114/2115 will not differ from each other, since the car is a restyled version of the VAZ 2108, 2109 and 21099. Over the years, these cars were produced in different versions and modifications. Initially, the VAZ-2115 had VAZ-21093 (carburetor) and VAZ-2111 (injector) engines. By the time production of the VAZ-2114 began, carburetors were completely abandoned and all VAZ 2114 and 2113 cars were already produced with an injection type engine. Therefore, fuel filters will differ depending on whether the fuel system is carburetor or injection.
In injection cars VAZ 2113/2114/2115 there are two filters installed, the main one is a fine filter and an additional coarse filter, which is a synthetic fiber mesh filter, which is located in the tank along with the fuel pump.
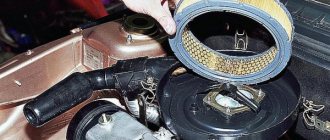
Fuel filter VAZ 2113/2114/2115 injector
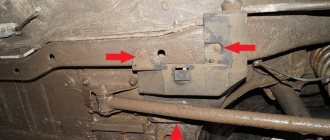
To gain access to the fuel filter, you need to use an overpass, since the filter is located under the rear part on the bottom in the form of a cartridge. The process of replacing the fuel filter for both cars with 1.5 and 1.6 liter engines is basically the same, the distinctive features will be different fasteners ( for models with a 1.5 l engine, a hexagonal fastening is used, for 1.6 l engines a spring fixation is installed with latches), and during installation, be sure to pay attention to the position of the arrow indicating the direction of fuel flow. For a car with a 1.5 liter unit, the arrow should be directed from the right to the left side; on a 1.6 liter engine, the arrow should accordingly be directed to the revolution.
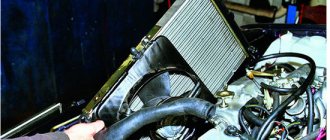
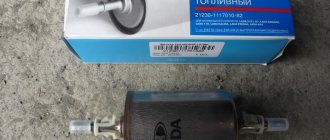
The fine fuel filter for injection vehicles VAZ 2113, 2114 and 2115 has the same design. Lada has assigned these filters the following catalog numbers: 21230111701000, 21230111701001, 21230111701002. These fuel filters have a “fitting” type connection. The fuel filter, which is designed on a turnkey basis, has the original spare part number - 210801117010.
| Dimensions of the VAZ 2113/2114/2115 fuel filter (injector) | |||
| External diameter, mm | Inlet diameter, mm | Outlet diameter, mm | Height, mm |
| 55 | 8 | 8 | 163 |
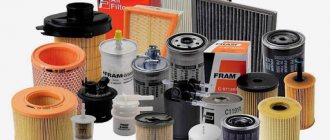
On sale you can find analogues of the same filters from other manufacturers:
| Manufacturer | vendor code | Connection type | Manufacturer country | price, rub. |
| SCT 2.9 | ST342 | union | Lithuania | 161 |
| Goodwill 3.4 | Fg702 | union | Korea | 184 |
| BIG Filter 4.0 | GB302E | key | Russia | 344 |
SCT ST342
Goodwill Fg702
The overall dimensions of these fuel filters are slightly different from the original part, but they are suitable for installation.
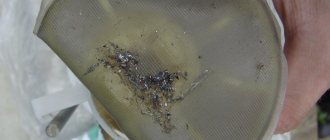
The coarse fuel filter VAZ 2113/2114/2115 is a mesh and is installed together with the fuel pump in a single module located in the tank. For this reason, this filter is not sold separately.
Security measures
Remember, you are working with fuel. Therefore, you need to protect yourself and everything around you. To do this you need:
- Do not smoke during repairs. Even a small fire can lead to a large fire that can spread far beyond your garage. Especially if you are in a garage co-op;
- Have a working fire extinguisher in the immediate vicinity of the workplace;
- Ensure ventilation of the work area. It is best to work outside, but since there may not be an inspection hole there, and it is almost impossible to organize a lift, open the garage door completely or even turn on the fan so that it expels fuel vapors from the garage to the street;
- If you get flammable on your skin, be sure to wash the area using soap.
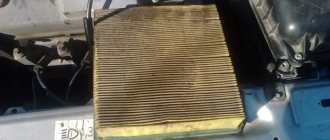
New fine filter
Fuel filter VAZ 2113/2114/2115 carburetor
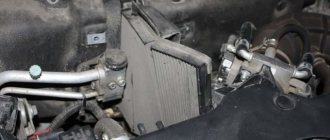
All carburetor “thirteen”, “fourteen” and “fifteen” cars are equipped with a fuel filter that does not differ from the vehicle’s equipment. On VAZs with a carburetor engine, the fuel filter is located in the engine compartment, next to the vacuum brake booster and brake fluid reservoir. Made in the form of a small cylinder of transparent plastic. The VAZ-2108-15i fuel filter is produced by LAAZ “Livny 1.3”. Catalog number of this part: 21081117010.
| Dimensions of fine fuel filter VAZ-2115 (carburetor): | ||||
| Filter version | External diameter, mm | Inlet diameter, mm | Outlet diameter, mm | Height, mm |
| In-line filter | 35 | 8 | 8 | 105 |
You can also find analogues of VAZ 2115 fuel filters (carburetor) from other manufacturers on sale:
| Manufacturer | vendor code | Manufacturer country | price, rub. |
| Bosch 3.8 | 0450904058 | Czech Republic | 67 |
| Bosch 3.8 | 0450904149 | Czech Republic | 178 |
| BAKER | FT103P | Russia | 114 |
Bosch 0450904058
PEKAR FT103P
The overall dimensions of these fuel filters may differ slightly from the dimensions of the original part.
When to change fuel filters?
According to routine maintenance, the manufacturer recommends replacing filters at least every 30,000 km. But depending on the quality of the gasoline being poured, the replacement period must be reduced to 15,000 km on injection engines and to 20,000 on carburetor engines.
Where are the purifiers located?
The location of fuel filters on VAZ models depends on the engine. On injection and carburetor systems they are located in different places.
Filter location on carburetor internal combustion engines
On carburetor VAZs, the fuel purifier is located under the hood. It is installed under the brake reservoir (main), secured with 2 clamps.
The filter for carburetor VAZs is located under the brake cylinder
Location of the cleaner on the injector
On a VAZ with an injection system, the FTO is installed under the car, at the rear near the muffler. It is mounted in the form of a cartridge in the fuel line. To inspect or dismantle it, you have to lift the car onto an overpass or pit.
VAZ 2115: replacing the fuel filter with your own hands
Replacing a VAZ 2115 fine gasoline filter, the arrow must coincide with the direction of fuel movement
Replacing the fuel filter in a VAZ 2115 may come as a surprise to some owners, because they have no idea about its location and existence before problems arise. According to the manufacturer's recommendations, replacing the VAZ 2115 fine fuel filter should be carried out after every 30 thousand kilometers of vehicle mileage. However, the manufacturer considers this mileage provided that the quality of gasoline at gas stations meets the highest standards.
Types of gasoline filters used
Depending on the type of power unit, the following modifications of filter devices are installed on the VAZ 2115:
- In the fuel supply system of 1.5 (8V) engines with a return line for excess gasoline, a flow filter 2112-1117010-01 with a threaded connection to the fuel lines (on nuts) is used.
- The fuel system of the VAZ 2115 with a 1.6 (8V) engine is equipped with a quick-release fuel filter 2123-1117010 mounted on plastic clips.
PROBLEMS ARISING
Unfortunately, the quality of fuel today is far from ideal and unpleasant situations have become common when jerks and dips appear during the movement, first at high speeds, then at low speeds. So:
- When the car begins to start poorly or does not start at all, there can be many and very different reasons; the owner cannot always guess that it is necessary to replace the VAZ 2115 fuel filter
- Since the driver’s opinion is that there seemed to be no problems before leaving, so only over time will the owner perhaps understand the real cause of the problem, which is hidden in the contamination of the fuel filter
- Some try to correct the situation by changing the oil in the engine or gearbox, others hope that their problem will be solved by flushing the injector or computer firmware
- The real cause of problems is dirt, which is present in large quantities in the fuel.
- It is natural that the dirtier the gasoline, the faster it clogs the filter, and this will more often cause dips and jerks to bother you while driving.
- The only correct way out of the situation is to replace the fuel filter on a VAZ 2115
- At the first such symptoms, the filter element should be replaced, regardless of the mileage of the car, at the time of trouble, even if it is much less than thirty thousand
- The procedure should be carried out in a designated place on an inspection ditch or overpass, do not dump fuel on the ground, place a container, remember about the environment
Attention: When repairing a car, do not forget that gasoline is highly flammable, so smoking or using a lighter when replacing fuel filters or any repairs related to the fuel system is life-threatening! In addition, fold rags soaked in gasoline separately and then the likelihood of a fire or explosion during repairs will be minimal. Always keep a powder or carbon dioxide fire extinguisher nearby.
- You must first find out what brand and type of filter you have, so as not to make a mistake when purchasing a replacement one.
- When installing a new filter with your own hands, replace the O-rings on the tubes
- You should also pay attention that the arrow drawn on the filter is in the direction of the movement of fuel in the line, otherwise your problem will return very soon
- Next, we will describe replacing the fuel filter on a VAZ 21154 in its technological sequence
- This sequence practically coincides with replacing fuel filters VAZ 2110-2115
Design and symptoms of malfunction
The fuel filter for the VAZ 2114 operates on the principle of direct cleaning and consists of a housing and a cellular paper filler. It allows the liquid component to pass through, but at the same time retains even the smallest solid inclusions and particles.
Signs that it is clogged include:
- greatly increased fuel consumption;
- “failures” in engine operation at high speeds;
- frequent spontaneous engine stop;
- significant loss of engine power;
- problems during startup, especially after a long period of inactivity;
- difficulty going uphill, during which the car often jerks;
- spontaneous braking, sudden loss of speed.
All these signs, and especially their combination, clearly indicate that the filter is clogged and it’s time to change it. True, before you start replacing, you should figure out where the fuel filter is located on the VAZ 2114.
Fuel filter location
You can find this device on the bottom of the car, right under its trunk - not far from the exhaust pipe (for this reason, you will need a pit or overpass to easily replace the filter).
FINE CLEANING ELEMENT
First of all, let's look at how to replace a fine gas filter on a VAZ 2115:
- After you have rolled the car onto the overpass, you should relieve the excess pressure inside the fuel line
- We reduce the pressure in the fuel system; to do this, disconnect the terminal from the fuel pump in the tank, start the engine, when it stalls due to lack of fuel, disconnect the terminals from the battery
- Spray WD-40 at the connection between the filter and the main line, and wait a few minutes
- After this, we go down under the car, and use keys “17” and “19” to loosen the tightening of the tube tips to the filter, photo below
Using two keys, unscrew the tubes from the filter
- Finally unscrew the nuts of the tube tips and remove the tube tips from the filter
- Fuel will spill out of the filter and pipes, that's why you need a bucket
- Then it remains to unscrew the coupling bolt on the filter mounting clamp
Unscrew the coupling bolt
- Removing the filter
- As you can see, replacing the VAZ 2115 gas filter is not a difficult job.
- Then the O-rings that are on the tips of the tubes
- We check their condition
- If they are torn or have lost their elasticity then the rings need to be replaced
- After this, screw on the new filter, do not forget to put the o-rings back in place.
- Remember the direction of the arrow on the filter so that it is in the direction of fuel flow
- After installation, connect the fuel pump and terminals to the battery, and let the engine run for about five minutes, check from below to see if gasoline is leaking, if it is leaking, tighten the pipe fittings
- Replacement of the VAZ 21154 fine fuel filter is completed
Preliminary stage
1.Relieve the pressure in the fuel system. This can be done by pressing the nipple under the black cap on the left side of the engine compartment for a few seconds. Don't forget to place a small container, as gasoline will leak out. (1-1, 1-2)
2. A similar result can be achieved in another way. To do this, remove the rear seat and see a small hatch under the seal. We unscrew 2 screws with a Phillips screwdriver, remove the cover and disconnect the terminal located under it.
We start the car and let the gasoline in the fuel line be used up.
3. Disconnect the battery terminal.
4. Raise the car and find the fuel filter under the bottom on the trunk side.
We clean off all the dirt with a metal brush and spray it on the threaded joints.
ROUGH FILTER
The electric gasoline pump is located in the tank in all VAZ cars. It is located in a housing with a mesh on it (for rough cleaning). Getting to the pump is easy, you just need to remove the rear seat and there is a hatch:
- You need to unscrew its fastening, under the hatch there will be a pump housing with auxiliary units attached to it
- The entire pump is replaced if it breaks or the fuel level sensor attached to it breaks.
- Damage can occur from driving with an empty tank, due to air getting into it and insufficient cooling
- We change the coarse mesh if replacing the previous filter did not eliminate jerking and dips in the movement of the machine
- The mesh is located in the pump housing, so it will have to be removed if it is replaced.
Replacement Tools
The instructions for replacing the mesh recommend the following tool:
- Keys “7” (head is better), “17”, “19”
- Pliers
- Two screwdrivers Phillips and slotted
- Liquid WD-40
- Pump used to inflate wheels
- Rags
- The mesh is new
- O-ring for rubber pump
- Possibly a fuel supply hose if the old one is roughened or cracked
Let's move on to replacement
Attention: It is recommended to carry out all work related to the fuel pump with an empty tank. It is prohibited to smoke, use matches or lighters during work, or perform work with a full tank of gasoline.
So:
- First you should, as in the previous case, relieve the pressure in the line
- Then remove the seat and unscrew the hatch
- Disconnect the terminal
- Unscrew the fittings using the “17” key
- Before unscrewing, it is better to fill the connections with WD-40, pump nuts too
- After this, unscrew the nuts with the “7” key
- The “ground” of the pump is screwed to one of the nuts, do not forget about this when assembling
Unscrew the nuts that secure the pump
- Remove the pressure ring
- Pull out the pump housing
Attention: Be careful! A gasoline level sensor is attached to the housing; otherwise, when removing it, you will bend the pointer and the gasoline level readings will be incorrect.
- Replacing a level sensor - this is the price of negligence and carelessness
- Remove the rubber seal
- Detach the lower glass
- It just snaps off
- It is usually full of dirt
- Remove it with a rag and wash it
- If the glass cannot be pulled out together with the body through the hole, it usually falls into the tank
- You don't have to worry, it can be easily removed by hand, so pull it out
- Remove the mesh (see Why you need to replace the mesh of the VAZ fuel pump) by simply pulling it up
- After that, put on a new one and you can put everything back together.
- If anything in the actions or order is not clear to you, delete the video
Mesh, also known as a coarse filter
VAZ 2115 how to replace the fuel filter is now clear to everyone, get started and remember about safety precautions.
How to clean the fuel pump yourself
Let's start with the fact that the mesh filter for the fuel pump is a coarse filter and is designed to capture large particles and deposits that are in the fuel and inevitably accumulate in the fuel tank. It turns out that the fuel pump has its own additional fuel filter mesh, which prevents debris from entering the fuel system from the tank parallel to the usual fuel filter. The process of cleaning or replacing the fuel pump mesh is almost similar to the general scheme for replacing the pump itself:
- The fuel pump is installed directly into the gas tank. You can get to the pump from the passenger compartment, as it is located under the rear seat. To gain access to the fuel pump, you need to remove the rear seat cushion or fold down half of the sofa (if possible).
- The fuel pump is usually located on the right and covered with a special plastic cover. The specified cover must be removed.
- Before removing the fuel pump itself, it is necessary to relieve the fuel pressure in the system. To do this, you will need to disconnect the power connector from the fuel pump, and then turn the engine with the starter.
- The next step is to remove the negative terminal from the battery, after which the tubes from the fuel pump are disconnected. These tubes are “supply” and “return”, they are secured with clamps that need to be pressed out. You should be prepared for the fact that a certain amount of gasoline may spill after removal. For this reason, safety precautions must be observed!
- Next, you need to unscrew the special pressure ring-cover of the fuel pump. It is very difficult to unscrew this cover manually. There is a special fuel pump cover puller for removal. If there is no such puller, then you can try to carefully unscrew the ring using improvised means. We strongly recommend that you first study on specialized auto forums how to remove the fuel pump cap on a specific car model.
- After unscrewing the cap, you can remove the fuel pump. Before complete removal, the remaining gasoline should be drained from its body, and the sealing ring should be removed.
- Now you can begin disassembling the fuel pump housing. To clean, you will need to remove the bottom part. There is often dirt in the indicated lower part of the housing.
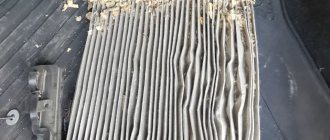
- After this, remove the fuel pump screen. To remove the mesh, just pry out the filter at the place of attachment to the pump body using a regular screwdriver. The fuel pump strainer usually becomes completely clogged, especially on cars with high mileage.
- Then the fuel pump mesh can be replaced with a new one or cleaned. It is better to wash the fuel pump mesh first with carburetor cleaner. Mechanical cleaning is done with a soft brush. Then the mesh should be dried and blown. The bottom of the pump housing and the cleaned mesh are finally washed again with gasoline.
- The final step is to reassemble the fuel pump and install the device in the gas tank. To facilitate installation, it is better to invite an assistant, as it may be necessary to ensure high-quality pressure of the pump to the tank. The fact is that many gasoline pumps have a special spring, the force of which must be overcome. At the same time, you need to make sure that the rubber seal is in place and at the same time screw in the pressure ring-cover of the fuel pump. When tightening the clamping ring with a puller or improvised means, do not exceed the tightening torque. If you tighten it too tightly, the fuel pump cap may burst; if you tighten it too weakly, the fuel pump will wobble due to poor fixation.
Please note that when installing a fuel pump on many car models, you need to be careful not to bend the fuel level sensor in the gas tank
It is also important to adhere to the position in which the pump was originally located.
In order to determine the correct position of the fuel pump, there are special indicators. Such indicators are made in the form of arrows and are located on the fuel pump, the gas tank body and the pressure ring. The correct installation of the fuel pump can be considered when all the arrows are in the same line. We would like to add that if the gasket is installed incorrectly, gasoline may leak out if you fill the tank full.
Now all that remains is to connect the fuel supply and return pipes to the fuel pump, while simultaneously checking that the clamps are securely fastened. The completion is to connect the electrical power connector to the fuel pump, after which you can start the car for testing.
Signs of a dirty fuel filter
If you experience any of the following symptoms, your fuel filter may be clogged and needs to be replaced.
- Increased fuel consumption (Causes of high fuel consumption on VAZ).
- Unstable idle.
- Dips when gaining speed.
- Poor engine starting.
- Troubles the engine.
In addition to the fuel filter, these signs also indicate a malfunction of the following elements: ECU, Spark plugs, High-voltage (HV) wires, DPKV, Mass air flow sensor, DD, DPS, Idle air control. So, when replacing the fuel filter, keep this in mind.
SIGNS OF CLOGGING
Like all other components and parts of a car, fuel filters require periodic replacement. Poor fuel quality, dirt and water in the tank contribute to the contamination of the filter elements. In addition, their clogging can occur for the following reasons:
- accumulation of resins included in the fuel;
- metal corrosion caused by moisture condensation;
- the presence of ice crystals in the fuel line during frosts in the cold season;
- chemical reactions during the interaction of fuel, metal, air and water cause the appearance of by-products (slag).
In general, clogged fuel filters affect the operation of automobile engines, which, depending on the type of engine, leads to:
- reducing the power of injection power units;
- unstable operation of the diesel engine (jerks when moving) and the inability to start it the first time;
In addition, there are symptoms that indicate a clogged fuel filter, regardless of engine type. These include:
- increased fuel consumption;
- “triple” of the motor;
- failures in the operation of the power unit when the speed increases.
There are also cases when:
- The car engine stalls when idling;
- The car starts to jerk unpredictably when driving on an incline.
Important! A clogged fuel filter does not happen suddenly. It becomes clogged gradually and the symptoms indicating its clogging are often perceived as insignificant
However, if you do not notice them for a long time, then you can wait not only for the filter to become completely clogged, but also for the engine to fail.
How to replace the fuel filter?
What we need to replace:
- fuel filter;
- O-rings;
- keys at 10, 17, 19;
- empty clean container for gasoline.
Removing the old filter
- Relieving pressure from the fuel line: How to relieve pressure in the fuel line?
- We treat the filter mount with penetrating lubricant (wd-40) if you have a 2111 1.5 liter engine.
- We take keys 17 and 19. With one we hold the filter from rotating, with the other we remove the fitting of the fuel supply line.
- Take an empty 0.5 liter container and pour out the remaining gasoline from the fuel line.
- We unscrew the fitting of the fuel outlet pipe.
- Disconnect the fuel line tubes from the filter and use a 10 mm wrench to unscrew the fuel filter coupling bolt.
With the fuel filter of a 1.6L engine, everything is much simpler - remove the fuel line tubes from the filter by pressing the fuel line clamps.
Installing the fuel filter
- First of all, we change the O-rings at the ends of the fuel pipes.
- Install the filter in reverse order.
The only thing to consider is the direction of the filter. There is an arrow on the gasoline filter housing indicating the direction of gasoline flow. If you have a 1.5 engine, then the arrow should be directed to the left side, if 1.6 - then to the right side.
Checking the connection
- Turn on the ignition for 6-7 seconds, then look at the fuel filter and look for traces of leaks.
- If necessary, you need to fit the fuel pipes onto the filter more tightly.
How to make a replacement
Before changing the fuel filter on a VAZ 2114, you should prepare all the necessary tools and materials, including:
- set of open-end wrenches;
- new filter;
- a pair of containers;
- O-rings for the fuel line.
While performing the work itself, you should follow the safety rules:
- before starting any manipulations with the fuel system, you should disconnect both terminals from the battery;
- do not smoke or use open flames during work;
- place all used rags in a metal can;
- prepare possible fire extinguishing means in advance.
Measuring pressure in the fuel rail
The filter replacement itself is carried out in several stages, the first of which is relieving the fuel pressure.
To produce it, you need:
- Put the car on the handbrake and turn it to neutral.
- Remove or move back the rear seats.
- Find a service hatch in the floor and open it.
- Disconnect the fuel pump connector through the hatch.
- Start the engine and wait until it stalls.
If for some reason you can’t remove the chairs and get to the access hatch, then you can go the other way:
- disconnect the terminals from the battery;
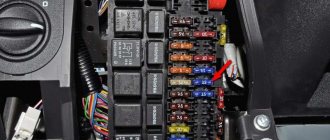
- remove fuse F3 in the common block (it protects the fuel pump circuit);
- connect the terminals to the battery, start the engine and wait until the remaining fuel is used up.
After the pressure in the fuel line has been relieved, you can begin to replace the filter itself.
Replacing the fuel filter
To do this you will need:
- Place the car in a pit or on an overpass.
- Place a container to collect fuel under the filter location.
- Using keys 17 and 19, unscrew the fitting of the fuel supply line.
- Unscrew the fuel outlet pipe fitting in the same way.
- Drain the remaining gasoline from the system.
- Loosen the clamp securing the fuel filter housing.
- Remove the old filter.
Installation of the new device is carried out in exactly the same order, but in reverse order (in this case, when installing the filter, you should take into account its working direction, indicated by arrows on the housing).
Removing the fuel filter
It is also worth noting that the entire replacement scheme above is suitable for filters used on 2114 with an engine capacity of 1.5 liters. On cars with an engine capacity of 1.6 liters, to replace it, simply open the latches holding the old filter, remove it and install a new one.
When installing a new filter, it is important to ensure that no fuel gets on its outer surfaces, especially on the sealing elements made of rubber. Even small drops of gasoline should be removed immediately with a dry cloth - this will help avoid chemical aging of materials and significantly increase the service life of the fuel filter. . Fuel filter direction
Fuel filter direction
After the replacement is completed, you should wait a little so that the air is displaced from the fuel system and the filter is filled with fuel. Then you will need to start the engine, let it run, and then carefully inspect the places where the filter is attached to the line. If gasoline leaks are detected, you should fit the filter pipes onto the fuel line hoses more tightly, then turn on the engine again and check the system for leaks again.
At the end of the conversation about the fuel filter, a few words should be said about the frequency of its replacement. So, it should be replaced with a new one when the first signs of a malfunction appear, regardless of the mileage. If the car is working properly and the filter shows no signs of clogging, then it is recommended to replace it at least every 20,000 km.
Sequence of replacement work
To replace the fuel filter on a VAZ 2115 you will need the following parts and tools:
- new filter;
- open-end wrenches for 17 and 19;
- socket wrench or socket 10;
- metal brush, rags;
- WD-40 cleaner;
- container for draining remaining gasoline;
- gloves and safety glasses.
The fuel filter on cars of the Samara 2 family is located on the bottom of the car between the gas tank and the luggage compartment. Therefore, to ensure normal access to the unit being removed, you need to install the machine on an inspection hole, overpass, or hang it on a lift.
Before carrying out work to replace the VAZ 2115 fuel filter, you need to remove the negative terminal from the battery. Then you should relieve the pressure in the fuel supply system and bleed gasoline through the fuel rail valve in the engine compartment.
Further work is carried out from below, from the trunk side of the car.
The bottom is the most contaminated element of the car body, so you first need to clean the filter and fuel supply lines with a metal brush, and also spray all threaded connections with WD-40 cleaner.
A container for draining fuel is installed under the filter element, then the filter fittings are held with a 19 wrench, and the nuts securing the fuel hoses are loosened with a second wrench (17). Before further actions, you need to wait until the remaining gasoline has completely drained from the loose connections.
After this, using a 10mm wrench, you need to unscrew the bolt of the mounting bracket that holds the fuel filter housing, and finally loosen the nuts of the fuel hoses.
After dismantling the filter device, you should check the condition of the rubber seals on the tips of the fuel lines. Damaged or deformed seals must be replaced with new ones.
If the VAZ 2115 is equipped with a new type of quick-release filter, then the replacement procedure is simplified: the plastic latches of the filter device are disconnected from the gas lines, the fastening clamp is unscrewed, and the part is removed from the car.
The new fuel filter is attached to the fuel lines and screwed to the bottom with a tightening bracket. Models with plastic clips are connected to gasoline hoses until a characteristic click is heard.
When installing the filter element, you must ensure its correct orientation. To do this, an arrow on its body indicates the direction of fuel movement. Some manufacturers, instead of arrows, put the following markings in the area of the fittings:
- IN: connection point for the fuel supply line (from the fuel tank);
- OUT: location where the exhaust hose is attached (to the machine engine).
For 1.5 engines with a fuel return drain system, the mark on the filter housing should be directed with an arrow towards the left wheel. For cars with a 1.6 engine, the arrow is positioned with its tip towards the right wheel.
After the work is completed, the battery is connected to the vehicle's electrical system, and gasoline is pumped into the fuel rail. To do this, turn the ignition key to the first position and wait for the fuel pump to operate. Without turning on the starter, repeat this procedure three times.
Next, the engine starts and the tightness of the fuel line connections is checked.
The procedure for replacing the fuel filter can be seen in the presented video:
Selecting a filter by manufacturer
Fuel filters for domestic cars, like other automotive consumables, are in constant demand among car enthusiasts. Therefore, a large number of domestic and foreign companies are engaged in the production of these devices. Based on the experience gained by owners of injection VAZs, the following conclusions can be provided about the quality of filter elements:
- Russian models with acceptable quality: “BIG”, “Nevsky Filter”, “Track”;
- imported products with high consumer properties: Bosch, MANN, Filtron;
- options with a controversial reputation: Zolex, SCT, AT, as well as unnamed Chinese-made products.
Some car owners of VAZ 2114, VAZ 2115 do not even think about the fact that it is necessary to change the fuel filter at least every 30,000 km. But in our realities (low-quality fuel), replacing the fuel filter for VAZ 2114, VAZ 2115 cars needs to be changed more often.