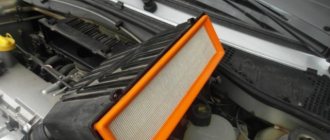
Due to the low quality of fuel at domestic gas stations, changing cleaning systems is an everyday procedure that can increase the service life of engine systems. You can understand that the screens are clogged and the fuel filter on Kalina (11173) needs to be replaced by the following signs:
- power failures during acceleration;
- difficult supply of fuel;
- the engine does not gain momentum;
- the pressure in the ramp drops below 2.3 atmospheres;
- The mileage on the old element is more than 30,000 km.
Service is carried out in 2 steps.
- Removing the coarse mesh.
- Changing the fuel fine cleaning tank.
At the same time, for the 1117 model there is no difference in the configurations; the 8-valve designs are repaired in the same way as 16-valve blocks.
1449644110_2279_4_13_01_kopirovat
Remove the fuel pump fuse from the mounting block.
Remove the fuel pump fuse from the mounting block.
Remove the fuel pump fuse from the mounting block.
We start the engine and let it idle until it stops due to fuel exhaustion. Then turn on the starter for 3-4 seconds. After this, the pressure in the fuel system will be released.
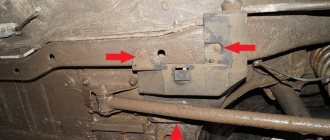
The fuel filter is mounted on the fuel tank next to the right side sill.
How often should you install a new one?
According to the manufacturer's service documentation, the fine filter element is replaced every 20,000 km.
For the grid, the service interval is 70,000 kilometers, driven by the tidy. However, in real operation, when it is necessary to change an element, the internal combustion engine itself will tell you. If problems arise, the power plant displays the following symptoms:
- loses power;
- periodically the engine does not start;
- the check light on the dashboard lights up;
- The speed fluctuates or dips occur during acceleration.
All these signs indicate a critical blockage of the mesh. In some cases, maintenance is required after filling with surrogate fuel. Some gas stations mix gasoline with unacceptable substances, which negatively affects the sensitive mesh.
1449643930_2279_4_13_06_kopirovat
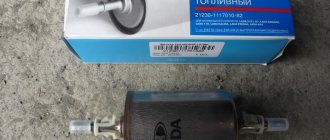
The arrow on the filter housing should be directed in the direction of fuel flow - towards the front of the car.
The arrow on the filter housing should be directed in the direction of fuel flow - towards the front of the car.
The arrow on the filter housing should be directed in the direction of fuel flow - towards the front of the car.
We put the tips of the fuel pipes onto the filter fittings until the clamps snap into place.
How does a fuel filter work?
If we touch upon the qualitative aspects of domestic fuel, they have long been the subject of many complaints. Note that in this regard, both the manufacturers themselves and the large army of Lada Kalina owners are indignant. Often, if you have no choice, you have to fill the tank of your “horse” with substandard fuel. Such gasoline is full of various impurities and abrasive particles, in addition to which there is also water. Among the factors causing fuel contamination are the following:
- storage for a considerable period of time;
- ingress of dirt and dust during transportation;
- reactions of a chemical nature that occur inside the tank, etc.
Abrasive particles can play a cruel joke on the engine, because they, along with the fuel, go straight into the combustion chambers. To prevent this negative point, manufacturers use filters. And you need a timely replacement of the fuel filter on your car. Read below about where it is located, how to remove a clogged filter and how to replace it with a new one.
These components include:
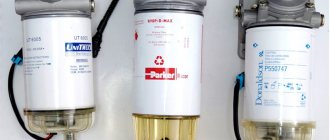
- coarse filters that can “stop” particles larger than 0.1 mm; such an element is a mesh with an appropriate cell size and is located in the fuel supply pump housing;
- filters designed for fine cleaning; they are capable of trapping smaller particles, the minimum size of which is 0.15 mm; the product is installed in the line between the tank and the motor.
The structural composition of the filter is as follows. A working element made of specialized paper is integrated into the metal body. Operation leads to gradual clogging of various kinds of particles and impurities suspended in the fuel. This prompts periodic filter replacement to be included in the mandatory list of work performed on the vehicle as part of scheduled maintenance. This approach is also valid for Lada Kalina.
How to remove door trim on Grant
Grant's suspension
Tuning Granta Liftback photo
1449643933_2279_4_13_07–2048×1365
The fuel filter must be located between stops that prevent it from moving in the bracket.
The fuel filter must be located between stops that prevent it from moving in the bracket.
The fuel filter must be located between stops that prevent it from moving in the bracket.
Having installed the fuel pump fuse, turn on the ignition and check the tightness of the connections.
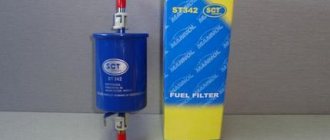
Replacing the fuel filter Lada Kalina
Is it important to change the filter?
According to the maintenance regulations, it needs to be changed every 30,000 kilometers. The figure is calculated taking into account the filling of high-quality, clean gasoline. If the quality factor of the fuel is in doubt, it is recommended to reduce the service interval by 2-3 times.
If you don’t change the consumables at all, the engine will act up and the load on the fuel pump will increase. Naturally with all the ensuing consequences.
The most popular filter brands:
- MANN – 820 rub;
- BOSCH – 450 RUR;
- HOLA – 400 rub;
- UFI – 250 RUR;
- PECAR – 310 rub.
If you go to a service station, the car owner will need to pay at least 1,000 rubles for everything. The final cost may vary in different regions.
Typical reasons for a clogged filter element on a VAZ
- operating the vehicle for longer than the recommended period;
- filling the fuel circuit with low-quality fuel, low-octane mixture for a long time;
- installation of non-original consumables;
- installation of spare parts from other technical equipment that are similar in appearance to factory ones;
- the machine was left idle for a long time, as a result of which the circuit became clogged and sediment formed.
...and their replacement
The Lada Kalina service book recommends changing the filter every 30 thousand kilometers or more often when using low-quality fuel. Unfortunately, it is impossible to check the quality of gasoline after each refueling, but the likelihood of dirty gasoline getting into the tank is high. For this reason, motorists change the element approximately twice as often as the car manufacturer recommends.
There are no recommendations on service intervals for the fuel pump mesh in the regulations. Motorists determine the need to replace or clean it independently. Signs of a dirty coarse filter include low fuel pressure in the power system and excessively loud operation of the fuel pump. It is useful to inspect the screen element each time there is a need to remove the fuel module.
Work on removing and installing fuel filters is carried out by disconnecting the negative terminal of the battery from the car body. The sequence of operations for the Lada Kalina station wagon, sedan or hatchback, as well as for modifications with eight or sixteen-valve engines, is the same.
Replacing the fuel filter
Replacing the Lada Kalina fine fuel purification element will not take much time. To work, you will need a container for remaining fuel, a screwdriver and a 10 mm wrench.
Before removal, relieve pressure in the engine power supply system:
- Use a screwdriver and open the fuse box hatch in front of the gear shift lever.
Using a screwdriver, use a screwdriver to open the fuse box hatch in front of the gear shift lever. - Pull out the middle fuse that powers the fuel pump.
Pull out the middle fuse that powers the fuel pump. - Start the engine, do not turn it off until the gasoline is completely exhausted. After stopping, turn the crankshaft once or twice with the starter.
It is more convenient to change this element on an inspection pit or a lift. Replacement procedure:
- Disconnect the negative terminal of the battery.
- Squeeze the clamps and disconnect the inlet and outlet tubes from the fine filter. Collect any remaining gasoline that leaks out into a container.
Squeeze the clamps, disconnect the inlet and outlet pipes from the fine filter - Loosen the bolt of the metal fastening clamp.
Loosen the bolt of the metal fastening clamp - Remove the filter and drain the fuel into a container.
Remove the filter, drain the fuel from it into a container - If a plastic clamp is installed, simply remove the fuel filter from it.
If a plastic clamp is installed, simply remove the fuel filter from it. - Install the new one, placing the arrow on the housing towards the front of the machine.
Install the new filter with the arrow on the housing facing towards the front of the machine. - Tighten the metal clamp bolt.
- Place the fuel inlet and outlet hoses onto the fittings. Press them against the filter housing until the clamps click.
- Restore power to the fuel pump, connect the battery.
- Start the engine, inspect the fuel line connections, and check for gasoline leaks.
When developing the Kalina, VAZ implemented such modern solutions as the production model, such as LED backlighting of the instrument cluster and keys, electric locking for reverse gear, perfectly illuminating headlights with electric corrector and polycarbonate glass without a lens, a heating and ventilation system with recirculation built into the instrument cluster trip computer... Compared to other VAZ models of the late nineties, Kalina stood out, as they say, to everyone.
Oleg Polazhinets
Wheels
Video: replacing the Lada Kalina fuel filter
Replacing the coarse filter
It is more convenient to change the fuel pump strainer when there is a minimum amount of fuel in the tank.
- Fold back the seat, lift the trim flap, and free access to the fuel pump hatch.
Remove the seat, lift the trim flap, free access to the fuel pump hatch - Unscrew and remove the hatch cover, remove dust and dirt from the fuel module cover.
Unscrew and remove the hatch cover, remove dust and dirt from the fuel module cover - Disconnect the electrical connector from the module.
Disconnect the electrical connector from the module - To relieve pressure in the power system, start the engine and wait for it to stop spontaneously after running out of gasoline. Turn the crankshaft two or three times with the starter.
- Turn off the ignition. Disconnect the battery from the car body.
- Release the clamps and disconnect the fuel hoses from the fittings on the fuel module cover.
Release the clamps, disconnect the fuel hoses from the fittings on the fuel module cover - Turn the module's clamping ring counterclockwise, resting the screwdriver against the protrusion.
Turn the module's pressure ring counterclockwise, resting the screwdriver against the protrusion - Remove the ring.
Remove the retaining ring - Pull the fuel module out. Drain the fuel from its housing.
Pull out the fuel module - Remove the rubber o-ring. To prevent dust and foreign objects from entering the tank, cover the hatch.
Remove the rubber o-ring - Use a screwdriver to press out the latch and disconnect the electrical connector on the inner surface of the fuel module cover.
Use a screwdriver to press out the latch and disconnect the electrical connector on the inner surface of the fuel module cover. - Hook it with a screwdriver and disconnect the drain tube from the module body.
Use a screwdriver to remove the drain pipe from the module body. - Press out the four latches.
Release the four latches - Remove the fuel module cover along with the electric fuel pump.
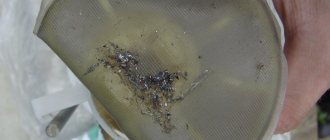
Remove the fuel module cover along with the electric fuel pump - Use a screwdriver to pry off the strainer from the fuel pump.
Use a screwdriver to remove the strainer from the fuel pump. - Install a new cleaning element. Assemble the module in the reverse order of disassembly.
- Install the hatch rubber gasket and the fuel module, pointing the arrow on the cover towards the car trunk.
Install the fuel module, pointing the arrow on the cover towards the trunk of the car - Secure the module with a clamping ring. Connect the fuel pipes and electrical connector.
- Connect the battery terminal. Start the engine, inspect the connections of the pipes with the fittings, check for fuel leaks.
This is interesting: Administrative regulations of the Ministry of Internal Affairs
The owners named two reasons for the “jerking” of the LADA Vesta SW Cross when starting off
The clutch and sensors remain the weak points of the improving Vesta.
Photo: LADA Vesta SW Cross, source Auto.ru
The network is replete with complaints from owners of LADA Vesta SW Cross with manual transmission about “jerking” when starting off, which begins at low mileage. Motorists on Drive2 cited two main reasons for the problem.
Poor grip
“The mileage is 30 thousand, you start off like in a PAZ. It's shaking darkly. There is an idea to change the clutch. I bought a Lancer a year earlier, everything is fine, and the mileage is 85 thousand,” complained the owner of a 2022 LADA Vesta SW Cross with a 1.8 liter engine and a 6-speed manual transmission.
There are many complaints on the Internet about the quality of the clutch used by AvtoVAZ when assembling 1.8-liter “manual” versions of cars. “Vestovody” about, “I changed it at 20 thousand”, “We changed it at 18.5 thousand km under warranty for a reinforced version of Valeo. It’s great now,” “I started shaking at 15 thousand, I installed a disk from Sachs, now it’s beautiful.”
In addition, motorists note that the clutch warranty is valid for just 30 thousand km, and therefore there is no point in delaying a visit to the dealer - there is a high chance that they will replace it for free. AvtoVAZ admitted this mistake and now it is much easier to contact dealers. It is also recommended to adapt the “box” every 10 thousand km for prevention, or even pay attention to the LADA Vesta with a CVT.
Knock and absolute pressure sensors
However, the reason for “shaking when cold” in the LADA Vesta SW Cross and 1.8-liter sedans may not only be the clutch:
“Check the knock sensor. Vesta 1.8 MT, shook at 7 thousand km. When starting off, it felt like the engine would jump out from under the hood,” “The clutch was changed at 16 thousand, but after 3 thousand everything happened again. Three times over 3-5 thousand kilometers they made adaptation at OD. After replacing the absolute pressure sensor and the knock sensor, my grandmother whispered. Now it’s 65 thousand, everything is fine,” Fr.
Most likely, the problem lies in the knock and absolute pressure sensor. So far the developers have not recognized the problem at the official level.
Photo: interior of LADA Vesta SW Cross 1.8 MT, source drivenn.ru
On this topic:
Toyota Land Cruiser 300 will become cheaper: The Japanese are preparing a version for India
A cheaper Kruzak may also appear in Russia. It’s interesting that owners of 1.6-liter West cars with manual transmission were less affected by the “twitching” problem. The car “shakes” less often, and “treatment” is easier and more effective. Moreover, clutch analogues in this case are of higher quality and the choice is wider.
First of all, owners of LADA Vesta SW Cross, if such problems arise, are recommended to contact the official service, without fear of “tales from the Internet” about the indifference of dealers.
Signs of product wear
The first and main sign indicating possible malfunctions is the obvious smell of gasoline in the car's interior. If there is no smell, you should pay attention to the appearance of the hose itself and its condition. Bend the product in different directions, but there should be no cracks or holes. If there is damage (even minor), the hose must be replaced. In addition, there are often situations where the cause of fuel leaks is the connection between the hose itself, for example, with a metal tube of the fuel rail or a connecting tube coming from under the bottom of the car.