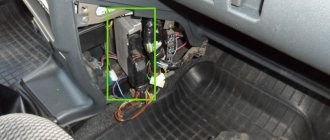
The electronic control unit is located under the instrument panel. To replace the electronic control unit, you will need a Phillips screwdriver. Remove.
2. Use the blade to cover the floor tunnel on the right.
3. Take hold of the protrusion two by one and move the fixing bracket of the plane along the connector until it stops.
4. Disconnect the block from the ECU from the wires.
5. Unscrew (not completely) the two nuts of the ECU mounting bracket.
On the opposite side, the bracket with the ECU nut is not secured
6. Move the bracket to the right with lifting and lifting the ECU slightly up, remove the ECU from Install
car ECU in the reverse order of removal.
electronic A faulty unit can only be replaced with a new unit in which the anti-theft function is not activated.
such When replacing the ECU, it will allow the engine to start regardless of the immobilizer.
To activate the anti-theft function, carry out the immobilizer training procedure.
activation For the anti-theft function of the new controller, it is necessary to perform a training procedure using the existing working and training keys.
The ECU on the Priora is located under the instrument panel on the right side. In order to get to the engine control unit, you need to remove the plastic plug of the floor tunnel at the feet of the front one. the passenger behind it is a controller, which is clearly visible in the photo below.
In order to replace (remove) the brains on a Priora, you will need the following tool:
- 10 mm head
- extension
- ratchet or
For M-74, the process of turning off the immobilizer will look like this:
Disconnect the battery, disconnect the immobilizer control unit from the network. A harness with cables and a double switch is connected to the immobilizer. The circuit is connected to the battery and computer using a VAG-COM adapter. The first button of the switch is activated, it “gives the go-ahead” to change the code. The code is changed in the WinFlash program. First of all, in the settings you select the module type and the information transfer speed parameter. The second switch button is activated; it is responsible for communication between the computer and the immo control unit. The standard lock code is retained, and the Eeprom cell data is overwritten. The whole process takes a long time, but you need to wait for contact. Upon completion of the recording process, the control unit is connected back to the vehicle network, and the battery is started.
Conversion of the comfort block
To recode the comfort unit, you need to connect the VAG-COM diagnostic adapter to the car and computer. To connect it to the vehicle's comfort unit, you need to turn the key, check the coding code for the comfort unit used on your vehicle and write it down, as it may still be required.
Go to the official Vag-Com website, enter the code of your comfort unit in the “Encoding” field and click the “Decrypt” option. A complete breakdown of the unit’s functions will appear on the monitor. Active functions are marked with a green light and a check mark. If you don’t need some functions, make them inactive, and enable the inactive ones that you need.
Check if everything is connected and activate. To activate the selected options, enter the new code in VAG-COM. If you mess up, you'll have to reset the new settings, enter the old code and start all over again.
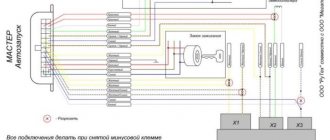
Two autostart connection schemes
Priora where is the oil pressure sensor located photo 16 valves
Autostart is implemented in different equipment models in different ways. Typically, two wires coming from the “power” connector must be connected to the gap in the standard wiring connected to the starter (pin “50”):
Autostart and alarm Starline A91
What is indicated above is the first option, but not the only one. Before installing an alarm system on a VAZ, ask how autostart works in it. Perhaps an “alternative” version of the scheme is used:
Autostart, Tomahawk brand equipment
Here, as you can see, there are two different circuits connected at the “T” point.
If the scheme is implemented in the first way, most likely, the signaling system is designed like this: by turning the key to the “Start” position, the owner initiates the triggering of the crawler. If the second option is used, the latter cannot be true. Thus, all crawler modules that have 4 taps (2 for antenna and 2 for power supply) are not applicable in any way in the second case.
“Thin” wires – antenna terminals
The connection is made through a break in the standard wiring or using inductive coupling. Both options are discussed below.
Schematic diagram (pinout) of connecting the front wiring harness on the Priora
Everything about the timing belt: what it is, explanation, where it is, how to find out what needs to be changed, types, prices, photos
The front part of the vehicle's electrical circuit is designed to supply voltage to the primary and auxiliary power circuits of the vehicle's on-board systems. The decoding of contact group chips is as follows:
- 1 – starter power supply;
- 2 – battery;
- 3 – charge supply from the generator;
- 4 – connecting block for the bundle (1 – 3);
- 5-7 – power supply to the device;
- 8 – engine compartment lighting lamp;
- 9-10 – head light;
- 11 – brake expansion tank level indicator;
- 12 – outside temperature;
- 13 – washer drive;
- 14 – external indication of reverse gear;
- 15 – cooling system fan;
- 16 – stove reducer;
- 17 – reserve resistor;
- 18 – wiper drive;
- 19 – interior relay and fuse module;
- 20 – stove motor;
- 21 – sound alarm indicator;
- 22 – horn power supply;
- A1/2, B1/2 – mass.
Error codes
In error mode, the computer may display the following codes:
- 2 - the network voltage is too high;
- 3 — malfunction of the fuel level sensor;
- 4 — malfunction of the coolant temperature sensor;
- 5 — outside temperature sensor error;
- 6 - engine temperature is too high;
- 7 - low pressure in the lubrication system;
- 8 — malfunction of the brake system;
- 9 - low battery voltage.
After troubleshooting, you need to reset the error. If no action is performed within 20 seconds, the on-board computer goes into normal operation.
How to bypass the immobilizer
Review of the updated Lada Niva - photos, options, specifications
If a malfunction occurs in the anti-theft system, the car cannot be started with the key, the immobilizer sends a signal to the ECM to block the main systems. If the need arises to install autostart, the driver has a question about how to disable the Priora immobilizer himself.
Using a crawler
The use of an immobilizer crawler allows you to use the autostart procedure for a vehicle without dismantling or disabling the APS. You can make a device to bypass the system yourself or buy it and install it at a service station.
A simple walker consists of a relay, an inductor for pumping power to the chip, and a diode. A working key is wound to the coil, the circuit is mounted in parallel to the standard pumping coil.
Without a lineman
At the service station, a procedure is carried out to reflash the engine ECU in order to disable the immobilizer. If you have an adapter, laptop and software, you can perform this operation yourself.
To do this you need:
- Disconnect the negative cable from the battery terminal.
- Gain access to the ECM, disconnect the unit from the vehicle network.
- Remove it from the car.
- Remove the cover from the ECU, solder the resistor on the board to a position that allows reprogramming.
- Connect the board to the adapter that provides communication with the computer and supply power to it.
- Using the program, erase data from non-volatile EEPROM memory.
- Save changes, disconnect from computer.
- Resolder the resistor to its original place.
- Install the ECM into the vehicle's electronic system.
When this operation is carried out, the engine ECU stops receiving signals from the immobilizer.
Resolder the chip in the control unit
If there is no adapter and it is possible to supply power to the ECM during programming, it is recommended to unsolder the EEPROM memory chip. In its place, put a new clean chip or the same chip, but only reset it using a programmer.
See » Operating instructions for the StarLine A62 CAN alarm system and how to enable autostart
Disconnect the control unit
Physically disabling and removing the immobilizer from the Lada Priora is not possible, because it is integrated into the car’s comfort unit circuit. Disabling the power supply unit will disable the vehicle.
Advantages of cars with a comfort unit
The standard list of comfort systems on new versions of cars includes:
- interior lighting;
- remote opening and closing of locks;
- window regulators;
- signaling;
- anti-theft systems;
- mirror adjustment;
- heating of the rear machine.
Premium class cars are also equipped with other latest electronics developments that make it possible to create comfort in the cabin.
The driver can recode the settings to suit his own menu.
Removing and installing the computer on a Priora
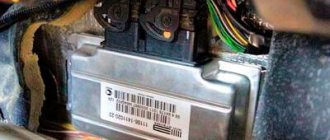
When the plug is removed, you need to find two nuts securing the ECU from the bottom to the metal strip. This can be clearly seen in the photo below.
It is necessary to unscrew the nuts securing the plastic strip on which the controller is located.
When both nuts are loosened, we move the bar towards the engine compartment literally 1 cm, after which we lift it up a little and move it to the side for removal.
Now we pull out the Priora engine control unit towards ourselves so that we can carry out further actions.
Now we unfold the block in such a way that it is more convenient to disconnect the block with the power wires. Next, you need to pull out the locking frame using a screwdriver or by hand, as shown in the photo:
And now the controller connector is disconnected without any problems.
Installation of a new control unit occurs in the reverse order of removal. It is advisable to carry out a similar procedure with the battery disconnected. If you need to replace the ECU on a Priora, then a new unit will cost at least 6,500 to 10,000 rubles. A used controller purchased from a disassembly unit can be purchased for 3,000 rubles.
Engine tuning Priora 21126 1.6 16V
Chip tuning of the Priora engine
For fun, you can play with the sports firmware, but there will be no obvious improvement; see how to properly increase the power below.
Priora engine tuning for the city
There are legends that the Priora’s engine produces 105, 110 and even 120 hp, and the power was underestimated to reduce taxes, various measurements were even taken in which the car produced similar power... what everyone decides to believe, let’s focus on the indicators declared by the manufacturer. So, how to increase the power of a Priora engine, how to charge it without resorting to anything special, for a small increase you need to let the engine breathe freely. We install a receiver, a 4-2-1 exhaust, a 54-56 mm throttle body, and we get about 120 hp, which is quite good for the city.
Boosting the Priora engine will not be complete without sports camshafts, for example, STI-3 camshafts with the configuration described above will provide about 140 hp. and it will be fast, an excellent city engine. The modification of the Priora engine goes further, sawn cylinder head, Stolnikov 9.15 316 shafts, light valves, 440cc injectors and your car easily produces more than 150-160 hp.
Electrical diagram of the dashboard (Torpedo) VAZ-2170 Priora
Part of the on-board network is designed to power the main group of vehicle equipment. The control and display elements of the instrument panel are concentrated here. The wiring supplies power to loaded parts and critical components:
- 1-3 – contact group of the front harness;
- 4 – supply voltage to the aft connector;
- 5 – power supply from the fuse panel;
- 6 – contact group of stops;
- 7 – instrument panel indication;
- 8 – control of illuminators;
- 9 – contact group of emergency airbags;
- 10 – horn;
- 11 – power supply of the diagnostic unit;
- 12 – on-board PC control;
- 13 – ignition coil controller;
- 14 and 15 – supply voltage to the EUR control unit;
- 16 – control of power window equipment;
- 17 – alarm relay;
- 18 – wiper regulator;
- 19 – air flow distributor for the ventilation system;
- 20 – stove;
- 21 – heater drive;
- 22 – heated rear wind window;
- 23 – onboard clock;
- 24-25 – radio connection;
- 26 – emergency warning button;
- 27 – glove compartment lighting;
- 28 – control button for the glove box illumination;
- 29 – bundle of wiring for ignition;
- 30 – to the emergency airbag control board.
- Central unit of body electronics Lada Vesta and XRAY (description, reviews) » Page 2 » Lada.Online
- Where is the VAZ 2110 and 2112 ECU 8 and 16 valves faulty and replacing the ECM
- Fuse box diagram for VAZ 21099 injector
- How to make a sound amplifier for a car with your own hands, assembly diagram of the device and its power supply for a car subwoofer, radio and speakers UMZCH rating
How it works and what blocks it
The immobilizer on Priora is designed to prevent theft of a vehicle by intruders. It consists of the following parts:
- APS unit, structurally combined with electrical package.
- A sensor, the presence of a key with a “native” chip in the form of a pumping loop wound around the ignition switch.
- Connecting wires for signal transmission.
- Keys with transponder.
When purchasing a car, the owner is given a special key with a red insert, which contains a chip that allows you to train working keys, and 2 working keys with programmable chips. The training key must be kept at home, because it gives access to setting up keys that the APS will consider “native”.
After activating the immobilizer and learning the working keys, the car can be started. But, only if the anti-theft unit “sees” the key with the transponder and a code is written in the chip that matches the information stored in the non-volatile memory of the APS.
In Priora, the immobilizer works as follows:
- When the working key is turned in the ignition switch cell, a voltage pulse is applied to an inductive coil wound around the lock, which excites electromagnetic oscillations in space.
- The switch contains an inductance in which the current strength changes, which allows it to receive a pulse from the pump loop.
- The capacitance is charged, supplying power to the chip with the code.
- The chip generates a return pulse, which is emitted into space and received by the pump loop.
- The signal enters the APS, where the codes stored in the block’s memory and the received codes are compared.
- If the data matches, the anti-theft device does not interfere with the operation of the engine ECU. If the codes do not match, the APS goes into protective mode, transmitting a signal to the ECU, which blocks power to the fuel pump, starter and ignition of the car.
Types of ECU memory
In order to perform its functions, the controller has to operate with a lot of data. Some of them are constantly in operation, others are loaded periodically. Therefore, memory is divided into three types:
- PROM is a programmable read-only memory device. It contains the so-called firmware - a program that controls engine operating parameters, such as fuel injection timing, ignition angle advance control, idle speed, as well as calibration data. This type of memory is retained when there is no power. Data changes are made using reprogramming.
- RAM is a random access memory device. Performs the same function as the RAM of a regular computer - temporary storage of information during one working session. This memory receives sensor data, stores diagnostic codes, as well as intermediate information about the activity of the microprocessor. It requires electric current to operate.
EPROM is an electrically programmable memory device. This type of memory is part of the standard anti-theft system. When starting the engine, the immobilizer control unit transmits codes to the Priora ECU, where password codes are located that allow or prohibit the start. In addition, the EPROM records deviations in engine operation. This memory does not depend on the supply of electricity and stores information in the controller permanently.
Types of ECU memory
In order to perform its functions, the controller has to operate with a lot of data. Some of them are constantly in operation, others are loaded periodically. Therefore, memory is divided into three types:
- PROM is a programmable read-only memory device. It contains the so-called firmware - a program that controls engine operating parameters, such as fuel injection timing, ignition angle advance control, idle speed, as well as calibration data. This type of memory is retained when there is no power. Data changes are made using reprogramming.
- RAM is a random access memory device. Performs the same function as the RAM of a regular computer - temporary storage of information during one working session. This memory receives sensor data, stores diagnostic codes, as well as intermediate information about the activity of the microprocessor. It requires electric current to operate.
- EPROM is an electrically programmable memory device. This type of memory is part of the standard anti-theft system. When starting the engine, the immobilizer control unit transmits codes to the Priora ECU, where password codes are located that allow or prohibit the start. In addition, the EPROM records deviations in engine operation. This memory does not depend on the supply of electricity and stores information in the controller permanently.
What data goes to the controller
The Priora ECU operates in the mode of continuous reading of information from sensors. Based on this information, the computer makes decisions about changing the operating modes of the engine systems. The types of data entering the controller are as follows:
- electrical voltage in the car network;
- presence of detonation in combustion chambers;
- vehicle speed;
- cooling system temperature;
- amount of oxygen in exhaust gases;
- air flow;
- temperature of the air entering the intake manifold;
- position of the camshaft and crankshaft;
- throttle position.
Characteristics of the immobilizer on Priora
Before you activate or disable the immobilizer yourself, let's look at the main characteristics. How to find the device, what is its operating principle and what disadvantages will the car owner have to face? We will answer these and other questions below.
Operating principle and device
The standard alarm system works on the principle of exchanging information with the control unit, depending on the situation, allowing or prohibiting engine starting. The immobilizer can only allow the engine to start if it successfully reads the key code. If the system does not recognize the key, then when you try to start the engine, the immobilizer will block the fuel pump circuit, as well as the ignition system. The procedure for exchanging information between the immo and the control unit is carried out via the K-Line diagnostic line. This means that there is a possibility that the system settings may be disrupted by interference from mobile gadgets, in particular if the ignition is activated (video author - Pavel Master).
In addition, you need to take into account that in cars with immobilizer it is undesirable to completely discharge the battery. In this case, chaotic data may be recorded in the system memory, which will require a trip to the service center. As for the device, it is identical to the APS-4 systems, which have been successfully used in VAZs since the early 2000s. The only difference is that the code itself is integrated into the ignition key, and the reader must be located in the steering column. It should also be noted that the activated immo can control the rear fog lights and power windows.
The design of the device is based on a microcontroller based on PIC16C65B, as well as a K-Line circuit designed to exchange information via the diagnostic bus. The device also includes an EEPROM memory where learning combinations are stored. It should be taken into account that the APS-6 module can be installed in the housing of the APS-4, of which, apparently, there were quite a lot of them at one time. During car production, the microchip is installed inside a standard remote control designed to control the central locking or signaling system (the author of the video is the IZO channel))) LENTA).
Location
If you don’t know where the immo is located in your car, try referring to the service instructions - it should indicate exactly where the unit is located. The difficulty in this issue is that the manufacturer can install this unit in different places, so car owners often do not know where to find the immobilizer in their car. As a rule, it is mounted in the compartment for the audio system - just below the central part of the dashboard. The electronic control unit is located in the same place.
Pros and cons of the standard protection system
Before we tell you which alarm connection points are used to activate it, we will briefly consider the main advantages and disadvantages of the systems.
Let's start with the advantages:
- if there is an immobilizer, the car owner does not need to crash into the wiring in order to ensure the safety of his vehicle;
- alarms installed additionally block only one electrical circuit when attempting to break into a car, and it will not be difficult for a professional attacker to bypass this circuit;
- inability to operate the vehicle with the immobilizer activated.
We also suggest that you familiarize yourself with the main disadvantages:
- the system may “glitch”, and failures, as a rule, occur much more often than with conventional alarms;
- lack of autostart function;
- in the case of third-party alarms, disabling the system will be easier than in the case of immo;
- no feedback.
Comfort block problems and their elimination
The most common cause of malfunctioning lighting, opening and closing windows and doors, locks and other elements are rusted or burnt (sticking) contacts of the comfort unit relay. They usually deteriorate due to moisture getting on the wires and the comfort unit.
If a faulty device is left in place or removed, the comfort functions will no longer function. Many car owners, due to the high price and complexity of connecting new blocks, tend to buy a used block or try to repair an old one.
The repair involves re-soldering, since the comfort block is a circuit, and if it doesn’t work, it means something has fallen off, burned or become corroded. Before starting repairs, you need to find out which relay is broken. In most cars, the comfort unit is located under the driver's seat.
To get a block, you need to:
- disconnect the battery;
- Unscrew the screws from the rear seat, usually they are hidden under a plug;
- from the driver's seat, unscrew the nuts using a ratchet wrench;
- squeeze out the plastic plug with pliers;
- pull out the seat;
- unscrew the terminals from the seat and remove it;
- unscrew the nuts and plugs and remove the cover plate;
- bend the carpet on the floor;
- if there is dampness, dry the floor and wires using a heat gun.
In some car models, the seat does not need to be removed. You can simply move the driver's seat all the way, remove the cover at the hood release handle and the plastic platform under the feet (by unscrewing the nut). Then remove the plastic sill from the driver's door opening and fold the mat toward the passenger side.
Underneath there is a thick wiring harness that goes to the comfort unit (black box). The wires are wrapped with rag tape. In the place where the adhesion is broken, the electrical tape will turn green due to oxidation.
To identify all damage, you need to go through the wiring going to the comfort unit. To do this, you can resort to the help of an electrician. He will test the wiring with a multimeter to determine which pin is faulty. Next, touching the contact with one probe and the block connector with the other, you need to set the tester for continuity.
This way you can determine which relay it will fit. This is an economical and lightweight option. You can use a labor-intensive but more reliable method. To do this, you need to remove the unit from the car, disassemble it and unsolder the relay one by one, checking where the bad contact is. Then check the resistance at the relay contacts in the on and off states.
If even a very small resistance is detected, the contacts are burnt, and therefore the voltage drops across them. Once the faulty relay is identified, all that remains is to replace it and solder it. If you do not know how to use a soldering iron or are unfamiliar with basic concepts in electronics, it is better to contact a workshop.
Sometimes it is enough to clean the relay contacts with fine sandpaper and wd-40.
Video “How to reprogram a standard alarm with your own hands?”
Detailed instructions for reprogramming the standard alarm are given in the video below (the author of the video is the Priorovod channel).
- We study the main malfunctions of the immobilizer
- General check before troubleshooting
- Main signs of immobilizer malfunctions
- What are the types of immobilizer malfunctions?
- How to fix immobilizer faults
Imagine a modern car without a security system thought out to the smallest detail. True, very difficult. Vehicles from the beginning of the last century immediately come to mind. But now you need to protect yourself as much as possible from intruders who are trying to steal your “pet,” even if it is in the garage.
Perhaps one of the best and most thoughtful solutions to modern car security is an immobilizer. And although repairing this device, like every complex electronic device, is not easy, it is still more reliable with it. And remember that there are specialized agencies and service centers that will help you and carry out restoration. Alternatively, you can try to troubleshoot the immobilizer yourself by first studying the instructions for it in detail.
General check before troubleshooting
Before performing general troubleshooting on your vehicle's immobilizer, check the following and correct as necessary:
— if the battery is discharged, charge it completely, and then start looking for problems with the immobilizer itself;
- if the ignition key is not original, use one approved by the brand of your car, and then start working on the immobilizer;
— remove the key and look for problems with it only;
- remove additional electronic gadgets or parts that may interfere, and look for malfunctions in the immobilizer system.
Main signs of immobilizer malfunctions
The main signs of malfunctions that should not be ignored are the following:
— when turning the key, the starter does not respond;
- when you turn the key and hear the starter moving, but the engine is silent;
— the dashboard signals with a corresponding light and sound;
— the car does not respond to pressing the corresponding button on the key fob (unless, of course, the problem is due to dead batteries in it).
Everything listed above is the most common signs that the immobilizer requires specialist help: software restoration or firmware updating. If you ignore such signals of malfunctions or entrust the task to amateurs, then everything can develop into more serious problems.
What are the types of immobilizer malfunctions?
The following types of immobilizer malfunctions are distinguished:
1. Software malfunction, which implies the destruction of the program in the engine ECU, immobilizer, or key chip. This problem can be resolved. Restoring the program of the listed systems helps. The exception is the chip key, which sometimes has no duplicates.
2. A hardware malfunction in which microcircuits fail or irregularities occur in the wiring of any system component. In this case, the fault must be diagnosed and corrected.
How to fix immobilizer faults
The immobilizer is structurally designed in such a way that a problem that occurs with one of its units will disable the entire system of the device. But of all the faults, the most common ones can be identified.
Insufficient electrical contact between the receiver and the antenna
In this case, the immobilizer malfunctions extremely often. There have been cases when it was possible to start the car only after the twentieth attempt. This problem occurs due to shaking, the antenna and receiver connectors are made poorly, the contacts are oxidized or dirt and grease have gotten on them.
In this case, the contact does not disappear immediately, but after a certain period of time, which depends on many factors. To fix this problem, you need to disconnect the receiver and antenna, turn off its power, then treat it with a special agent that eliminates contamination and oxidation. If necessary, it is better to tighten the antenna contacts.
Poor contact of one of the electrical wiring connectors
This problem also occurs if the antenna connectors are dirty. To eliminate it, dismantle all immobilizer wiring and check the condition of each wiring connector and blocks. Clean them with a special cleaner and tighten as necessary.
Signs of the need for internal combustion engine repair
The reasons why the operation of the engine is disrupted are arranged in a small list, starting with refusal to start and ending with floating idle speed (this problem was removed on the 127 “engine”). Not all breakdowns end in capital damage - sometimes it’s enough to add oil, sometimes it’s enough to adjust the ECU settings.
Compression reduction
A decrease in cylinder compression below 16 atmospheres is a bad sign. Such a high limit corresponds to a compression ratio of 11.
Knocks in the engine
Engine knocks can come from several points. These could be hydraulic compressors, timing belt rollers or pins. The knocking noise could also be caused by low oil level. The answer to the question will be given by a thorough detailed inspection of all parts of the unit and checking the oil level.
Blue smoke from the exhaust pipe
The blue smoke that comes from the exhaust pipe appears when oil enters the combustion chamber. It can leak either from the valves or from under the piston. The result is the same: the oil is eaten up and blue smoke pours out of the chimney. Once the leak is located, half the problem will already be solved.
Troit motor
Sometimes in the cold the engine may stall - don’t be alarmed by this, because it may simply be one of the spark plugs that fails. In this case, we advise you to simply restart the engine and it will stop running.
How much does it cost to overhaul a Priora engine - average price
Self-repair of a Priora engine with 16 valves costs an average of 16-20 thousand rubles. The cost depends on the severity of the breakdown and may be lower or higher than this average range. Repairing a Priora engine can be entrusted to the wrong hands, but then you will have to pay for the work - sometimes the cost of repairs reaches as much as 40 thousand rubles.
This is an unreasonably inflated figure, because, as practice shows, you can rebuild the engine on a Priora, working at a moderate pace, in just three days - and three days of work is definitely not worth that kind of money. Don’t be afraid of not being able to cope - your Lada is easy to repair, and using the advice and “tutorials”, you will conquer even such a task that is impossible at first glance.
Standard ignition switch - article number, price, how it works, device
The module on Priora does not work directly with the components that initiate the engine start. For it to work properly, you need to wait a few seconds before starting until the fuel pump creates the required pressure. On the Priora, only wires are connected to it - the paths along which messages pass from the ignition switch to the electronic control unit.
The ECU of the Priora car just receives data about the position of the key and can crank the starter if this operation is “not blocked”. Due to a breakdown, it can only turn on the ignition, leaving the battery to work.
After the ECU key has turned, it gives commands to several parts at once. When you turn on the second position, let the fuel pump run for 5 seconds so that it pumps fuel from the tank closer to the engine.
When the starting process itself begins, the starter rotates - the force it creates goes to the crankshaft;
the ignition system element converts the low voltage current coming from the battery into a high one so that the spark plugs are “charged” and give a spark at the right moment;
The injector creates the first batch of air-fuel mixture to put it into the chamber, where everything is ready for it - the pistons “move”, the spark plugs spark.
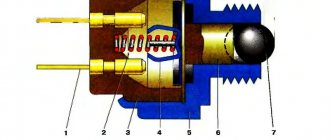
In the module itself, everything is simple - there is a cylinder with a return spring inside, between the coils there is a locking ball that does not allow it to curl up more than necessary, and a locking rod holds the structure in place. Finally, as a complication of the entire system, there is an “immobilizer” - an anti-theft system that you can install yourself. It just takes a long time to set it up.
A regular kit with a master key and several door cylinders (with an immobilizer) costs from 1,800 - 2,000 rubles, catalog number - 2170-3704005. A set without a master key (without an immobilizer) can be purchased for 1,200 – 1,400 rubles, article number -2170-3704006.
Signs of the need for internal combustion engine repair
The reasons why the operation of the engine is disrupted are arranged in a small list, starting with refusal to start and ending with floating idle speed (this problem was removed on the 127 “engine”). Not all breakdowns end in capital damage - sometimes it’s enough to add oil, sometimes it’s enough to adjust the ECU settings.
Compression reduction
A decrease in cylinder compression below 16 atmospheres is a bad sign. Such a high limit corresponds to a compression ratio of 11.
Knocks in the engine
Engine knocks can come from several points. These could be hydraulic compressors, timing belt rollers or pins. The knocking noise could also be caused by low oil level. The answer to the question will be given by a thorough detailed inspection of all parts of the unit and checking the oil level.
Blue smoke from the exhaust pipe
The blue smoke that comes from the exhaust pipe appears when oil enters the combustion chamber. It can leak either from the valves or from under the piston. The result is the same: the oil is eaten up and blue smoke pours out of the chimney. Once the leak is located, half the problem will already be solved.
Troit motor
Sometimes in the cold the engine may stall - don’t be alarmed by this, because it may simply be one of the spark plugs that fails. In this case, we advise you to simply restart the engine and it will stop running.
How much does it cost to overhaul a Priora engine - average price
Self-repair of a Priora engine with 16 valves costs an average of 16-20 thousand rubles. The cost depends on the severity of the breakdown and may be lower or higher than this average range. Repairing a Priora engine can be entrusted to the wrong hands, but then you will have to pay for the work - sometimes the cost of repairs reaches as much as 40 thousand rubles.
This is an unreasonably inflated figure, because, as practice shows, you can rebuild the engine on a Priora, working at a moderate pace, in just three days - and three days of work is definitely not worth that kind of money. Don’t be afraid of not being able to cope - your Lada is easy to repair, and using the advice and “tutorials”, you will conquer even such a task that is impossible at first glance.
How to activate the immobilizer?
Before starting use, it is recommended to activate the immobilizer.
In order to do this, you must follow these instructions:
- Take both standard keys, get behind the wheel and close the door behind you.
- Insert the key with the red mark (training) into the lock and turn on the ignition.
- After six seconds, turn off the ignition system. The indicator lamp in the instrument cluster will flash approximately 5 times per second, which is a sign of a normal learning process. If this does not happen, there may be problems with the immobilizer system or faulty components.
- While the warning light is flashing, you must remove the red key, insert a regular key into the lock and activate the ignition. This procedure should be completed within six seconds. The buzzer will confirm that the training has been completed correctly with three short beeps.
- Wait another six seconds, after which the buzzer should sound two additional signals. If this does not happen and the warning light stops flashing rapidly, then the learning process has failed and should be started again. If re-learning is also unsuccessful, then you should look for a malfunction in the system or key, which could have been previously trained for a different immobilizer.
- If training is successful, turn off the ignition. If it is necessary to train additional keys, then such actions are performed with each one.
- If you do not need to register additional keys, then immediately after the sound signals you must turn off the ignition and remove the regular key and replace it with a red one.
- Turn on the ignition and receive confirmation in the form of three beeps with the buzzer.
- In six seconds, two more signals should pass. After this, you can turn off the ignition, but do not remove the key from the lock.
- Six seconds after turning off the ignition circuits, the buzzer should sound once and the flashing frequency of the lamp should increase.
- After this, turn on the ignition (within 5...6 seconds) using the red key and turn it off after three seconds.
- After a few seconds, the buzzer should sound (three beeps) and the lamp on the instrument cluster should go out. The ignition can be turned on again no earlier than after 10 seconds. When using some controllers, sound signals may appear immediately when the ignition is turned off.
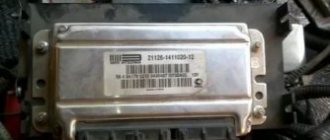
How to replace the Priora ECU
There can be many reasons for replacing the controller: the desire to install another model that can work with more efficient firmware, failure, incorrect operation.
You can find out which ECU is on the Priora using the diagnostic method, or by using the firmware identifier, which can be checked on a special website. Bosch M 10 and “January-7” controllers are installed on cars.
In order to change the ECU, you need to do the following:
- Disconnect the on-board system from the battery. To do this, simply remove the negative terminal.
- Remove the plastic lining of the tunnel on the right side.
- Push the bracket securing the connector with the bundle of wires all the way.
- Remove the block with wires.
- Unscrew the 2 nuts in the place where the Priora ECU is attached to the bracket.
- Lift the controller up and remove it through the right side.
As can be seen from the description, the procedure is very simple and does not take more than 5-10 minutes. Installation occurs in reverse order.
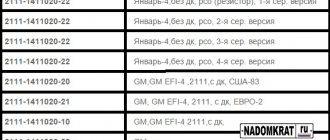
Types of ECU (esud, controller). What kind of ECUs are installed on VAZ?
"January-4", "GM-09"
The very first controllers on SAMARA were January-4, GM - 09. They were installed on the first models before the year 2000. These models were produced both with and without a resonant knock sensor.
The table contains two columns: 1st column – ECU number, second column – brand of “brains”, firmware version, toxicity standard, distinctive features.
| 2111-1411020-22 | January-4, without DC, RSO (resistor), 1st ser. version |
| 2111-1411020-22 | January-4, without recreation center, RSO, 2nd ser. version |
| 2111-1411020-22 | January-4, without recreation center, RSO, 3rd ser. version |
| 2111-1411020-22 | January-4, without recreation center, RSO, 4th ser. version |
| 2111-1411020-20 | GM,GM EFI-4,2111,with DC,USA-83 |
| 2111-1411020-21 | GM, GM EFI-4, 2111, with DC, EURO-2 |
| 2111-1411020-10 | GM,GM EFI-4 2111,with DC |
| 2111-1411020-20 h | GM, RSO |
VAZ 2113-2115 from 2003 are equipped with the following types of ECUs:
"January 5.1.x"
The following types of hardware implementation are distinguished:
- simultaneous injection;
- in pairs - parallel injection;
- phased injection.
Interchangeable with “VS (Itelma) 5.1”, “Bosch M1.5.4”
| 2111-1411020-71 | January-5.1.1, without dk, with |
| 2111-1411020-71 | January-5.1.1, without dk, with |
| 2111-1411020-71 | January-5.1.1, without dk, with |
| 2111-1411020-71 | January-5.1.1, without dk, with |
| 2111-1411020-71 | January-5.1.1, without dk, with |
| 2111-1411020-72 | Itelma, without dk, with |
| 2111-1411020-72 | Itelma, without dk, with |
| 2111-1411020-72 | Itelma, without dk, with |
| 2111-1411020-72 | Itelma, without dk, with |
"Bosch M1.5.4"
The following types of hardware implementation are distinguished:
- simultaneous injection;
- in pairs - parallel injection;
- phased injection.
Interchangeable with “VS 5.1”, “January 5.1.x”.
| 2111-1411020 | without dk, rso |
| 2111-1411020 | without DC, with (adjustable with scanner) |
| 2111-1411020-70 | BOSCH, without dc, with |
| 2111-1411020-70 | BOSCH, without dc, with |
"Bosch MP7.0"
As a rule, this type of controller is released onto the market and installed at the factory in a single volume. Has a standard 55-pin connector. Capable of working with recrossing on other types of ECM.
"Bosch M7.9.7"
These brains began to be part of the car at the end of 2003. This controller has its own connector, which is incompatible with connectors produced before this model. This type of ECU is installed on VAZ with EURO-2 and EURO-3 toxicity standards. This ECM is lighter weight and smaller in size than previous models. There is also a more reliable connector with increased reliability. They include a switch, which will generally increase the reliability of the controller.
This ECU is in no way compatible with previous controllers.
"VS 5.1"
The following types of hardware implementation are distinguished:
- simultaneous injection;
- in pairs - parallel injection;
- phased injection.
"VS 5.1" is interchangeable with "Bosch M1.5.4", "January 5.1.x".
"January 7.2."
This type of ECU is made with a different type of wiring (81 pins) and is similar to Boshevsky 7.9.7+. This type of ECU is produced both by Itelma and Avtel. Interchangeable with Bosch M.7.9.7. As for the software, 7.2 is a continuation of January 5th.
This table shows variations of the BOSCH ECU, 7.9.7, January 7.2, Itelma, installed exclusively on the VAZ 2109-2115 with a 1.5L 8kL engine.
Chip tuning LADA Priora in Nizhny Tagil
LADA Priora Chip tuning LADA Priora allows you to increase the dynamic characteristics of the engine without interfering with the engine design and replacing parts, by flashing the ECU and changing the engine control program. Chip tuning is safe and does not reduce the life of the engine and transmission. Each tuning firmware that we install on LADA Priora is commercial, that is, purchased by us from the best tuning studios in Russia. Here are some famous authors with whom we work: Paulus, Ledakol, Adakt, Motor-master.
With flashing it is possible to:
- Increase the power of a gasoline engine up to +10% hp.
- Increase diesel engine torque up to +10% HP
- Reduce accelerator pedal response time
- Disable software control of the catalyst and lambda probe after it
- Disable programmatically the first lambda probe (EURO-0)
- Disable the Absorber valve software
- Make individual adjustments
- and more... (check with a specialist)
Price list for chip tuning LADA Priora
| Model | ECU | Price |
| LADA Priora (2008-2010) | January 7.2, Bosch 797, Itelma M73 | 1,800 rub. |
| LADA Priora (2008-2010) | Avtel M73 (write protected) | 2,500 rub. |
| LADA Priora (2010-2014) | Avtel/Itelma M74, Bosch 17.9.7 | 2,500 rub. |
| LADA Priora (2013-present) | Avtel/Itelma M74.5, M75 | 3,000 rub. |
Computer diagnostics of the engine for errors is included in the cost of work. The prices indicated in the catalog may vary both up and down; check with a specialist for all the details by contacting us by phone or via social networks.
Didn't find your car? Contact us, I'm sure we can help you!
Why choose us?
- Our auto repair shop has been professionally engaged in flashing and chip tuning of cars for more than 6 years. The experience we have accumulated allows us to offer chip tuning for a large number of brands and models of cars. The experience of our work can be easily tracked in our group on VKontakte in which we regularly post photo reports of the work done, our experience and achievements. Car owners who have done chip tuning with us leave their reviews and tell us what has changed after the firmware.
- We use high-quality software from the best authors, such as Paulus, Ledakol, Adakt. We work with leading tuning studios in Russia and Europe, such as LabSpeed (St. Petersburg), SEDOX (Norway), ChipAuto (Latvia) and others...
- Our experience in optimizing engine control programs guarantees you that chip tuning will not affect the life of the engine and gearbox. All settings are within safe parameters, and you can be sure that our work will not harm the car.
- To reprogram electronic control units, we use only original equipment of Russian and European production: - Kess v2 Master and K-Tag Master from Alientech (Italy) - PCM Flasher, MMC Flasher, Combiloader (Russia) The amount of equipment allows us to offer our services on a wide range brands and models of cars. Most cars have the ability to reprogram via the OBD2 service diagnostic connector
- All the firmware we work with is configured based on the factory firmware, preserving all identifiers visible to the official dealer, so with us you don’t have to worry about the car being removed from warranty after our work.
- We are confident in ourselves and give a guarantee, money back and factory program, if you are not satisfied with the result of our work!
Comments
You can ask a question here that interests you, write your review or opinion. We will try to answer you as soon as possible.
Self-diagnosis systems
Like any computer, the Priora ECU has feedback from the user.
The driver learns about problems using signal codes, which can be seen in two ways: using an additional on-board computer connected to the diagnostic connector, and on the instrument panel after performing simple manipulations.
For self-diagnosis, you can install the following devices:
- State X 1 P Priora. A small device that is inserted in place of a standard button. Has an LED display with 3 characters. In addition to the diagnostic function using 30 parameters, it allows you to warm up the spark plugs during cold periods, independently regulate the temperature at which the cooling system fan turns on, and reset engine errors.
- Priora State Matrix. A more serious on-board computer. It is placed in place of the standard clock and has a graphic display of 128 x 32 pixels.
In addition to the functions listed on the previous computer, the device can work with gas equipment, reading gas consumption. The “Afterburner” function allows you not only to reset engine errors, but also to roll back the controller to its factory state, thereby resuscitating it. After activating this option, the “Priors” ECU mode will turn on, which was set at the factory. This bookmaker also has the ability to update the software.
Multitronics C-900. Universal on-board computer. Can be installed in different places. It has enormous capabilities both in diagnostics and adjustments. Suitable for a wide range of cars. It has a 480 x 800 pixel LCD display and the ability to change settings directly from your home PC.
Interpretation of the symbols for the rear wiring harness of the VAZ Priora
This part is organized to supply power to the main instruments and engine control system of the Lada Priora. From here, voltage is supplied to the main components, units of the vehicle’s power plant, as well as control sensors and ECUs. The standard electrical circuit connection system (pinout) looks like this:
- 1 – ECU power supply;
- 2 – main block of the electronic system to the dashboard;
- 3 – distribution board;
- 4 – speedometer;
- 5 – road surface roughness sensor;
- 6 – indication of pressure in the engine crankcase;
- 7 – TPS;
- 8 – DTOZH;
- 9 – indication of antifreeze temperature sensor;
- 10 – mass air flow sensor;
- 11 – control XX;
- 12 – main relay of the fuel pump;
- 13 – VT circuit fuse;
- 14 – relay BZ;
- 15 – fuse of the above circuit;
- 16 – ECU fusible link;
- 17 – DPKV;
- 18 – power supply for mass air flow sensor;
- 19 – phase distribution;
- 20 – mixture detonation sensor;
- 21 – EMC for purging the adsorber;
- 22 – diagnostics of the air flow sensor;
- 23 – power supply to the ignition coil;
- 24 – supply voltage to spark plugs;
- 25 – power supply to fuel injectors;
- 26 – terminal from the ignition coils to the ECM;
- 27 – feedback from 26;
- 28 – ECM connector to the injection system;
- 29 – response to the previous output;
- A – phase on the battery;
- B1/2 – ignition mass;
- C1 – mass from short circuit.
The rear part of the electrical wiring chain is responsible for the vehicle's lighting and peripheral systems. This includes lights, locks and windows. The pinout of tips and terminals looks like this:
- 1 – dashboard response;
- 2 – power supply for the door behind the driver;
- 3/28 – power supply for the front passenger panel equipment;
- 4 – maintenance of power windows and door locks;
- 5-6 turn signals;
- 7 – interior lighting;
- 8 – handbrake indication switch;
- 9-10 – aft dimensions;
- 11 – temperature inside the car;
- 12-15 – circuit breakers for lighting the interior of the machine;
- 16/17 – power supply to the devices of the aft right and front left doors, respectively;
- 18/19 – voltage to the rear right and left speakers, respectively;
- 20 – cigarette lighter power core;
- 21 – EBN;
- 22 – contact group of the cargo compartment lighting circuit breaker;
- 23 – heated rear windshield;
- 24 – luggage compartment lighting lamp;
- 25 – additional stop;
- 26 – power line to the electric lock of the luggage compartment lid;
- 27 – power supply for rear number plate illumination;
- A1-4 – mass;
- ХР1/3 – electrical package power controller.
The small harness, located in the luggage compartment, has only three terminals:
- 1 – power supply to the stern license plate lights;
- 2-3 – license plate lighting lamps;
- 4 – trunk lid lock motor.
The harness is routed to supply power to the driver's door equipment. There is an output to the key panel installed in the armrest. There are six elements in total:
- 1 – additional terminal to the rear of the machine;
- 2 – line to the left fuse;
- 3 – electric window drive;
- 4 – armrest control module;
- 5 – door lock drive;
- 6 – rear view mirror control chip.
The unit duplicates the voltage supply from the center console to the passenger keypad located on the right side of the car. There are only seven connectors here:
- 1 – continuation of the main highway to the rear;
- 2 – terminal of the line to the right front speaker;
- 3 – window lift drive;
- 4 – electric window lift button;
- 5 – door lock drive;
- 6 – control of the position of the rear view mirror, as well as heated glass;
- 7 – continuation of the highway to the rear.
Read more: Connecting a Pioneer radio by wire colors, diagram and video instructions
Circuit breakers
LADA PRIORA 21723
F1 (green) 30 Electronic engine management system F2 (blue) 60 power package control unit, engine fan, heated rear window, ignition switch unloading relay F3 (blue) 60 cooling fan power supply circuit, horn, alarm, ignition switch, instrument cluster, interior lighting, brake light, cigarette lighter F4 (blue) 60 Priora generator F5 (red) 50 Electromechanical power steering F6 (blue) 60 Generator
F1 (blue) 15 Main relay and starter interlock circuit F2 (brown) 7.5 Controller power circuit F3 (blue) 15 Electric fuel pump fuse K1 - Ignition relay K2 - Electric fuel pump relay
F1 25 Electric radiator fan of the cooling system F2 25 Heated rear window Priora F3 10 High beam right F4 10 High beam left F5 10 Sound signal F6 7.5 Low beam (left) F7 7.5 Low beam (right) F8 10 Alarm signal F9 25 Heater Priora F10) 7.
5 Interior lighting, instrument cluster, brake light F11 20 Windshield wiper F12 10 Terminal 15 devices F13 15 Cigarette lighter F14 5 Side light left, license plate light, trunk light F15 5 Side light right F16 10 Terminal 15 ABS F17 10 Fog light (PTF) left F 18 10 Fog lamp (PTF) right F19 15 Seat heating F31 or F27 30 Electrical package control unit