DIY speaker rings
Today, most modern vehicles come with standard speakers. However, lovers of loud music in cars are often not satisfied with their sound, so they buy larger speakers. In this case, a different kind of problem arises - how to install large-sized equipment in the cabin so that, on the one hand, it does not disturb passengers, and on the other hand, to create truly clear sound?
One of the common ways to solve the problem is to make podiums for speakers. They can not only improve sound quality, but also take the performance of the speaker system to a whole new level.
A DIY acoustic shelf allows you to mount speakers of different sizes and shapes
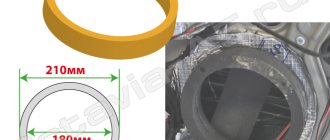
How to make spacer rings for speakers
You will need : plywood, drill, jigsaw, sealant, varnish.
The thickness, width and other dimensions of spacers for columns are calculated individually in each case, so there are no universal sizes of spacers. The diagrams presented above can act as a template, which will be modified locally.
The total thickness of the spacer is determined individually. Approximately, for a speaker mounting depth of 52 cm, spacer rings 16 mm thick should be suitable.
Procedure:
- Determine the outer and inner diameter of the rings (using a sample or speaker).
- Cut out the spacer slides with a jigsaw, having previously drilled holes for installing the jigsaw blade.
- Fasten all parts of the spacer (if they are composite) using glue or self-tapping screws.
- Try on the door spacers and modify them if necessary. Make sure that the spacers fit tightly to the surface, nothing interferes with the correct positioning of the speaker, and the door trim is installed without problems (modify locally).
- Coat the rings with several layers of varnish.
When installing spacers, make sure that it and the speaker are secured as tightly as possible (stick vibration isolator strips under the ring), this will eliminate the occurrence of vibrations and rattling. Seal all cracks using caulk. It is recommended to combine the installation of spacers with sound insulation of doors.
Algorithm of actions
For convenience, you can first drill holes around the perimeter of the cut
We cut the trim with a utility knife.
Install and secure the spacer
Attach the column to the spacer
Tags: spacer rings, router
Comments 98
Please tell me which in your opinion is better, kicx or ural? In terms of speakers. Thank you very much)
Read more: Parking near the bus stop
I understand which is better.))) But comparing my two options, which is better?
Well, as if Kicks and Urals are different... At least you wrote the models))) But I’ll tell you - listen and find out what’s best for you!
Kicx pd-5.2 and Ural ak47s comp.
You have to listen and then choose!))
Well, as if Kicks and Urals are different... At least you wrote the models))) But I’ll tell you - listen and find out what’s best for you!
There is an option to take either one or the other, I can’t choose (I already had Kicks like that. Not bad. They say that crossovers are an extra overpayment of money. You can get by with Conders, right?
I'm not your advisor here. I had neither one nor the other.
I tried everything and settled on the same device!
I tried to do it using something like a real radius bar (I drilled holes). I didn't really like it. It's more convenient with this thing.
Yes, any radius can be adjusted. I also made a sleeve and a pin on which I put this device. Otherwise the self-tapping screw will quickly gouge everything! I cut about 50 rings - the flight was normal. Instead of laminate, I used 1 plywood and fixed the knitting needles into the original plank of the router.
You need to make the base out of something solid, then it won’t gouge with a self-tapping screw. But even with a bushing the option is not bad!
If you have a cutter and don’t make a ruler, you can’t find a piece of plexiglass...
As you may have noticed, I made myself a ruler.
My friend, we made spacers in the Nissan Sunny in exactly the same way)) A convenient topic for a cutter!))
I wanted to share an idea on how to cut straight rings without a radius bar, but in the end I took it and made a radius bar)))))
Threat Respect for the idea!
Thank you! But this is not quite a radius bar. This one has an attachment to the base of the router and many, many holes for different diameters.
What you are talking about is just a type of radius bars. Moreover, it’s not the most convenient;)
But it is the cheapest and easiest to manufacture.
Nene, I’m talking about the inconvenience of branded strips that are screwed on and have holes
Understood. I've never worked with one like this.
But it is the cheapest and easiest to manufacture.
Read more: Fines based on VIN code traffic police website
I myself use one similar to yours, only welded (a friend cooked it). Very comfortably!
You will need : plywood, drill, jigsaw, sealant, varnish.
The thickness, width and other dimensions of spacers for columns are calculated individually in each case, so there are no universal sizes of spacers. The diagrams presented above can act as a template, which will be modified locally.
The total thickness of the spacer is determined individually. Approximately, for a speaker mounting depth of 52 cm, spacer rings 16 mm thick should be suitable.
Procedure:
- Determine the outer and inner diameter of the rings (using a sample or speaker).
- Cut out the spacer slides with a jigsaw, having previously drilled holes for installing the jigsaw blade.
- Fasten all parts of the spacer (if they are composite) using glue or self-tapping screws.
- Try on the door spacers and modify them if necessary. Make sure that the spacers fit tightly to the surface, nothing interferes with the correct positioning of the speaker, and the door trim is installed without problems (modify locally).
- Coat the rings with several layers of varnish.
When installing spacers, make sure that it and the speaker are secured as tightly as possible (stick vibration isolator strips under the ring), this will eliminate the occurrence of vibrations and rattling. Seal all cracks using caulk. It is recommended to combine the installation of spacers with sound insulation of doors.
Let us remind you that new speakers are not the only popular accessory for Lada Priora.
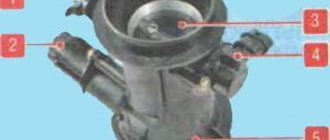
Machining a cylindrical hole
As a result of these actions, a cylindrical hole is formed suitable for installing speakers. Before installation is carried out, it is worth noting the need to paste the resulting cylindrical hole with Vizomat 10, as was the case at the stage of pasting the outer side of the wooden ring.
An aspect of gluing a cylindrical hole is the pursuit of two goals, among which are:
• protection of the column and its contacts from water (it can get on the column when the glass is completely lowered);
• creating a trumpet effect.
To achieve these results, Vizomat 10 is cut into thick strips, resulting in the Vizomat being several mm shorter than the cylindrical hole and not touching the completely lowered glass.
The density of the entire structure plays an important role. To achieve the optimal density, you can cover the circumference of a wooden ring with Bitoplast, as a result of which the mounted column will be pressed as much as possible against the homemade ring.
We install 16 cm speakers in the Lada Granta, and also cover their circumference with Bitoplast. This pasting is carried out in order to maintain the intensity of the sound, since air will not escape under the door trim.
At this point, the installation of speakers in the front doors of Granta is completed, and all that remains is to assemble the door. After such installation, the weight of the doors increases slightly and, accordingly, the protrusion from the installed column increases slightly.
What should a podium look like?
As follows from the above, the podium for the midrange or midbass is not a simple decorative element, but a necessary component of the audio system that affects the sound quality. To effectively perform its task—damping unnecessary vibrations—the podium must be heavy. The heavier the better.
In order for a part to be heavy, it must be made of the appropriate material. But in practice, plywood is most often used, since it is easy to process at home.
Did you know that archaeologists discovered the first archaeological artifact made from a material reminiscent of modern plywood in the territory of Ancient Egypt. The plywood casket dates back to the 15th-16th centuries BC. e.
Plywood is a relatively light material. To increase weight, podiums are made as large as possible. Of course, taking into account the features of the car interior.
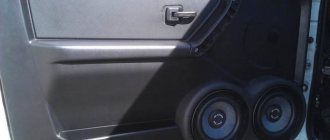
Installation of 16 cm speakers using spacers
A spacer is, in this case, a wooden product that follows the shape of the column. It is made in the form of a ring; the material used is usually fiberboard, MDF board or plywood. But even in this case, you may need to cut the metal of the door, which in my opinion is a little blasphemous in relation to the car.
Spacer made of two rings, MDF material
- The inner diameter of the ring is measured so that the speaker is freely attached to it, and for the best sound, they try to ensure that the speaker fits as tightly as possible to the ring.
- The outer diameter should be such that the column is attached tightly to the ring, and, if possible, fits behind the upholstery so that the metal of the door does not have to be cut.
The video below shows the installation of a 16 cm speaker system in the front doors of a Lada Priora. The principle is the same.
Video
Renault Logan 1.6 16V › Logbook › Installing component acoustics in the front doors
Hi all! Having heard the sound of high-quality audio systems in cars a couple of times, I wanted to build a similar system at home. The scheme is as follows: standard JVC head with AUX, USB, Bluetooth and four RCA outputs, four-channel Pride amplifier, 2-component acoustics in the front, coaxial acoustics in the rear shelf. That's basically it. Standard scheme.
I also note that the doors were previously vibration-soundproofed in 4 layers: vibration insulation of the external metal, a sound absorber inside the door, vibration insulation of the internal metal, a sound absorber between the card and the internal metal.
16.5 cm MDLab SP-C17.2 NEW component speakers were purchased for installation in the front doors. The remaining elements and their installation will be discussed in the following posts. Let's begin!
First of all, we remove the card; to do this, unscrew the 4 screws/screws and pull it off the clips.
The hole in the card, of course, is for the 13th speakers, so we cut out all the “extra” plastic until there remains a hole suitable for the new speaker.
The spacer is purchased, 22 mm thick, it needs to be filed a little so that the card will then fall into place, the cutout faces forward in the direction of travel of the car. The thickness of the spacer fits perfectly, and I advise everyone to take one.
Use a drill to make a hole for the wire.
The screws that were purchased turned out to be too short, so all the holes look like this.
The standard hole for the wires is clearly too small; the metal had to be bent. I didn’t want to do this, but I couldn’t think of another option.
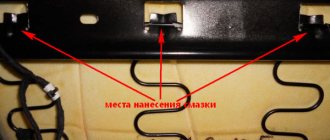
To ensure a tight fit of the spacer to the card, sealing and to completely eliminate rattling, I laid a bitumen cord under the spacer.
What advantages do podiums provide?
Before you start assembling a podium for speakers with your own hands for a car, it will not be superfluous to find out why they are made in the first place and what they provide.
Acoustic podiums objectively have a number of advantages. Someone simply mounts a speaker, which is quite powerful and of high quality, but decides not to use the podium. Although the sound quality will be much weaker than with an additional design.
It is also worth adding that there are no particular problems with installation. Here you definitely won’t have to cut out the metal elements of the door. But the noise will probably disappear, low-frequency sounds will increase, and the sound will become more transparent. Of course, if the driver is not a music lover and the main thing for him is that there is simply music, all these modifications will turn out to be superfluous and unnecessary. But those who understand car audio and love to enjoy music understand perfectly well that there is no place without a podium.
The podium also becomes a constructive solution that allows you to install speakers or loudspeakers of substantial size, for which the car does not have standard seats.
Regarding what else podiums can provide, it is worth emphasizing several points:
- creates a voluminous and most pleasant, high-quality sound;
- the design improves the appearance of the car if you choose the right materials and colors;
- with the help of a podium you can emphasize the beauty of branded and expensive speakers;
- the same podium easily hides external defects in acoustics;
- Various materials are suitable for manufacturing, among which the favorites are wood, carbon fiber and fiberglass;
- When finishing, you can use various coatings, including genuine leather, Alcantara, or regular carpet.
Renault Logan 2010, engine Gasoline 1.4 liter., 75 hp, Front drive, Manual — car audio
Comments 24
Like the metal of the door, I made even spacers
Judging by the gaps between the spacer and the door trim, then even slightly upward
But I thought, on the contrary, they stand down and play on the floor
Well, here, as much as anyone has enough imagination, some of these podiums with a turn of the speaker make their “eyes hurt.” And so, I repeat, my door is parallel to the metal, maybe a little upward, but I didn’t really notice it.
Great idea! I would do the same for myself, but the speakers won’t fit - they will be pressed against the glass by magnets
By the way, what is the advantage of large magnets on speakers? There are ovals on the shelf, their magnets are very healthy, and the new speakers with a smaller magnet sound better and louder. P.S. I don't know much about car audio.
I can’t explain correctly about magnets, I don’t have a technical education, I don’t understand the whole point yet. I watch a lot of tutorials on car audio on YouTube, but I haven’t come across a COMPETENT answer to this question. And about the sound, the answer is in the question itself - now your speakers are in a more correct place, they play in the volume of the door, nothing interferes with the propagation of the sound wave as in ovals (ovals are essentially anti-car sound))).
What is the best way to strengthen the walls of plastic spacers?
- Log in to reply to this topic
#1 OFFLINE ltd500
- From: Moscow
I understand that it sounds crazy, but there are reasons for this and this is a temporary solution, and I ask you not to throw poop. And I know it's better to replace it with something else
There are plastic spacers for the speakers in the front doors and they are of complex shape. For making them from wood or aluminum, they want some inhumane money, which I would rather spend on the speakers themselves
In principle, they are quite rigid, two-layer. But I understand that it is not enough and most likely they will rattle, so it occurred to me to strengthen their structure with a bay between the layers, something.
Renault Logan Stepway Authentique › Logbook › Front 16.5 cm in Logan
Hi all! I've done a lot of things to the car over the past month. It's time to share. I'll start with the last one... I replaced the front, the first owner installed 13cm Sony coaxial ones, in principle not bad, but you always want better. I installed JBL CS-760c component ones. Aaaand, immediately installed photos:
OK it's all over Now. The result on the doors was at the beginning.
PS photo for comparison of speakers:
In the comments, please do not write things like “I immediately had to make noise”, “about the location of the tweeters”, “guano columns”, etc. and so on. I will delete without a response. I like everything.
Well, I’ll answer questions about the case to the best of my ability)
Modern fashion for car audio
Today, most modern vehicles come with standard speakers. However, lovers of loud music in cars are often not satisfied with their sound, so they buy larger speakers. In this case, a different kind of problem arises - how to install large-sized equipment in the cabin so that, on the one hand, it does not disturb passengers, and on the other hand, to create truly clear sound?
One of the common ways to solve the problem is to make podiums for speakers. They can not only improve sound quality, but also take the performance of the speaker system to a whole new level.
A DIY acoustic shelf allows you to mount speakers of different sizes and shapes
Making a platform for a column
- Measure the size of the speaker for the radio. And also take measurements of the protective mesh.
- Draw a ring on the cardboard, taking into account the fact that the internal diameter corresponds to the diameter of the place where the column will be planted. And the outer diameter of the ring is equal to the diameter of the protective mesh. To get it right, you need to add 6 mm to the annular diameter. For a decorative ring.
- Transfer the cardboard model onto a sheet of plywood and trace it. It is better to take plywood of at least 8 mm.
- Cut out all the details - shapes. It is better to glue the decorative ring to the base and attach it with small nails.
Details for the podium