Make or buy
Let's start with the main thing. Namely, from the idea of modernization. The gearshift lever is usually located inside the case, and the top handle itself, which the driver grabs when changing gears, can be plastic, silicone, leather, etc.
The leather option is usually found on more expensive models. And in Soviet or old domestic cars, glass knobs with flowers, roses and other once-fashionable handle decor options are not so rare. Now some people appreciate rare solutions, trying to decorate the interior of their own car with something similar. Making a complete lever attachment from glass, plastic or silicone is quite problematic. It's much easier to buy it. But you can sew the cover yourself if you have certain skills and desire.
SWITCH MECHANISM
In the old box it is located at the bottom and bathes in an oil bath. After spending the night in the cold, the oil thickened, making it difficult to change gears for the first few kilometers. In addition, at the bottom of the box there were clamps for the rods and reverse forks, a reverse light switch, and a gear selection seal - all of these are potential sources of leakage. Sealants and other materials, of course, helped, but the problem was radically solved only by moving the mechanism upstairs.
The new mechanism is a separate module. It can be installed last and removed if necessary without disassembling the box. This is technologically advanced not only in production, but also in repair. Already at the concept stage developed by the VAZ team, a selector grill appeared in it, clearly repeating the gear shift pattern and setting the lever stroke when selecting gears. The mechanism includes a lock against accidental reverse gear, which is only accessible from neutral.
Having embodied the concept in metal and made it work correctly, the unit was sent for fine-tuning to the German company (Scha¨ffler), which has long been engaged in the engineering and production of engine, transmission and chassis parts. One of the most interesting changes proposed by foreign experts is the so-called three-dimensional central plate instead of several return springs and locks. Its spatial shape is calculated by a complex computer program, and the manufacturing equipment requires high precision. After all, the central locking ball walks along this plate, and it is this plate that sets the necessary forces when turning on and selecting speeds.
The characteristics of the mechanism were selected on the original simulation stand. The tester sits down on the seat and begins to go through the gears, while the automatic system imitates the shift pattern, forces and lever strokes implemented on a specific production car. You can also upload your own settings. Don't like an overly tight lever? A couple of taps on the keyboard and the effort is reduced. So, step by step, we selected the optimal settings for the “eighty-one”. The computer processed the data and produced parameters for constructing an accurate mathematical model, according to which those very tricky central plates were made.
Material selection
All work begins with the selection of material. Nobody forbids you to take some kind of rubber, fabric or any other option. But here the issue of practicality and operational stability should be taken into account.
It is optimal to choose one of the following materials.
- Leather. If we take practicality, quality, aesthetics and price-quality ratio, then leather cases are objectively the best. Only leather should be purchased specifically for cars, and not for haberdashery or furniture. These are materials that are completely different in quality and characteristics. Automotive leather has a polymer coating that additionally protects against mechanical damage, ultraviolet radiation, chemicals, oil, gasoline, etc. When selecting parameters, it is also worth choosing perforated leather without large pores;
- Eco leather. Fashionable and popular material based on polyurethane. Do not confuse with leatherette, which uses PVC. The latter does not breathe and has worse performance characteristics than eco-leather. Practical, inexpensive and easy to use. Although the skin is still a little inferior;
- Alcantara. A relatively new material that is very pleasant to the touch, does not fade, does not freeze, unlike leather, and does not crack. Don't be put off by the fact that Alcantara is thin. In fact, it is durable and wear-resistant. May cost slightly more than genuine leather. Plus, Alcantara is easier to work with and can be processed better.
Regardless of what you choose, each material is perfectly suited to the task at hand.
It doesn’t matter what kind of car you are going to sew a leather, eco-leather or Alcantara cover on.
But what if you turn to professionals?
Since the gearbox installed on the Lada Grant is cable driven, the only solution offered at the service station is to replace the cable.
The procedure is quite expensive, since workers will need a lot of time to replace. In addition, replacing the cable is not very effective - only the rattling disappears, but the vibration remains. And one more thing - a new cable will last for about 3-4 thousand kilometers, and then again you will have to go to a service station, which will lead to new expenses and another loss of time.
How does AVTOVAZ comment on this problem?
It is worth noting that the AVTOVAZ plant constantly holds so-called “Quality Days”, which you can visit and contact management with your complaints and suggestions. On one of these days, members of the Lada car lovers club expressed their complaints about the rattling gearbox. In response, it was stated that a more ergonomic cable drive is currently being developed. The design will use flexible cables, which will make it virtually impossible to transfer vibrations to the gearbox itself, so we will wait for the new product. Until then, we will fight the problem ourselves.
Recommendations for covering
First of all, you need to remove the handle from the main long gearshift lever. It is the handle that we will tighten. If you wish, you can also replace the cover of the lever itself, which hides the metal pipe in the tunnel. But more on that another time.
The task is to obtain blanks. Here is an option:
- wrap the handle with cling film;
- or just use a plastic bag;
- wrap tape (stationery or masking tape) on top, but most importantly tightly;
- Use a marker to apply future markings on the tape;
- Use a sharp knife to cut the wound tape;
- you will receive something like a blank or papier-mâché;
- remove, level on the table;
- Apply the completed patterns to the purchased material for reupholstery;
- cut according to the pattern, but make leather blanks literally 2-3 mm smaller, otherwise the cover will hang;
- step back 5 mm from the edge of the leather and go through it with a sewing machine (stitch);
- return the pattern to the gearshift knob, treating the reverse side with glue;
- when the glue fixes the handle, you can start sewing together the pieces of leather;
- insert good quality threads into the stitches of the seams and tighten them tightly;
- if leather was used, wet the material after stitching is completed;
- Replace the gear diagram, if there was one.
But there is another option. It is suitable for those who like the old case's shape and seam placement, but the product is simply worn out. To do this, carefully remove the old trim from the gearshift knob.
It will be used as a template for a new case. Cut out blanks from the new material in the shape of the old cover, and sew them together in the same way. The convenience of this option is that you do not need to measure anything, make markings, etc.
IMPORTANT! The cover should be sewn from the wrong side so that the seams are not on the outside. Then the comfort of gripping the gearbox will deteriorate significantly.
I think we can end here. If you have personal experience with gearshift knob trim, be sure to write in the comments, share your secrets and highlight the important points of the procedure.
Thanks to everyone who reads us! Subscribe, ask your questions and invite your friends to join us!
( 1 ratings, average: 5.00 out of 5)
Did you like the article?
Subscribe to updates and receive articles by email!
We guarantee: no spam, only new articles once a week!
Automatic transmission Jatco
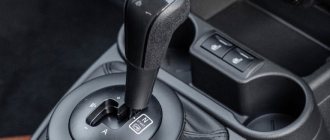
In August 2012, sales of LADA cars with Jatco automatic transmission began. To remove the handle, you must first lift the casing up and remove the two screws securing the mount to the rod. Then, on the bottom right side, disconnect the white wire that goes to the O/D button. By the way, the automatic transmission handle can be shortened.
How to change the gear knob on a VAZ 2114
Replacement of the gearshift knob is required only in case of mechanical damage. More often you have to remove and install it to replace a loose cardan or repair a broken lever bushing. The sequence of actions for dismantling the lever is as follows:
- remove the handle cover to open access to the handle mount;
- remove the hatch of the decorative plastic tunnel;
- unscrew the fastening screws;
- remove the plastic tunnel;
- unscrew the lever axle nut;
- remove the axle;
- remove the lever.
To install the lever in place, you need to do the following:
- insert the lever into its original place;
- apply lubricant to the lever axis or to the inner surface of the bushing;
- insert the lever shaft and tighten the nut;
- install a decorative tunnel;
- tighten the screws securing the tunnel;
- install a decorative hatch;
- put the cover on the VAZ 2114 gearbox handle and secure it.
We remove manual transmission 2181 on our own — Lada Granta, 1.6 l., 2013 on DRIVE2
Well, the moment has come when it needs to be repaired after installing the lock, everything goes wrong. I came from the south and inspected the seals, there was a barely noticeable stain from the seal, a month later there was a puddle on the protection and half of the gearbox housing, running from both seals. A vibration appeared at 100 km/h, not because of the wheels, but just in the gearbox, which is why the seals ground out. In general, I don’t have money for the service, I pick it myself. The plans include replacing all bearings, adjusting the preload in the differential, seals and 2nd gear synchronizer.
Today I managed to do a lot and it was only in 3 hours.
We remove the battery, air filter housing, corrugation, disconnect the air flow sensor and adsorber connectors
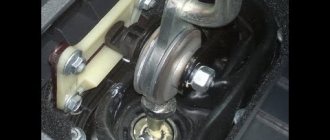
remove the plate under the battery 2pcs, disconnect the connectors from the reverse and speed sensors, remove the shift cables from the movable ball-shaped joints and then the plate securing the cables.
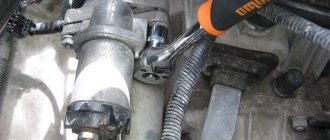
disconnect the clutch cable, remove the starter,
hang out the front of the car, climb down
This is how I found her a week ago
then drain the oil from below, unscrew the plate at the flywheel
now you need to remove the drive somehow
you will also have to remove the left lever, on the right we unscrew only the ball
We knock down the drive by additionally unscrewing the rear engine mount
Don't forget to unscrew the nut with the rod going to the manifold
We also unscrew the bolt of the lower fastening of the ignition module; it is screwed into the gearbox.
Remove the last support to the body, 3 nuts and 2 bolts in the cushion. Having previously supported the engine with a jack. Well, unscrew the last 3 bolts from the block, 2 on top and 1 on the front. After which you can remove the gearbox.
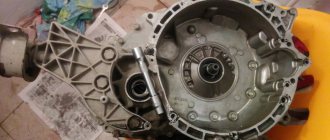
Removing the gearbox
Price: 10,000 ₽ Mileage: 38,500 km
Page 2
Well, the moment has come when it needs to be repaired after installing the lock, everything goes wrong. I came from the south and inspected the seals, there was a barely noticeable stain from the seal, a month later there was a puddle on the protection and half of the gearbox housing, running from both seals. A vibration appeared at 100 km/h, not because of the wheels, but just in the gearbox, which is why the seals ground out. In general, I don’t have money for the service, I pick it myself. The plans include replacing all bearings, adjusting the preload in the differential, seals and 2nd gear synchronizer.
Today I managed to do a lot and it was only in 3 hours.
We remove the battery, air filter housing, corrugation, disconnect the air flow sensor and adsorber connectors
remove the plate under the battery 2pcs, disconnect the connectors from the reverse and speed sensors, remove the shift cables from the movable ball-shaped joints and then the plate securing the cables.
disconnect the clutch cable, remove the starter,
hang out the front of the car, climb down
This is how I found her a week ago
then drain the oil from below, unscrew the plate at the flywheel
now you need to remove the drive somehow
you will also have to remove the left lever, on the right we unscrew only the ball
We knock down the drive by additionally unscrewing the rear engine mount
Don't forget to unscrew the nut with the rod going to the manifold
We also unscrew the bolt of the lower fastening of the ignition module; it is screwed into the gearbox.
Remove the last support to the body, 3 nuts and 2 bolts in the cushion. Having previously supported the engine with a jack. Well, unscrew the last 3 bolts from the block, 2 on top and 1 on the front. After which you can remove the gearbox.
Removing the gearbox
Price: 10,000 ₽ Mileage: 38,500 km
www.drive2.ru
How to eliminate the rattling of the VAZ 2114 gearbox handle
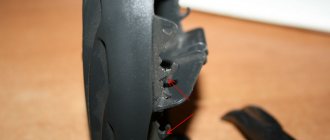
Often, the VAZ 2114 gear knob resonates with the operation of the engine and makes an unpleasant rattling sound due to the following problems with the bushing:
- wear of plastic bushing inserts;
- discrepancy between the length of the sleeve and the dimensions of the fork.
In the first case, you will have to change the plastic inserts or the bushing assembly. In the second, you will have to bring the dimensions into line. To do this you will need a file, electrical tape and a vice. Often the manufacturer installs a bushing, which with its edges touches the traction fork (stage) and knocks on it when it vibrates. To get rid of noise, you need to do the following:
- unscrew the bushing fastening;
- remove the bushing;
- clean (wash with kerosene) the bushing from any remaining lubricant;
- make preliminary markings by drawing a line 1-3 millimeters from the edge of the sleeve;
- wrap the sleeve with electrical tape along the marking line, leaving the edge open;
- Clamp the bushing in a vice and use a file to file off the edge protruding from the electrical tape.
After such an operation, all that remains is to put on the plastic inserts and put the gearshift knob in place. The edges of the bushing will no longer touch the metal fork and the VAZ 2114 gear knob will stop rattling.
However, you can remove the handle without removing the gearshift lever, following these instructions:
- We disconnect the exhaust pipe fastenings and move the exhaust system to the side, so it will not interfere.
Next, disconnect the gearbox control drive rod from the lower end of the lever and move the rod to the side.
In the VAZ's interior, unfasten the lever cover clasp and remove the cover along with the lower holder.
At the next stage, we lift the plastic lining of the tunnel, thereby removing it through the top of the gear shift knob.
Under the plastic lining is a noise-insulating cover, which can be removed by unscrewing four nuts.
- Everything is ready, to remove the handle, press on it and pull the handle out from below through the opening in the body.
If you carry out this work following these instructions, then you will not spend much time and effort on the entire repair.
Video on how to remove the gear knob on a Renault Logan:
Video about replacing the gearbox cover on a Passat car:
Tuning the gear knob:
== Disassembly and assembly of the synchronizer ==
Synchronizers of 1st–2nd, 3rd–4th and 5th gears are disassembled and assembled in the same way. We show the disassembly and assembly of a synchronizer using the example of a 5th gear synchronizer. Before disassembling, we mark the blocking rings and their position relative to the synchronizer clutch. Remove the blocking rings. We mark the position of the hub relative to the coupling and the position of the crackers relative to the grooves of the hub, so that during subsequent assembly they will be installed in their original places. To disassemble the synchronizer...
...carefully slide the coupling along the hub, holding the balls with your hand to prevent them from “shooting out”.
5th gear synchronizer parts:
1 – coupling; 2 – ball; 3 – cracker; 4 – spring; 5 – hub. Before assembly, we inspect the synchronizer parts. Nicks and chips on the splines of the hub and coupling, the gear rims of the locking rings and the coupling are unacceptable. We replace defective parts with new ones. If there is significant wear on the working conical surface of the blocking ring (the minimum permissible axial clearance between the ends of the gear rims of the gear and the blocking ring is 0.6 mm), it must be replaced. For ease of assembly of the synchronizer, generously lubricate the springs, crackers and balls with grease. Putting the hub on the workbench...
...insert springs into the hub sockets, and crackers into the grooves - in accordance with the previously applied marks. We insert the assembled hub into the coupling, orienting it so that when the ball is subsequently installed...
...it would be located exactly in the middle part of the coupling groove - in its deepest place.
Place balls in the holes of the crackers...
...and, pressing each ball in turn with a screwdriver... ...we push the hub along the splines of the coupling.
When installing the synchronizer on the shaft, the grooves on the coupling and hub must face: – for the 1st–2nd gear synchronizer – towards the 1st gear gear; – for the 3rd–4th gear synchronizer – to the 3rd gear gear; – for the 5th gear synchronizer – to the thrust plate of the shaft bearings.
Grooves on the clutch and synchronizer hub.
Clutch, gearbox, transmission Lada Vesta
Products from the Dustershop77 range on the topic of the article:
| Name | Manufacturer | Price | Availability | Add to cart |
| DC709 | Gas pedal cover for Duster 2015 / Captur / Logan / Terrano / Vesta / Isk-Ray | Duster-Guard | 1000 / 800 rub. Discount: 700 rub. | >10 |
| DC952-7703062062 | Gasket for gearbox drain plug, transfer case Renault Duster / Terrano / Captur original 7703062062 | Original | 200 / 100 rub. Discount: 50 rub. | 3 |
| DC590-V053-1500403 | Carpet covers (6 pcs) Lada X-Ray | Pt GROUP | 2500 / 1900 rub. Discount: 1500 rub. | >10 |
| V021-01400404 / LVE111703 | Tunnel pads for carpet (2 pcs) | Pt GROUP | 1500 / 1300 rub. Discount: 950 rub. | 3 |
| V046 | Passenger carpet cover for Lada Vesta from 2022 | 1200 / 900 rub. Discount: 900 rub. | 2 | |
| DC589-V054-1500404 | Tunnel pads for carpet (2 pcs) Lada X-Ray | Pt GROUP | 1900 / 1500 rub. Discount: 1000 rub. | >10 |
| V086 | Rear seat carpet covers | ArmAuto | 1000 / 900 rub. Discount: 900 rub. | 1 |
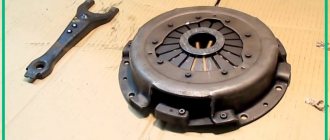
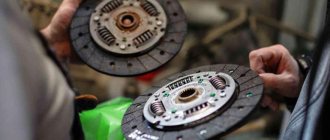
| DC524-302054100R | Clutch kit for 1.6 (H4M) 4×2 gearbox JR5 (5-speed) original art. 302054100R | Original | 7500 / 6900 rub. Discount: 6500 rub. | 1 |
| DC1560-8200884113 | Drive oil seal original Renault 8200884113 left | Original | 1000 / 800 rub. Discount: 700 rub. | 2 |
| DC422-510009710 | Release bearing H4M 4×2 JR5/JH3 5-speed. LUK 510009710 306200650R 7701478631 8200046103 8200764613 8200990502 306205482R 306205482R 306206219R 306201586R | Analogue | 4500 / 3900 rub. Discount: 3500 rub. | 1 |
| DC383-ASAM-30799 | Gear shift lever bushing ASAM-SA 30799 original art. 7700732903 | Analogue | 400 / 150 rub. Discount: 100 rub. | 2 |
| DC440-8200410813 | Drive shaft retaining ring original art. 8200410813 | Original | 500 / 300 rub. Discount: 250 rub. | 2 |
| DC956-7700102458 | Automatic transmission filter DP2 original 7700102458 | Original | 900 / 600 rub. Discount: 500 rub. | 1 |
| DC1667 | Clutch kit Vesta (1.6l 21129 + manual transmission VAZ / AMT) LUK | Analogue | 5500 / 4500 rub. Discount: 4200 rub. | 1 |
| DC882 | Carpet door sill covers Sandero 2014/Stepway 2014/ X-Ray | Duster-Guard | 2600 / 2000 rub. Discount: 1700 rub. | 4 |
| DC950-321031MG0B | Rear gearbox filler plug Renault Duster / Captur / Nissan Terrano 4x4 321031MG0B | Original | 1000 / 800 rub. Discount: 700 rub. | 1 |
| DC1316-8201630012 | Guide (tool) for centering the clutch and release (H4M-JR5/JH3) original 8201630012 | Original | 2000 / 1800 rub. Discount: 1600 rub. | 1 |
| DC1630-7703075180 | Filler plug for gearbox / transfer case original 7703075180 | Original | 200 / 150 rub. Discount: 100 rub. | 1 |
| DC1631-8200201381 | Transmission/transfer case filler plug gaskets original 8200201381 | Original | 500 / 350 rub. Discount: 300 rub. | 1 |
| DC1818-7701209239 | Outer CV joint boot Renault Duster, Terrano, Captur Renault Duster 1.6 4WD/1.5DCi 7701209239 original | Original | 3200 / 2500 rub. Discount: 1900 rub. | 1 |
| DC1708 | Tunnel linings for carpet Lada X-Ray 2015- | Duster-Guard | 2500 / 1700 rub. Discount: 1400 rub. | 2 |
| V045 | Driver's carpet trim for Lada Vesta from 2022 | 900 / 650 rub. Discount: 650 rub. | ||
| V047 | Tunnel carpet overlay for Lada Vesta from 2022 | 900 / 650 rub. Discount: 650 rub. | ||
| DC1956-21820160121100 | Clutch fork boot Grant, Vesta, X-Ray 21820160121100 | Original | 150 / 100 rub. Discount: 70 rub. | |
| DC1963-21102301035 | Left drive oil seal Vesta, Largus, X-Ray article 21102301035 (red 35x57x9) | Original | 200 / 120 rub. Discount: 80 rub. | |
| DC1964-21102301034 | Right drive oil seal Vesta, Largus, X-Ray article 21102301034 (black 35x57x9) | Original | 200 / 120 rub. Discount: 80 rub. |