The Niva Chevrolet door handle is a common consumable. More than half of drivers reinstall the part after the first year of using a new car. The reason for rapid failure is improper installation of the internal parts of the handle. The fastener bolts are overtightened, the locking and opening rods are stretched to the maximum, and you have to put a lot of pressure on the part to get into the interior. Read more about how to change the internal and external handles on the front and rear doors, as well as the causes of breakdowns and criteria for choosing a replacement part in our material.
Causes of malfunction
Experienced drivers, when buying a Niva, loosen the pull rods of the outer handle and additionally lubricate the movable parts. This allows you to increase the service life of the part up to 5 years. At the same time, the door will open and close smoothly, without knocking, and the lock mechanism will be stable.
If this is not done, after a year drivers will notice that a gap begins to form between the handle and the door, the element dangles, but the opening/closing process occurs smoothly. The reason is that the inner bracket or bracket that connects the inside of the handle and the door is sagging. Reasons for failure:
- The internal and external handle of the rear door of the Niva Chevrolet is made of plastic; the part breaks if you press hard on it.
- Door warp. To close the door on a Chevrolet Niva, significant force is required.
- Damage to internal mechanisms and lock cylinders.
- Corrosion, wear of movable parts of the locking mechanism.
- The rod is torn or stretched.
Regardless of the causes of the malfunction, during repairs it is necessary to remove the inner door trim and remove the locking mechanism from the car. Despite their simple design, door handles are not repaired, but replaced. In rare cases, when there is no suitable color of the upper adjustment on the market, the internal mechanism is reinstalled into the old cover.
How not to slam a door loudly on a Niva
Sanek 18 Feb 2009, 00:27
Vitya wrote: Please note that I do not think that remodeling and finishing UAZs is not good! Vice versa! I respect those who took the UAZ as a basis and designed it for specific purposes - “dear to his heart”! ))))
The doors of VAZ 2104, 2105, 2106, 2107, NIVA do not close well. Part 1
Cleaning and lubrication, maintenance and adjustment of door
on VAZ 2104, 2105, 2106, 2107, NIVA
…
Adjusting door locks.
a little about adjusting door locks, how I adjust door locks. Vkontakte community …
. however, he also expressed his position.
+1. If for fishing, use a long trunk tow bar. For hunting, the silencer is quieter, the body colors are appropriate, and the locks are quiet. By the way! How to make the doors on Niva so that they don’t slam across the entire field? We're exhausted! We're scaring away all the ducks! Sanek Nivanuty Age: 23 Messages: 12976 Registered: January 31, 2009, 01:59 From: Tomsk Car: Lynx, Honda Steed 600, TTR 125 Gender: Male Advertising Register and read the forum without advertising. By the way, free advertising space on the right is sold for only 1000 rubles per month.
Tractor driver 18 Feb 2009, 00:39
Sanek wrote: How can you make it so that the doors don’t slam across the entire field on Niva?
don’t slam the door just a tractor driver Roadless sick Age: 24 Messages: 5985 Registered: Jan 13, 2008, 20:13 From: From the same gate as the rest of the people. (KGB) Car: Caterpillar Gender: Male
snake 18 Feb 2009, 01:00
Sanek wrote: +1. If for fishing, use a long trunk tow bar. For hunting, the silencer is quieter, the body colors are appropriate, and the locks are quiet. By the way! How to make the doors on Niva so that they don’t slam across the entire field? We're exhausted! We're scaring away all the ducks!
He lifted the handle, closed the door and pressed it tightly, released the handle, the door closed without a bang. snake Beginner flooder Posts: 152 Registered: Jan 22, 2008, 10:34 am Car: Japanese Niva Gender: Male
Sanek 19 Feb 2009, 21:36
So! The Ottoms have moved away! here we need to talk about the silent closing of doors on the Niva. And we're talking about the region. They say the locks on the doors can be put in a plastic box, and the doors will close like on a foreign car.
Sanya Nivanuty Age: 23 Messages: 12976 Registered: Jan 31, 2009, 01:59 From: Tomsk Car: Lynx, Honda Steed 600, TTR 125 Gender: Male
TDV 19 Feb 2009, 21:45
Sanek wrote: yes! The Ottoms have moved away! here we need to talk about the silent closing of doors on the Niva. And we're talking about the region. They say the locks on the doors can be put in a plastic box, and the doors will close like on a foreign car.
They're lying! TDV Beginner flooder Age: 32 Messages: 187 Registered: Jan 14, 2008, 21:45 From: Tomsk Car: UAZ 315201 Nissan Teana 4wd Gender: Male
Sanek 19 Feb 2009, 22:33
We just bought German locks on the eleventh day. Regular Toko locks in plastic. and the doors quietly closed.
Sanya Nivanuty Age: 23 Messages: 12976 Registered: Jan 31, 2009, 01:59 From: Tomsk Car: Lynx, Honda Steed 600, TTR 125 Gender: Male
Skay 20 Feb 2009, 20:56
Sanek wrote: yes! The Ottoms have moved away! here we need to talk about the silent closing of doors on the Niva. And we're talking about the region. They say the locks on the doors can be put in a plastic box, and the doors will close like on a foreign car.
Tools and Supplies
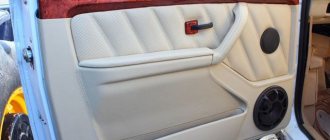
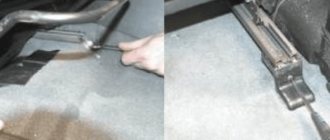
To get to the handle fastening bolts, it is necessary to dismantle the door trim. During the renovation process, removal and installation of cladding remain the most labor-intensive operations. A plastic film is installed under the door card, which protects the insides from dust.
It is recommended not to remove the boot completely; just peel off the upper left corner and unscrew the film to the middle.
For the work you will need the following materials and tools:
- key to 8;
- Phillips and flat head screwdriver;
- ratchet with extension;
- Fiol-1 lubricant.
Advertisements on NN.RU - Auto
Conversion of a cargo-passenger gazelle, an all-metal gazelle, an autoline into a cargo gasel 3302 gas 33023 gazelle-farmer includes c.
A specialized company for the conversion of trucks produces extensions for man man, iveco and iveco truck tractors.
Lengthen Kamaz under a body 7.5 m Lengthen Maz Zubrenok, Maz under a body 9 m Re-equipment of the chassis of an extended truck.
The company offers you to upgrade the Fiat Ducato Fiat Ducato basic version for a solution.
A pensioner disappeared without a trace in Nizhny Novgorod. PSG "Lynx" announces the start of search activities.
The next five days the weather will not bring any wild surprises. By October standards, the working week will be quite warm: air temperature.
The legendary cafe, located near the wall near the Dmitrov Tower and loved by many Nizhny Novgorod residents since Soviet times, was demolished yesterday.
Today healthy lifestyle is fashionable. A holiday in the Nizhne-Ivkino sanatorium, where you can improve your health, is not only useful.
The process of replacing the inner door handle
Before starting repairs, the negative terminal is removed from the battery. Replacing the outer handle step by step:
- Remove the door card.
- Disconnect two rods: the inner handle drive and the lock button rod.
- Remove the lock button rod and disconnect the lock rod.
- From the inside, unscrew the nut and bolt securing the outer handle.
- From the outside, pull the handle towards you by 2–3 mm, move it to the left, and pull it out of the groove.
- The mechanism is pulled out from the door along with the lock cylinder drive. Use a screwdriver to pry off the washer and remove the spring.
- Pull the drive fastening pin out of the cylinder and remove the drive.
- Pressing the lock ring with a screwdriver, pry up the lock switch and pull out the cylinder.
- Clean the cylinder, if the lock is reinstalled on a new handle, lubricate the movable parts with Feol.
Assembly is carried out in reverse order.
When installing, you must first install it on the rods and only then screw the outer handle onto the door.
When replacing the inner door handle of a Chevrolet Niva, it is also necessary to dismantle the trim; the procedure for carrying out the work is:
- Unscrew the two fastening screws using a ratchet wrench.
- Remove the rods.
- Attach the drive to the new handle and tighten the screws back.
How not to slam a door loudly on a Niva
Sanek 18 Feb 2009, 00:27
Vitya wrote: Please note that I do not think that remodeling and finishing UAZs is not good! Vice versa! I respect those who took the UAZ as a basis and designed it for specific purposes - “dear to his heart”! ))))
The doors of VAZ 2104, 2105, 2106, 2107, NIVA do not close well. Part 1
Cleaning and lubrication, maintenance and adjustment of door
on VAZ 2104, 2105, 2106, 2107, NIVA
…
Adjusting door locks.
a little about adjusting door locks, how I adjust door locks. Vkontakte community …
. however, he also expressed his position.
+1. If for fishing, use a long trunk tow bar. For hunting, the silencer is quieter, the body colors are appropriate, and the locks are quiet. By the way! How to make the doors on Niva so that they don’t slam across the entire field? We're exhausted! We're scaring away all the ducks! Sanek Nivanuty Age: 23 Messages: 12976 Registered: January 31, 2009, 01:59 From: Tomsk Car: Lynx, Honda Steed 600, TTR 125 Gender: Male Advertising Register and read the forum without advertising. By the way, free advertising space on the right is sold for only 1000 rubles per month.
Tractor driver 18 Feb 2009, 00:39
Sanek wrote: How can you make it so that the doors don’t slam across the entire field on Niva?
don’t slam the door just a tractor driver Roadless sick Age: 24 Messages: 5985 Registered: Jan 13, 2008, 20:13 From: From the same gate as the rest of the people. (KGB) Car: Caterpillar Gender: Male
snake 18 Feb 2009, 01:00
Sanek wrote: +1. If for fishing, use a long trunk tow bar. For hunting, the silencer is quieter, the body colors are appropriate, and the locks are quiet. By the way! How to make the doors on Niva so that they don’t slam across the entire field? We're exhausted! We're scaring away all the ducks!
He lifted the handle, closed the door and pressed it tightly, released the handle, the door closed without a bang. snake Beginner flooder Posts: 152 Registered: Jan 22, 2008, 10:34 am Car: Japanese Niva Gender: Male
Sanek 19 Feb 2009, 21:36
So! The Ottoms have moved away! here we need to talk about the silent closing of doors on the Niva. And we're talking about the region. They say the locks on the doors can be put in a plastic box, and the doors will close like on a foreign car.
Sanya Nivanuty Age: 23 Messages: 12976 Registered: Jan 31, 2009, 01:59 From: Tomsk Car: Lynx, Honda Steed 600, TTR 125 Gender: Male
TDV 19 Feb 2009, 21:45
Sanek wrote: yes! The Ottoms have moved away! here we need to talk about the silent closing of doors on the Niva. And we're talking about the region. They say the locks on the doors can be put in a plastic box, and the doors will close like on a foreign car.
They're lying! TDV Beginner flooder Age: 32 Messages: 187 Registered: Jan 14, 2008, 21:45 From: Tomsk Car: UAZ 315201 Nissan Teana 4wd Gender: Male
Sanek 19 Feb 2009, 22:33
We just bought German locks on the eleventh day. Regular Toko locks in plastic. and the doors quietly closed.
Sanya Nivanuty Age: 23 Messages: 12976 Registered: Jan 31, 2009, 01:59 From: Tomsk Car: Lynx, Honda Steed 600, TTR 125 Gender: Male
Skay 20 Feb 2009, 20:56
Sanek wrote: yes! The Ottoms have moved away! here we need to talk about the silent closing of doors on the Niva. And we're talking about the region. They say the locks on the doors can be put in a plastic box, and the doors will close like on a foreign car.
Repair kit
The VAZ manufacturer produces repair kits for all components and assemblies of the Niva. The catalog number of the repair kit for the Chevrolet Niva is 2123-6205150, 2123-6205151. The kit includes internal door opening/closing mechanisms. The parts are made of high-strength steel and brass. The repair kit for the Niva front and rear door levers includes:
- two retainer springs:
- blocker buttons;
- brackets.
Rods and ends are not included in the repair kit; AvtoVAZ manufactures the parts separately.
Video on this topic
Removing the lock is carried out according to the following sequence of actions: The lining and handle will be removed. The lock is removed by unscrewing three screws with a screwdriver.
Don't forget to remove the wiring harness. The lock drive lock is located under the handle. The screws are unscrewed and the drive rod is disconnected from the handle located inside. Let's start unscrewing the guide rods. The front and back doors have different designs. The gearmotor is disconnected from the wiring and the blocking button.
The lock is removed and replaced.
You can replace the door yourself; it does not require much knowledge and skills; all that is necessary for a beginner is to familiarize yourself with the brief sequence of actions and get started.
It is worth knowing that the door needs to be replaced if it cannot be repaired, but in all others any repair can be carried out. At this point the work can be considered completed.
Next, you will need to replace the damaged elements of the handle or replace it completely with a new one. Assembly is carried out in reverse order.
Eliminating rattling and play in door handles
Video about repairing the outer handle of the front door of a Niva Chevrolet Replacing the inner handle This work can be easily done independently, but there are several points that you should pay attention to in the process. First you need to remove the plastic decorative trim from the door. There is a film underneath, which is recommended to be removed from above to avoid damage.
Next, remove the rods from the handle and dismantle the assembly itself. I glued the tongue with superglue. If the tongue is broken, then the front part of the handle is only held on by a screw. By the way, they were broken off on all the doors. After assembly, the play disappeared.
To disassemble the rear door, you first need to remove the locking ring under the window lifter handle: Pry up the locking ring...and remove it. Then the window lifter handle will be removed.
We remove the trim around the inner door opening handle in the same way as the front door, unscrew the screws under the T sprocket. We unscrew the self-tapping screw in the recess of the armrest. Here is where they are: Location of the rear door trim pins The outer screw for securing the lock on the rear door is located here: The outer screw for securing the rear door lock In addition, It was not possible to turn the handle outward, as on the front doors, so I inserted a screwdriver through the hole in the door, pulling the handle:
Eliminating backlash
The play of the handles on the door of an SUV is associated with the design of the fasteners. Inside there is a silumin tongue or bracket on which the second fastening screw is fixed. In the process of opening the door, the thread of the second screw becomes loose. The next common cause of backlash is that the silumin bracket comes off or bends. The repair procedure in this case is as follows:
- Remove the inner lining.
- Loosen the fastening screw on the side where the part does not move away from the body, and unscrew the bolt completely on the backlash side.
- Unscrew the handle from the outside and check the serviceability of the silumin insert. If the tongue is broken off, the assembly begins to loosen because it is held on by a self-tapping screw, replace the insert.
If the bracket is bent, it is enough to straighten the tongue and screw the handle back; when the bushing is broken off, many drivers do not look for a replacement; they glue the part with superglue. The effect of this work will last 2-3 months.
For rear doors, the play of the handle is removed in a similar way; you need to tighten the screws or replace the metal insert. There is a difference in the procedure for dismantling the trim; it is necessary to remove the window lifter retaining ring when removing the door card.
You can repair a door handle for a Niva yourself in 30 minutes if you follow the work procedure. How long the handle will last depends only on the quality of the selected part.
Chevrolet Niva “Project N” › Logbook › Taping the rear (fifth) door.
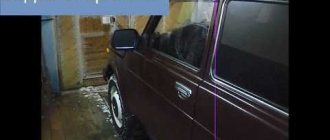
A little background. I already had experience in car sizing. I glued my VAZ 2113 back in 2009 (but never finished it). True, then the materials were different and the effect from them was not so good. But at that moment I didn’t know this. For a very long time I did not recognize self-adhesive vibration material, preferring hair dryer. But as you know, progress does not stand still! When I bought a Chevrolet NIVA, I planned to tape only the trunk and front doors (while listening to music). At that time, I was already familiar with the professionals in their field, “Bass Zone,” and I planned to entrust my car to them. Friends who know me well dissuaded me from this idea, citing the fact that I would have to redo everything later anyway. In general, I decided to glue it myself and not stop at the doors with the trunk. After talking with a person very competent in noise and vibration insulation, I realized that I knew absolutely nothing. He helped me a lot with the selection and amount of material needed for the entire car. He also told a lot, explained and gave a lot of practical advice. The material was chosen by Shumoff. I started with the back (fifth) door.
Having dismantled the door, I was slightly horrified by what I saw. The wires hung like snot and were practically not secured.
Got the wiring in order. Material: fabric insulating tape “tesa”, reinforced tape “tesa” and “Shumoff”Specific.
And I started gluing the inside of the door. The first layer was glued with vibration-absorbing, multi-layer, self-adhesive material “Mix F” with a thickness of 4.5 mm. I tried to cover as much of the inside of the door as possible. This was very difficult due to the welded spare wheel mounting amplifier.
Next, on top of the vibration-absorbing material, I glued self-adhesive noise-absorbing material “Comfort 6” with a thickness of 6 mm.
Then it was the turn of the outer part of the door; the first step was to close the technological holes. I used sheet aluminum 0.4 mm thick. and “Mix F” for small holes. The aluminum was secured using double-sided, self-adhesive tesa mounting tape.
On top of the plugged technological holes, I glued vibration-absorbing material “M3” with a thickness of 3 mm. “Comfort 3” (self-adhesive sealing material) was glued along the perimeter of the lower part of the door, where the trim fits.
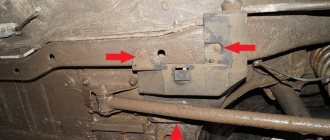
Eliminating prerequisites
The misalignment of the transfer case occurs due to an undeveloped design. Therefore, many craftsmen strive to modify the fastening so as not to bother with alignment once a year. A special frame is used for this. In recent years, it can be purchased in stores, but you can also make it yourself.
The advantages of this modification are the following:
To assemble the subframe you will need a square pipe. Some people use a corner, but in this case the structure will be less durable. The support plates are made of sheet steel.
Before assembly, you should cut off the old transfer case mounting bolts. Now it will be installed on the subframe. The pipe is cut to size and the frame is welded. After that, holes are drilled in the crossbars for fastening the transfer case. It is important not to make a mistake with the sizes. The next step will be assembling the mount to the body. Sheet steel support plates are welded to the subframe. Holes are drilled in it. After fitting, you need to drill holes in the floor of the car.
M12 bolts should be used for fastening
, as well as thick washers. After installing the subframe, do not forget to treat it with an anti-corrosion compound. This will increase the service life of the part. This is how, through simple manipulations, you can get rid of one of Niva’s sores.
. Even great cars have flaws. The domestic SUV Niva is no exception. During active use, vibrations emanating from the transmission may occur. That’s when the question arises of how to center the transfer case on the Niva. In fact, this work is not difficult, but there are some nuances that are better to know before starting work. Some people, knowing this feature of this car, install a subframe, this can significantly reduce the noise of the transmission.
Niva transfer case. Ways to eliminate vibration
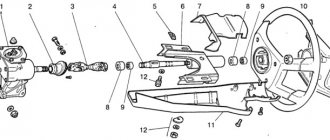
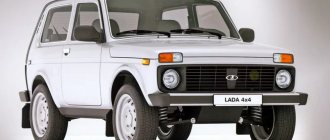
The Niva family of cars differs from VAZ passenger cars in permanent all-wheel drive - they have two drive axles. In total, the VAZ SUV has three differentials in its transmission - one for each axle and another center differential.
1. Oil seal; 2. Thrust ring of the front bearing of the drive shaft; 3. Front bearing cover; 4. Front drive shaft bearing; 5. Transfer case front cover; 6. High gear; 7. Gear clutch hub; 8. Gear clutch; 9. Low gear; 10. Transfer case housing; 11. Rear drive shaft bearing; 12. Drive shaft; 13. Transfer case rear cover; 14. Intermediate shaft; 15. Rear intermediate shaft bearing; 16. Rear differential housing bearing; 17. Installation ring of the rear axle drive shaft bearing; 18. Rear axle drive shaft bearing; 19. Oil seal deflector; 20. Rear axle drive shaft flange; 21. Rear axle drive shaft; 22. Bearing thrust ring; 23. Differential housing; 24. Rear axle drive gear; 25. Satellite; 26. Axle of satellites; 27. Retaining ring of the satellite axis; 28. Spring washer; 29. Driven gear; 30. Differential housing bearing retaining ring; 31. Differential locking clutch; 32. Front axle drive shaft; 33. Front axle drive housing; 34. Retaining ring of the front axle drive shaft bearing; 35. Differential bearing spring washer; 36. Front differential housing bearing; 37. Driven gear of the speedometer drive; 38. Speedometer drive housing; 39. Front intermediate shaft bearing; 40. Gearbox; 41. Elastic coupling; 42. Constant velocity joint; 43. Transfer case; 44. Shims; 45. Transfer case suspension bracket; 46. Rear engine mount bracket.
Transfer case Niva 21213
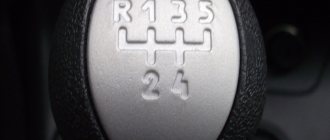
Model VAZ-21213 is an all-terrain passenger car with permanent all-wheel drive and differential lock. Brand 21213 is a restyled version of the first VAZ SUV, VAZ-2121. RK Niva 21213 has three gears:
21213 is equipped with 4-speed and 5-speed gearboxes, and when the first speed of the transfer case is turned on, the car operates in standard mode, the gear ratios in the transmission are from 5-speed. The checkpoints are as follows:
When you turn on the second position of the transfer case lever (reverse position), the gear ratios change (lower):
On ordinary roads, the transfer case is always in first gear, the transfer case control lever (reduction gear) is pushed forward. The neutral gear of the RK disconnects the transmission, and in this position the car does not drive; there is also a neutral in the gearbox.
Motorists often ask the question: why is neutral gear needed in a transfer case? The neutral is used when connecting additional units to the transmission, for example, a mechanical winch; in this case, a power take-off must also be installed.
conclusions
If you follow the instructions above, you can independently cope with replacing the handle on a Niva Chevrolet .
Thank you very much, OLEG, FOR THE DETAILED INSTRUCTIONS AND VIDEO ON REPAIRING THE DOOR HANDLE. came in handy.
Good instructions and with pictures, otherwise it is quite difficult for a beginner to read only the text, but with pictures it is much easier and faster. I changed it myself, thanks.
It seems simple, but it also has its own peculiarities, and doing something with the car yourself is much more pleasant and economical))
Main problems with the range multiplier
The main function of the range multiplier has the properties of a gearbox divider; it turns them on or off the gear speed.
Most transfer case breakdowns are purely mechanical in nature (for example, a cut shaft between the gearbox and the transfer case). This is provoked by inattention to fuel and lubricant levels, wear of rubber bands, incorrect location (alignment) of the unit, and the condition of adjacent components. The first indicator of problems with the transfer case is characteristic noise and vibration in the body.
Vibration when driving on Niva
The first reason is that at a speed of more than 70 km per hour, it’s all about the cardan shaft; only the original one must be installed. Next, replace the crosspiece on the cardan shaft, after which you must drag the shaft to a stand and balance it, otherwise the vibration will resume.
The second reason for vibration is the intermediate shaft, it must also be original, otherwise it will quickly fail. We take only the original AvtoVAZ one from the factory, otherwise vibration and breakdowns cannot be avoided.
The third reason for vibration is the breakdown of the gearbox flange bearings. To eliminate the problem, place additional support on the gearbox.
How to overcome noise when maneuvering in a transfer case
You can buy new handles for the levers. We change it ourselves, prying up the support with a screwdriver, take out the lever axis and get rid of the old handles. We remove the old lever springs and install new ones. Insert the lever axis and secure it with a corkscrew nut. Now, when driving with the new handles, there is no characteristic noise in the cabin. The handles can be easily changed without leaving the salon.
Stiff switching of the lock lever
This issue can be easily solved in the following way: when driving, just turn the steering wheel slightly and the lock will immediately turn on without any problems.
There are also: jamming of the pneumatic cylinder, sticking in the neutral position, or the rod is sitting tightly. Burnt gear and shift fork.
Transfer case for Niva, signs of breakdowns:
Repairing the transfer case in Niva 21213 with your own hands is quite possible in case of minor breakdowns. The owner of a Chevy Niva will only need the basic skills of a car mechanic. It is more difficult to correctly install and center the Niva transfer case. Here it is still recommended to contact a car service. A diagram of the unit itself is presented in the vehicle documentation.