1200 rub. for the photo report
We pay for photo reports on car repairs. Earnings from 10,000 rubles/month.
Write:
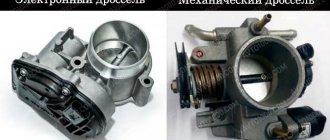
The task of the throttle valve (hereinafter referred to as DZ) is to regulate the amount of air supplied to the intake manifold. Its position is adjusted in accordance with the position of the accelerator pedal. The damper drive can be mechanical (using a cable) or electronic (using an electric motor). The position of the remote control is recorded by a special sensor. It transmits the relevant information to the ECU, which in turn makes a decision on the amount of fuel supplied and changing the engine operating mode. You can read more about its structure and functions in additional material on our website.
Throttle assembly Lada Largus general description
The Lada Largus throttle assembly is the simplest control device and serves to change the amount of main air supplied to the engine intake system. It is installed on the inlet flange of the intake pipe. An air filter is placed on the inlet pipe of the throttle assembly; the connections of the throttle assembly with the inlet pipe and the air filter are sealed with rubber gaskets. There is a hole in the throttle body to supply additional air to the idle speed controller. A valve rotating on an axis is installed in the throttle body. At one end of the axle there is a throttle position sensor of the engine management system, at the other there is a lever to which the intermediate rod of the throttle drive is connected. During operation, the throttle assembly does not require maintenance or adjustment; just monitor the condition of the rubber seals to avoid air leaks.
Rice. A. Throttle assembly of the K7M Lada Largus engine: 1 - idle speed regulator; 2 — throttle valve drive lever; 3 — throttle valve; 4 — throttle position sensor; 5 — throttle body
Rice. B. Throttle assembly of the K4M Lada Largus engine: 1 - return spring; 2 — screw for adjusting the position of the damper; 3 — damper drive lever; 4 — flange for mounting the unit; 5 - throttle valve; 6 — damper position sensor; 7 - sealing ring
This is interesting: The electric motor of the cleaner works, but the brushes do not move Lada Granta
Throttle assembly (pipe) - removal/installation
For part numbers, see here and here
Throttle assembly 8-cl. engine
1 — throttle position sensor; 2 — connection pipe with the air filter; 3 - body; 4 — throttle valve; 5 — air supply channel to the idle speed regulator; 6 — connection pipe with the inlet pipeline; 7 — throttle valve drive lever; 8 — idle speed regulator
Throttle assembly for 16-cl engine
Place the car in the workplace, brake with the parking brake, turn off the ignition and disconnect the earth wire terminal from the battery.
.
For cars with K4M engine
Remove the intake silencer and air filter housing (see here).
Disconnect the drive cable from the throttle assembly.
Unscrew the two bolts and remove the throttle assembly 1, Figure 11-6 (head 8, extension).
1 — throttle assembly (pipe)
For cars with K7M engine
Remove the air filter housing (see here).
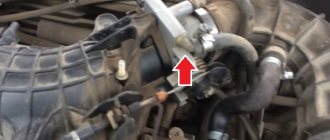
Disconnect the ball joint 1, Figure 11-7, of the throttle assembly drive (flat-head screwdriver).
1 — ball end of the throttle pipe drive; 2 — block of wires to the throttle position sensor; 3 — throttle assembly (pipe); 4 - idle speed controller
Disconnect the 2 wire connector from the throttle position sensor.
Disconnect the wire block from the idle speed regulator 4.
Unscrew the fastening bolt and remove the throttle body retainer (screwdriver with Torx T30 bit).
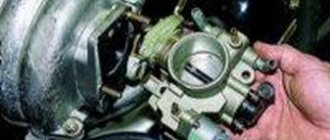
Remove the throttle body 3 by tilting it.
For cars with K4M engine
Before installing the throttle assembly, install a new gasket on it, after lubricating it with engine oil.
Install throttle assembly 1, Figure 11-6, onto the vehicle, screw in and tighten the fastening bolts.
The tightening torque of the bolts is 14 N.m (1.4 kgf.m).
Attach the drive cable to the throttle assembly.
Install the air filter housing and intake silencer.
For cars with K7M engine
Install throttle pipe 3, Figure 11-7.
Install the throttle body housing retainer and tighten the fastening bolt.
The bolt tightening torque is 15 N.m (1.5 kgf.m).
Connect the wire block to the idle air control 4.
Connect the 2 wire connector to the throttle position sensor.
Attach the ball end 1, Figure 11-7, of the throttle pipe drive to the throttle pipe (pliers).
Install the air filter housing.
Operations for all vehicle trim levels
Connect the earth wire terminal to the battery.
Video
Source
Signs of a dirty throttle valve
In order not to confuse the symptoms indicating excessive carbon deposits on the valve, it is better to first visually inspect it, and if there are no visible oil or coked deposits on the walls of the throttle assembly, then, with a high degree of probability, cleaning the throttle valve will not eliminate the problem.
themselves look like this :
- problematic engine starting;
- uneven engine operation;
- floating speed at idle;
- freezing engine speed;
- drops in speed until a complete stop.
Removing the throttle position sensor Lada Largus
You will need: TORX 20 key, tester.
1. Disconnect the wire from the negative terminal of the battery.2. Press the latch and disconnect the wiring harness block from the sensor.
3. Connect the tester to terminals “B” and “C” of the sensor in resistance measurement mode (for clarity, shown on the removed sensor).
4. Measure the resistance at the sensor terminals with the throttle valve fully closed. It should be 2.3-2.4 kOhm.5. Turn the throttle valve by hand until it is fully open and measure the resistance again. It should be 1.3-1.4 kOhm.6. To replace the sensor, unscrew the two bolts securing it (for clarity, removal is shown on the removed throttle assembly),...
When is throttle body cleaning required?
The throttle valve is one of the engine elements that requires periodic maintenance, as it can become clogged. In this case, there is no need to observe any special frequency, since much depends on the quality of the fuel and oil, and the condition of the filters. There are several signals that it is time to clean the throttle assembly:
- unstable operation of a cold engine, floating idle is the main symptom;
- the appearance of “floating” speed, and in various operating modes;
- increased fuel consumption;
- insufficient dynamics when pressing the gas pedal;
- the engine may suddenly stall;
- Periodic lighting of the Check indicator, which subsequently goes out.
Note that such signs may indicate other failures of the fuel supply system and engine. But at the same time, it is necessary to check the throttle valve, since it is often the cause of the problem.
Video: CLEANING IAC. Regulator training. Cleaning the throttle. REFILL.
Dust settling
This is where the oil dust mixes with regular dust. This black, sticky mass settles in the throttle working space, through which air flows into the engine.
The resulting layer affects the diameter, and therefore the throughput of the throttle. This affects the operation of the engine, its response to sudden pressing of the gas pedal. In addition, the oily mixture can get into the IAC, which adversely affects the idle speed. Therefore, it is necessary to clean the throttle from unwanted formations inside it.
Mistakes when cleaning the throttle valve
Many inexperienced car owners can incorrectly clean the throttle assembly, at a minimum risking not getting the desired effect, and at maximum - completely damaging and disabling the throttle body. Therefore, it is important to understand when to do the procedure, how to do it and what means to use.
Dirty throttle valve
Clean throttle
To properly clean the throttle body DO NOT :
- Clean the damper in any unclear situation (there are even jokes about this).
- Clean the damper without removing it (the effectiveness of such cleaning is insignificant, since often it is only possible to remove carbon deposits on the damper itself, and the internal walls and air channels of the damper are not cleaned).
- When cleaning with a rag, use excessive force, which can lead to damage to both the damper itself and the nearby TPS.
- Use brushes rather than soft materials. Such an error also quite often leads to loss of performance of the remote control, since on some throttle units the inner wall and damper are coated with molybdenum for even smoother air passage. This layer is often confused with plaque and is removed. As a result, the damper begins to either “bite” or allow excess air to pass through (the speed increases).
- Forgetting to teach the throttle after cleaning. Dampers with an electronic gas pedal require proper learning of the remote control in order to set the idle speed to the required value.
The throttle valve should be cleaned every 30-50 thousand km . Adhering to all the above recommendations and taking into account the main mistakes that inexperienced car owners make, no more questions should arise about how to clean the throttle valve, be it mechanical or electronic. For cleaning you need a minimum of equipment and costs, just a carb cleaner and clean rags, as well as a screwdriver for dismantling the unit.
content .. 37 38 39 40 ..
Lada Largus (2019). Lost engine idling (possible reasons)
Before identifying a malfunction, it is necessary to carry out a visual inspection of the engine compartment (elements of the ignition system, sensors, tubes, hoses), check the tightness of the contacts in the connecting blocks, the tips of high-voltage wires in the ignition coil and spark plugs. Causes of unstable idling of an injection engine related to the ignition system
— Spark plugs are faulty
Faulty spark plugs: flooded after an unsuccessful start, the insulator is “broken,” the gap between the electrodes does not correspond to the norm (0.9 – 1.1 mm), the spark plugs do not match the engine’s heat rating. External signs: unstable idling, uneven exhaust from the muffler (periodic or frequent misfires). It is necessary to blow out the spark plugs: press the gas pedal all the way down and crank the engine with the starter for several seconds (the so-called purge mode). Having turned them out, evaluate the condition of the contacts, the presence and color of carbon deposits, and check the gap with a round feeler gauge. Non-working spark plugs are often clogged with carbon deposits or wet. But in some cases it is impossible to determine their malfunction visually, so the easiest way is to install a new kit and check the engine idling again.
— High-voltage wires are “broken”
External signs are similar to candlesticks. You can check the serviceability of the wires with a tester in ohmmeter mode. You can start the engine in the dark and observe the glow on the “broken” wires. In addition, it is necessary to visually verify the integrity of the wires and their tips, the absence of dirt and cracks on them. — The ignition coil (module) is faulty
First, we inspect the coil: check for cracks and damage. Then we check it with a tester in ohmmeter mode (See “Checking the ignition module”). We replace the one that does not pass the test with a serviceable one.
Malfunctions related to the engine control system (ECM)
— Idle speed regulator (sensor) (IAC) is faulty
The rod of a faulty regulator may not timely close the air supply channel necessary for engine operation at idle under the throttle valve. Signs of a faulty regulator, in addition to unstable idling: starting the engine by pressing the gas pedal, jerks and drops in speed when changing gears and coasting, “floating” speed, idling sometimes, sometimes not, drop in speed when powerful electrical consumers are turned on. At the same time, in other modes with the gas pedal pressed, the engine can operate normally without failures, jerking or jerking. The sensor can be checked with a tester or replaced with a known good one (by adjusting the protrusion of its needle).
— Throttle position sensor (TPS) is faulty
A faulty TPS may provide the control unit with incorrect information about the throttle position. As a result, at idle speed the engine speed may increase greatly and be reluctant to decrease to normal or not decrease at all. The TPS can be checked with a tester or replaced with a working one.
— The throttle valve does not close tightly
It is necessary to check the tightness of the air damper by removing the air filter housing. By pressing the gas pedal several times, check the smooth operation of the damper drive and its opening and closing. If there is carbon deposits in the throttle assembly that prevents the valve from closing tightly, remove it, for example, with carburetor cleaner.
— The coolant temperature sensor (DTOZH) is faulty
Based on the sensor readings, the control unit determines the amount and duration of injection, how far to move the IAC rod and open air access to the engine. If the DTOZH is faulty, then, for example, in cold weather the unit will not allow you to greatly enrich the mixture at start-up and at idle (the engine either will not start, or will start, but will “triple”). But in the heat, on the contrary, give a rich mixture and the idle speed will go through the roof.
— Speed sensor (DS) is faulty
Signs: after stopping the car, the engine runs unevenly, then the speed stabilizes, the speed drops when changing gears and coasting.
— The oxygen concentration sensor (OC) is faulty
The sensor's sensitive element may have failed (for example, due to the use of low-quality fuel, the use of inappropriate sealants during engine repairs), the heating coil has burned out, or the electrical circuit is faulty. The air intake hole in the sensor may be clogged (with dirt, anticorrosive). You can preliminarily check the sensor with a tester without dismantling it, but checking it with diagnostic equipment is advisable.
— “Suction” of foreign air into the intake tract
Check the tightness of the hoses going to the throttle assembly and to the vacuum brake booster, and the fastening of the clamps. The vacuum hose can be pinched to prevent it from affecting engine operation.
— The valve clearances are not adjusted
Check and adjust the clearances in the valve mechanism using washers.
- Worn camshaft cams
Can be determined visually or by checking with a micrometer.
— Disturbed valve timing
The timing belt has jumped a tooth or two. Or, during repairs, the marks on the pulleys are set with deviation.
— Low compression in engine cylinders
The piston rings are worn out, broken or stuck, the valve is burnt out. The malfunction can be identified by measuring the compression in the engine cylinders.
— The gear has shifted relative to the generator drive pulley.
As a result, the control pulse from the crankshaft position sensor arrives at the wrong time.
Causes related to the power system (fuel supply system) and the fuel vapor recovery system
— Fuel filter clogged
The frequency of replacing the fuel filter is 30,000 km, but it can be more often, taking into account the quality of the fuel.
— Low pressure in the power system
The pressure regulator on the ramp may be faulty (the drain channel is constantly open), the fuel pump or the fuel lines may be damaged. A visual inspection and checking the pressure in the power system (2.5-3.5 bar) is necessary.
— Injectors clogged
In this case, interruptions in engine operation are possible not only at idle, but also in other modes. Exhaust from the muffler with uneven frequent misfires. Increased idle speeds are possible due to their leakage.
— The adsorber is faulty
First of all, check the tubes going to the adsorber.
Notes and additions
— If the sensors of the engine control system (ECM) fail
The “Check Engine” light on the instrument panel comes on.
Examples of throttle valve adaptation on VAG and Lancer IX vehicles
In this video, they will tell you and show you how to adapt the damper for a VAG car.
Adaptation of remote sensing for Volkswagen Golf 4:
- We warm up the engine to t=80 0 C and turn off the car. Then we connect the USB-KKL cable to the diagnostic connector and, after turning on the ignition, launch the diagnostic program (VAG-COM 3.11).
- We enter section 01-engine.
- We poll the fault memory (02).
- We erase detected faults (05).
- After returning to the previous menu, enter the “adaptation-10” section.
- On channel 00, press the “read” button.
- Save the result and return to factory settings.
- Enter the basic settings (04) and go to the measurement mode.
- If the group value is 001, press “start”.
- We wait 2-3 minutes, then close the program and disconnect the cable. Adaptation is complete.
Adaptation of remote sensing of Nissan cars with an electronic gas pedal:
- Fully release the accelerator pedal.
- Turn on the ignition for at least 2 seconds.
- Turn off the ignition and wait at least 10 seconds.
- Turn on the ignition for at least 2 seconds.
- Turn off the ignition. The accelerator pedal adaptation procedure is completed.
- We are adapting the throttle valve. The accelerator pedal is released.
- Turn on the ignition and turn it off immediately. We wait at least 10 seconds. During this period of time, the damper moves.
- We teach air supply at idle speed (XX).
- Warm up the engine and gearbox to operating temperature.
- We turn off all electrical equipment of the car.
- We start the engine and bring it to operating temperature.
- Turn off the ignition and wait at least 10 seconds.
- Fully release the accelerator pedal.
- Turn on the ignition and wait at least 3 seconds.
- Within 5 seconds, press the accelerator pedal five times, then wait 7 seconds.
- Pressing the accelerator pedal, hold it until the CHECK stops flashing and lights up constantly (about 20 seconds are required).
- After the CHECK light comes on continuously, you must release the pedal within 3 seconds.
- We start the engine to run at XX.
- Press the pedal several times to check the stability of the XX.
Adaptation of remote sensing on VW Passat B5:
- Warm up the engine to operating temperature and turn off the car.
- We turn on the ignition, but do not start the engine.
- We connect the cable to the diagnostic connector and launch the program.
- We enter section 01-engine.
- We enter the basic settings (04).
- In the damper adaptation we select 060 for cars with electronic damper control, and value 098 for cars with cable-controlled damper.
- Let's start the adaptation.
- We are waiting for the “ADP RUN” entry to appear on the screen and the subsequent “ADP OK” entry.
- We return to the basic settings.
- Turn off the ignition. Adaptation is complete.
Cleaning algorithm
Now we will give a step-by-step algorithm for properly cleaning the throttle valve.
- First of all, you need to get to the damper itself. The design is different in different engines. But as a rule, to do this you need to remove the air duct that runs from the damper to the air filter.
- Dismantle the damper. To do this, unscrew several mounting bolts (2-4 pieces), and also disconnect the necessary connectors (for example, the connector from the absorber purge valve).
- To clean, you must use a carburetor cleaner. There is a wide variety of them, and in auto stores you can easily find a product in accordance with your preferences and capabilities (we will talk about them later).
- Using a rag and the mentioned product, you must thoroughly wipe the damper outside and inside.
- You also need to clean the protective grille (if your car has one).
- Assembly of the unit is carried out in the reverse order.
This is interesting: Causes and methods of troubleshooting the rear suspension of Lada Granta
Let's return to the story of cleaning the damper.
- Remove the air system pipe leading from the air filter to the throttle body.
- Unscrew the throttle valve mounting bolts.
- Disconnect the throttle position sensors.
- That's it, the throttle is in your hands. Be sure to cover the intake manifold with a rag to prevent dirt from getting in there.
Just a small matter: spray carburetor cleaner on the choke. For example, we used a product from Astrohim. It does not have a pungent odor and does a good job of dissolving deposits on the damper. Let the mixture soak in a little and start scrubbing away the plaque.
But! Do not use any abrasive materials when cleaning the valve and generally do not overdo it with friction force. This way, you risk removing useful deposits and losing the tightness of the system or disrupting the smooth operation, causing the damper to move jerkily.
After the procedures are completed, install everything in reverse order.
Cleaning without removal
Also, many car owners are interested in the question of how to clean the throttle valve without removing it. Such methods do exist, but you must immediately understand that high-quality cleaning is only possible by dismantling the damper .
To do this, you will need a special product - an intake tract cleaner. You can use different brands. You can also use EGR valve cleaning fluid, WD-40, and solvents for cleaning.
So, the procedure without removing the node :
- As in the previous algorithm, you need to remove the air duct to get to the damper.
- With the damper closed, spray the surface with cleaning liquid and remove the cleaned dirt using a rag.
- Open the damper and remove dirt from the side surface.
- Make sure that the cleaning agent gets into all channels. The cleaning procedure is similar using a rag.
Let us repeat once again that for proper cleaning, the throttle valve must be removed from the car. And when installing it back, it is advisable to replace the damper gasket with a new one. Fortunately, its price is low.
It should also be remembered that in most cases, after cleaning the throttle valve, it is necessary to perform actions to “train” it . This procedure is carried out either using a computer (by connecting it to the car's ECU), or by manipulating the ignition and gas pedal. In this case, it is impossible to give universal recommendations, since they can differ significantly for each manufacturer and even model. Remember this!
FakeHeader
Comments 10
I was also planning to change it, but I didn’t get to the store yet
I looked through the pictures of these rings, the colors: white, black, red, gray, and in your picture you have blue ones
also different materials: silicone, fluorosilicone, rubber according to GOST...
And from what material do they live better, especially in winter?
It’s -10 C so far, I’ll be driving it for the first winter, I haven’t noticed any problems with revs, but I’m already wary of this problem based on frequent reviews.
IMHO the color doesn't matter. But the material - rubber hardens in the cold, and there are constant temperature changes under the hood. But this is my opinion, and I am not an expert)))
Press the gas to the floor and hold it in the pressed position with some kind of piece of wood. Next, go to the engine, remove the stopper, and use the shirt to move the blue comb until the damper tab is pressed against the mating part. If when pressed it is already pressed, then there is no need to adjust! If you still made the adjustment, then after it is completed, put the stopper in place, remove the piece of wood and play with the pedal a couple of times and repeat the procedure with the pedal pressed to the floor. Check that everything is pressed and voila the pedal is ready. For a while it will seem that the pedal is very “sharp”, but then you will get used to it!
Largus valve speed floats
According to reviews, the problem with floating engine speeds is familiar to many Lada Largus owners. This is especially true in winter, when the car has difficulty starting when cold (starting the engine is difficult in the morning). In such situations, floating speeds only make the situation worse.
The tachometer needle may jump chaotically from 1000 to 1500 rpm or not reach the “warm-up” level at all, staying below the required idle speed values. Experts do not recommend self-diagnosis of the car.
If the cause of the problem is unknown, it is better to contact a service station.
Car engine modifications and their features
The reasons why the speed may fluctuate on Largus are due to differences in the technical characteristics of the engines. Depending on the configuration, an 8- or 16-valve engine is installed.
8-valve K7M 800
This engine model was borrowed from Renault Logan and Sandero. Such motors have been installed on Largus since 2010. The unit complies with the Euro-4 standard, its power is 83 hp. With. Among the disadvantages:
- floating idle speed;
- high fuel consumption;
- lack of hydraulic compensators in the valve mechanism - the gaps need to be adjusted every 30,000 km;
- the need to replace the timing belt every 60,000 km - a broken belt will inevitably lead to bending of the valves;
- unreliability of crankshaft oil seals;
- vibration and increased noise during operation of the power unit.
The 8-valve engine is too weak for Largus. Among the advantages are the unpretentiousness of the engine and its inexpensive maintenance.
16-valve K4M
This engine is used only in the top modifications of Largus in the “Lux” configuration. Engine power is 106 hp. s, but it still requires improvements. It differs from the previous unit:
- absence of vibration and almost complete absence of noise;
- low fuel consumption.
The disadvantage of the 16-valve engine can be considered its complex design, which leads to the high cost of the car. The engine life is about 450,000 km, but servicing the unit is more expensive. The main thing is not to use it often under increased loads and undergo maintenance on time.
Causes and methods of eliminating difficult engine starting
To successfully start the engine, the fuel mixture and a spark from the spark plugs must simultaneously appear in its cylinders.
The engine cannot be started if one or more elements are faulty. This happens, for example, when the starter does not spin the crankshaft.
If floating idle speeds have become too annoying, and it is no longer useful to turn the engine with the starter, it’s time to understand the causes of the malfunctions that have arisen. The table shows the most common reasons why the Lada Largus engine speed fluctuates and it may not start.
| Cause | Diagnosis and manifestations |
Remedy
Regular and timely maintenance of the car will minimize or completely eliminate possible problems with starting the Lada Largus engine.
You should not randomly change all the parts without first checking their functionality. Comprehensive diagnostics are necessary, since there can be several sources of malfunction at once. Modern cars of the VAZ family are equipped with the same type of engines. For this reason, the solution to the problem will be virtually the same for different cars.
Owner reviews
Owners of LADA XRAY who independently performed the throttle valve zero adaptation procedure note that the car stopped twitching and acceleration became smooth.
Some reviews from Drive2.ru (link to post):
I don’t know about others...But it REALLY helped me! Not long ago I got into an Xray and thought that I had forgotten how to drive a manual transmission! There were jerks with almost every shift. Yesterday I read the post and after work I spent 5 minutes on this procedure... And lo and behold, he stopped twitching! Today, driving around the city was absolutely fantastic... even the consumption dropped... but I think it’s due to the change in pedaling... So I definitely recommend doing it.
It really works! This morning I did this operation and the car drove much better, especially at low speed. Why is this not done during pre-sale preparation?
I’ve been suffering with this problem for half a year, but here it’s 3 minutes! I even wrote to AvtoVAZ, they sent me... to the dealer.) Now, after carrying out the above mentioned manipulations, I’m driving for the second day without twitching!
In the morning I carried out these manipulations at an ambient temperature of -10 and an engine temperature of 50 degrees. The car is unrecognizable - all the twitching is gone. Acceleration became smooth, and fuel consumption seemed to drop slightly. I rode all day long.
Let us remind you that we previously published an information letter from AVTOVAZ, which tells us what to do in case of vibrations and jerks when starting off a LADA car.
Key words: ECM Lada XRAY | ECM Lada Vesta | ECM Lada Largus | ECM Lada Priora | ECM Lada Granta | ECM Lada Kalina | ECM 4x4 | esud niva | universal article
Share on social networks:
Found an error? Select it and press Ctrl+Enter..
Causes of pollution and how to deal with them
There are several reasons why the throttle body becomes dirty over time. By avoiding their appearance, you will automatically extend the time between cleaning it. Reasons mentioned include:
- Using low-quality gasoline . If there is sediment in it, it will definitely get into the throttle assembly, where it will turn into carbon deposits. Therefore, try to fill in high-quality gasoline and refuel at proven gas stations.
- Clogged fuel filter . If you do not change the fuel filter in time, then there is a possibility that pieces of dirt from it will get into the fuel system, including the throttle assembly.
- Dust and dirt getting into the intake system . This can be caused by various reasons - clogged air filter, damage to the integrity of the air duct, various mechanical stress.
- Crankcase gases with oil dust . They are the main cause of oil deposits on the valve. They can enter the combustion chamber through the valve cover from the crankcase ventilation system. The situation is aggravated by the fact that they carry oil dust. It is this that burns and remains as sediment on the surface of the throttle valve.
Clogged fuel filter
Change the air and fuel filters on time, fill with high-quality gasoline, and prevent dust from getting into the car's fresh air ventilation system. All this will save you from the need to clean the throttle valve ahead of schedule.
Throttle valve clogged and cleaning intervals
From time to time, the throttle valve inevitably becomes clogged, which manifests itself in various ways. In this regard, a reasonable question arises: how often should it be cleaned? It is not entirely possible to answer this unequivocally, since there are no recommendations on this matter. Some car owners visit auto repair shops when they suspect an engine problem.
Some people believe that the damper needs to be cleaned after every 40,000-50,000 km. Others have a different opinion and clean the damper more often, after 30,000-40,000 km.
Typically, black carbon deposits on the valve indicate low quality fuel. When operating a vehicle with such gasoline, there is a risk of oily deposits forming. After this, there should be no question whether the throttle needs to be adapted.
As a rule, if the piston group is experiencing some problems, then a characteristic sign is the valve becoming coked with soot and oily impurities. Sometimes this indicates crankcase ventilation is clogged.
Why does the valve get clogged?
The performance of the throttle valve depends on a large number of factors. The car owner is required to regularly change filters and oil, and use high-quality fuel. Among the reasons that lead to throttle clogging in K4M engines are:
- Poor quality fuel that forms carbon deposits, including when additives are not added correctly.
- Untimely replacement of the air filter.
- Failure of fuel, oil and air filters.
- Drops of oil from the engine entering the air duct.
It is especially unpleasant when several negative factors are combined, for example, oil from the engine and dust from the air. In this case, a coating forms that prevents the throttle valve from working normally, the seals fail, as a result of which it will need to be cleaned and the sealing rings replaced.
Video: The revs of Lagrus, Duster, Logan, etc. are floating. Solution. Cleaning the throttle.
When and how to do it yourself
adaptation of the throttle valve zero and adaptation of the misfire diagnostic function:
- After replacing the ECU controller or resetting the controller using a scan tool.
- After replacing the throttle assembly.
Throttle zero adaptation procedure
When the car is stationary, you must turn on the ignition, wait 30 seconds, turn off the ignition, wait until the main relay turns off.
- the engine turns over;
- the car is moving;
- the accelerator pedal is pressed;
- engine temperature is below 5 °C or above 100 °C;
- Ambient temperature is below 5 °C.
Misfire diagnostic functions:
- warm up the engine to operating temperature (parameter value “Coolant temperature” = 60...90 °C);
- accelerate the car in 2nd gear until higher crankshaft speeds are reached (parameter value “Engine crankshaft speed” = 4000 min-1) and perform engine braking (“Engine crankshaft speed” = 1000 min-1);
- Perform engine braking six times in one trip.
This adaptation procedure is specified in the technological instructions for LADA cars.
Cleaning process
Removing and cleaning the throttle valve on Renault Logan and other models where the K4M engine is installed, for example, Largus or Duster, is done at a service station. But you can do this yourself, since this operation does not require special knowledge or tools.
The reason that the speed of a cold engine fluctuates is the depressurization of the seal connecting the throttle and the intake manifold. To check this, you need to unscrew 4 bolts. Remove the throttle cable and connector from the idle air control, which will require a socket wrench. After this, the intake receiver is removed, for which you will need an E8 head; you can use a 6 head, which removes two bolts.
The crankcase ventilation pipe is disconnected from the idle air control valve. The receiver is pulled off the throttle towards the engine shield. The Renault Logan 1.6 16 valve throttle body is removed after unscrewing the two bolts that are located under it, which will require a 8mm socket.
On the removed assembly you can see the Renault throttle valve O-rings, made of special rubber. The small seal goes into the intake manifold, and the large one into the receiver. The floating idle speed is affected by a small o-ring that needs to be replaced. However, after removing the manifold, it is recommended to replace or additionally seal both Renault Logan throttle valve gaskets.
After removing the old seals, the throttle is treated with a washing liquid in the form of an aerosol or other available method. Then it is thoroughly wiped with a rag. Seats for rubber seals are thoroughly degreased.
There are several solutions for sealing the intake manifold and receiver. The ideal option is new original gaskets. But they are expensive, and in addition, the market always offers a huge number of fakes, which very quickly fail. A good solution is to leave the original seals, if they are intact, but wrap several layers of FUM tape under them. This will avoid unnecessary costs and ensure sealing of the throttle for a long time.
Before installing the throttle, all rubber seals are lubricated with silicone grease, and if this is not available, regular oil will do. Assembly is carried out in the reverse order, the throttle is carefully inserted into the intake manifold, and with greater force than it was removed from it, then the bolts are tightened. After this, the receiver, gas pedal cable and other previously removed components are installed in the reverse order.
Experience shows that cleaning the throttle assembly on your own is not difficult even for an inexperienced car enthusiast. To do this, you will need a set of socket wrenches and carburetor flushing fluid or other similar composition. It is imperative to pay attention that when reinstalling the seals, they must adhere to a degreased surface, otherwise they will quickly fail. Removing and installing the throttle assembly, which is located at the top of the engine, does not cause any difficulties.
Removal and cleaning
Removing the throttle is quite simple, for this:
- The air filter is removed
- Four bolts are unscrewed on the body
- The gas drive is disconnected
- The Renault Logan throttle sensor is disconnected, one is located in front of the throttle, the other on the back side
- The damper is unscrewed and removed and checked for the presence of various deposits
- We remove the idle speed sensor and check its condition, if necessary, clean it, this can be done using a carburetor cleaner
- The valve on the throttle is bent and flushed
- Wipe the seat with a damp cloth
The removal and cleaning process takes no more than an hour, but after this procedure the engine begins to work much better, but if after this procedure the problem does not go away, it is recommended to replace the idle speed sensor.
Throttle valve contamination is a natural phenomenon for it. Cleaning the throttle, depending on operating conditions, is done quite rarely, approximately once every 100 thousand kilometers. The degree of contamination is easy to determine by eye, and if the metal inside is covered with a black, greasy layer of dirt, then it’s time to clean it.
Throttle valve contamination is a natural phenomenon for it. Cleaning the throttle, depending on operating conditions, is done quite rarely, approximately once every 100 thousand kilometers. The degree of contamination is easy to determine by eye, and if the metal inside is covered with a black, greasy layer of dirt, then it’s time to clean it.
Other section materials
| Technical description |
| Vehicle specifications |
| Vehicle registration details |
| Safety precautions during maintenance and repair |
| Location of the main components and assemblies of the car |
| Vehicle technical check |
| Maintenance schedule |
| Checking the condition of wheels and tires |
| Wheel replacement |
| Replacing the windshield and trunk door glass wiper blades |
| Checking the fluid level in the windshield washer reservoir |
| Checking the oil level in the 1.6 (8V) engine |
| Changing the oil and oil filter of the 1.6 (8V) engine |
| Replacing spark plugs for 1.6 (8V) engine |
| Replacing the replacement element of the 1.6(8V) engine air filter |
| Replacing the accessory drive belt |
| Checking the condition and replacing the timing belt of the 1.6 (8V) engine |
| Checking the level and adding engine coolant 1.6(8V) |
| Replacing engine coolant 1.6 (8V) |
| Checking the oil level in the 1.6 (16V) engine |
| Changing the engine oil and oil filter |
| Replacing spark plugs for a 1.6 (16V) engine |
| Replacing the replacement element of the 1.6(16V) engine air filter |
| Replacing the 1.6(16V) engine accessory drive belt |
| Checking the condition and replacing the timing belt of the 1.6 (16V) engine |
| Checking the level and adding engine coolant 1.6(16V) |
| Checking the level and adding oil to the gearbox |
| Checking the fluid level in the master cylinder reservoir |
| Replacing fluid in brake and clutch hydraulic drives |
| Bleeding the hydraulic brake system |
| Checking the fluid level in the power steering reservoir |
| Checking the condition of the brake system |
| Checking the chassis and transmission |
| Checking the steering condition |
| Engine 1.6 (8V) |
| Replacing the cylinder head cover gasket for a 1.6 (8V) engine |
| Checking and adjusting thermal clearances in the valve drive of the 1.6 (8V) engine |
| Replacing the camshaft oil seal of the 1.6 (8V) engine |
| Replacing the exhaust manifold gasket for 1.6 (8V) engine |
| Replacing the exhaust manifold gasket for 1.6 (8V) engine |
| Replacing the rear crankshaft oil seal of a 1.6 (8V) engine |
| Replacing the 1.6 (8V) engine oil pressure warning sensor |
| Replacing the oil pan gasket for 1.6 (8V) engine |
| Removing the 1.6 (8V) engine oil pump |
| Replacement of engine power unit mounts 1.6 (8V) |
| Removal and installation of 1.6 (8V) engine engine |
| Engine 1.6 (16V) |
| Replacing the 1.6 (16V) engine oil pressure warning sensor |
| Removing the fuel rail protection for the 1.6 (16V) engine |
| Removing the oil separator for the engine crankcase ventilation system 1.6 (16V) |
Eliminating floating idle speed on Renault Logan, Sandero, Largus, Duster
Attention !!! We have released an addition to this video, be sure to watch it before doing the work.
Find out more about the new Logan
- Removing the oil sump of the K4M engine Renault Logan Sandero (Renault Sandero Logan)
- Removing and installing the Renault Logan cooling system radiator: step-by-step instructions
- Replacing the ignition coil Renault Logan - Review of French cars
- Engine 1.4-1.6(8V) | Renault | Renault management
- Removing the engine radiator 1.4-1.6(8V) | Renault | Renault management
- Renault Logan ignition system: checking and removal
- Replacing the engine oil pan gasket 1.4-1.6(8V) | Renault | Renault management
- Logan engine drain plug - New Logan