The main design feature of a front-wheel drive car is the absolute combination of the vehicle control device with the torque supply device. Undoubtedly, this causes complexity in the design and, accordingly, some difficulties in repair work, but front-wheel drive has several undeniable advantages. The front wheel drive is very reliable and requires little space. If you regularly take care of your vehicle, this drive will work for quite a long time. More on this later in the article.
Front wheel drive, when it is necessary to remove the front wheel drive
The need to remove the front wheel drive arises when the drive itself or its elements fail. The cause of drive failure is worn parts in the hinge, deformation of the wheel drive shafts, or a damaged or torn cover, which is necessary for its tightness. If any part malfunctions, it must be replaced, which requires dismantling the front drive and then installing it.
Speed sensor VAZ 2110 16 valves signs of malfunction
Damage may occur:
- the presence of interruptions in operation, false data in the readings of devices for determining speed and measuring the number of wheel revolutions;
- lack of stable engine operation at idle;
- a lit Check Engine light on the dashboard;
- stopping the computer from issuing errors about the absence or interruption of sensor signals (P0500 and P0503).
These problems arise for various reasons: the sensor connectors are dirty, the contact or integrity of the wire connecting the computer to the sensor is broken.
Front wheel drive, how it works
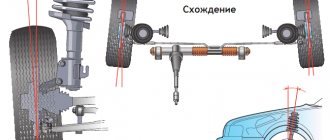
The design of the front wheel drive includes two constant-velocity joints and a shaft made of pipe at the right wheel, and from a rod at the left. The outer joint consists of six balls, an inner race, a separator and a housing. There are special grooves in the cage and in the hinge body for the placement of balls. The splined tip of the hinge housing is located in the front wheel hub and is attached to it with a nut. The grooves, which are located in the longitudinal plane, are made along a radius that ensures rotation of the outer hinge up to 41 degrees.
The hinge cage is mounted on the shaft splines between the locking and thrust rings. The internal hinge differs from the external one in that the tracks of its cage and body are straight, not radius, which allows the hinge elements to move in the longitudinal direction. This is necessary to compensate for movements caused by vibrations of the power unit and front suspension.
Balls of the same sorting class are mounted in the inner and outer hinges, so if necessary, six hinge balls are replaced at once, which must be of the same sorting class. During the assembly process of the internal hinge, a selective method is used. Replacing any one element is unacceptable - the internal hinge must be replaced as an assembly.
The hinge components are lubricated with CV joint grease - 4, which is placed in the hinge bodies during assembly. The sealing of the hinges is ensured by protective covers, which are secured with clamps.
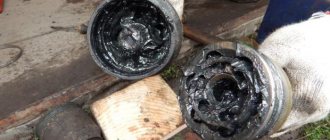
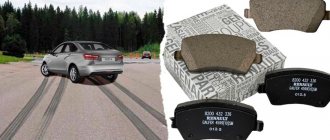
When do you need to change the outer and inner CV joints?
When it starts knocking, then it needs to be replaced, in addition, you also need to monitor the condition of its boot and from time to time look under it and see if there is grease inside the boot, whether dirt or other kinds of particles have got there, sand for example, under the boot of this There absolutely shouldn’t be anything, only one lubricant should be there. To understand in more detail how you can check the CV joint for performance, you can watch the video clip which is posted just below.
Tools, assistants, accessories and consumables
- Hammer.
- Wooden plank.
- Stub.
- Mounting blade.
- A piece of pipe.
- Screwdriver Set.
- Set of wrenches.
Replacing a grenade
Before you begin the process of replacing a grenade, you need to arm yourself with the following tools:
- lift;
- a sledgehammer or large hammer;
- an ordinary hammer;
- heads for 17 and 30;
- balloon type wrench;
- a chisel, not necessarily sharp;
- a flat screwdriver, preferably a slotted one;
- wrenches 13 and 17;
- crowbar or pry bar;
- pipe;
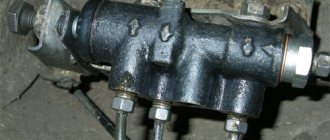
- a special puller designed to replace CV joints;
Special puller for CV joints
And, of course, you should purchase a new CV joint kit.
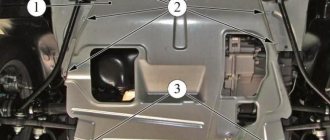
Front wheel drive 2110, how to remove, step by step instructions
- First you need to unlock the hub nut located under the protective cap, which must first be removed.
- Next, you need to slightly unscrew the bolts on the wheel mounts, and the nut on the hub. It is worth noting that this nut is tightened very well. Therefore, to unscrew it, you need to use a lever, for example, a piece of pipe.
- Then we put the car on the parking brake, put chocks under the rear wheels, and then lift the front part. Next, remove the front wheel and unscrew the nut on the hub.
- The brake pads and brake caliper must be removed. We hang the bracket on the front suspension spring. Pay attention to the brake hose; it should not be too tight, much less bent.
- Next, you need to disconnect the steering knuckle from the stand, for which we unscrew the two nuts and remove the bolts.
- Then you need to remove the shank of the outer hinge, which is located in the hub, by pressing the fist down.
- Using a mounting spudger, remove the second corner of the element from the gearbox.
- If you are removing two drives at once, insert any plug instead of the first drive that you removed from the gearbox. For example, a plug can be used as an old internal hinge. After these activities, remove the second element. All this needs to be done so that the differential side gears do not move and fit well when you assemble the front drives.
Video “Removing the gearbox”
This video shows the step-by-step process of removing the transmission.
Most owners of 2108-21099 are aware of the problem with engaging and sometimes knocking out 2nd gear. And I was no exception))) Since the cost of work at the service station did not particularly suit me, I decided to go through the checkpoint myself. As it turned out later, there is nothing complicated about this. Without problems with the Murzilka, you can safely climb into the gearbox!)) Having studied a lot of articles on the Internet, having studied all the intricacies, I got to work at the moment while the car was being painted (naturally, only the bare body was painted), and everything else was in the garage and needed a little renovation. I took the box to the car wash. They washed it thoroughly for me there. The next day I disassembled the box, laid out each piece on pieces of paper and signed the next removal number)))) Oh, how tedious it was. The first problem arose with the nuts on the shafts, which only my father could unscrew. The second problem arose with the bolts securing the metal plate that holds the bearings of the primary and secondary shafts, under a Phillips screwdriver. Well, no matter how much they didn’t want to unscrew, I already broke 2 of my favorite large screwdrivers until I bought an impact screwdriver)))) The impact screwdriver became a new favorite, the screwdriver is SUPER))) Having unscrewed the plate, I found a collapsed plastic separator of the secondary shaft bearing (((
And naturally, the ball bearings were replaced with bearings with a metal cage, and the roller bearings were simply new
With grief, we pick out the retaining rings of the bearings with round pliers and remove the crankcase... I discovered a broken spring in the gear shift mechanism, which reduces the play of the lever and helps to disengage the gear.
I ran through all the auto stores and the search was unsuccessful ((((And of course, everyone offered to buy the complete mechanism for 1,700 rubles, diligently insisting that I had no choice, that I would still have to buy it. I even went to our production specifically for the spring GOC, in an attempt to find something similar, but alas... But to spite all the store sellers, I naturally found help on GOOGLE (I always turn to it) and found an interesting idea to install a spring from the radiator cap of a VAZ Classic. The old cap with 6ki father))) And of course she fit like her own.
How to install front wheel drive
After replacing all faulty elements, install the front wheel drive in the reverse order of removal. Don't forget to install the new retaining ring into the inner joint housing. This must be done so that when the car is moving, the drive does not jump out of the side gear. When assembling, remember that the left shaft of the auto element is shorter than the right one.
Why does the speedometer break?
It is worth noting that in some cases it is not difficult to repair the speedometer yourself.
In others, you will need the help of specialists. Thus, oxidation of contacts is considered a fairly easy to fix fault. It is characterized by the “jumping” of the arrow, despite the fact that the speed of movement remains stable. The problem is resolved by cleaning the contacts.
The wires are frayed. This reason can be suspected by the chaotic movement of the needle when starting the engine. Meanwhile, experts note that sometimes the problem does not manifest itself for a long time. It can be identified using a tester.
Sensor failure. A speed control device whose performance is questioned is replaced with a known good one. If the speedometer begins to function normally after this procedure, then there is no point in further looking for damage. Often sensors become unusable after their housing is destroyed and water or dirt gets inside.
Connectors. They are located in the VAZ-2110 in a place where they are constantly exposed to dirt. As a result, the contact is broken and the speedometer needle moves chaotically. The connectors must be completely cleaned and the connection must be checked for reliability.
Often the speedometer also begins to malfunction due to shaft wear. In this situation, it will be possible to get rid of the problem only after completely replacing the above-mentioned part.
Pro tips, valuable repair tips
The part needs to be connected to the gearbox. This must be done with a hammer. You should not hit it too hard, just hit the outer end of the front wheel drive along its axis. Hit through the wooden plank, not at the drive itself. Drive until the inner joint shank is secured in the side gear.
The front wheel drive is a fairly important part in the car system. Repairing it is a rather labor-intensive procedure, but it is quite possible to do it yourself using the instructions described above. We suggest watching a video that will allow you to see the whole process in practice, which will greatly simplify the replacement.
What to do if the speedometer does not work on a VAZ-2110 with an injector
As you know, devices installed in a car allow you to monitor the situation while driving on the streets and monitor the operation of the engine and all other systems. Among others, the speedometer occupies a special place. It is located on the dashboard directly above the steering wheel. With its help, the driver finds out at what speed the car is moving.
In a situation when the speedometer and the injector installed on the VAZ-2110 do not work properly, the person behind the wheel puts both his own health and the lives of passengers at risk. At the same time, he can easily “earn” a fine from a traffic police officer for speeding too high. Thus, a working speedometer allows you to avoid a considerable amount of trouble.
Speedometer on VAZ-2110
As you know, the manufacturer installs an electronic speedometer on this model. If it has become unusable, then this problem is quite serious, since the above-mentioned device itself is not for sale. For this reason, you will have to buy a whole shield. However, in fact, in nine out of ten cases the problem is in a completely different place.
On a VAZ-2110 with an 8-valve engine, the speedometer receives information from the speed sensor. It, in turn, is located in the gearbox. There, through two gears, it receives torque data from the gearbox shaft.
Everything works similarly for cars with 16-valve engines.
Most often, as noted above, the problem is that the sensor is too dirty. In general, dust always accumulates under the hood of the VAZ-2110. It, when mixed with oil, creates a fairly stable barrier. As a result, the reliability of the speedometer readings becomes unconditional. The problem is easily solved - the sensor is cleaned and dried.
It is worth recalling that it will be more convenient to access it directly through the gearbox, since doing this from below is very inconvenient.
Another very common reason is problems with the electrical network. It all needs to be checked. In addition, attention is also paid to:
- reliable fastening of wiring in terminals;
- their general condition;
- fuses located within the mounting block.