September 14, 2016 Lada.Online 132 584 7
The car jerks, there is no traction, vibration is felt, or the engine is rough; all these are symptoms of improper operation of the individual ignition coil (IIC). Other signs of a faulty ignition coil are the presence of errors 0301, 0302, 0303 and 0304, indicating misfire in one of the cylinders. Let's look at a few simple ways to check the ignition coil with your own hands.
It is worth noting that the process of checking IKZ on modern Lada cars (XRAY, Vesta, Largus, Granta, Kalina and Priora) does not have significant differences. All actions are performed in the same way.
Lada 2112 › Logbook › Inspection of ignition coils
Due to the jerking that has been going on for two weeks now on
an engine warmed up below 70 C and the lack of effect from using the cleaning nozzle of Hi-Gear 3216 (I’m reaching the tank), I removed the ignition coils to search for a potentially faulty one in their camp using a simplified testing method learned from the Internet. The coils turned out to be of two types - the middle pair was made in Germany by Bosch (art. 0 221 504 461, from 01.2008 the article was replaced by 0 221 504 473), the outer ones were made domestically.
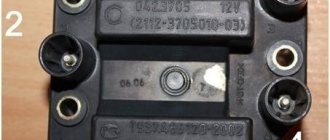
VAZ marking of coils depending on the manufacturer: 2112-3705010-10
— “BOSCH”, Germany;
2112-3705010-11 - NPP "ITELMA", Moscow; 2112-3705010-12 - JSC "SOATE", Stary Oskol; 2112-3705010-13
- PO "SEVER", Novosibirsk.
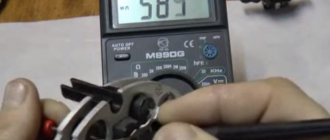
In the phenolic radiation of the body components of the Chinese multimeter DT9205A, work began vigorously. According to Internet recommendations, the switch of the device was switched to the 200 Ohm position and by closing the contacts against each other, the value of the device’s own resistance was obtained at the level of 0.8. The resistance of the primary winding, checked by closing the 1st and 3rd contacts of the coil, for domestic samples was 1.1-1.2, and for imported ones - 1.2, which marks complete parity of values at the level of 0.4, as the difference between the values obtained from the samples and the device’s own resistance. Order. But when checking the resistance of the secondary winding by turning the switch to 2 MOhm and closing the spring with the red probe and the middle contact with the black one, the effect of phenol vapor apparently weakened and all the coils, including the spare one (either working or not), kindly given by the previous owner of the car addition to the machine, the unit displayed on the multimeter screen did not move one iota. Naturally, the mind, altered by the smell of Chinese plastic, immediately decided to conduct a series of research experiments by checking the reaction with all other contacts and in reverse polarity, as well as with all other switch positions. The experiment did not bring any new data. The outlet was a summary of reviews from other users of the method, every second of whom had a similar result of checking the secondary winding and, accordingly, the verification method as a whole should be considered untenable and subjective...
But in search of better conductivity with the probes, I removed the rubber bands from the Bosch coils and wiped the contacts and springs. To wipe, just in case, I used a can of Nano Protech that was lying around. Auto electric." It turned out that one of the reels had not only a torn rubber band, but also a spring that was broken in half, so I immediately replaced these parts by removing them from the above-mentioned spare reel. Domestic-made reels did not yield to this operation - either the elastic fits on them much more tightly, or it is not removable at all...
The next morning, having taken a leisurely sip in the method with a multimeter, having put the coils in place, I am glad to note that although the adjustments and rare omissions in engine operation did not disappear, noticeable jerks and dips during movement still disappeared! Apparently half the battle was in the spring. The second half of the battle may lie either in oil drops found in the wells, or in injectors that have failed, or in the same undiagnosed coils. The option with defective spark plugs looks untenable, since the last set was installed two weeks ago, just after jerking appeared and the associated shadow of mistrust fell on the old set.
Source
How to check the ignition coil on a VAZ-2112 16 valves with your own hands
The ignition coil, which is located in the car, essentially converts the low voltage from the battery and generator into high voltage, to supply it individually to each spark plug. Roughly speaking, this is a miniature electrical transformer, the moment of failure of which is almost impossible to predict and repairs and diagnostics have to be carried out on the failed device. Below in our article we will tell you in detail how to check the ignition coil for a VAZ-2112 with your own hands.
The video describes in great detail the algorithm for checking the ignition coil on a VAZ-2112:
How to restore
Opening the aluminum plate, you will find a small printed circuit board on which the active components are located. It is coated with transparent silicone. It will need to be removed as it will interfere with repairs.
Pay attention to the wires that connect the board and connector pins. They are aluminum, and this metal undergoes destruction much faster than copper
All these wires will need to be replaced. Some motorists who repair modules use wires that are used in mice for personal computers. But you need to get used to working with them - they are covered with paint.
In general, the diagram of the entire module is simple, it contains:
1. Two BU931 transistors (you can use the domestic analogue of KT848A, it performs well and is much cheaper).
2. Two SGS-THOMSON switches (model L497D1).
Ignition coil device
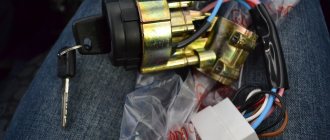
It is known that on 8-valve engines an ignition module was used (module repair, diagnostics) with two channels and coils that are capable of transmitting a spark to a pair of spark plugs at once. However, on a 16-valve engine, the coils became individual for each spark plug.
Prices and articles
The ignition coil from the Russian manufacturer SOATE for the VAZ-2112 has article number 2112-3705010-12 and costs around 1,000 rubles . Analogs from Bosch can cost twice as much, but the quality of these parts is much higher. In any case, the choice is always yours.
Ignition coil from Bosch.
Result
After two revisions, a number of improvements were noticed:
- ─ the car accelerates better;
- ─ failures disappeared;
- ─ response to the gas pedal has become clearer;
- ─ idle speed became stable;
- ─ gasoline consumption decreased by 0.7-0.9 liters to 7.8 l/100 km in the city.
- ─ the engine starts faster, the starter does not turn for more than 2 seconds.
It feels like the engine has become 100 thousand km younger.
Let us remind you that you can improve the spark on engines with an ignition module. By the way, do not forget that sparking is affected by high-voltage wires.
Your feedback on modifying ignition coils using capacitors:
Your feedback on reducing the connectors in the ignition coil circuit:
The process of checking all ignition coils on a VAZ-2112
The VAZ-2112 engine with 16 valves uses individual Bosch ignition coils and in order to check them, the following procedure must be followed:
The order of dismantling does not matter.
If it is damaged, replace it
Let's look at its correct location
Despite the fact that many people on the Internet talk about the impossibility of checking a coil with their own hands, it is possible to check it only by knowing their initial values, which are measured in ohms .
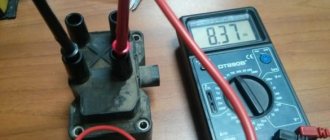
On the multimeter, a value of 00.3 Ohm is normal.
The value of 00.8 ohms is subtracted from the resistance of the multimeter and we get 00.5, which is the norm.
When the readings on the primary winding on all coils are correct and show their values, we proceed to checking the secondary winding.
Such designations indicate the serviceability of the ignition coil.
The number “1” stands for infinity and indicates a faulty ignition coil.
Let's sum it up
As you can see, the VAZ 2110 ignition module is a fairly simple device consisting of contacts, coils, boards and wires. However, only contact connections can be repaired. Other elements are beyond repair and need to be replaced.
At the same time, before starting repair work, it is necessary to properly test the module. To do this, you should adhere to the general rules, and also take into account the subtleties and nuances discussed above. As a result, diagnostics of the VAZ 2110 ignition module allows you to quickly identify certain problems and eliminate problems.
Symptoms of a problem
It is extremely rare for two built-in coils to fail at once, so it is more likely to be possible to start the engine with a faulty unit. However, even an inexperienced driver will immediately suspect something is wrong. The malfunction will appear as follows:
- unstable (floating) idle speed;
- the engine has difficulty picking up speed;
- characteristic sound of the engine (triple);
- jerking when accelerating (while moving).
Operating a car with such a breakdown is possible (you can drive to a garage or car service station), but it is not advisable unless absolutely necessary.
Similar signs of unstable engine operation are possible with a number of other ignition or fuel supply faults. To differentiate possible breakdowns, the performance of the ignition unit should be determined. It would be useful to check the contacts of the wires coming to the device, as well as their integrity.
Methods for diagnosing device performance
The simplest method that will help determine the performance of the coil is to replace it with a similar working device. This is possible if there is somewhere to get it. Please note that the module must match the parameters of the device under test. If the engine with a working coil works as before the breakdown, the ignition module is definitely faulty.
The main testing method involves using a multimeter. It consists in determining the resistance of the secondary windings of the coils built into the ignition module. The method is simple and does not require additional skills. The device does not need to be removed for testing. The check is done with the engine turned off.
This is how you check the resistance of the secondary winding with a multimeter
- High-voltage wires are removed from the module sockets.
- The tester switch is set to the 20 kOhm position.
- The multimeter rods are placed in turn in the recesses of the corresponding contact pairs (1 and 4, 2 and 3).
- With an intact secondary winding, the performance in both cases is the same. Normally, the resistance should be about 5.4 kOhm (in some models the indicators differ, which needs to be clarified). If the resistance is much greater, then there is a winding break. The resistance is much lower - a breakdown. The coil is faulty and cannot be repaired.
Video: How to check the secondary winding with a multimeter
When is there an option to repair?
If during testing both secondary windings show integrity and serviceability, the reason for the inoperability of the coils may be a break in the soldering of the switch wires. Such damage is detected when the rear cover of the module is removed. If you have a soldering iron and know how to use it, you can restore the integrity of damaged contacts, while at the same time strengthening the rest. This, unfortunately, is the only failure of the ignition module that can be repaired.
Testing the ignition module can be done using simple do-it-yourself instruments. Based on our advice, you will be able to fully check both the module itself and other elements of the mechanism that may be the cause of the breakdown. We wish you success in this matter!
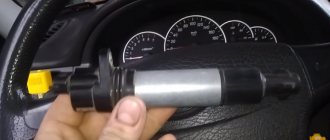
Visual inspection of the IKZ
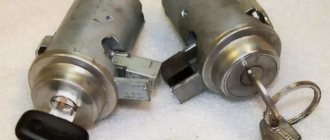
Remove the ignition coils from the engine using a 10mm or Torx E8 socket wrench (depending on the powertrain model). Carefully inspect the removed coils. There should be no cracks, damage to the rubber cap, melting or leakage of plastic. The spring located inside the coil must be in the correct position.
Checking the ignition coil with a multimeter
Checking the voltage at the terminal block of the wires
:
How to check ignition coil resistance
:
Attention! The resistance of the secondary winding of the ignition coil is highly dependent on its temperature. Carry out the test when the coil is completely cool. Compare the resistance of all four ignition coils to each other. A faulty ignition coil can be identified by very different values, provided that all coils are from the same manufacturer.
The process is also shown in the video: