ENGINE 11183 1.6L 8-valve JSC AvtoVAZ, the engine is known to car enthusiasts under the names: 11183; engine 21114; 2114; Kalina motor; motor Kalina, etc. VALUE Cylinder displacement, cubic meters. cm - 1.596 Rated power, l. With. (at 5200 rpm) - 82 Maximum torque, Nm (at 2700 rpm) - 120 Number of cylinders - 4 Number of valves per cylinder, pcs. — 2 Total number of valves, pcs. - 8 Cylinder diameter, mm - 82 Piston stroke, mm - 75.6 Spark plugs - A17 DVRM, BPR6ES (NGK), etc. Cylinder operation diagram - 1 - 3- 4- 2 Power system - Injector (distributed injection with electronic control) Fuel Unleaded gasoline AI-92 Fuel consumption, l./100 km. (city/highway) - 8.8/5.7 Lubrication system Combined (splash + under pressure) Type of engine oil - 5W-30, 5W-40, 10w-30 and 10W-40 Amount of engine oil, l - 3.5 Cooling system — Liquid, closed type Coolant — Based on ethylene glycol Motor life, thousand hours. (theory/practice) - 150/300 Weight, kg - 127
Car problems: 1-Reduced speed and traction for a couple of seconds. 2-On gasoline (there is still gas) it makes a little noise... 3-In the dark there is a bright ring of breakdown around the spark plug insulators.
Old high-voltage wires: Tag-No. 9216 01/21/13 13:03:54 PES/SCC SAMARA RUSSIA On the other hand: PES/SCC RUSSIA SAMARA 2190 3707080 rev.00C Wire resistance. 1-5.5 kOhm 2-4.7 kOhm 3- Does not show, infinity. 4- 3.2 kOhm
I bought new high-voltage wires: high-voltage wires with 8 valves. "Milena" 2111-3707080 For all fuel-injected VAZ cars (8kL) Resistance up to 7 kOhm How to connect.
Misfires during engine operation can be caused not only by faulty high-voltage wires, but also by failure of the ignition module. To identify a malfunction of the ignition coil on the Lada Kalina, we will need a multimeter with which we will measure the resistance at its contacts. Measurements are carried out in several stages to determine all possible faults in a particular section of the circuit. I’ll tell you everything in order below:
Individual ignition coils for LADA, which company is better?
On some engines of LADA cars (for example, VAZ-21126, 21127, 21129, etc.), the plant installs individual ignition coils (IKZ).
Currently, there are a large number of counterfeits of these products on the market. Let's find out what to look for when choosing ignition coils. The table of applicability of individual ignition coils is compiled according to catalogs of parts and assembly units:
| Article\Model | Engine | Lada Priora | Lada Kalina 2 | Lada Granta | Lada Vesta | Lada Largus | Lada XRAY |
| 21120-3705010-10 | VAZ | + | |||||
| 21120-3705010-11 | + | + | + | + | + | ||
| 21120-3705010-12 | + | + | + | + | + | ||
| 21120-3705010-13 | + | + | + | + | + | ||
| 21120-3705010-15 | + | + | + | + | |||
| 8200765882 | Renault | + | |||||
| 224332428R | + |
The catalog number of ignition coils installed from the factory indicates its manufacturer:
- 2112-3705010-10 - “BOSCH”, Germany;
- 2112-3705010-11 - "Dynatec" BV, Amsterdam;
- 2112-3705010-12 - JSC "SOATE", Stary Oskol;
- 2112-3705010-13 - “FSUE PO Sever”, Novosibirsk
- 2112-3705010-15 – ELDOR CORPORATION
Original or analogue?
There are more than 10 different manufacturers of ignition coils on the market. Depending on this, the price for IKZ can vary significantly. For example, good imported ignition coils for VAZ engines can now be found for 1500-1800 rubles. Cheaper Russian analogues will be 2 times cheaper.
It is worth considering that a fake part will have a significantly shorter service life than the original part. For example, according to reviews from owners, after installing Chinese ignition coils, the “cylinder misfires” error almost immediately appeared and the engine began to tune up. After 500-1000 km, the ignition coils completely failed.
WHICH GDP IS BETTER TO CHOOSE?
When choosing a GDP, two key factors must be taken into account - their resistance and breakdown voltage. The lower the resistance, the better the electrical impulse will be transmitted, and the magnitude of the maximum breakdown voltage determines how resistant the high-voltage wires on the VAZ 2114 will be to breakdowns.
The resistance value of products from different manufacturers differs from each other. As an example, we give you the resistance of the most popular types of GDP:
| Manufacturer | Resistance on cylinder No. 1 (kOhm) | Resistance on cylinder No. 2 | Resistance on cylinder No. 3 | Resistance on cylinder No. 4 | Breakdown voltage (kV) |
| Tesla | 3.27 | 4.16 | 5.02 | 6.26 | 50 |
| Cezar | 3.1 | 3.53 | 4.23 | 5.34 | 50 |
| Finwhale | 1.95 | 2.18 | 2.6 | 3.42 | 50 |
| Ween | 6.17 | 6.57 | 7.52 | 9.89 | 35 |
| Slon | 4.24 | 4.74 | 5.19 | 7.6 | 50 |
The cost of the Tesla GDP set is about 500 rubles, Cezar – 450 rubles, Ween – 270 rubles, Finwhale – 600 rubles, Slon – 500 rubles.
How to spot a fake
A few examples of how to visually distinguish original (high-quality) Bosch ignition coils from counterfeits :
- Under the casing of the original, a plastic case is visible (the fake has a metal case).
- There are two stamps on the original casing. They are not present on the fake.
- The outer edge of the original mounting axle box has a protrusion. There is no protrusion on the fake.
- On the fake there is no high voltage symbol (lightning) next to the mounting axle box.
- On the original plug, the font is made more clearly, the surface of the plug is better processed.
- The coding profile of the counterfeit plug is more rounded.
- The fake contacts are noticeably thicker and more rounded.
- The original has traces of casting.
- The factory number on the original is circled in an oval.
- The counterfeit rubber tip does not have a manufacturing date, product type number or logo.
- The extreme turns of the contact spring of the original are wound more tightly.
Other distinctive features with photos are presented in the report, which site users can download:
To download files you need to log in to the site.
Before purchasing new IKZ, make sure that the old ones are faulty (how to check ignition coils). Or maybe try to repair them? Leave reviews about ignition coils and your recommendations in the comments.
Let us remind you that the smooth operation of engines also depends on spark plugs. Do you know which candles are best to choose?
Source
Ignition coil Kalina cross 16 valves
Yesterday I was going to change the spark plugs on my swallow
. When removing the ignition coils on cylinders 3 and 4, I discovered cracks in the coil rubbers: . There is nothing to do, I went to the store to get new ones. He said that two ignition coils are needed for the 1.4 liter engine. They brought it and showed it - they seemed similar. I took it. Upon arrival at the garage, I began to compare the original kutushkas and the new ones. This is where the differences emerge. The rubber bands that fit on the candle were of a slightly different shape and were. removable, i.e. if you put a cut on a candle and then remove it, the cut remains on the candle. And how do you get it out of the narrow well, you ask?
The markings seem to be the same. On original ones: 0 221 504 473 2112-37050010-10 08-03-03 B 02774 Made in Germany On new ones: 0 221 504 461 2112-3705010-10 08-04-18 Made in Germany On the box of new ones it is written: Ignition module V 1.6 Kalina. So I’m wondering if these are the right coils, or maybe some kind of fake. I'll post a few more photos. Original coil:
About the Kalina ignition system
Kalina is a car of the famous AvtoVAZ and is equipped with two types of engines: 8 valve and 16 valve. The difference in these engines is quite significant, both in power characteristics and design.
Depending on the type of engine installed, the spark formation system in the combustion chamber also changes. For example, in 8-valve Kalina engines, an ignition module is used that is responsible for 4 cylinders at once, but in 16-valve engines, individual ignition coils are used, that is, each cylinder has its own coil, which is responsible for the formation of a spark in that particular cylinder.
Since this article is devoted to the ignition system of the Lada Kalina car, namely the ignition coils, after reading this article you can easily check your car’s coil for malfunction and possible failure.
Connection diagram for high voltage wires
Connecting new or removed old wires must be done strictly according to a specific scheme. Otherwise, the spark will not coincide with the compression stroke in the cylinder block.
In other words, when the fuel mixture is ready to ignite in the cylinder, a spark is required to ignite it. If the connection is incorrect, the spark will not appear at the required moment and ignition will not occur, which will make starting the engine impossible.
Scheme
The order and counting of cylinders in VAZ engines starts from the timing belt drive, from left to right, that is, the first cylinder will be at the timing belt, and the 4th at the oil filler neck.
Most often, the cylinder number is indicated on the ignition module, but there are cases when there are no designations on the module, then it is necessary to connect the cylinders according to the diagram shown below.
- The first cylinder is connected to the lower left contact on the MH;
- The second cylinder is connected to the upper left contact on the MH;
- The third cylinder is connected to the upper right contact on the MH;
- The fourth cylinder is connected to the lower right contact on the MH;
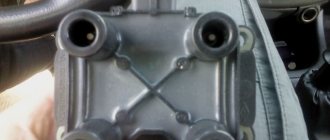
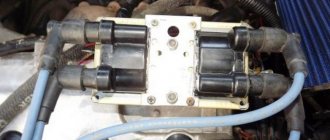
Ignition module
Below we describe in detail the design of the ignition module, signs of its malfunction, as well as testing methods for diagnosing this part yourself.
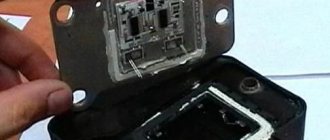
MH device
The ignition module is a square piece inside, which contains two coils. They are windings made of copper wire inside of which a steel core is placed. Each coil is responsible for the operation of two cylinders.
The MZ has secondary and primary windings designed to increase the voltage, which is necessary to form a powerful spark and ignite the fuel mixture in the combustion chamber.
Signs of malfunction of the MH
The Kalina ignition module has several typical symptoms of a malfunction, such as:
- Troubles the car engine;
- Jerks when moving;
- Loss of power;
- Difficulty starting the engine;
- “CHECK ENGINE” lights up;
Most often, if one of the windings of the ignition module breaks, two cylinders fail at once, since they work in pairs. If two cylinders fail at once in a car, this is a clear sign of a broken ignition module.
Examination
Checking the ignition module is divided into two stages: checking the external condition and checking with the device.
External condition assessment
It is necessary to dismantle the module and conduct a thorough inspection. The lower part should not have any chips, holes, etc. damage. There should be no rust, traces of corrosion, or any chips on the upper part where the high-voltage wires are placed. If the MH looks good outwardly, then you can start checking with a multimeter.
Testing with the device
Testing with a multimeter is carried out by measuring the resistance of the coils and the voltage on the power circuit of the ignition module. This method will help assess the condition of the module, as well as its serviceability.
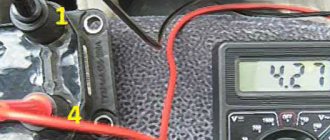
First you need to check the integrity of the MH control circuit. We set the switch on the device to measure direct voltage in the range of 20V. Turn on the ignition on the car and connect the probes of the device to the first two contacts on the connector (as shown in the photo). The device should show the presence of voltage in the range from 11 to 13 Volts.
Checking the power supply circuit of the MH
Next, we proceed to check the module itself. To do this, set the device switch to measure resistance in the range of up to 200 Ohms. We connect the probes of the device to the terminals of the module, namely 1-3, 2-4 (as shown in the picture). The resistance on the device should be no more than 5 Ohms
Signs of faulty wires
There can be many different signs of faulty high-voltage wires, but there are several signs that, once detected, require the wires to be replaced.
- The car jerks when you press the gas pedal. This is due to the fact that with a higher load the engine needs a large amount of fuel and its timely combustion, but since the wires are not able to give a spark at the right time, the car begins to twitch.
- When starting the car, one or more cylinders may not fire. This is due to the fact that when a spark is transmitted, it breaks through to the housing due to breakdown of the insulation.
To check the wires in more detail, you need to remove them from the car and carefully inspect them.
The wires should not contain:
- Gusts;
- Zadirov;
- Insulation breakdowns;
- Cracks in the plastic case;
If such problems are found on the wires of your car, they need to be replaced.
Custom ignition coil
This coil is installed on a 16-valve engine and is structurally different from the MZ in that it is responsible for the operation of only one cylinder. It is installed directly in the spark plug well and is put on the spark plug.
When it breaks down, the cylinder to which it is directly related fails.
IKZ device
The ignition coil, like the ignition coil, has two windings, a secondary and a primary, between the turns of which a metal core is placed. The coil has a rubber cap that fits onto the spark plug and prevents the spark from escaping to the side onto the engine housing.
Signs of IKZ malfunction
Below is a list of indirect signs, the presence of which can suggest that the ignition coil is faulty.
- The engine is tripping;
- Loss of power;
- Jerks when accelerating;
- Difficulty starting the engine;
- “CHECK ENGINE” lights up;
If such signs are detected, it is necessary to check the ignition coil.
Examination
The check is carried out in two stages: visual and using a device. These two methods will help you accurately verify the serviceability of the IKZ on Kalina.
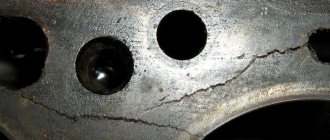
Visual inspection
Visual damage to IKZ
It is necessary to remove the IKZ from the spark plug well and inspect it carefully. There should be no chips or cracks on the reel body. The resulting cracks can provoke a breakdown of the coil, which can lead to misfire in the cylinder. You should also pay attention to the rubber cap; there should be no cracks or tears in the rubber; these defects will inevitably lead to misfires and spark breakdown to the engine body.
If a visual check shows that the IKZ is in good condition, you can begin checking using the device.
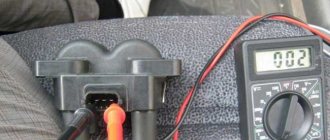
Checking with a multimeter
Testing with the device involves measuring the insulation resistance of the secondary and primary windings, as well as its integrity.
Ideally, the winding resistance should be as follows:
- Primary winding: tend to zero;
- Secondary winding: 300-400 kOhm;
So, let's start checking the primary winding. We set the measurement switch of the device to measure a resistance of 200 Ohms. Then we can check the error of the device; to do this, we close the probes of the device with each other and look at the readings of the multimeter; in this case, the error of the device is 0.7 Ohm (visible in the photo).
Determination of instrument error
After the error of the device has been determined, we proceed to measuring the resistance. To do this, we connect the multimeter probes to the extreme terminals of the coil (as shown in the picture (Fig. 1), pins 1 and 3) and obtain the resistance of the primary winding (in this case, 1.1 Ohm (Fig. 2)) from here we subtract the instrument error and get the desired value (in this case the coil is working).
Next we check the secondary winding. We move the multimeter switch to the 2000 kOhm position. We connect the red probe of the multimeter to the coil output (to the spring), and the black probe to the middle contact of the coil input (middle contact of the connector). We get the resistance of the secondary winding, which should be within acceptable values.
Checking the secondary winding
Based on the readings received, we conclude that the IKZ is serviceable.
Price for IKZ Kalina
General tips for connecting high-voltage wires.
Laying wires. Do not try to connect the wires in a bundle. Disassemble the wiring harnesses, release the wires from the plastic holders. Connect the high-voltage leads to the corresponding cylinder spark plugs. Lay the wires so that they do not rub against each other, engine parts, or hoses. Avoid sharp bends and tension on the wires. After connecting all the wires, secure them into the bundle with special comb holders included in the delivery kit.
The procedure for connecting I/O wires to a VAZ carburetor (2108, 2109, 21099)
The central wire from the distributor cover always goes to the ignition coil (bobbin).
The outlet of the distributor cover, which faces towards the front of the car, is connected to the first cylinder.
The outlet of the distributor cap, looking down, is connected to the third cylinder.
The outlet of the distributor cap, looking rearward, is connected to the fourth cylinder.
The outlet of the distributor cap, looking up, is connected to the second cylinder.
The procedure for connecting high-voltage wires to a VAZ Classic, Niva with a carburetor and distributor.
Central wire from the ignition coil (bobbin)
Injection VAZ produced before 2004 with an old-style ignition module (4-pin low-voltage connector)
Injection VAZ produced after 2004 with a new ignition coil (3-pin low-voltage connector)
As with the old-style ignition modules, the new coils are also marked with pins corresponding to the cylinders. But the connection order is different from the order on the old-style ignition module. Be careful.
Hello dear reader. Today I will talk about high-voltage wires installed on the 8-valve Lada Kalina.
I install high-voltage wires from Slon on Lada cars from the factory. There is a kit 2111-3707080-10 for the 1.6 engine and kits 2111-3707080 for the 1.5. The latter can be installed on Kalina and Grata, but it is a little shorter, because The cylinder block of the 21114 or 11183 engine is slightly higher than the block of the 1.5-liter engine. He is now standing on the car.
You can read about the manufacturer here:
During the operation of vehicles, the product showed good performance. Owners of cars, without conducting detailed diagnostics of the car, often, due to inexperience, change them unnecessarily.
Therefore, recommendations for dismantling explosive wires will be as follows:
: When removing the wire cap from the spark plug, carefully grasp the cap with your hand and squeeze it a little so that you can feel the tip of the wire. Then remove the cap;
: Similarly, remove the wire cap from the ignition module socket. In this case, you can slightly shake the cap to the sides and twist it a little. his.
Of course, all manipulations are performed with the ignition off. And even better, with the negative terminal removed.
When installing high-voltage wires, you must try to ensure that they intersect with each other and touch anything as little as possible. The factory clamps included in the kit are used for these purposes. You can also use clamps to adjust the sag of the wire.
The ignition module sockets and high-voltage wires are marked.
But it’s more convenient for me to mount according to the photo below.
1st wire is the bottom socket of the module;
2nd wire - upper module socket;
3rd wire - right module socket;
4th wire - left module socket.
We install the caps on the spark plugs and sockets. Then we adjust the tension with a clamp, and only then snap its lock.
For the convenience of checking the oil level, the wires of the 1st and 2nd cylinders are fastened with the clamp from the kit, and their tension/sagging is adjusted.
Against the background of the general fashion for “high-voltage wires of zero resistance”, the wires presented above have a sufficient thickness of the core, good silicone insulation and caps. They are a finished product. Over the 10 years of operating Lada Kalina, I installed different high-voltage wires on these cars and came to the conclusion that these are the most optimal. However, there were also fakes of Slon kits. There are two Kalinas in the family, and I also had experience working with a fleet of Lada training cars, where I worked as a mechanic.
I’ll tell you about measuring the resistance of high-voltage Slon wires in the next article.
ENGINE 11183 1.6L 8-valve JSC AvtoVAZ, the engine is known to car enthusiasts under the names: 11183; engine 21114; 2114; Kalina motor; motor Kalina, etc. VALUE Cylinder displacement, cubic meters. cm - 1.596 Rated power, l. With. (at 5200 rpm) - 82 Maximum torque, Nm (at 2700 rpm) - 120 Number of cylinders - 4 Number of valves per cylinder, pcs. — 2 Total number of valves, pcs. - 8 Cylinder diameter, mm - 82 Piston stroke, mm - 75.6 Spark plugs - A17 DVRM, BPR6ES (NGK), etc. Cylinder operation diagram - 1 - 3- 4- 2 Power system - Injector (distributed injection with electronic control) Fuel Unleaded gasoline AI-92 Fuel consumption, l./100 km. (city/highway) - 8.8/5.7 Lubrication system Combined (splash + under pressure) Type of engine oil - 5W-30, 5W-40, 10w-30 and 10W-40 Amount of engine oil, l - 3.5 Cooling system — Liquid, closed type Coolant — Based on ethylene glycol Motor life, thousand hours. (theory/practice) - 150/300 Weight, kg - 127
Car problems: 1-Reduced speed and traction for a couple of seconds. 2-On gasoline (there is still gas) it makes a little noise... 3-In the dark there is a bright ring of breakdown around the spark plug insulators.
Old high-voltage wires: Tag-No. 9216 01/21/13 13:03:54 PES/SCC SAMARA RUSSIA On the other hand: PES/SCC RUSSIA SAMARA 2190 3707080 rev.00C Wire resistance. 1-5.5 kOhm 2-4.7 kOhm 3- Does not show, infinity. 4- 3.2 kOhm
I bought new high-voltage wires: high-voltage wires with 8 valves. "Milena" 2111-3707080 For all fuel-injected VAZ cars (8kL) Resistance up to 7 kOhm How to connect.
AVTOVAZ's recommendations for spark plugs are as follows: Applicability of spark plugs for VAZ cars.
JSC ZAZS, Russia A17DVRM BERU, Germany 14R-7DU CHAMPION, England RN9YC NGK, Japan BPR6ES DENSO, Japan W20EPR BRISK, Czech Republic LR15YC BOSCH, Germany WR7DC
JSC ZAZS, Russia - AU17DVRM BERU, Germany - 14FR-7DU CHAMPION, England - RC9YC NGK, Japan - BCPR6ES DENSO, Japan - Q20PR-U11 BRISK, Czech Republic - DR15YC BOSCH, Germany - FR7DCU
Interelectrode gap: Classic ignition system - 0.5 mm (tolerance +0.05) BSZ - 0.7 mm (tolerance +0.05) Injection - 1 mm (tolerance + 0.1) (this is for us)
I came to the following conclusion for myself:
From studying various topics. 1st place BOSCH, WR7DPX 1.1mm = from 220 RUR 1 piece 2nd place EZ Standard. T17DVRM 1.0 mm = 280-380 rubles 4 pcs. 3rd place - NGK, BPR6ES - 11...1.1mm = 500 rubles 4 pcs.
We get the car from the passport. BOSCH, Germany WR7DCX 1.1mm = 345 rubles 4 pcs JSC “Robert Bosch Saratov” or EZ, Russia A17DVRM A15DVRM 0.7-1.0 mm = from 185-220 rubles 4 pcs. NGK, Japan BPR6ES = from 150 rubles pcs