The ability to have a good overview of the road situation is one of the main safety factors not only for the driver of the Lada Kalina 2, but also for other traffic participants. During the daytime, the driver relies on his vision, and at night, the light of the head optics comes to his aid. Here, the stability of the headlights and the quality of the luminous flux they emit come to the fore. Let's look at the reasons and how to replace the low beam lamp.
Replacement process
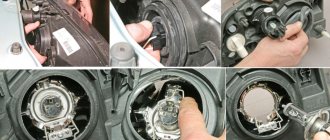
The lamp replacement process lasts 5-10 minutes. Experienced motorists can do it in two. No tools are needed. Let's start the replacement process:
- Open the hood.
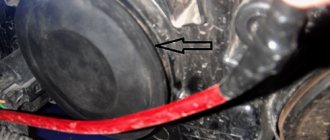
- We remove the plug from the headlight where the replacement will be carried out. It is not necessary to adjust the headlights after replacing the lamp.
The plug is marked with an arrow
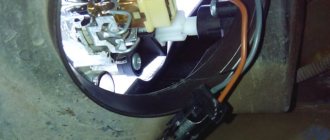
- We remove the plus and minus wires for powering the lamp.
The plug is removed, the cartridge is close
- We move the latch aside.
Move the latch aside
- We take out the lamp. This should be done carefully enough so as not to break the old light bulb.
Removing the lamp
- We carry out the assembly in the reverse order.
Thus, the lamp is replaced and the car is ready for further use.
Lamp selection
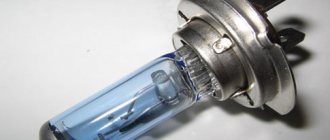
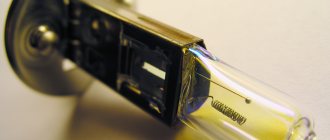
Bulb type H7, do not mix it up
The low beam lamp is marked - H7.
It is quite easy to find in the car market or in spare parts stores. The most common manufacturer remains OSRAM.
On the left is a Chinese lighthouse, on the right is a domestic OSRAM
These are domestically produced lamps that have gained popularity due to the price-quality ratio.
Other good manufacturers are:
- Bosch,
- Hella,
- Koito,
- Philips,
- Valeo.
These are already higher quality lamps, which are also more expensive than the popular OSRAM. Thus, the choice of lamps is quite wide, and every car owner will have something to choose from.
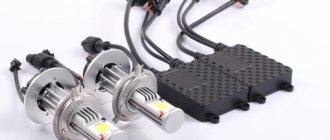
LED lamps for low beam
Controversial issue. It is difficult to choose the optimal ones in terms of quality.
Appearance of diode lamps
Light diode lamps view of the hood
Light diode lamps view from the hood
Tips for choosing headlight bulbs
Currently, the most commonly used bulbs are H7 sockets. They are divided into:
- halogen;
- LED;
- halogen with xenon effect;
- xenon
Halogen lamps have the most average performance. These lamps are the most common among car owners. But these lamps are also the shortest lasting due to their high heat. Halogen lamps with xenon effect always have an increased service life compared to conventional halogen lamps.
LED lamps are more economical, but are more vulnerable to external influences: impacts, shocks. But at the same time, LED lamps are record holders in terms of service life. Also, having purchased these light bulbs, you may encounter some difficulties when adjusting the light beam, described below in the article.
Xenon lamps are immune to shock and vibration. Their temperature regime is closest to that of daylight. But not everyone can afford such lamps due to their high cost. Also, xenon bulbs require the installation of an additional light ignition unit.
As a rule, when choosing replacement light bulbs, drivers are guided by reliability and low cost. An important factor is also the efficiency of lamps in conditions of poor visibility. Philips and BOSCH bulbs fit these criteria perfectly among halogen bulbs. Philips light bulbs, like almost all other products from this company, are the longest-lasting halogen lamps, but also less bright.
An exception is Philips “X-Treme Vision”, which produces LED bulbs with increased luminous flux, but their service life is lower than that of their classmates. BOSCH lamps, on the contrary, wear out faster, but, as a rule, they shine brighter. The color range of the light beam from BOSCH light bulbs is also more diverse.
Among LED light bulbs, the highest quality ones are Philips “X-Treme Vision” and the Korean “MTF-Light Argentum” series with high glow temperature and brightness.
The most popular halogen bulbs with xenon effect are produced by Koreans. "MTF-Light Palladium" is a lamp with a fairly high glow temperature (5500 K) and the attractive effect of expensive xenon. This model is also the most budget-friendly of xenon lamps. Also worth highlighting is “Osram Cool Blue Intense”, which is visually close to the original xenon. The light emanating from such a lamp has an attractive white-blue tint.
The most popular xenon lamp in Russia is “MaxLux H7”. The ratio of its cost and characteristics is quite favorable. This lamp, with a cost of up to 950 rubles, has milky white and bluish shades and a glow temperature from 4300 to 6000 K. The disadvantage of the lamp is its production in Chinese Sho-Me factories, which sometimes gives reason to doubt the quality and integrity when delivering goods to the shops.
Always carefully check the lamps you purchase for unexpected cracks or deformations!
For more expensive models, there are top Japanese manufacturers such as KOITO MANUFACTURING. The cost of such lamps is the highest, but the quality is strikingly different from their colleagues for the better.
You can find the cheapest light bulbs from domestic ones and from Dialuch. But only one thing can be said about these light bulbs - their low price fully corresponds to their quality. Such bulbs are more suitable for owners of domestic cars and cars assembled in Russian factories (for example, Hundai “Accent” and Renault “Logan”).
How to replace the low beam lamp Kalina hatchback, sedan, station wagon
The replacement is absolutely easy. You don't need any special knowledge or skills to do this. Even an inexperienced car owner can cope with this task. The only thing is that you need to act consistently and clearly. So, replacing a lamp consists of the following steps:
- First you need to open the hood.
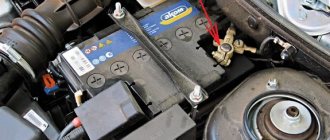
- Then turn off the power by removing the terminal from the battery.
- The washer reservoir should also be removed for convenience.
- Next, remove the rubber cover-cover.
- Then you need to pull out the light bulb by squeezing the latch with your fingers.
- Then the light bulb is pulled out and the terminal is disconnected from it.
This completes the procedure. It is very important to remember how the lamp was located and what wires were connected to it.
Otherwise, you may connect the new headlight incorrectly, which will require you to contact a professional. If you feel that this work is beyond your capabilities, it is better to immediately take the car to a technical service, where all the procedures will be performed for you. Of course, you will have to pay for this, but the result will be maximum.
Adjusting the headlight beam
Correctly adjusting headlights can only be done in a service station. However, let's look at how this operation is performed by experienced craftsmen.
Kalina-2 block headlight, correct adjustment of the beam direction
There are two adjustment screws on the back wall of the unit called the headlight unit. The first of them, located closer to the radiator, allows you to deflect the light beam “up and down”, and the “horizontal” direction is adjusted with the second screw. Ideally, this should happen: when the car is 5 meters from the screen, the border of the light spot touches line “2” (see figure). Line “1” is spaced from the ground at a distance equal to the height of the centers of the headlights. The second line is drawn 65 mm lower.
When making adjustments, the corrector switch is moved to position “0”. Of course, you only need to turn on the low beam. We also note that the headlights are adjusted one by one (the “excess” light source is covered with a cloth).
Here are a couple more tips that will be useful:
- The centers of the beams should be on lines AE, BE;
- Line “0” has the following meaning: it intersects with line “1” at one point, so the border of the spot should pass exactly through this point;
- The caps of the plastic adjustment screws are compatible with a hex screwdriver. However, a Phillips screwdriver will also work.
Replacing low beam lamps on Lada Kalina
Before starting work on replacing low beam lamps, it is worth clarifying that the Lada Kalina is equipped with two types of engines, eight- and sixteen-valve, which have different designs, and, therefore, all dismantling/installation manipulations with equipment are somehow related with an engine, will have a slightly different character.
On a sixteen-valve engine, it is more difficult to change the lamps; on the right side, if you do not have sufficient flexibility in your hands or it is large, you need to remove the washer reservoir.
And one more point needs to be clarified: when replacing one lamp, it is very advisable to change the second one (that is, both left and right), and in no case should you take the lamp by the base , since in this case dark spots will remain or it will quickly burn out.
First you need to remove the rubber plug behind which the lamps are located.
Next, the wire contacts from the lamp are disconnected.
The next step is to release the lamp from the spring.
The defective lamp is carefully removed and replaced with a new one, fixed with a holder.
The wire blocks are put in place and the tightness is checked. After replacement, it is better to adjust the headlights.
Heading optics contains 4 lamps
Let's look at how the directional optics, that is, the front headlight, is designed. The block contains four compartments, each of which contains one element:
- High beam lamp (H1);
- Low beam lamp (H7);
- Combined lamp for running lights and “dimensions” (W21/5W);
- Turn signal lamp (P21W yellow - PY21W).
The standard size of the element is indicated in parentheses.
If we talk about low and high beams, standard power lamps (55 watts) are installed from the factory. It is not recommended to greatly exceed this value. Lighting fixtures of sizes H1-H7 look like this:
H1 – high beam, H7 – low beam
When making a purchase, the main thing is not to confuse an H7 lamp with a halogen lamp of a similar size (H4). Also, some companies produce 24-volt lighting devices.
When replacing halogen light sources, adhere to the following rules: do not touch the glass with hands without gloves; it is recommended to degrease the lampshade before installation. “Secunda” is suitable as a cleaner.
The following text shows the side and running lights:
There will be two filaments in the headlight bulb and DRL
Its standard size is W21/5W. Well, the turn signal bulbs in the directional optics use standard ones. They are equipped with a metal base, their standard size is P21W (PY21W).
The yellow lampshade looks like orange
Reasons for loss of low beam
There are several reasons for the low beam to malfunction, some of which lead to the usual burnout of the lamps. It should be noted that there is a likely tendency for a similar malfunction to recur on Kalina with an enviable frequency - one and a half to two months. Reasons for this:
- Lack of tightness of the headlight (dust or moisture entering the bulb settles on the reflector mirror and the lamp bulb, which leads to its overheating. You can learn more about the reasons and ways to eliminate fogging of headlights at the link);
- An upward change in voltage in the vehicle network (a voltage surge also causes the halogen headlight bulb to burn out).
There are other possible problems that cause the lack of low beam:
- failure of the fuse responsible for the proper functioning of optical devices;
- violation of the connection of the lamp plugs (oxidation or burning of contacts).
Which lamps are best to use in low beam headlights?
As a rule, on the Lada Kalina, halogen type H7 lamps from the German company OSRAM (12-volt, 55 Watt) are installed in the low-beam headlights. You can replace it with an equivalent lamp from a German manufacturer or choose, for example, a halogen light source from Philips Extreme Vision, which is distinguished by its brightness and exorbitant price. But you can approach this issue from a less expensive side, purchase, for example, lamps from GE SportLight or even simpler: buy domestic halogens. Despite the low cost, the products are in no way inferior in lighting brightness to their famous competitors.
Despite the low cost, the products are in no way inferior in lighting brightness to their famous competitors
Replacing the low beam lamp on Kalina is quite easy and simple. The main thing is to choose the right lamp, which must be marked H7 . The most common manufacturers chosen by motorists are OSRAM and Philips.
Low illumination of viburnum: factors of problems
The most common malfunction in vehicles is burnt out light bulbs. Sometimes this happens quite often, indicating the appearance of an auxiliary cause that caused the breakdown.
Note: When dismantling halogen light bulbs, you need to ensure that the bulb is sterile.
It is very important to keep debris and dirt out. Therefore, sometimes the touch of fingers can play a cruel joke
Low beam lighting on the Lada Kalina refuses to shine in the following cases:
- The fuse that protects the light bulb's power circuit fails.
- The headlight housing has become depressurized, dirt and foreign particles have gotten inside. The reflector along with the bulb bulb becomes clogged, and this leads to overheating and, accordingly, damage to the filament.
- Unstable operation of the generator voltage stabilizer. As is known, power surges significantly increase the breakdown of halogen light bulbs.
- The power supply to the lighting equipment has been damaged, for example, oxidation has occurred, a wire has broken, or the contact of the light bulb plugs does not work.
Installing a new one: sequential instructions
The procedure for removing and installing a headlight, which is located on the right or left side, is not particularly different from each other. It is only important to act strictly according to the instructions. When installing a new light bulb, you must only hold it by the base and do not touch it with your hands. When removed, you can completely hold it in your hands.
Note that for the Lada Kalina (16-valve engine) a lamp with an H7 socket is required. Install the new one as follows:
- Determine the seat so that the protrusion in the base coincides with the groove on the headlight. It must be firmly fixed. Only then will it be clear that the protrusion has fallen into the groove;
- press the latch against the lamp so that the center of the base is between the antennae of the latch;
- snap the latch into place;
- connect both wires to the clamp and close the lid tightly.
After completing this procedure, you need to turn on the headlights at close range and check their operation. If everything is fine, then the installation was completed correctly. Otherwise, you will have to take the car to a car service center and pay money for it. Lamps should only be purchased in special stores. It is advisable to give preference to well-known manufacturers and models with a guarantee. Osram H7 12V 55W headlights for the Lada Kalina Cross are very popular today.
Running lights for Kalina: installation method, connection
Nowadays, the question of which running lights is best for Kalina is quite relevant. Since November 2010, all vehicles are required to drive with low beams or fog lights on during the daytime. In accordance with the changes made to the traffic regulations, daytime running lights (DRLs) can be used. After the adoption of this resolution, car owners encountered certain difficulties. In the first place was the problem of forgetfulness: people did not turn on the lights due to lack of habit. Sometimes they forgot to turn them off.
And if in the first case, traffic police officers initially tactfully reminded about the rules, then in the second, discharged batteries caused extremely negative emotions among vehicle owners. When changes were made to the rules and daytime running lights were allowed for use, some car owners of Lada Kalina and other brands attempted to resolve the issue using homemade devices, various lamps and components from commercially available LEDs.
A variety of homemade devices of various types and qualities have appeared. But the changes made to GOST strictly regulated the requirements for DRLs. Manufacturers of lighting devices for motor vehicles did not miss their chance, and a variety of daytime running lights from various companies appeared on sale.
Basic criteria for choosing headlights
The popularity and demand for running lights is increasing over time. The various types of such lamps offered by manufacturers can not only ensure traffic safety, but also diversify the appearance of the vehicle. When choosing, you should carefully read the markings on the lamps.
Automotive lighting devices must be marked to permit their use on the territory of the Russian Federation. You should not choose devices based on the lowest cost. In addition to their low operational reliability, such lighting devices may be rejected during the next technical inspection. Then the car will be unusable until the causes are eliminated.
Markings must be clear, not exposed to external influences and located in a visible place. They must contain the country of origin code in accordance with EU requirements. The presence of a reflective element is also necessary. The selling organization is required to have a certificate for the product offered.
Parts manufactured by Hella, Philips, and Osram meet these requirements. Many of them can be installed on Lada Kalina. The cost of the kit ranges from 2,000 to 15,000 rubles. and depends on the manufacturer, design, performance characteristics and completeness.
To study the variety of shapes and lighting options when selecting daytime running lights for Kalina and preliminary evaluate design solutions, you can view photos presented in sufficient quantities in specialized magazines and on the Internet. Kits designed for self-installation are available for sale. These sets include:
- mounting brackets;
- connecting cable;
- connector;
- set of fasteners, bolts, nuts, latches;
- set of lighting fixtures.
The kit may contain a special device that, according to the rules, turns on and off the running lights when starting and stopping the engine. When purchasing such a kit, a connection diagram must be available. When installed on Kalina, running lights designed for foreign cars must be adapted to specific operating conditions.
Method of installation of lighting devices
The installation of DRLs on Lada Kalina cars, like on all other cars, can be done at a car service center or independently. There are no restrictions in this regard either in the rules or in GOSTs. The main requirements for the location of daytime running lamps are:
- The distance between the closest inner sides of the lamps must be at least 60 cm. If the overall width of the car is less than 130 cm, a distance of up to 40 cm is allowed.
DRL installation diagram for Lada Kalina
- The distance from the outer side of the lamp from the overall edge of the car should be no more than 40 cm. The lamps can be located at a maximum height of 150 cm, at least 25 cm from the surface of the roadway.
- In terms of length, the lamps are installed on the front side of the engine compartment, observing the height clause.
- The correct installation is considered to be the position when the light reflected in the rear and side mirrors of the car driving in front does not interfere with its driver. Angles of deviation from the axis of movement of the vehicle are allowed up to 20° in both directions horizontally and 10° vertically (down or up).
- In addition to observing the installation dimensions of fluorescent lamps, GOST regulates the brightness and size of the area illuminated by the devices. Basically, homemade devices do not pass testing based on these parameters.
The process of installing DRLs on the Lada Kalina must begin by removing the upper and lower grilles. If you decide to install lamps in the bumper, you need to remove it too. But the optimal place is the bottom grill, since it can use existing holes.
In the selected places, it is necessary to make markings according to the shape and size of the lamps, and carefully check for compliance with GOST requirements. Then use a regular knife or any other suitable tool to cut or widen the holes for the devices. It is advisable to be careful when working and not to exert much force to avoid damaging plastic parts.
After adjusting the holes for the devices, you need to secure them with standard fasteners from the purchased kit, lay and secure the wires along the grille. After this, the parts can be installed in place. It is not advisable to secure the lower grille or other part with fixed lamps thoroughly until the devices are fully checked after connection.
Connection to Kalina's on-board network
There are no restrictions or rules regarding the connection diagram in GOST. But turning on and off daytime running lights must obey certain rules. The running lights should turn on automatically when the engine starts and turn off when the engine stops. When you turn on the high or low beams, the DRLs should turn off. Sometimes Kalina car owners want to additionally turn off the daytime lights when the engine warms up.
This option is possible with certain knowledge and skills in working with automotive wiring. When installing daytime running lights on Kalina in the factory version with a diagram and instructions for connecting to the control device, usually no problems arise. The mentioned device is a relay with five terminals numbered 85-87, 87a and 30. To connect it to Kalina, you need to find any power wire from the low beam headlights and the positive wire from the ignition switch.
All these wires need to be installed with a female terminal with a small piece of wire, carefully insulating the connection points. Wires of the required length are also connected to the relay terminals, but with male terminals. Next, the wire from terminal 86 of the relay must be connected to the car body under any mounting bolt. It is advisable to immediately connect the wire marked “minus” from the DRL here.
The wire from the relay terminal with number 87a must be connected to the “plus” from the ignition switch. Wire 85 must be connected to the wire from the low beam headlights. You need to connect the positive wire from the running lights to terminal number 30. Relay terminal 87 is not used.
After installation is completed, you can check the operation of the lamps on the Lada Kalina car. To do this, you need to turn on the ignition. When the engine is running, the daytime running lights should light up. Next, you should turn on the low-beam headlights, the DRLs should go out, and the low-beam headlights should light up.
When switching to high beam, the situation should remain the same. Next, you need to turn off the high and low beams, and the running lights will light up. Then turn off the engine and the daytime running lights should go out.
Low beam lamps, their types and malfunctions
Lada Kalina is a budget project of the domestic AvtoVAZ plant, and as befits an economy-class car, it cannot please you with high-quality components that can last at least a couple of years without interruptions. Most often, low beam lamps fail. There may be several reasons for malfunctions. This:
- The headlight is not sealed, which leads to its clogging. Dust settles in the lamp and leads to destructive overheating.
- Increased voltage in the on-board network, which is directly related to the operation of low beam headlights. In order to find out what voltage the generator produces, you need to diagnose it using a tester. The voltage should not exceed 14.4 V.
- Overvoltage causes the fuse to overheat.
- Violation of the electrical circuits of the right and left lamps.
- Oxidation of contacts.
There are other reasons, but these are the most common.
In order to find out whether the lamp needs to be replaced, or whether the breakdown lies in other parts, for example, in a defective fuse ( F12 and F13 ), you must first check it with a multimeter, put it on a continuity test and touch the parallel contacts on the fuse or lamp if it rings Either it works properly, it is silent, then you need to change the faulty part.
It is important to find out whether voltage is supplied at all to all terminals. If voltage is not supplied, then you need to ring the wire until the cause of the breakdown is discovered .
Here it is worth clarifying that driving without low beam lamps is categorically unacceptable, since in the dark, such an omission can lead to a serious accident.
At the moment there is a wide range of lamps. Experienced motorists put the following on the Lada Kalina:
- Lamps from Osram, which cost about 310 rubles.
- Narva, which cost a little less, 290-300 rubles.
- An excellent option for the Lada Kalina are Philips H7 halogen lamps, costing 290 rubles. a piece.
There are also all kinds of modifications: all-weather lamps, improved visual effect, heavy-duty, designed for round-the-clock operation, etc.
Possible causes of malfunction
So, if the low beam in one of the headlights of a Lada Kalina does not light up, then the reason most likely lies in a burnt-out light bulb. Replacing it will not be difficult for every car owner.
However, unfortunately, there are a number of other reasons for this malfunction, the most common of which are the following:
- The contacts in the plug block are oxidized or burnt;
- The fuse has blown;
- Open circuit;
- The relay has failed.
Below we will look at how to fix all these problems.
H7 standard bulb
Replacing the lamp
Replacing the low beam on Kalina is quite simple. Moreover, you will only have to spend a few minutes of your time on this.
The only thing is that before replacing old lamps, you need to purchase new ones of the H7 standard. It is advisable to install new bulbs on two headlights at once so that they provide the same glow.
Removing the plug
Replacement instructions are as follows:
- First of all, you need to remove the rubber plug located on the back of the headlight. To do this, you must first open the hood.
- Then you need to remove the positive and negative terminals from the contacts.
Releasing the latch from the landing
- Next, you need to press the spring bracket with your own hands and remove it from the seat.
- After this, you need to remove the old light bulb and put a new one in its place.
- Then you need to replace the bracket, put the terminals on the contacts and install the plug.
When replacing light bulbs, you need to pay attention to the quality of the contacts. If the contacts are oxidized or burnt, they must be cleaned
Fuse and relay block Lada Kalina
Replacing the fuse
If, after replacing the lamps, the low beam headlights in the Lada Kalina still do not work, you should check the fuses. They are located in the mounting block under the steering wheel.
The lamps are protected by different fuses:
- Right lamp – F12
- Left lamp – F13
It must be said that it is not always possible to visually identify a blown fuse. Therefore, even if it has no external defects, you should check the voltage at the terminals with a test lamp or multimeter.
Lada exterior lighting diagram
Open circuit
If the fault cannot be eliminated, then you need to find an open circuit.
You can do this as follows:
- If there is no voltage at the fuse terminals, you need to ring the wire that goes from F13 to contact No. 56 of the lighting control unit, since you can turn on the low beam headlights on Kalina using switch No. 5.
- If the wire is intact, but 2 headlights do not light, then switch No. 56 must be replaced. However, you should first check whether voltage is supplied to the switch itself.
- If voltage is supplied to fuses F13 and F12, you should check whether there is voltage at the relay output. Let us remind you that the low beam relay in the Lada Kalina is located in the mounting block.
- If there is no voltage, you should check the area from F12 to contact No. 56 of switch No. 4, which is located on the steering wheel, as well as the area from terminal No. 56a to terminal 1 of relay K7. It is also quite possible that switch No. 4 or the relay itself is not working.
Replacing the latter is not difficult, since it is simply inserted with contacts into the socket.
In the photo - lighting relay Lada Kalina
In cases where there is voltage at the relay output, you should check the wiring of the machine from the mounting block to the headlights according to the diagram.
As we can see, finding an open circuit or a faulty part is not difficult. To do this, you only need a low beam circuit on Kalina and a multimeter or test light. These are, perhaps, all the main reasons for this malfunction on the Lada Kalina car.
How to replace the lamps yourself
Changing a light bulb in Kalina yourself is not difficult. The time spent on the work depends on the skill of the driver and the size of the hands. Some owners change light fixtures in 15-20 minutes without removing the headlight, while others suffer for more than an hour and ultimately dismantle the optics.
When replacing, cloth gloves are used. This helps protect the skin on your hands and also prevents contact with the bulb. When touched, fingerprints remain, which heat up when the light is turned on and after a while burn through the thin glass.
During work, the battery terminal is unscrewed to avoid a short circuit, which will lead to burnout of the fuse link in the fuse box.
Far module
Replacing the high beam lamp is easier than in the low beam module, since the cover is located closer to the radiator grille.
To perform the operation you will need:
- Turn off the Kalina engine.
- Open the hood lid.
- Remove the protective boot on the back of the flashlight.
- Carefully disconnect the plastic chip.
- Open the latch.
- Pull out the lamp.
Assembly is carried out in reverse order. When installing the terminal, you need to check the contacts and, if necessary, clean them using a flat-head screwdriver, sandpaper or a special chemical spray.
Low beam
Replacing a low beam lamp on a Lada Kalina depends on the experience of the owner and is divided into two types:
- Without removing the headlight.
- With module dismantling.
Most Kalina owners cannot replace the lamp in the left headlight due to limited space. In this case, you will have to ask a more dexterous friend or dismantle the lighting device yourself for convenience.
To change lamps on installed optics:
- Unscrew the filter housing near the left headlight and move it towards the engine.
- Disconnect the washer motor terminal, remove the screws and move the reservoir to the side.
- Open the light module seals.
- Remove the block with wires.
- Remove the spring clip.
- Remove the part.
Carrying out replacement work yourself
Before replacing the lamp, a number of preparatory operations are required. In particular, during the work you will need:
- the lamps themselves (one or two);
- hand tools (set of wrenches, pliers, screwdrivers);
- thin, clean work gloves;
- a bottle of alcohol or vodka and a piece of clean cloth.
The car itself should also be prepared before changing the lamp.
It needs to be installed on a level area with the handbrake on, and chocks placed under the wheels to prevent possible rolling of the car.
The car, of course, must be turned off.
When all operations have been completed, you can open the hood and disconnect the power from the negative terminal of the battery. This is done to prevent a short circuit from occurring. When low beam, in this case it will be necessary to dismantle the headlight washer reservoir.
The lamp can be changed with or without removing the headlight from the car. When you decide not to remove the entire block, you first need to pull any petal of the rubber plug that secures the lamp in the headlight. The order in which the wires fit to the lamp must be remembered or sketched. Next, you need to carefully remove the spring clamp of the lamp itself by pressing on it and disengaging it. This must be done carefully, otherwise it may fall into the lighting fixture itself, which will entail dismantling the entire headlight unit. The lamp that requires replacement must be removed and a new one put in its place.
Installation of a new lamp must be carried out with gloves, otherwise the grease marks that will remain on the lighting device will reduce its service life. When contact does occur, the lamp must be wiped with a cloth soaked in an alcohol solution. The remaining operations to replace the lamp are carried out in the reverse order of disassembly.
When the assembly is completed, you can start the car and check the functionality of the low beam.
Recently I encountered a problem. When I turned on the low beam at night, I was surprised to find that it was simply not there. Before that, I traveled to Russia, where it is mandatory to turn on the lights during the daytime. Therefore, when the low beam disappeared and what caused it, I did not know.
The electrical circuit for turning on the low beam in Kalina is extremely simple. Along the path of electric current from the power source (battery or generator) to the low beam bulb there are fuses, a lighting unit, and a low/high beam switch.
The search began with the simplest thing - checking the fuses. They turned out to be fine. After two more causes have been ruled out (the lighting unit and the headlight switch), it is time to check the low beam lamps.
What can I say, this is a very, very inconvenient matter, especially if you are doing it for the first time and do not know all the design subtleties.
IMPORTANT! Everything stated below is my personal experience. It is not a fact that the technology described is correct. Therefore, the author does not bear any responsibility for any possible damage caused as a result of the actions described below.
I started with the right headlight. In order to get to the lamp, I had to remove the windshield washer fluid reservoir. It turned out to be quite simple. In order to remove the windshield washer reservoir you need to:
- Remove the terminals from the motor contacts (two motors, in the case of a station wagon or hatchback), first remembering how they are connected;
- Unscrew the front bolt securing the tank, which is located above the headlight;
- Loosen the nut that clamps the rear reservoir mount near the shock absorber strut;
- Carefully remove the tank without spilling its contents.
After this we get completely normal access to the headlight.
Procedure for removing the low beam headlight:
- Remove the rubber cover to access the headlight;
- Carefully remove the two headlight power wires, remembering their location;
- Gently press and slightly lift the iron latch;
- After the bracket is removed from the grooves, move it to the side;
- Carefully remove the low beam lamp by the contacts.
The procedure for installing the low beam lamp is reversed. IMPORTANT! Under no circumstances should you touch the glass part of the lamp with your hands, because... When turned on, it will immediately burn out. If this happens, you should thoroughly wipe the glass part of the lamp with alcohol and let it evaporate completely.
Procedure for installing low beam headlights:
- Install the low beam lamp so that its protrusion on the base fits into the corresponding groove on the lampshade, thereby securely fixing it.
- After this, the most difficult part of replacing the lamp is performed - you need to carefully fix the lamp with a latch, falling exactly into the grooves, and you need to make sure that the lamp itself does not rotate in the lampshade. To do this, the latch is wound up a little from the top, then pressed lightly and lowered down.
- If everything went well, you should definitely check the reliability of the lamp so that it is securely held by the latch and does not rotate around its axis.
- Connect the wires, observing polarity;
- Close the hole to access the lamp with a rubber cover;
- Reinstall the windshield washer reservoir, securing it and connecting the wires.
After this, if necessary, you can proceed to replacing the left low beam lamp. Access to this lamp is much worse, because... It is almost impossible to remove the coolant reservoir without draining the antifreeze. Therefore, you have to dodge and act by touch.
Several years ago, the government approved a law according to which during the daytime it is necessary to drive a car with either low beam headlights or DRLs (daytime running lights). As a result, car low beam lamps began to burn out much more often. The first generation Lada Kalina is no exception. Those who do not want to drive with low beam headlights install daytime running lights. Kalina 1, unlike the second generation model, does not have DRLs, so you have to drive with low beam headlights. From our instructions you will learn how to replace the lamps in the front headlight unit, as well as the reasons why these lamps may not work.
How the work is carried out
Let's figure out how to replace the low beam light bulb on Kalina with your own hands, the process is quite simple and, by and large, does not require any special devices, you only need your hands. But still, the tool may be needed at the preparation stage.
Preparation
It is important to ensure a comfortable and safe working environment, so remember the following:
- The work can be done anywhere - even in the yard near the house, but it is advisable to go to the garage. There you can not be afraid of precipitation and, if necessary, find this or that tool.
- First of all, the hood is opened and the terminal is removed from the battery. We remind you of this in every review. Therefore, make it a habit to de-energize the system when working with electrical equipment to prevent short circuits and electric shock.
- Further preparation depends on what engine is installed in your car, you need to provide access to the rear of the headlight housing, and for this you need to disconnect the expansion tank on the left, and the options on the right may be different. Therefore, be guided by the situation and decide for yourself. What needs to be removed and what should not be touched.
Replacement process
The assembly instructions have the reverse sequence compared to the disassembly process, the main thing is to place the light bulb correctly, which the cutouts on the base will help with.
Which lamps are best to use in Kalina
To find out which lamps are installed in Kalina during assembly, you need to remove the cover and pull out the part.
The name, model and type of spare part are printed on the case. AvtoVAZ uses products from Philips as the main light. However, some models contain parts from Osram. When searching for light bulbs in Kalina, you should be guided by proven options:
- number on the Kalina body or in the vehicle passport;
- a burnt-out sample previously removed from the lantern.
The body number is entered into a special window that pops up when you visit online resources with catalogues. Such systems independently determine the year of production, configuration and type of lighting equipment and offer a list of original spare parts and replacements for Kalina.
The number is provided to the seller in the store to accurately determine the part code. A simple and reliable way is to remove the lamp from the base and buy a new one based on the sample. In this case, you avoid purchasing the wrong part and having to go back to the store for an exchange.
The Kalina hatchback and sedan use the same lighting devices. The type of spare parts is no different for the station wagon.
When choosing a light bulb, it is important to adhere to the recommended parameters from the Kalina manufacturer. Installing a light with a higher power will lead to melting of the internal parts of the optics and damage to the contact group
After installing cheap substitutes, damage is possible due to poor quality assembly of the part and even explosion of the bulb.