Published: 01/28/2021
- Problem #1: One headlight doesn't work
- Other reasons why one low beam headlight does not light up
- Problem No. 2: one of the xenon phases does not work
- What to do if you need to go
- Possible causes and diagnostics of the malfunction
- Headlight device
- One of the high beam lamps has burned out
- Low beam lamp burnt out
- Why don't the low beams come on?
- Wiring
- Low beam does not work: reasons
- Replacing the Priora light module
- Wiring problems
- Which bank deposits will be subject to 13 percent?
- Low beam does not work: reasons
Problem #1: One headlight doesn't work
If there is a problem with one headlight, it usually means that one of the incandescent bulbs has gone out. Tungsten filaments have a limited lifespan, which depends on the number of hours of use and how strong the vibrations are during driving. The more you use your car at night, the faster one or both headlights will fail.
A non-working headlight is a discomfort that affects safety
A typical automotive incandescent bulb (halogen or regular) has a lifespan that can range from 600 to 2000 hours of use. For the average car owner who drives between 12,000 and 15,000 miles per year, this means that the headlights may need to be replaced every five or six years, depending on how often they are used. Driving on rough roads can shorten the lifespan by causing the thin filament inside the lamp to fail prematurely.
How to fix? Replace the burnt out lamp. But before you do, take a close look at the electrical connector on the back of the headlights and make sure it's not corroded or loose.
The housing is a sealed plastic shell with a light bulb and a socket installed on the panel.
The procedure for replacing a light bulb should go through the following steps:
- The socket that holds the light bulb usually screws into the housing.
- By rotating it counterclockwise about a quarter turn, unlock the tabs and pull the lamp out of the housing socket.
- Once the socket has been removed from the housing, you can unplug the old bulb from the socket and replace it with a new one (the bulbs must not only be the same shape and size, but also the same wattage.
- After installing the bulb in the socket, check the plug before inserting it back into the headlight housing.
- Turn on the headlights to make sure the lamp comes on.
- If everything is ok, turn off the headlights, then put the bulb and socket back into the housing.
- Be sure to screw the socket about a quarter turn clockwise to lock it in place (otherwise water and dirt can get into the housing, causing corrosion and fogging).
We would like to give an important tip that even most auto mechanics do not know: use latex gloves when replacing a light bulb, because... sebum and oil residues corrode the glass of the halogen lamp and it eventually burns out earlier than it should.
If the new headlight does not light up when you turn on the backlight, the socket may be loose or corroded, or there may be a wiring problem in the headlight circuit. If the outlet is corroded, treat it with an electronics cleaner.
If this does not restore a good electrical connection, you will have to replace the outlet. Treating the socket with dielectric grease before installing the lamp will help protect it from moisture and corrosion.
Checking for broken contact
If you are not sure if the thread is broken, you can check its integrity:
- Set the digital voltmeter (DMM) to the lowest value on the resistance scale.
- Turn on the digital multimeter and touch the test leads on each side of the lamp contacts.
If there is continuity, your indicator will beep or show zero resistance; otherwise, the display will show infinite resistance, overload, or no sound, depending on the specific meter configuration.
The following video shows how a blown fuse can affect one headlight.
Attention: proper handling of car headlight bulbs
When working with a light bulb, never touch its surface. Oil on the skin of your fingers, combined with the high operating temperature of the bulb, will shorten the life of the bulb or cause it to break down more quickly.
Other reasons why one low beam headlight does not light up
Sometimes the abnormal operation of headlights lies in very unusual reasons. Thus, there is a known case when the owner of a Niva turned off the low beam after he dismantled the headlight cleaners, which had long ceased to function. As a result, for a long time he could not understand why the low beam on both headlights turned off. Only through experimentation did he manage to discover that for the headlights to work normally, the presence of any motor, be it left or right, is necessary. Ultimately, it was necessary to create an imitation of the presence of these elements by closing the contacts going to them.
This example illustrates that if, after checking all electrical circuits and the functioning of all elements, the malfunction cannot be eliminated, you should remember whether any changes or improvements have been made to the design of the car in the foreseeable past. After all, it cannot be ruled out that in the process of making changes, some brilliant idea of an engineer at the car plant was violated, which provoked the disappearance of the light.
In cases where all of the above measures were taken, but it was not possible to achieve normal operation of the low beam lamp, you should contact specialists at a service station. Otherwise, further searching for the reason why one low beam headlight is not on may take a lot of time without achieving the desired result.
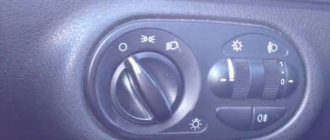
Finding out the reasons that caused the low beam to fail and gaining experience in eliminating them will also help if the opposite problem occurs - the high beam stops lighting while the low beam is working normally. As a rule, the causes of the malfunction in this case are the same as those described above, only they are also supplemented by inadequate operation of the steering column switch. By the way, it can also be the reason why one low beam headlight does not light up. And in this case, it is best to simply replace it.
Problem No. 2: one of the xenon phases does not work
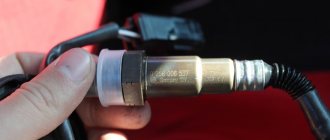
Diagnostics: Xenon headlights, unlike halogen incandescent lamps, do not have a tungsten filament, therefore, if the lamp does not light up and voltage is properly supplied to it, then most likely there is a crack in it through which xenon gas passes.
The xenon element requires a high and working voltage, so if this device does not work, first of all you should check the electronics - test the contact with a multimeter. In some cases, the bulb and igniter are connected together and are one device. In such cases, they can only be replaced as a whole.
Problems with xenon
Xenon headlight bulbs are quite expensive (from $50 to $100), and igniters are even more expensive (the price can be about $200!). Therefore, before you start replacing, make sure 100% that the problem is in the xenon.
There is a reliable way to test this: replace the "good" lamp that works on the other side with a headlight that does not work. If the headlight now works, then you can know for sure that the light bulb you removed was faulty and needs to be replaced. Better yet, swap the headlights, then the picture will become completely clear.
My car uses xenon headlights
Many modern cars are equipped with high-intensity discharge (HID) or xenon headlights. You can notice this by the bluish-white light they produce.
This type of lighting is electronically controlled and does not have a filament like regular light bulbs. Instead, an electric arc between two electrodes is directed at a gas (usually xenon) inside the bulb to produce light.
To check the light bulb:
A common procedure that you can do at home is to change the headlight bulbs between the two front units. If after replacement the “faulty” headlight works but the other one does not, the lamp must be replaced.
To check the igniter:
If your model has an igniter that is separate from the light source, you can perform the same test on the igniters to ensure you are not dealing with a faulty component.
HID lamps require over 15,000 volts to bridge the electrode gap. After this, the voltage drops below 100 volts.
If you are having problems with the chain or one of its components, consult your vehicle's repair manual before performing any tests.
Whether you have old style lamps or a more modern design, follow the logical steps to get your lights shining again.
What to do if you need to go
The road is always full of surprises and unpleasant surprises. There are situations when the headlight optics fail while on the road. Not everyone will agree to stay overnight in the middle of a deserted highway. Moreover, this is very dangerous, since a stationary vehicle is practically invisible on the road.
In such situations, it is better to act as follows:
First, you should immediately turn on the hazard lights and pull off the road to the side of the road. Without turning off the light illumination, check the operation of the daytime running lights, headlights, and fog lights. After this, you need to activate all available means and start driving at low speed in the far right lane. In cases where none of the lights are on, you can use improvised means. For example, instead of headlights, you can attach a portable flashlight powered by a battery or cigarette lighter to the bumper or radiator grill. Attach a warning triangle to the rear window, which will reflect the light of cars coming behind you. It is best to sit behind a slow-moving vehicle that clearly illuminates the road ahead
It is important to maintain a safe distance
The action algorithms described above will help solve problematic situations on the road. On the other hand, if the road is completely invisible and the lights do not work, then it is better to wait for more favorable conditions. The solution may be a tow truck or another car that agrees to take the “blind” car in tow.
Possible causes and diagnostics of the malfunction
- First of all, if the headlight does not light, we check the light bulb itself; it even happens that by the time you discovered a malfunction of the head light, both low-beam lamps had already burned out. This almost never happens with high beam lamps, since they are used very little.
- One of the most common reasons for headlights not working is a melted fuse thread. However, on most modern cars the power supply circuits of the right and left headlights are not interconnected and are protected by separate fuses. Therefore, the failure of one fuse element leads to the failure of one headlight. This headlight malfunction can be diagnosed visually by opening the mounting block and inspecting the fuses responsible for the operation of the failed lighting element. In cases where access to the mounting block is difficult, you should find out which other circuits are protected by this fuse and check the operation of devices receiving power from these circuits. If these devices also do not work, in 99% of cases the assumption about a failed fuse turns out to be correct.
- If the assumption that the protective element has melted is not confirmed, it is necessary to check the head light relay. Typically, a relay failure leads to the cessation of operation of only one of the lighting systems. Either the low beam or the high beam disappears. You can verify the functionality of the light switch relay by carefully listening to the sounds that occur when you try to turn on the headlights. If short, loud clicks are heard from under the instrument panel when turned on, this indicates that the relay is working properly. The absence of a click confirms the assumption that the relay is faulty.
- It is also necessary to check all the connectors of the electrical wires going to the headlight; perhaps, after the last repair, they simply forgot to put a connector on the headlight terminal and, accordingly, it will not burn as a result. This happens if not a single light bulb is on in the headlights.
- If the headlights still do not light up, then further search is carried out under the hood of the car. You should carefully inspect the existing wires and connections, move the terminals suitable for the headlights, and check the lighting lamps. Sometimes, due to a power surge in the on-board network, it happens that both lamps burn out at the same time. Also, due to water entering the engine compartment, they can oxidize and cease to perform the conductive function of the “chips” at the junctions of the wires.
Actually, the search can end here. If it was not possible to find the fault using the measures described above, further diagnostics of the electrical wiring should be carried out using a multitester and the procedure for “testing” the electrical circuits of the car. The last attempt to determine the cause of the malfunction in the field can be to check the presence of current at the terminals that supply the low beam headlights. To do this, just insert a known-good lamp into the socket or strike the “+” wire against the “-” wire. The start of operation of the lamp or a spark jumping between the wires indicates the presence of electric current in the network and a malfunction of the headlights or lamps themselves. The lack of response to the test gives reason to assume that there is a break in the headlight power supply.
Fuse and relay box
The fuse and relay box is located on the left, lower part of the instrument panel. It is accessible by pressing the button and folding the lid down. To remove fuses, there are special non-conductive pliers in the upper left part of the mounting block.
1 - K5 - high beam relay. If the high beams in two headlights do not work, check this relay. If one of the high beam headlights does not work, check fuses F3 and F13, as well as the lamps and the high beam switch.
2 - K4 - low beam relay . If the low beam in both headlights does not work, check this relay. If only one low beam headlight does not work, check fuses F2 and F12, as well as the lamps themselves and the light switch.
3 - K1 - lamp health control relay.
4 - non-conductive tweezers for removing fuses.
5 - power window relay . If your power windows stop working, check this relay. It could also be in fuse F5, or in the window lift drive system itself. To get to the mechanism, you need to remove the door trim. Check the electric motor, the appearance of the gears and the absence of binding of the mechanism.
6 - K3 - turn signal and hazard warning relay . If your turn signals or hazard lights do not work, check this relay and fuse F16, as well as the turn signal lamps themselves and their switch.
7 - starter relay . If the car does not start and the starter does not turn, check this relay. It could also be a dead battery, as well as the starter mechanism itself.
8 - backup fuses.
9 - fog lamp relay . If the fog lights do not work, check this relay and fuses F4 and F14. Also check their connection diagram, the serviceability of the wiring and connectors, as well as the lamps in the headlights and the power button.
10 - K2 - windshield wiper and washer relay . If your windshield wipers or windshield washer are not working, check this relay. Also check the wiper motor, washer pump and washer fluid level in the washer reservoir.
11 - K7 - rear window heating relay . If the heating does not work and the rear window fogs up, check this relay and fuses F8 and F9. Also check the connection contacts to the terminal points of the heating elements (at the edges of the glass at the rear pillars). If everything is in order, but the heating does not work, the issue may be in the wiring (the wires are frayed or something else).
12 - K6 - add. relay, ignition relay . If your ignition does not turn on or is having problems with it, check this relay. This relay protects the ignition switch contacts from burning. Also check the ignition switch itself and the contact group.
13 - row of fuses F1-F1014 - row of fuses F11-F20
Headlight device
The first thing that needs to be mentioned when talking about problems with light is the design of the front headlight unit itself.
As a rule, this element includes the following components:
- front lamps;
- rear light bulbs;
- turn signals;
- parking lights.
Design of the VAZ 2114 headlights
In addition, some configurations may have additionally installed fog lights.
There are also several reasons why out of this entire list only the low beam may fail, namely:
- burnout of light bulbs;
- oxidation of contacts on light bulb sockets or sockets;
- electrical circuit break;
- blown fuses;
- broken off/on button.
Diagnostics and repair of VAZ 2114 headlights
As you can see, there are not many possible causes of the malfunction, and finding them if the diagnostics are carried out correctly will not be difficult.
My headlight fuse keeps blowing after replacement.
Trying to find the source of a short in a circuit can be challenging.
A short circuit occurs when the power or main wire (carrying current to the loads in a circuit) finds a short path to a grounded surface. Most likely, a short circuit will cause a circuit fuse to blow or one or more light bulbs to burn out.
Short circuits can happen when:
- The insulation of the hot wire breaks and the wire touches the metal of the housing.
- The hot wire becomes pinched between the two pieces, cutting the insulation and creating a ground.
- The hot wire becomes disconnected from the component and dangles, touching the ground.
- The hot surface melts the insulation of the hot wire, allowing the bare wire to touch the grounded surface.
This general way to find closure may work for you:
- Connect a test light across the blown fuse or circuit breaker. If the indicator light is on, there is a short circuit in the circuit.
- Disconnect the socket, relay and switch one at a time.
- When the test light goes off, you have found the part of the circuit where the short circuit is located.
If necessary, consult your vehicle's repair manual to locate components and identify wires.
One of the high beam lamps has burned out
With such a malfunction, the high beam does not fail completely - as a rule, only one lamp turns off. Almost every car owner knows the solution to the problem in this case, but we will still remind you how to make a replacement:
- Unscrew the bolts securing the rim of the faulty headlight
- Turn the glass clockwise and pull the headlight out of the housing
- Disconnect wires from contacts
- Press the latch and carefully remove the light bulb
You can verify that the lamp is faulty by examining the filament (as is the case with ordinary household lamps). If the lamp is faulty, you need to purchase a new lamp and install it in place of the old one, without touching the glass with your hands. After that, reassemble everything in reverse order and make sure the high beam is working.
Replacement Tips
Speaking about replacing failed components of an electrical circuit, it is worth saying a few words about the correct replacement of light bulbs.
It must be done in the following order:
- Turn off the ignition and remove the key from the lock.
- Open the hood.
- Unscrew the headlight unit (to do this, unscrew the bolts on both sides) and remove it.
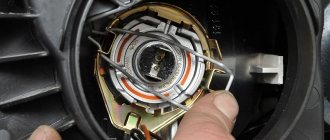
- Dismantle the contact group by disconnecting it from the reflector (this procedure should be done extremely carefully).
- Once you find the spring clips, release them.
- Remove the non-working light bulb.
- Insert a new light bulb into the vacated socket.
Reassembly and installation of the headlight unit is carried out in the same sequence, but in reverse order. If necessary, a similar procedure can be performed with the second block. It is worth noting that it is highly advisable to replace lamps not with bare hands, but with light gloves - the glass of the bulbs is quite thin, and with strong pressure it can burst right in your hands.
Low beam lamp burnt out
Firstly, if the low beam bulb does not light up when the high beam is working, you need to check whether it has burnt out. In this case, the lamp may have two separate filaments, one of which lights the high beam, and the other lights the low beam. Therefore, there is nothing surprising in the fact that they can turn on autonomously from each other.
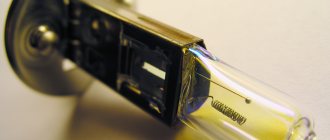
Replacing a halogen lamp on a headlight is not difficult, even if you are not an auto electrician. Let's consider a simple algorithm for this procedure:
- the hood of the car must be opened and secured;
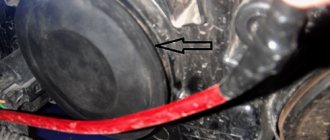
- the protective cover must be removed from both sides of the headlight;
- disable contact group;
- remove the spring clips;
- remove the burnt out light bulb;
- put a new one in its place;
- return all removed elements to their place.
It is important to know a few rules for working with lamps:
- it is necessary to degrease the surface of the bulb before installation, otherwise there is a high risk that the lamp will immediately burn out due to contamination;
- It is not recommended to work with a glass flask with bare hands. This may leave traces of grease on it that cannot be removed and the lamp will be damaged. The best option is to use cotton gloves, and if you don’t have them on hand, you can wrap the flask in a cloth or napkin.
The fuse is broken
This is the second common reason why the low beam light of one of the car headlights does not light up. Let's look at how to fix it yourself:
- the fuse box for electrical circuits must be opened;
- if one of the fuses has blown, it needs to be identified (usually this is not difficult) using a diagram;
- The faulty fuse must be replaced with a new one.
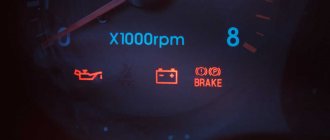
We recommend
“The oil light is on at idle: let’s look at the reasons” More details
Let’s clarify that if fuses on your car often burn out, you need to look for a breakdown in the wiring. Then, using a special device, it is necessary to ring the wires to determine where their integrity is compromised. If it is impossible to do this yourself, you need to contact an electrician who can find the cause of frequent breakdowns. In fact, this is a rather serious problem, in which repairs cannot be put off for a long time, since breakdowns in the wiring can lead to a short circuit and fire of the machine.
Why don't the low beams come on?
In a Priora, the low beam may not light up for several reasons: the fuses have blown, the light bulbs have burned out, or the light switch (MUS) is faulty. Let's look at each of the reasons in more detail.
Headlight fuse
The possibility of failure of the low beam headlight fuse is possible, since with frequent use of the car, the load that the headlights take on heats up the fuse link and thereby disables it even without any current surges in the circuit.
It should be noted that the fuse protects each headlight individually, that is, failure of two fuses at once is unlikely. But it is recommended to start checking with them. These fuses are located in the prior mounting block under numbers F6 and F7 and have a fuse current of 7.5A.
If they are working properly, move on to the next point.
Burnt out low beam lamps
Burnout of lamps is possible due to long-term use and thermal overload. In the summer, when operating a car in the city with the headlights on, it does not provide proper cooling of the lamp, which often leads to burnout of the lamp filament. But, as in the case of fuses, failure of both lamps at once is unlikely.
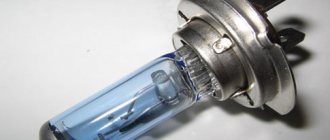
All Lada Priora, regardless of the year of manufacture, are equipped with H7 type low beam lamps. But the high beam lamps will be different, namely with and without DRLs. Models with running lights are equipped with a high beam lamp of type H15, and those without running lights are equipped with type H1.
Light control module
Quite often, the MCC is the main culprit of this problem due to burnout of tracks on the board or oxidation of contacts. This can be treated by replacing the module with a new one or troubleshooting the old one with your own hands. You can understand that the reason is in the module by blinking the high beam; if the high beam is blinking and the low beam is not on, then in most cases the light control unit is faulty.
Wiring
First of all, when the low beam stops working, check the reliability of the connections in all the blocks involved in the low beam electrical circuit. Their contacts often simply oxidize and after cleaning the problem is eliminated. Sometimes also due to vibration the connectors come loose and the circuit breaks. The contact groups need to be cleaned of oxides - a needle file or a school eraser is suitable for this. A nail file will also work (this tool will probably be found in any car lady’s purse).
Sometimes the light does not come on because the button that turns it on fails. There are contacts inside it, which, in turn, can also be damaged by corrosion. It is not difficult to verify that the starting device has failed - just disconnect the wires from it and short-circuit them. If this is the reason, then the light will come on. There is no point in repairing a button that has become unusable - it is easier to replace it with a new one.
Low beam does not work: reasons
So, proper lighting of the road while the car is moving is a very important factor that ensures the safety of the driver, his passengers and other road users.
While driving a vehicle, the driver needs to clearly see the road along which the car is moving.
High/low beam headlights are very important because they provide good visibility both at night and in cloudy weather conditions. Today there are several types of car headlights, which can be divided into the following categories:
- Main headlights using halogen, xenon, high-intensity discharge lamps, diodes, etc.;
- Fog lights - the main purpose is additional illumination of the road while driving in thick fog (most often, the manufacturer already supplies cars with a set of fog lights);
- Spotlight headlights - powerful headlights provide the driver with good visibility, especially when driving on unfamiliar roads (headlights are not intended for city driving, as they can blind other drivers);
At the same time, for low and high beams, as well as for fog lights, halogen lamps are most often used, designated by the type of base as R2, H1, H3, H4, H7, HB3, HB4.
As for the problem itself, if the low beam does not work, the reasons may be different. It is important that the cause of the malfunction of the low beam or high beam headlights is accurately determined. Here are some of the main reasons why the low beams do not light up:
- low beam lamps have burned out;
- the fuse threads have melted (since basically the power circuits of the left and right headlights are not interconnected and are protected by separate fuses, a failed one of the fuse elements can lead to the failure of one headlight), the malfunction is diagnosed visually. In case of difficult access to the mounting block, check the operation of devices receiving power from circuits protected by the same fuses;
- faulty headlight relay (lighting systems stop working, there is either low or high beam). The malfunction can be detected by ear, by turning on the headlights and listening to the sounds that arise; if short, loud clicks are heard, the relay is working properly; if there are no clicks, the relay is faulty;
The connectors of the electrical wires going to the headlights are not connected correctly or are not connected at all (for example, they forgot to connect them after repairs). In this case, only one of the two headlights does not light up. - water entering the engine compartment of the car (oxidation of the “chips” at the junctions of the wires, as a result of which the “chips” cease to perform a conductive function). Diagnose the malfunction by checking all the named wires and connections suitable for the headlights;
- voltage surge in the on-board network (both lamps burn out at the same time);
- other non-standard reasons (for example, a crack in the headlight through which water gets in and moisture condenses).
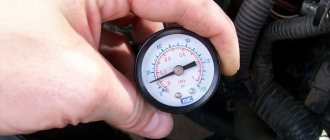
Please note that if a malfunction is not identified, additional diagnostics of the electrical wiring are carried out using the procedure of “testing” the electrical circuits of the car with a multimeter. By the way, to quickly determine the cause, you need to make sure that there is power at the terminals
Of course, the lack of current at the terminals supplying the low beam headlight bulbs will result in no low beam
By the way, to quickly determine the cause, you need to make sure that there is power at the terminals. Of course, the lack of current at the terminals supplying the low beam headlight bulbs will result in no low beam.
To diagnose such a malfunction, you must do the following:
- insert a working lamp into the socket and “strike” the plus wire against the minus wire;
- a spark jumping between the wires or the lamp turning on indicates the presence of current in the network and, accordingly, indicates a malfunction in the headlights or lamps themselves;
- if there is no spark or the lamp does not light up, there is a break in the headlight power supply.
Please note that this method of checking is only suitable for simple cars where the ECM system is not complex. In turn, an attempt to short-circuit the plus and minus wires on many modern cars can lead to serious failures, errors in the ECU memory, etc.
Methods for repairing headlights in the field
The above-described malfunctions are quite easily eliminated right on the road. No complex diagnostic or repair equipment is required. So, instead of a blown fuse, you can insert several cores from a stranded wire. In this case, one core is approximately capable of withstanding 1 ampere. The veins can be inserted directly into the socket or wrapped around the fuse. It is important that the contact surface is pressed tightly against the homemade fusible element.
A faulty relay can be replaced with a similar one used to switch on other high-voltage circuits. You can dismantle and use to replace a faulty headlight switch relay the element for switching on the power window circuit, heated seats, and additional equipment. In addition, many cars have a special backup socket with an unused relay. The connectors of almost all the elements in question in the car are similar to each other.
To turn on the headlights bypassing any faulty elements of the power circuit, you should use wires of sufficient cross-section and length. In this case, the ends of the wires are stripped of insulation and connected to a car socket designed for a portable lamp. The “cigarette lighter” can be used in a similar way. In this case, it is better to connect from the reverse side of the power point, connecting the wires directly to the terminals. The second ends of the wires are connected directly to the low beam lamp. It is important that only one headlight should be connected in this way. This is enough to get to your home or repair site while taking the necessary precautions. Connecting two powerful electrical consumers at once can lead to an overload of the power supply circuit of the cigarette lighter or socket, which often causes a fire in the car! You can read how to improve the headlights of your car here.
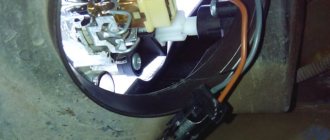
Replacing the Priora light module
Replacing the ICC is quite simple. The first step is to remove the fuse box cover by turning the three latches 90 degrees and pulling the cover towards you.
Then unscrew one screw that secures the light block and take it out. We disconnect the chip and install the new MUS in the reverse order.
Light module chip
The cost of a light module may vary depending on the vehicle configuration; the initial price of a module is from 1000 rubles and above.
Please note that it is best to buy an ICC with your own sample and depending on the configuration of your car. If you install a module from a car with a different configuration, its correct operation is not guaranteed.
Most often, when installing a non-native module, the side lights remain constantly on.
We hope you found our article useful.
Category: Life hacks, Personal experience, Repair
Wiring problems
If you notice that the low and high beam headlights do not light up, then it is likely that the problem is related to the wires. In order to determine such a malfunction, you will need to check all the terminals through which the connection is made, as well as the fuse box. It is quite possible that oxidation of the contacts occurred somewhere or a poor-quality connection was made. This causes increased current in these nodes, causing them to become very hot.
To correct the problem, simply clean all pad contacts with sandpaper or a file. It is also worth checking the headlight switch; the button contacts could also have oxidized.
Healthy! It is better to start searching for such a malfunction with the button, since it is the damaged switch that most often causes problems with the operation of the headlights.
Let's sum it up
Taking into account the above information, it becomes clear that most malfunctions related to the external lighting of the car (low beam is gone, high beam is not on, low and high beam headlights are not on, etc.) are relatively easy to fix. The main thing is to find the cause of the breakdown and choose the right method to repair a particular malfunction.
We also recommend reading the article about which lamps are better, halogen or LED. From this article you will learn about the advantages and disadvantages of lamps of this type, as well as what features and nuances you should pay attention to when choosing a particular type of automobile lamps for headlights.
Finally, we note that only with a working headlight cleaning system, provided that the headlights are correctly adjusted and the car’s lighting equipment is fully functional, the driver receives safety and comfort. At the same time, the external lighting of the car allows the driver himself to navigate in the dark, and for other road users to detect the vehicle.
This means you should make sure your car's headlights and brake lights are working properly before every trip. If malfunctions are noticed, until the breakdown is eliminated, operating the car in the dark or in poor visibility conditions (if the brake lights are faulty, even during the day) is prohibited.
Which bank deposits will be subject to 13 percent?
The following are subject to taxation:
- ruble and foreign currency deposits in banks located in the Russian Federation;
- investments in debt securities.
The total amount of all investments of an individual is considered.
The following are not subject to tax:
- deposits in the amount not exceeding 1 million rubles;
- deposits with a rate of 1% or less (provided that during the year the rate did not increase above 1%);
- escrow accounts.
Do investments add up?
Yes, all deposits of an individual across all banks are summed up. The income received for the year is considered to be based on the value of all bank investments, so there is no point in breaking them up into small amounts of less than 1 million rubles and opening them in different banks.
This is precisely what was stated by the Head of Sberbank, German Gref, who warned against the need to split investments - this will not help avoid a new tax burden.
The tax office will sum up all investments registered in the name of a particular citizen, calculate the total income received for the year on all deposits, and then determine the amount of excess over the product of the key rate and 1 million rubles.
From what date is it entered?
After the statement of the President of the Russian Federation, many are interested in the question of when the changes will come into force and from what date the new tax will be collected. The implementation dates are determined in the new law.
The tax burden on bank investments will take effect in 2021.
Notifications of the need and amount to be paid will be sent to investors as early as 2022. When calculating, the key rate as of 01/01/2021 will be taken.