How to set the ignition on a VAZ using marks
Almost all modifications of the VAZ-2114 and 2115 are equipped with engines with BSZ (non-contact electronic ignition). To make the setup, you need to:
- Unscrew the timing case fasteners and remove it.
- Adjust the gap from the crankshaft sensor (located near the generator pulley) to the gear disk. The permissible value is up to 0.7 mm.
- If the distance is normal, check that the crankshaft pulley is not misaligned.
- To ensure that the marks on the flywheel align with those on the gearbox housing (can be seen on the hatch), the crankshaft must be rotated. It is convenient to do this by grasping the pulley mounting bolt.
Note! It is prohibited to turn the camshaft pulley itself.
- The mark on the cylinder block must align with that on the oil pump pulley. They should be adjusted.
- The last mark (on the camshaft pulley) should coincide with the other mark on the cylinder head.
Having placed the marks on the VAZ model, you can see that the pistons of cylinders 1 and 4 are located at the dead center at the top, if everything is done correctly. In this case, the power unit operates correctly because the crankshaft sensor sends correct data to the ECU.
Removing and troubleshooting the flywheel:
- Before starting work, remove the battery (see the article on how to remove the gearbox) from the car, drain the oil from the gearbox and remove the starter.
- Remove the gearbox and disassemble the clutch.
- Now that you have reached the flywheel, unscrew the six bolts securing it. But to do this, put back one bolt securing the gearbox and insert a screwdriver into the teeth of the flywheel with one hand so that it does not rotate while unscrewing the bolts.
- While holding the flywheel with one hand, remove the bolt locking plate from the final bolt with the other.
- Now carefully remove the flywheel from the crankshaft flange.
- Next, you can begin to inspect (defect) the flywheel and first of all inspect the teeth of the steel disk. If they have gross marks or other damage, then the flywheel should be replaced with a new one.
- If everything is in order with the rim of the teeth, then switch your gaze to the adjacent surface of the driven disk; it should not have deep abrasions or other defects.
- Also carry out a similar troubleshooting on the back side of the driven disk, or rather, look at the adjacent crankshaft flange.
If such distortions are visible in points 7 or 8, then the flywheel must be replaced with a new one or repaired - sanded using special equipment in a car repair shop.
To carry out an accurate check or repair of the clutch driven disc, take it to a car workshop that has the required equipment. Actions and recommendations for repairing the flywheel:
- The defect of the adjacent surface of the clutch disc (3) should not be more than 0.06 mm.
- The parallelism between the upper contact surface of the driven disk and the lower surface (2) for fastening the clutch should not be more than 0.1 mm.
- On the clutch disc planes (1 and 3), the runout should not be more than 0.1 mm.
- When cleaning the surface of the flywheel (3) from abrasions and scratches, you should know that the maximum possible removal of a layer of metal is no more than 1 mm.
- At the same time as side (3), surface (2) should also be sanded. To do this, maintain a step between them with a height of 0.5±0.1 mm. When grooving, keep the adjacent surfaces (1 and 3) parallel.
Once you've finished cleaning the flywheel surface, proceed to reinstall it. First of all, degrease the bolts and threaded holes under them, and then apply sealant to their threads. Reinstall the part in the order of removal, only align the holes on the crankshaft flange and the flywheel correctly (they are located asymmetrically).
Didn't find the information you are looking for? on our forum.
We recommend reading:
- When starting off, a knock is heard from the front of the VAZ 2110
- VAZ 2112, 16 valves cylinder head assembly
- Error 0340 VAZ 2114 8 valves
- Gasoline consumption is ok. City, highway, mixed cycle
- Tightening the shank nut of the VAZ 2107 and Niva gearbox
- How to disassemble a generator on a VAZ 2112
- Installing contactless ignition on a VAZ 2121
- The engine idles intermittently VAZ 2110 injector
Checking the set ignition
To check the ignition on an 8-valve engine, an injector, you should prepare:
- Multimeter.
- Set of keys and screwdrivers.
- Pliers (necessarily with insulated handles).
Attention! Due to the lack of special equipment, the described method can only test the operation of the circuits. Diagnostics of the microprocessor part will not be available.
- When the ignition is turned off, check how tightly the high voltage wires are seated and what contact is in the module.
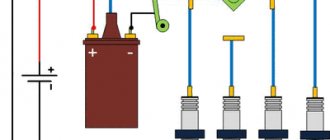
- Remove the connector from the module, connect a multimeter (monitoring mode should be low AC) to pins C and B, make sure there is voltage. Check the coil (2nd and 4th contacts).
- Check the functionality of high-voltage wires. Install a working spark plug in each cap in turn, attach one end to the block and crank the engine with the starter. The presence of a spark signals that everything is normal. Its absence on each wire means the module is faulty.
If you managed to set the ignition correctly on the VAZ model and this was confirmed by the test, but problems are still observed, you need to check the power system.
2115 IGNITION MODULE DIAGRAM
The circuit diagram and connection diagram of this electronic device is presented below.
The ignition module installed on the Lada Samara is extremely resistant to both low and high temperatures. Operating temperature range: -400/+1300C.
The only negative point in the operation of this electronic device is its complete inability to repair. However, even a novice car enthusiast can replace it on his own.
Experts consider the most common malfunctions of the Samara ignition module to be:
Consequences of incorrectly setting timing marks
If the ignition is set incorrectly, the following negative aspects are possible:
- If the engine has 16 valves, then they become deformed or bent during operation, accumulating damage.
- The previous problem causes damage to the cylinder head.
- The guide bushings may also become unusable.
- Cracks may appear in other engine components.
- The motor overheats.
- The engine piston mechanism can burn out.
- Oil residue may appear on the spark plugs.
Note! If the engine has 8 valves, then the consequences are not so critical - traction disappears, the belt quickly wears out and breaks.
After repairs, the following factors most often indicate an incorrectly set ignition:
- The car accelerates worse.
- Frequent overheating of the motor.
- The craving became much worse.
How to set the ignition correctly
Setting marks on an injection engine not only corrects the ignition timing, but also coordinates the operation of the gas distribution mechanism and the injection system.
Therefore, by correctly setting the marks on the VAZ-2114 engine, we fully regulate the operation of all its systems.
The adjustment should begin with preparation - placing the car on a level surface and tightening the handbrake. You can use several methods, but we will offer one of the optimal ones, without any special acrobatic tricks, which are not particularly desirable, especially in winter.
The work is carried out in the following order:
For ease of work, it is recommended to remove the right front wheel. It will provide full access to the timing mechanism drive, and this way you can set the marks more accurately and quickly. In addition, you must first remove the plastic timing belt cover from under the hood.
Removed the wheel and plastic protection
Loosening or dismantling the timing belt on a VAZ-2114 (8 valves)
Checking the set ignition
Timing device VAZ 2110 injector 8 valves
Many people are concerned about the question of whether the valves on the injection engine of the VAZ 2110 bend. No, they don’t. The 8-valve injector does not suffer from this defect. But this does not mean that you should not monitor the timing belt. Since loosening and subsequent jumping of the belt by a certain number of teeth will lead to inevitable problems
It is worth paying special attention if engine oil gets on the belt; an oiled belt will not last long. Below is a detailed image of the timing diagram of the 8-valve injection engine “tens”
See the photo below.
When replacing the timing belt on a VAZ-2110, it is necessary to clearly align the marks on the camshaft and crankshaft pulleys; without this, the engine will not operate normally. Another important point is that when the tension roller moves to its original state, the marks shift as the belt tension changes. Therefore, carefully check whether the timing marks are clearly aligned before putting on the cover covering the timing belt.
conclusions
This way you can quickly and effectively check or set the ignition marks on the injection VAZ 2114. Good luck to everyone!
The 2nd Samara was the first front-wheel drive car from VAZ with an injection system at the beginning. The first copies of the VAZ-2114 were still sold with an eight-pole engine and a contactless ignition system, and subsequent engines already had a 100% electrical system with the same 8 valves. Before installing the ignition, it is necessary to find out what system is installed on the engine, which we will do at the moment.
It is quite simple to calculate the type of ignition system on a VAZ-2114 - if a switch is installed, an analogue of a contact ignition ignition switch, this means that the system is contactless, but with a distributor-distributor. In this case, the ignition timing is set by turning the distributor to a certain degree. The accuracy of the adjustment depends on the experience of the technician, as well as on the equipment used. However, such a system will allow you to flexibly and accurately adjust the ignition using a strobe light.
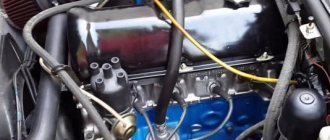
Most engines that were installed on the 2nd Samara and the tenth VAZ have a non-contact electric ignition system. There is no distributor, since the ignition timing is controlled automatically in real time and only with the help of the engine control system, electronics. The system does not require maintenance, and its diagram is shown in the photo below.
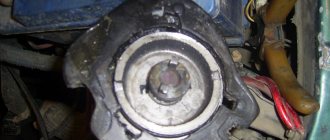
As can be seen from the diagram, which is implemented in eight-valve injectors, for the correct operation of the ignition system of the electric engine control unit, it is necessary to supply the appropriate information from the sensors. The main sensor of the system is the crankshaft position sensor. It is located on the left at the exit of the cylinder block next to the alternator drive pulley when looking at the end of the crankshaft.
Replacing the timing belt on the 8 cl engine VAZ 2108,2109,2110,2111,2113,2114,2115
Crankshaft position sensor
You may also like
The crankshaft pulley has a main gear drive, which generates electrical vibrations, and the sensor converts them into an impulse, this impulse is fed to the computer. The control unit, starting from the crankshaft position, sends a signal to the ignition module, which distributes the spark between the spark plugs.
In addition, the crankshaft position sensor sets the timing of fuel injection, so we will first monitor its condition.
Signal diagram from the crankshaft sensor: 1 - main disk of the crankshaft; 2 — crankshaft position sensor; 3 — crankshaft rotation angle; 4 - output signal of the crankshaft position sensor
Align the flywheel mark with the mark on the flywheel housing
We monitor the coincidence of the marks on the oil pump pulley and the outflow mark on the cylinder block
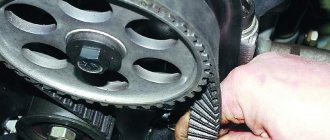
We check the coincidence of the marks on the camshaft drive pulley and the timing belt cover
If the three marks match, it means that the pistons of the first and fourth cylinders are at top dead center at that point. It is then that the gap between the teeth of the main disk should coincide with the boss on the cylinder block, and the 20th tooth from the gap should coincide with the crankshaft position sensor. This is when the sensor pulsates the engine control unit, indicating that the piston of the first cylinder is at top dead center of the compression stroke.
As can be seen from the diagram above, the ignition system consists of high and low voltage circuits. Because of this, there are a few things you need to know when checking your system.
You may also like
How to quickly set time stamps on 8kl weight
High-voltage wires operate on the order of forty thousand volts. In our case, such a voltage is not dangerous, but receiving a discharge even with a low current and such a voltage is practically beneficial for health and mood. Therefore, it is best to work with rubber gloves and use equipment with insulated handles.
To check the condition of the system, you will need pliers with insulated handles, a standard set of tools and a multimeter. Please note that we are only testing the circuits and not the microprocessor part. This requires computer equipment and special training.
Check the voltage at terminals C and B of the ignition module.
Check ignition coil pins 2 and 4 using a multimeter
Checking high voltage wires
So you can do it yourself - install the ignition on a VAZ-2114 with injection 8-valve engine. Good luck to everyone!
Adjustment on carburetor versions
Most textbooks and books on repairing classics tell you how to set the ignition on a VAZ-2105 carburetor using a control light. Experienced Zhiguli car owners can easily do without it.
To set the ignition correctly, all conditions must be met. The marks on the crankshaft pulley should be opposite the long mark on the timing cover.
The round mark on the camshaft gear should align with the boss on the camshaft housing. The piston in the fourth cylinder must be installed at TDC, and the contacts in the distributor must be open. The slider contact is directed to the fixed contact of the fourth cylinder.
The light bulb is needed to control the moment of sparking. It is connected at one end to terminal “K” on the coil, and at the other to ground. At the moment, the piston of the first cylinder is also set at TDC, but not on the compression stroke, but on the exhaust stroke. How to set the ignition correctly on a VAZ-2105? The setting is carried out on the fourth cylinder.
Setting valve timing by marks on VAZ 2113, VAZ 2114, VAZ 2115
Welcome! Valve timing - thanks to these phases, the engine operates synchronously and there are no malfunctions in its operation, but if the valve timing is disrupted, then either the piston will reach the top point at the wrong time when it should, or the valve will lag, and therefore it will be very pronounced engine operation with interruptions at idle, well, the engine will not really run, so to prevent this from happening, the valve timing should always be set according to the marks and the engine will thus work correctly and synchronously, by the way, when everything is set according to the marks (Camshaft , crankshaft), then you automatically have all the parts of the Gas Distribution Mechanism set to “TDC is the Top Dead Center” and to “BDC is the Bottom Dead Center”, for example, you set the crankshaft according to the marks, then the pistons of the first and fourth your cylinder will automatically rise to the very end and will be at TDC, and the pistons of the third and second cylinder will lower and will be at BDC, so that you can clearly see what it looks like from the side, look at the photo just below, in which those same pistons are located like we said it in this article (That is, some are in the NMT, while others occupy the top point). Note! To make this installation, you don’t need a lot of tools, of course, if everything is set correctly for you, if your phases are all out of whack (That is, the marks are not evenly aligned, for example, the mark on the camshaft matches, but not on the crankshaft), then you will need more tools, because the timing belt will have to be removed, in general, to carry out all the work, stock up on: Spanners, spanners, screwdrivers, as well as small screws, or instead of screws, thin drill bits can be taken, a wrench with spanner heads can also be stocked up, Well, that’s all, if you just need to set everything according to the marks, then you won’t even need screwdrivers with drills (This is if you remove the timing belt), ring wrenches and wrenches will be enough, by the way, you completely forgot, also stock up on sockets if you have them (You can use them instead of a socket wrench)!
Checking completed actions
To diagnose the actions performed, you will need pliers, a standard tool and a tester (multimeter). High voltage wires can be checked with a multimeter. Normal wire resistance is from 5 kOhm to 12 kOhm.
At this stage, we will perform diagnostics of circuits, and not microprocessor elements. To check the latter, you will need specialized equipment and experience, which we do not have.
So, how is the check done:
- First you need to turn off the ignition and diagnose the contacts on all plugs and pads. It is also necessary to diagnose the tightness of the fit, as well as the contact of the high voltages in the module.
- Next, remove the block from the module and diagnose the voltage at terminals C and B. In this case, the tester must be configured in the mode for measuring low alternating current.
- Check the high voltages. To do this, you need to install a working spark plug in the cap and attach it to the block head. At this point, your assistant should try to start the engine by turning the starter. If the wire is working, then a spark will jump between the spark plug and the block head. Thus, it is necessary to diagnose all wires.
- In the event that there is no spark on only one cable, it is necessary to thoroughly diagnose the module itself, but in most cases the device must be replaced. If everything works correctly, the spark plugs are working properly, but there are still problems with the engine, you need to check the power system.
Causes of ignition problems
As mentioned earlier, in order to set the ignition in the electronic system you will have to go into the “brains”, there you can also check the functionality of the sensors, so they greatly influence the operation of the system, regardless of the type of ignition.
On the electronic type, the main causes of failures are:
Before moving on to the radical measures proposed in the third option, it is worth additionally checking the correct location of the labels. In cars with contactless ignition, this is the ignition installation of the VAZ 2114, and for cars with an electronic system, debugging is important to check the synchronization of the injection system with the gas distribution mechanism.
Getting ready to adjust the ignition
In order to correctly set the ignition timing of the VAZ 2114 and carry out debugging, you need to prepare. The method described below does not require acrobatic agility from the owner and is quite feasible both in the uncomfortable and cramped environment of a garage and if the car enthusiast has a tummy.
IMPORTANT! Thorough preparation always speeds up the process of technical work significantly, regardless of what exactly needs to be repaired.
Preparation for debugging ignition marks is carried out as follows:
Marks and direct adjustment
When the preparation is completed and the car is ready to work with it, you can begin to set the ignition marks of the VAZ 2114. The task of the procedure is to check the synchronism of the system (correlation of the camshaft, crankshaft and injection timing), with some nuances for the electronic system.
For electronic ignition systems, there is a small nuance - the need to check the distance from the master disk to the sensor. Normally, this distance should not exceed 0.7 mm, but should not be less than 0.5 mm. You can use a valve feeler gauge to check.
The further procedure for the electronic ignition system is as follows:
Useful video
You can glean interesting information by watching the additional video below:
On a car with contactless ignition, everything is even easier; you don’t have to remove the wheels, but you will need an assistant. It is necessary to find the compression stroke of the fourth cylinder. To do this, insert a rubber cone into the spark plug hole and turn the ratchet. Pushing out the cone will mean that the compression stroke has been found.
Having illuminated the spark plug hole, we align the longest mark of the cover with the mark of the pulley. We set the breaker to the appropriate clock and check the operation of the system according to the fourth point described above.
How to determine the slider position
The distributor slider in this video is installed on the 4th cylinder...
How do we determine which cylinder the distributor slider should be placed on? Of course, a spark jumps in this cylinder when the compression stroke ends.
In order to determine the (TDC) compression stroke, the spark plug is unscrewed and some car owners insert a plug made of paper or other material into the hole. Then rotate the engine shaft until the plug comes out of the spark plug hole.
You can do it much easier and faster using the method proposed by the author of this video...
We unscrew the spark plugs of the first and fourth cylinders, take a rubber hose, its outer diameter should fit tightly into the spark plug hole and insert it there. Then we blow into the hose with our mouth, first into the first cylinder, and then into the fourth.
In which cylinder is blowing tighter, then in this cylinder there is a compression stroke, that is, both valves of the cylinder are closed and a spark should jump here. For example, the fourth cylinder is blowing tighter and, accordingly, the slider on the distributor also “looks” at the fourth cylinder.
Ignition switch and features of its replacement
ZZ plays an important role in the vehicle's SZ, both for an 8-cl and 16-cl engine. It is activated when the starter is working, thanks to it the lighting, turn signals, and power windows work.
Replacement or repair of the VAZ 2115 ignition switch may be required if:
To replace you will need: a set of keys, a hammer, screwdrivers, a thin chisel.
The replacement procedure consists of the following steps:
After assembly, you should start the engine and check the operation of the switch (the author of the video is the MY LADA channel).
Consequences of incorrectly setting timing marks
If the ignition is set incorrectly, the following negative aspects are possible:
- If the engine has 16 valves, then they become deformed or bent during operation, accumulating damage.
- The previous problem causes damage to the cylinder head.
- The guide bushings may also become unusable.
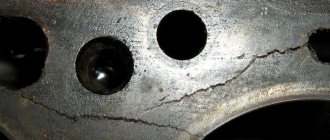
- Cracks may appear in other engine components.
Crack in the cylinder block
- The motor overheats.
- The engine piston mechanism can burn out.
- Oil residue may appear on the spark plugs.
Oil deposits on spark plugs
- The fuel mixture loses its ignition moment.
Note! If the engine has 8 valves, then the consequences are not so critical - traction disappears, the belt quickly wears out and breaks.
After repairs, the following factors most often indicate an incorrectly set ignition:
- The car accelerates worse.
- Frequent overheating of the motor.
- The craving became much worse.
VESKO-TRANS.RU
AutoNews / Reviews / Tests
- Home
- Auto garage
- How to correctly set the ignition on a VAZ 2115
How to correctly set the ignition on a VAZ 2115
how to install the ignition
injector on vase 2115 in pictures
The object of conversion is a VAZ 2108, 2109 or 21099 with a modification of the 21083 carburetor engine. The main goal is to convert a carburetor engine into an injector with 16 valves, installing it on the cylinder head from a VAZ-2112. VAZ testing-2109 converted to a 16-valve head (even down to the high-quality software version) shows a huge difference in the car's behavior compared to the standard power system.
Some reduction in performance at low revs (up to 2000 rpm) is compensated by a significant improvement in traction once the engine is revved at huge revs. Personally, the acceleration in fourth gear with 16 valves is the same as in third gear with a carburetor engine. On a flat, level road the engine simply cuts out at 5000 rpm. For most drivers, this creates an unforgettable memory.
What to prepare: Cylinder head 16V cylinder, equipped with receiver and manifolds, knock sensor, MOH, throttle body with throttle position sensor, DMRV, idle control, exhaust pipe with exhaust system, exhaust system, exhaust system, exhaust system, cam pulleys shaft, timing cover, phase sensor, controller, complete set of wires, fully equipped gas tank and fuel line, oil level sensor and indicator, ramp complete with injectors, HF position sensor, generator with tensioner and brackets, pistons with pins and rings, connecting rods, crankshaft pulley, generator drive, exhaust system kit, oil pump housing. reflux position sensor
HF How it works: our client has operations that can be done without removing the block, but it is even more convenient to work with the engine removed. 1. We remove the cylinder head, a regular gasoline tank, our customer has fuel pipes, we completely disassemble the ignition system, remove the generator, thermostat and, in addition, our customer only has to make pulleys and belts. We install a gas tank with a gas pump (from a model with an injector) instead of a conventional one.
We remove the stock cylinder head, remove the carburetor, all the wiring and ignition system that was replaced. 4.5. Disconnect the radiator pipes.
Some are used, but a new 2112 engine kit is inexpensive and does not require purchase. 3. Remove the tray while operating the machine. We replace the old pistons and connecting rods with 12-pattern (floating pin) pistons and decimal rods. Changes are necessary because the old ones are designed for the lowest compression ratio and do not even have special grooves for the rear head valves. 4.
https://youtube.com/watch?v=aIOMGBmM3SM
https://dtp-avarii.ru/metki-zazhiganija-vaz-2115-inzhektor/https://carfrance.ru/ustanavlivaem-zazhiganie-na-vaz-2114-po-metkam-nastrojka-grm-i-inzhektora/ https://avtotrue.ru/kak-vystavit-zazhiganie-na-vaz-2115-inzhektor-2/https://vaz-russia.com/remont-vaz-2113/ustanovka-faz-gazoraspredeleniya-po-metkam- na-vaz-2113-vaz-2114-vaz-2115.htmlhttps://vesko-trans.ru/kak-pravilno-vystavit-zazhiganie-na-vaz-2115/
How to check the ignition coil?
Before diagnosing the ignition coil (SC) on an 8-valve engine, you should check whether there is voltage on the coil. To do this, you need to disconnect the wire block and check it with a tester. The voltage should be 12V.
Typical unit malfunctions
Signs of a faulty short circuit in VAZ engines with 8 valves, UAZs and other cars are similar:
If the listed symptoms appear, you first need to check the spark plugs and crankshaft position sensor. Fuel injection into the injectors is regulated based on sensor readings, so if there is excessive fuel consumption, they require checking. The short circuit should be checked last.
You can check the ignition module (IM) on an 8-valve engine in one of three ways: