General information about the car.
VAZ-2115 Samara-2 is a front-wheel drive sedan, the first representative of the updated Samara family of cars.
The VAZ 2115 car is the founder of the family codenamed Samara-2. The model range includes the 3-door VAZ 2113 hatchback, the 5-door VAZ 2114 hatchback and the VAZ 2115 sedan itself. The Samara-2 family is a modernization of the VAZ 2108, 2109 and 21099 models, respectively.
In 1997, the VAZ 2115 sedan began to be assembled at Pilot Industrial Production (EPP); in 2001, assembly began on the factory assembly line. Currently, the VAZ 2115 is on wide sale; three versions are available: standard (21150-20), norm (21150-21) and luxury (21150-22). In terms of price, the car occupies an intermediate position between the Samara and the tenth family.
The appearance of the car has noticeably changed - the front and rear parts have been changed, the interior has been updated, while the sides, doors and roof remain the same. The new model is distinguished by the front part of the body with original headlights, a modified shape of the hood and front fenders, new taillights with an insert between them, bumpers painted in body color, a trunk spoiler with an additional brake light, door moldings, door sill fairings, a new trunk lid with floor level connector. New efficient lighting technology is provided. The modernization has noticeably improved, modernized the appearance of the car, and also improved the aerodynamics of the car.
The interior of the VAZ-2115 car has become more comfortable, a new, more convenient and advanced instrument panel has appeared, which has a more streamlined and ergonomic shape, backlit push-button switches and indicator lamps (the so-called “European panel”), an adjustable steering column, a steering wheel from the “tenth” "family, "console" between the front seats. The new heater design provides efficient heating of the interior. The standard equipment includes an on-board driver warning system for closing the door locks, unfastened seat belts, leaving the ignition key in the lock, the level of oil and coolant in the engine, and extreme wear of the brake pads. The luggage compartment has become more spacious and convenient due to the increase in the trunk lid. The power units are similar to the VAZ-21099.
The cars use 1.5-liter gasoline engines, both carburetor and with an electronic fuel injection control system with a 5-speed manual gearbox. Initially, modifications with a carburetor engine were produced. In 2001, a modification of the VAZ 2115i was released with an injection (VAZ 2111) engine with distributed fuel injection. To increase service life and reduce noise at idle, a new clutch driven disc with an idle damper is provided.
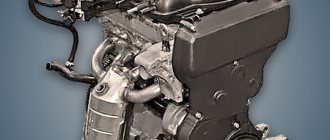
Engine diagram and structure
General view of the engine
Before we begin to consider the issue of the engine design and description of the characteristics, it is necessary to consider the design of the components and parts that are located directly in the main power unit and outside.
Diagram and design of the Samara-2 engine
1 – generator drive pulley; 2 – oil pump; 3 – timing belt; 4 – toothed pulley of the coolant pump; 5 – front cover of the timing mechanism drive; 6 – tension roller; 7 – camshaft toothed pulley; 8 – rear cover of the camshaft drive; 9 – camshaft oil seal; 10 – cylinder head cover; 11 – camshaft; 12 – front cover of camshaft bearings; 13 – pusher; 14 – valve guide; 15 – oil separator mesh for the crankcase ventilation system; 16 – exhaust valve; 17 – inlet valve; 18 – rear cover of camshaft bearings; 19 – fuel pump; 20 – housing of auxiliary units; 21 – ignition distributor sensor; 22 – outlet pipe of the cooling jacket; 23 – cylinder head; 24 – spark plug; 25 – crankcase ventilation hose; 26 – flywheel; 27 – crankshaft rear oil seal holder; 28 – rear crankshaft oil seal; 29 – cylinder block; 30 – oil pan; 31 – oil level indicator (oil dipstick); 32 – crankshaft; 33 – piston; 34 – connecting rod cover; 35 – connecting rod; 36 – crankshaft main bearing cover; 37 – front crankshaft oil seal; 38 – crankshaft toothed pulley.
Also, it’s worth looking at a cross-section of the VAZ-2114 engine:
Cross section of the Samara engine
1 – oil pan drain plug; 2 – oil pan; 3 – oil filter; 4 – coolant pump; 5 – exhaust manifold; 6 – intake manifold; 7 – carburetor; 8 – fuel pump; 9 – cylinder head cover; 10 – camshaft bearing cover; 11 – camshaft; 12 – crankcase ventilation hose; 13 – valve adjusting washer; 14 – pusher; 15 – valve cotters; 16 – valve springs; 17 – oil scraper cap; 18 – valve guide; 19 – valve; 20 – cylinder head; 21 – spark plug; 22 – piston; 23 – compression piston rings; 24 – oil scraper ring; 25 – piston pin; 26 – cylinder block; 27 – connecting rod; 28 – crankshaft; 29 – connecting rod cover; 30 – oil level indicator; 31 – oil pump receiver
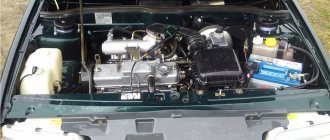
What is under the hood of the VAZ 2114
Under the hood of the VAZ 2114 its key mechanisms are located. First of all, this is an engine - four-cylinder, single-row, with 8 or 16 valves. From the receiver, compressed air enters it and passes through the air filter (to the right of the engine).
In addition, under the hood of the 2114 there are:
- The windshield washer reservoir is to the left of the engine.
- The hydraulic tank for the brake system is just above the air filter.
- The battery is in the lower right corner.
- The cooling system expansion tank is on the right, above the battery.
- Fuel system adsorber - between the hydraulic drive reservoir and the expansion tank of the cooling system.
- The gearbox is under the engine, on the right side.
The adsorber on the VAZ 2114 appeared in order to comply with Euro-2 and Euro-3 environmental standards. It is designed to capture spent fuel vapors that have not liquefied. With the help of an adsorbent (usually activated carbon), the vapors are absorbed. A malfunction of the device is indicated by a characteristic hissing sound when opening the fuel tank, and a drop in engine speed at idle.
Sensors, their purposes and malfunctions
Let's now talk in more detail about each of the sensors, let's look at where they are and what they look like.
Idle speed (IAC)
The device is located in the throttle assembly. It is a small induction coil with a needle inside. Depending on the controller readings, one or another voltage is applied to the coil winding and the needle extends a certain distance into the throttle pipe, regulating the air supply. With this, the idle speed is adjusted.
There is no indicator responsible for this sensor. Therefore, if this node fails, then this can be understood by the following “symptoms”:
- The engine stalls at idle or when changing speed;
- “Floating”, unstable idle speed;
- When turning on a cold engine, there is no increased speed.
To replace the sensor, you must turn off the power to the machine's wiring, completely disconnect the throttle assembly, and then remove the sensor from it, after first disconnecting the terminals that supply electricity to it. In place of the old sensor, you need to install a new device and place the throttle assembly in place.
Detonation (DD)
The knock sensor is located between the cylinders on a car engine and reacts when the fuel detonates inside the cylinder. In essence, it is a piezoelectric element. When gasoline detonates, the sensor converts the resulting vibrations into electricity. Current is supplied to the on-board computer and signals a fuel explosion. After this, the ignition timing is automatically adjusted.
If this type of sensor breaks down, the fuel begins to detonate in the engine. To check the device for functionality, you need to disconnect it using a key from its mounting location, connect it to a voltmeter and knock on it. If voltage was applied to the voltmeter, then the unit is working; if not, it is faulty.
To replace a device, you need to unscrew it from the seat using a key, disconnect the terminals from it and install a new device.
Oxygen (Lambda probe)
The oxygen sensor, also known as a lambda probe, is installed on the exhaust pipe close to the cylinders. It measures the amount of oxygen contained in exhaust gases and the environment. It only works when the engine is on, as it must be heated to function. When oxygen molecules hit the sensor, electricity is generated, which is supplied to the control unit. The on-board computer, based on sensor readings, regulates the supply of oxygen to the engine cylinders.
If the sensor fails, the following consequences occur:
- Unstable gasoline consumption: sometimes more, sometimes less;
- “Walking” speed at idle;
- A sharp drop in power when accelerating.
In order to replace this sensor, you need to turn off the power to the car, disconnect the wires going to the device, unscrew it with a key, and then put a new one in its place.
Crankshaft position (CPCV)
This sensor regulates the ignition of the combustible mixture in the cylinders depending on the position of the crankshaft. This position is determined by reading electromagnetic pulses from the toothed pulley of the electric generator. The sensor itself is located in close proximity to it.
Crankshaft position sensor
Symptoms of device failure may include:
- Idle speed instability;
- “Floating” speed;
- Power drop;
- Problems when turning on the engine.
At home, the performance of the sensor can be tested using a multimeter in ohmmeter mode. The resistance at the device contacts should be from 500 to 700 Ohms. If it differs greatly from these values, the sensor is faulty.
To replace the sensor, you need to turn off the power to the car's wiring, disconnect the battery, disconnect the electrical contacts from the device, and then unscrew the mounting bolt, remove the sensor and install a new one.
Camshaft position (CPRV)
This sensor, called DPRV for short, reads data from the camshaft. This happens with the help of a special gear installed on the shaft, on which two teeth are missing. This sensor is needed to adjust the ignition angle by the car’s on-board computer.
Camshaft position sensor
If this device breaks down, idling becomes unstable and the engine's fuel consumption increases.
Symptoms of malfunction
The malfunction of the water pump on the four can be determined by characteristic symptoms or a combination of them. Most often this is evidenced by:
- Coolant smell in the cabin. This symptom may indicate a pump failure. But the characteristic “amber” can also occur with other malfunctions.
- Frequent overheating of the motor. The vehicle's dashboard will indicate that the engine temperature is too high. Under normal conditions, it should not exceed 90 degrees.
- Uneven or regular wear on the timing belt. The crankshaft pulley may also look very worn.
- Coolant leak near the pump and timing belt. Traces of this liquid may be visible in the engine compartment and under the car. It is worth noting that sometimes the problem occurs when the oil seal wears out or is installed incorrectly.
- Pump noise and vibration. Unpleasant sounds are heard from under the hood when the engine is running. This symptom does not always indicate a failure of this part; it can also be caused by other reasons.
The appearance of one or more of the above symptoms or a combination of them is a reason to immediately check the pump. After all, its breakdown is very dangerous. As a result, the timing belt may break and, as a result, the valves and pistons of the engine will meet if the pistons are installed without recesses. The motor will jam. And only expensive and complex repairs will help restore its functionality.
The service life of the part for this AvtoVAZ model is about 100,000 km. But sometimes it can break even earlier. Therefore, on long runs, it is recommended to regularly monitor its operation.
What does the price depend on?
Motorists who need engine overhaul of a VAZ-2114 are faced with different prices for such a service. The cost depends on the influence of factors:
- Engine capacity.
- The prestige of the service company, its pricing policy.
- Urgency.
- Scope of work.
- Difficulty of repair.
- The need for a specialist to visit.
- Cost of spare parts.
- Equipment used.
- Automotive technician qualification level.
The more work is required to restore the engine of a VAZ-2114 car, the more expensive the service of a specialist will cost. You will have to pay extra for urgency and a specialist visit.
How to change the engine on a VAZ 2114
The VAZ 2114 engine changed throughout the entire production period of this car. The first models of the VAZ 2114 or “Samara-2” (as it began to be called by analogy with its predecessor) rolled off the production line with an engine from the VAZ 2109. It was an eight-valve injection engine with a relatively small volume - only one and a half liters. This engine did not differ in terms of developed power, which was 78 horsepower.
Since 2007, VAZ 21114 engines began to be installed on cars, with an increased volume of 1.596 liters and a maximum power of 80-84 hp. With. This engine complied with the Euro-3 environmental standard.
And since 2010, a model with a 16-valve engine has been produced. It's also a four-cylinder engine, but instead of two valves per cylinder there are four. The 16-valve engine has more power - 98 horsepower, faster acceleration, but is more susceptible to breakdowns than the eight-valve engine.
Thus, under the hood of the VAZ 2114 there are key mechanisms, the main one of which is the engine. Its operation is based on a distributed fuel injection system, which is regulated by an electronic control unit.
Latest comments:
- Igor: I don’t have a fitting, the throttle is electronic, what should I do?
- Denis: Hello everyone. On the ventilators, what should the wires be attached to?
- Vova: I did everything as in the picture, except I didn’t install a new cigarette lighter. P [. ]
- Mukhtar: Guys, salamaleikum to everyone, I have such a problem with the arrows on the panel and im [. ]
- Vitaly: Hello, I have a VAZ 2115. I recently encountered such a problem with [. ]
Hood VAZ 2109 Repair VAZ 2108 2109 21099
Friday, May 22nd, 2015
The hood of the VAZ 2109 comes with a long or short wing. A short wing was installed on the old nines, and a long wing on the newer ones. They look like this:
Hood of VAZ 2109 short wing
Hood of VAZ 2109 long wing
Replacing the hood of a VAZ 2109 is not difficult:
Hood stop for VAZ 2109
1) Remove the chip from the hood illumination lamp.
Hood lighting VAZ 2109
And we stick the wire out of the hood.
VAZ 2109 hood light wire
If the hood will not be changed, but is removed for some work, then we attach a thread or thin wire to the wire. This is done so that later you don’t have to worry about threading the wire back. 2) Disconnect the washer tube in the hood of the VAZ 2109.
Washer tube VAZ 2109
Tee of washer tubes VAZ 2109
3) Unscrew the hood mounting bolts and remove the hood. If the new hood does not have washer nozzles installed, there are no washer tubes, there is no backlight, then we remove all this from the old one and install it on the new hood. After replacing the hood of the VAZ 2109, it is necessary to adjust it. To do this, the hood mounting bolts are tightened, but not tightened. The hood of the VAZ 2109 is closed and the gaps between the hood and wings are leveled.
Hood clearance VAZ 2109
Then the gap between the hood and the radiator grille is leveled. To ensure that the hood of the VAZ 2109 is level with the wings in height, there are rubber caps in the front part of the hood. By rotating these caps clockwise and counterclockwise, you can raise or lower the hood. When replacing the hood of a VAZ 2109, you should keep in mind that an unadjusted hood may snap into place and cannot be opened from the passenger compartment. Then remove the engine protection from below and move the hood lock tongue with your hands.
Open hood of VAZ 2109
Export models of the VAZ 2109 had Shumka (sound insulation) on the inside of the hood, designed to reduce noise from engine operation. Fur coats are also placed under the hood of the VAZ 2109. This coat is needed so that the engine retains its heat longer in the cold. As is known from physics, heat from a hot engine rises and is quickly lost through a metal hood with good heat exchange. The fur coat retains this heat under the hood, preventing it from dissipating. Everyone, of course, has their own opinion on this matter, but in the northern regions of Russia, a fur coat under the hood of a VAZ 2109 is an irreplaceable thing.
To home
Another video with an example of replacement
https://youtu.be/QxX3tCjapJE
The VAZ-2114 car uses a hidden engine cooling circuit with an injector. It is highly complex and includes 28 elements. Traditionally, the assembly of the cooling system of this car is not of high quality. Therefore, throughout the entire period of operation, it requires constant monitoring, regular maintenance and repair. In this regard, many owners of this car are interested in the nuances associated with independent maintenance, repair and operation of the cooling system, among which the most common questions are:
- 1. How to properly replace the coolant mixture?
- 2. How to flush the cooling system?
- 3. How to remove air from the VAZ-2114 cooling system?
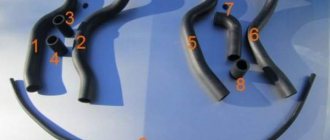
- 4. How to properly replace the cooling system pipes?
What is an injector
The concept of injector includes complete engine control, due to the unification of all systems. The main system characteristic of this type of engine is the fuel supply. The design of this unit eliminates the carburetor, which significantly increases the resource without interruption of engine operation. The injection of the injector system is carried out directly into the combustion chamber through nozzles. It is this device that helps increase the speed and power of the VAZ 2114 and 2115, with the same valve operation.
The diagram of this power system highlights the main unit - a computer that automatically regulates fuel injection into the chamber, operation of valves, fuel pump, etc. That is, the main part of the engine injector is electrical equipment.
VAZ 2115 fuse diagram
The most common models are 3722010 (since 2004) and 21150 3722 010 10. The set of protective elements of electrical equipment in them is not very different from each other, but there are differences, and they are reflected in the decoding of the diagrams below.
The main mounting block under the hood of the car.
| Item no. | Power, A | What protects |
| 1 | 10 | Lamps for rear fog lights and PTF turn-on indicator |
| 1* | 10 | Headlight cleaner motor and relay (contacts). Headlight washer activation valve |
| 2 | 10 | Turn signals, breaker relay and hazard warning lamp |
| 3 | 7.5 | Interior lighting front, center, trunk Ignition switch Engine management system Brake lamps On-board computer |
| 3* | 7.5 | Rear lights (brake light) Body interior light |
| 4 | 20 | Cartridge for connecting a portable lamp Heated rear window (contacts) |
| 4* | 20 | Cigarette lighter Socket for portable lamp |
| 5 | 20 | Horn Cooling fan motor |
| 6 | 30 | Power windows Power relay (contacts) |
| 7 | 30 | Heater motor Windshield washer Headlight wiper motors (in operating mode) Cigarette lighter Glove compartment lamp Rear window heating relay (winding) |
| 7* | 30 | Headlight wiper motor Winding Heater motor Window washer Rear window wiper motor Windshield and rear window washer activation valve Cooling system fan activation Rear window heating relay coil Indicator lamp Glove compartment lighting |
| 8 | 7.5 | Right PTF |
| 8* | 7.5 | Left PTF |
| 9 | 7.5 | Left PTF |
| 9* | 7.5 | Right PTF |
| 10 | 7.5 | Left dimensions License plate lamps Engine compartment lamp Instrument lighting switch Illumination lamps for switches, instruments, cigarette lighter, ashtray, heater control levers Illumination panel for heater levers |
| 11 | 7.5 | Right dimensions |
| 12 | 7.5 | Right low headlight |
| 13 | 7.5 | Left |
| 14 | 7.5 | Left high beam headlight High beam indicator lamp |
| 15 | 7.5 | Right high beam |
| 16 | 15 | Turn signals, relay-breaker for turn signals and hazard warning lights (in turn signal mode) Reversing light lamps Lamp health monitoring relay On-board monitoring system display unit Instrument cluster Insufficient oil pressure lamp Parking brake activation lamp Brake fluid level lamp Battery low warning lamp Trip computer ( if installed) Generator field winding (in engine starting mode) |
| 17 | — | Reserve |
| 18 | — | Reserve |
| 19 | — | Reserve |
| 20 | — | Reserve |
The asterisk indicates older configurations. Relay
| K1 | Headlight cleaners |
| K2 | Turn signal and hazard warning switch |
| K3 | Wiper |
| K4 | Lamp integrity |
| K5 | Window lifters |
| K6 | Sound signals |
| K7 | Heated rear window |
| K8 | High beam |
| K9 | Near |
Additional unit in the cabin
| Circuit breakers | Power, A | What is he responsible for? |
| 1 | 15 | Main relay |
| 2 | 15 | Constant power supply to the controller |
| 3 | 15 | Fuel pump |
Relay
| K4 | Fuel pump |
| K5 | Cooling fan |
| K6 | Main relay |
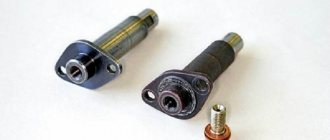
Starter fuse and relay
The VAZ 2115 retractor should be looked for on the device itself. To check it without removing the device, lift the hood cover and place it between the fan radiator and the engine. On diagrams it is often referred to as a blocking switch. The contact protection relay is called additional. The photo shows what it looks like.
Cigarette lighter fuse
It is numbered F4 with a rating of 20 Amps. The new ones are marked as F7 with a power of 30 A. The element often does not work due to short circuits.
Fuel pump fuse and relay
Placed in an additional interior mounting block under the glove compartment. The first is marked as F3 and its power is 15 A, and the number of the second is K4.
Where is the relay and ignition fuse located?
It is located in the cabin, under the instrument panel on the driver's side.
VAZ 2115 heater fuse: where is it located?
F7 and rated at 30 Amps is placed in the cabin.
Fan
The relay was placed in an additional block under the glove compartment - K5. The insert is located in the main block - F5 with a rating of 20 Amps.
Generator
A three-level voltage regulator relay was placed on the installation. It can be seen right next to the wires coming from the latter.
Turn signal relay
Lada 2115 has been marked K2 since 2006. Located in the engine compartment mounting block.
Heated rear window
The answer is F4, with a power of 20 A.
Windscreen wipers
Fuse element number F7.
Stop signals
F3 rated 7.5 Amps.
Radio tape recorder
The fusible protective element of the tape recorder is F5 and rated at 20 Amps.
Reverse fuse
Located in the main mounting block - F16.
Idle relay
Located on the throttle assembly.
Wipers
This is #3. The main signs of its malfunction are a sudden stop of the windshield wipers and their intermittent operation.
Lamp health monitoring relay
No. 4 in the main block.
Where is the fog light relay located?
Located on the fender near the battery. Or trace its position through the wires from the fogs themselves.
Which fuse is responsible for the power windows on the VAZ 2115
Primary installer element F6, rated 30 A.
Low and high beam
4 elements rated 7.5 Amps. Designated - F12, F13, F14, F15 - right and left low beam, and for high beam.
Interior lighting
No. 3 at 7.5 A is responsible for it.
Charger
The battery fuse is installed on the battery.
central locking
You need to determine the location of the wiring harness going to the installer, where the insert is located.
Emergency crew
No. 2 in the main block. Rating - 10 A.
Dimensions
The protection elements are designated F10 and F11 and both are rated at 7.5 A.
Instrument panel fuse
No. F16 and rated at 15 A.
Instrument lighting
Comes complete with 7.5 A dimensional protection in F10.
Number plate illumination
No. F10 at 7.5 Amperes.
Windshield washer fuse
No. F7 and rated at 30 Amps.
ECU relay
No.
Fuse F3
Responsible for protecting the interior lighting circuits, instrument lighting, brake warning lights and, in some versions, the on-board computer. Nominal - 7.5 A.
Fuse F7
The fusible element in the VAZ 2115 is responsible for the headlight and glass cleaners, washer, glove compartment lighting and stove. Its power is 30 A.
VAZ 2115: fuse F10 is on
The fusible element is responsible for the left dimensions; it burns out for one reason - the metal frame of the dashboard frays the wiring and a short circuit occurs. To solve the problem, it is necessary to insulate and secure the cable.
Fuse F16 is on
An element rated 15 A is one of the most important in the VAZ 2115 - it is responsible for a huge number of circuits, from turn signals to alarms. The burnout is due to poor performance of the reverse sensor - the factory one requires replacement.
Fuse for on-board computer
The element takes the place of F3 with a rating of 7.5 A or F16 with a rating of 15 A in the main block.
Relay K4 VAZ 2115: what it is responsible for
Responsible for the proper operation of headlight lamps. Located under the hood with number 4.
Immediately after purchasing a car
So, you have become the happy owner of your own car, moreover, not a used one, but a brand new one, which brings much more positive emotions than buying a used foreign car at the same price. First of all, you should pay attention to anticorrosive. The bottom of the car and wheel arches come out of the factory without protection, so either contact a service station or take the time to buy plastic protection and a can of bitumen mastic. But you should not blindly trust the service station; always check the quality of the service provided.
new VAZ 2114 cars
After you have dealt with the car body, you should take up the wrenches and check the tightness of the nuts and bolts, at least those that can be obtained without unnecessary difficulties. The fact is that the domestic manufacturer has such a sin as loose bolts and nuts, which create unpleasant rattling noises.
Run-in
Warming up a new engine is a very important stage, and it is not necessary to wait until the temperature reaches operating 80 degrees; it will be enough to overcome the lower limit of 40 0 C. If the car has not yet been run-in, then be sure to monitor the speed and do not load it with sudden accelerations, especially in a cold state.
During the break-in process, the engine pistons undergo final grinding, and if the engine is not warmed up, then as a result, not all elements will go through the thermal expansion phase, which will lead either to their rapid, uneven wear or to engine seizure.
Tuning model 2114
VAZ 2114 seems to be created for tuning. The vast majority of finishing operations described on the Internet are associated with this particular car. There is nothing surprising here. Some components need to be modified for successful further operation, and some need to be modified to give the vehicle a more modern and unique look.
Tuning applies to any of the car’s components: interior, body, engine and suspension. One of the options is replacing the engine with a motor from Lada Priora, which has already been mentioned above. Let's look at what other lengths owners go to to give their cars individuality. The very shape of the Lada 2114 calls for making it a sports car. Of course, only externally.
For this purpose, kits are available for sale, the name of which speaks for itself - Fast and Furious, Sport, etc. In addition, bumpers of various configurations, spoilers, and linings are sold separately. All this, of course, is not cheap. And taking into account painting in body color, as well as installation work, the amount becomes even greater. But I must admit, it's worth it. These VAZ 2114s look very impressive and are the envy of friends and acquaintances.
This tuning suits the VAZ 2114 Perseus especially well, however, subject to professional painting. Another way to attract the eyes of passers-by to your car is to lower it. Recently, many such cars have appeared on the streets of our cities. This is done using special short-stroke racks, which are also commercially available. Some of them allow you to achieve a lowering of up to 70 mm.
Car enthusiasts show their greatest imagination when... What don’t they put here! From banal electric windows to multi-colored door trims. They completely change the dashboard, install a different, more convenient from their point of view, steering wheel. But sometimes this is done even at the expense of safety. Don't be lazy, look at photos of similar tuning. Some of the salons on them are a real work of art.
https://youtube.com/watch?v=821-UhIh7Yc