Reliability and long service life of the suspension are among the priority characteristics of the car. Even at the design stage, engineers set the task of developing a suspension that would be maximally adapted for domestic roads.
The result turned out well; the design even caused delight and surprise among some car enthusiasts. The average resource of suspension elements exceeds 100,000 km. Despite a number of positive aspects, there is always a fly in the ointment.
Lada Vesta after 78,000 km: the cheapest to maintain. But it is not exactly
The editorial sedan underwent the fifth maintenance in its life. We refused the services of the official service and switched to servicing the car ourselves. The regulations are strictly followed, but going on a long journey while driving a Vesta is still a little scary.
LADA > Vesta
More than once I had to read and listen to reproaches: why don’t we run more intensively on Vesta?
This model even now, three and a half years after its launch into the series, does not lose its relevance and is of great interest.
But here’s the problem: there are no conditions for long runs yet. A couple of vacations a year add mileage, but not globally. And even if I hadn’t switched to a motorcycle for the summer, editorial Vesta still wouldn’t be striking with the numbers on the odometer now. Therefore, Vesta has only undergone five maintenance tests so far.
Wear of stabilizer link joints
Catalog number of the original stands (bones) - 8450006750, length - 283 mm. Due to poor-quality road surfaces, pins (hinges) often fail prematurely.
Replacing the “bones” yourself is not at all difficult if you follow the instructions for using the technical device.
Required tools:
- wrench 16, 19, Torx 30;
- a set of new “bones”.
Step-by-step instruction:
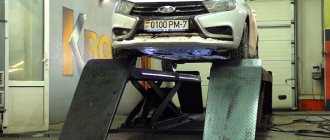
- Jack up the car and remove the wheel on the right.
- Unscrew the upper and lower fastenings of the “bone”.
- We insert a new one, tighten the nuts, and screw the wheel.
- By analogy, we repair on the left.
Self-service
Since the three-year warranty period had ended, we saw no reason to overpay the dealer for work if we had our own technical center in Tushino. And the consumables purchased at a regular spare parts store made the pockets lighter to a minimum. A canister of “synthetics” Lada Ultra 5W40 (1187 rubles), oil (193 rubles), air (255 rubles) and carbon cabin filters (334 rubles) - that’s the entire set required. Total - less than 2000 rubles for everything. An official TO-5 dealer would cost about 7,000 rubles.
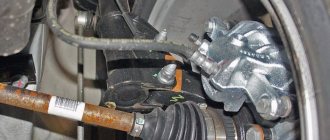
Ball joint knock
After 60 - 65 thousand kilometers, owners note the appearance of a knocking sound in the area of the axle shaft. Most often when turning at low speed.
The tip of the ball joint is rolled into a plastic sleeve. During the systematic operation of the car, the moving surfaces wear out and play forms.
The process of replacing the ball joint yourself is not difficult, but be careful not to violate the installation technology.
To verify that the ball is faulty, just jack up the side of the car. Loosen the wheel up and down, the presence of knocks and clicks will be a sign of wear on the ball joint.
Upholstery
I praise the upholstery. Vesta is a budget car, and 78,000 km can be called serious mileage. The “leather” interiors of other foreign cars that are not the cheapest look depressing for such mileage. Lada's fabric is in order! She practically didn’t stretch out on the driver’s seat cushion (in the Almera, for example, the picture was worse). The central armrest, on which I constantly lean, does not show any traces of use.
And the interior trim is not easily soiled. I have three dogs, and although I carry them in the back seat in a special hammock, the sides of the sofa and the door panels cannot be completely covered. So there are no stains on them. For three and a half years I did without stain remover, using a simple vacuum cleaner.
Sequence of actions when replacing roll bar bushings
Catalog number - 8450006748, cost of original spare parts - from 350 rubles/piece. As an alternative, use polyurethane bushings from Chevrolet Niva (17012680).
Required tools:
- TORX 40 wrench, heads “13” and “16”;
- knob;
- extension wrench;
- torque wrench;
- new bushings, preferably polyurethane ones, as they have a longer service life.
Step-by-step instruction:
- We hang the front part of the car with a jack and use a hydraulic lifting mechanism.
- Unscrew the steering gear casing (head at “10”).
- We unscrew the steel brackets that secure the rubber bushings (the key is set to “13”).
- Unscrew the front bolts (T40 key) and remove the bushings.
- We insert new ones and assemble the structure in reverse order.
Tighten the bolts with a force of 2.0 kgf/m.
When to change the timing belt?
On Vesta the unit is different, 16-valve. But the components for it are from the same suppliers. And the mileage already makes you think about changing the timing belt preventively, without waiting for catastrophic consequences. If it were my personal car, I would do it that way. However, the “Behind the Wheel” life tests imply strict adherence to the maintenance regimen prescribed by the factory. And in the Vesta service book there is not a word about the mandatory replacement of the timing belt. Only reservations about condition monitoring at each maintenance. So, we’ll keep an eye on it and wait a while with the replacement. Although the experience of Granta and Datsun is annoying. Moreover, both cars did not stop at the doorstep of the editorial office, but in the Tula and Vladimir regions.
The red sedan continues to clock up the kilometers. By refusing dealer service in favor of independent service, I expect a reduction in the cost per kilometer. If there are no unscheduled malfunctions, Vesta has a chance to become the cheapest car in the Za Rulem fleet.
- You can operate any editorial vehicle in our “ZR Park” section.
- The most popular accessory for Vesta now is radiator protection. We also recommend taking a look at towbars, hood supports and car floor mats.
Wear of stabilizer bushings
The first sign of “fatigue” of the stabilizer sealing bushings is a dull knock when overcoming a speed bump. Even in Lada Vesta, the manufacturer saves on materials and uses the cheapest ones. As a result, the service life of the bushings is short; creaking of the Lada Vesta suspension appears after several tens of thousands of mileage.
Other signs of bushing wear:
- knocking in the area of the front axle when the car rolls;
- beating in the steering wheel at speeds over 60 km/h;
- play in the steering wheel when maneuvering;
- arbitrary deviation of the machine from a given course. Car enthusiasts say that it “takes away” to the side.
Related link:
Replacing batteries on a key fob in a Lada Vesta.
The final conclusion will be given by a mechanic after conducting a comprehensive diagnosis.
Review of Manufacturer Prices
| Catalog number / Size / Diameter | Price in rubles |
| Original | |
| 17012680 (inner diameter 21.5 mm.) | From 400 |
| 8450006748 | From 400 |
| Analogs | |
| Polyurethane from Chevrolet Niva 2123 (17012680) | From 350 |
| Polyurethane for Lada Vesta from Kia Rio (548132K100, 548141G000) | From 550 |
| 54813-2K100 (diameter 21.5 mm.) | From 550 – 600 |
| KSBSOULF (diameter 21.5mm) – new sample | From 550 – 600 |
| Vesta front left / right (8450006750), stabilizer struts length 275 mm | From 700 |
| RENAULT Logan suspension mount (30768) | From 130 |
| Nut RENAULT 7703034221 | From 300 |
| Bracket 8450006747 | From 350 |
| Rod 8450006748 | From 450 |
| Toyota Rav4 (48820-42020), length 285 mm | From 2500 |
| CTR (CLT50) | From 650 / piece |
| Renault, SASIC, SIDEM, LEMFORDER, length 275 mm | From 400 |
| Alfa – Fiat – Lancia 46413122 | From 370 |
| MONROE: L15600 | From 380 |
| Multipla, Lybra | From 350 |
| Kia Rio (548132K100) | From 370 |
| Bracket (548141G000) | From 250 |
*prices are as of April 2, 2019.
Conclusion
If you notice a third-party creaking, knocking, or rattling noise in the suspension, don’t panic. Malfunctions are a natural process. At the initial stage, it is important to correctly identify the source of the breakdown and its location.
If you do not have a special tool, such as mounting tools or TORX keys, contact a service station. It is extremely difficult to repair a car with your bare hands. Regarding the manufacturer of spare parts, the final decision rests with the owner of the technical equipment. The domestic manufacturer is not inferior in quality to foreign analogues. In this case, it is not advisable to overpay for the brand.
Lada Vesta body repair price - dealer and service station
The accident does not necessarily have to be serious, because most often car owners are haunted by minor accidents and collisions in which there is no risk of injury. But even in this case, there is no escape from expenses. And if you consider that in big cities minor accidents are commonplace, the relevance of today’s topic about the price of Lada Vesta body repairs becomes clear.
Especially in light of the fact that Vesta represents a big step forward in the development of the Russian automotive industry. However, it must be admitted that the beautiful design, rich equipment, modern technical solutions and other factors not only made operation much more comfortable, but also influenced the price of the car, both in terms of purchase and repair.
Reaction
As for the reaction to the results of the video, there is a noticeable division of car owners into 2 camps. The first believe that the cost of body repairs for the Lada Vesta is too high, especially taking into account the force of the impact. As an example, old models are given - 2108, 2109, etc., where the price of spare parts is significantly cheaper. Particularly indignant are their quotes from the dealer, who demands about 20% of the price of the entire car for repairs.
Others point out that this is a model of a completely different level in comparison with the classics that are fading into history. Therefore, higher prices are quite reasonable. However, their main complaints are about the price of the optics - headlights are really expensive.
Be that as it may, before you go shopping for a Lada Vesta, it is worth collecting information regarding the prices of components that are most often “asked for replacement” in the event of an accident. These are the hood, headlights, taillights, chrome bumper trims, front and rear bumpers, amplifiers, etc. In addition, it would not be amiss to compare the likely costs with the price of the CASCO policy.
Assessing the damage
To determine the price of Lada Vesta body repairs, Autoreview employees contacted both the official dealership and third-party service stations to compare the cost of spare parts and labor. Naturally, repairs at the dealer turned out to be much more expensive.
Dealer
Here, the managers sent almost all the components for replacement - the hood, bumper, headlight, radiator grille, bumper amplifier, honeycomb, etc. In fact, only the wing agreed to putty and tint, since the crease there is extremely insignificant.
Work at the dealer is quite predictably quite expensive
As a result, the official salon would charge about 40,000 rubles for the work, while about 70,000 rubles would have to be spent on spare parts. The total cost is 110,000 rubles.
Here the situation is much better. In particular, the craftsmen announced that only those components that cannot be restored will be replaced - the chrome trim on the bumper, the bumper amplifier and the headlight. They undertook to straighten and glue everything else.
At third-party service stations the overall price is significantly lower
The work was estimated at the same 40,000 rubles, while spare parts would have had to be collected for only 20,000 rubles. The total cost is 64,000 rubles, which is almost 2 times more profitable than at the dealer. It is worth noting the point with the work - it is estimated at one amount, but at the same time installing new parts is much easier and faster than editing, puttying, priming and painting damaged ones, and therefore we can conclude that the cost of work from the dealer is higher.
As for the purchase of non-original parts, in this case it is not a fact that they will be found at all, because the list of components is small. And it’s unlikely that at a serious service station, craftsmen will waste time fitting new, but incorrectly cast or stamped parts. On the other hand, psychologically, not all car owners will agree to drive a car with straightened parts, and therefore will install new ones.
Regarding X Ray, the price tags for him are much higher - 165,000 rubles at the dealer and 105,000 rubles at the service station!
Assessing the damage
After the sedan hit the barrier, specialists began inspecting the car and counting “battle losses” to determine the price of body repairs for the Lada Vesta. It’s worth noting right away that Vesta passed this test noticeably better than X-Ray, which was reflected in the final results. In this case, there are differences in the layout of the machines.
Immediately after the collision
The first difference from X Ray was that the Vesta had almost no displacement of the front left wing. Thanks to this, it did not block or damage the driver's door, which opened easily. In addition, there was a gap between the upper edge of the wing and the front left pillar.
Reviews
| № | Positive |
| 1. | Stepan Vasilyevich , 42 years old (otzovik.com): the suspension is mounted on a subframe, the levers and steering knuckles are of a new shape. Obstacles on the road are overcome smoothly, without impacts. |
| 2. | Gennady Semenovich , 39 years old (www.zr.ru): at speeds up to 125 km/h the suspension works as comfortably as possible. The problems start from above. |
| 3. | Timofey , 22 years old (autobann.su): pleased that gas shock absorbers are installed by default. This is just right for the urban cycle. |
| 4. | Kirill , 33 years old (lada-vesta.net): before the Lada Vesta I had a Granta, it has an old type suspension design. Vesta uses frame technology. The steering rack and stabilizers are fixed to the beam. |
| 5. | Semyon Nikolaevich , 44 years old (otzovik.com): my positive review of the chassis and suspension of the Lada Vesta. The car is in its second year - no complaints, minor bumps are absorbed silently. |
| 6. | Lev Nikolaevich , 45 years old (www.zr.ru): I live in a rural area, you know what the roads are. The suspension works great. My recommendations to motorists. |
| 7. | Dmitry , 20 years old (autobann.su): springs are installed separately from shock absorbers, semi-independent type with a number of improvements that were so lacking in previous generations. |
| 8. | Mikhail Gennadievich , 43 years old (lada-vesta.net): the angle of inclination of the front pillars is 5 °, which has a positive effect on the handling characteristics of the car. The steering from the second generation Renault Megane is better than its domestic counterpart. |
| 9. | Kirill , 40 years old (otzovik.com): good car, good build, no comments on the chassis or transmission. |
| 10. | Petr Semenovich , 42 years old (www.zr.ru): the car is three years old, there are no comments on the components, I systematically carry out technical inspections and diagnostics, and treat the equipment with care. |
| 11. | Alexander , 35 years old (autobann.su): during two years of active operation of the car, I replaced the rubber bushings on the stabilizers once. I am satisfied with the build quality of the domestic car. |
| Negative | |
| 12. | Konstantin Stanislavovich , 43 years old (www.zr.ru): the chassis has not lasted even two years, it thumps, the suspension creaks in the cold. The officials said that this is not a warranty case and they cannot help. I replaced the rubber bands myself with polyurethane ones. |
| 13. | Vitaly , 27 years old (otzovik.com): instead of standard rubber bands, I installed polyurethane ones from Chevrolet Niva. The service life of the last 60 - 70 thousand km. As it turned out, the reason for the knocking was premature wear of the rubber seals of the stabilizer link. |
| 14. | Grigory Vladislavovich , 45 years old (autobann.su): a model with obvious defects, after purchase it needs a comprehensive re-upholstery of components, mechanisms, and partial noise reduction. |
Related link:
Tips from experts on eliminating creaking stabilizer bushings on Lada Vesta
BRAKE SYSTEM
Inspecting the rear suspension, you can find that the car is equipped with drum brakes. Good design for do-it-yourself maintenance and repair. This design has been used for a long time and is well known to many car enthusiasts.
Front disc brakes. Similar to those used on Renault! Looks like the brake pads are from TRW. These pads have proven themselves well in operation. Car enthusiasts even praise them!
The unusual location of the LADA Vesta brand and model designation is striking. Inside the car, the multifunction steering wheel attracts special attention! This innovation was not noticed on AvtoVAZ models produced earlier. Without going into details, let's say that the steering wheel is equipped with all sorts of buttons and wheels.
Now let's look at the features of maintenance and repair of the Lada Vesta engine.
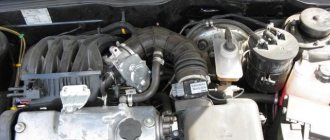
ENGINE COMPARTMENT
So. Engine 16 valve volume 1.6 liters. Closed on top with a plastic lid. The cover is held in place by 4 stops; this advantage makes it easy and simple to remove it to access the engine and carry out its maintenance and repair. Having removed the cover, we immediately discover that replacing the spark plugs does not present any difficulties, since they are immediately at hand.
The spark plugs have ignition coils with connectors connecting them to the wires of the electrical circuit. By simply squeezing the clamps, these connectors are removed and disconnected from the coil. Next, we unscrew one screw on each ignition coil and after that, you can change or remove it and examine the condition of each spark plug. If necessary, spark plugs need to be changed!
The gas distribution mechanism (GRM) is driven by a belt drive. The toothed belt itself is located under the casing on the side of the expansion tank. The frequency of replacing the timing belt is once every 180 thousand km. But when researching the topic of pump reliability on the Internet, I suddenly discovered that it is very often recommended to change it after about 90 thousand km.
Consequently, the timing belt will need to be removed at such moments. On the other hand, this makes it possible to once again examine its condition and, if necessary, replace it.
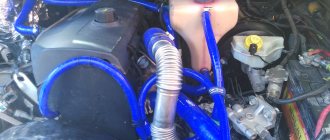
WINDOW WASH RESERVOIR
The glass washer reservoir is conveniently located. Its neck is located on the right in the direction of travel, next to the support of the front right pillar. Its lid opens with a simple click, and the very location of the neck makes it easy and simple to fill in washer fluid.
Another advantage of the top location of the tank is that it can be easily dismantled. This is sometimes necessary when water has been poured into the tank, and as usually happens here in Russia, frosts suddenly hit and the water in the tank froze. In this case, it is easy to take it out, defrost it and drain the water.
AIR FILTER
The air filter is located on the left in the direction of travel, next to the battery. Maintenance and repair is not difficult. It can be removed without the help of a tool. There are latches on both sides of the case. By pressing them, the plastic air filter housing easily slides out of its place. Now we remove the element from the housing, carefully inspect it, and, if necessary, replace it with a new one.
Having inserted the filter into the housing, we install the whole thing back, press on the upper part so that it sits in place with a characteristic click. All! We can say that the air filter has been serviced and repaired. Now you can begin further research.
CHECKING AND CONTROLING THE OIL LEVEL
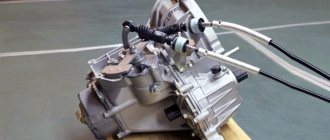
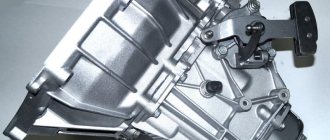
To begin with, it should be said that the car is equipped with a robotic gearbox. We will not go into lengthy explanations of the operating principles of such a unit. Just for information, we note that gear shifting in such a unit occurs using an electronic unit. You can also add that a robotic gearbox is cheaper and easier to maintain and repair than an automatic gearbox.
I will only say that the oil level is checked and filled through the hole in the front of the gearbox. To drain the oil, there is a plug installed at the bottom, which can be unscrewed using an 8mm square socket wrench.
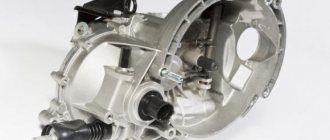
A more detailed examination of the clutch and gearbox reveals a removable subframe! Which is a good solution in case of maintenance and repair of these devices. Having dismantled the subframe, we can easily remove this unit, and if necessary, the clutch!