A car enthusiast without special skills or training can carry out independent maintenance of the seat heating element (hereinafter referred to as EPS).
Seat heating buttons on Lada Vesta
Main stages during dismantling and disassembly:
- We place the car on a flat platform, platform. A roadside overpass or inspection hole will not be needed.
- We provide priority safety measures, squeeze the parking brake.
- On the driver's (passenger) side, move the seat all the way back and unscrew the two screws at the base.
- Similar steps, just move it forward all the way and unscrew the two screws.
- Turn off the ignition and reset the battery terminals.
- We disconnect the contact chips from the limit switches.
- We remove the seat from its regular place and place it on a workbench for preventative maintenance.
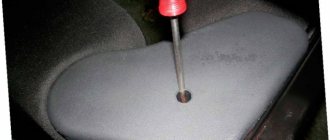
- We dismantle the plastic decorative insert and cladding.
- Unclench the metal brackets and release the heating element.
- We remove the foam rubber.
- We carry out troubleshooting of the EPS and detect mechanical damage.
- Based on the results obtained, we decide on the advisability of replacing or restoring the previous one.
- We assemble the structure in reverse order.
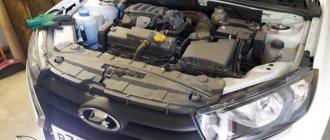
Where is the heating mechanism located?
In cars of the Lada Granta and Lada Vesta family, the EPS are located under the front driver and passenger seats.
To carry out preventive maintenance and diagnostics, first dismantle the seat.
Note to the driver!!! Before dismantling, be sure to turn off the ignition and reset the battery terminal. Since an AIRBAG unit is located under each of the seats, turning off the limit switches when the power is activated will lead to an open circuit and false alarms of the sensors.
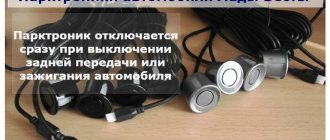
Connection
Connection diagram for heated rear seats:
It is better to take contact “B” from a protected high-current circuit with a fuse. Contacts “A” and “C” can be found in the ERA-GLONASS lighting lamp, in the ISO radio or cigarette lighter connector. Before starting the connection, do not forget to disconnect the negative terminal of the battery.
Installation and connection of heated rear seats on a Lada Vesta on video in several episodes:
Let us remind you that we previously learned how to connect heated windows/mirrors to an additional alarm channel on Lada Vesta and XRAY, as well as how to turn on the heated windshield through a separate button.
Found a mistake? Select it and press Ctrl+Enter..
Source: xn--80aal0a.xn--80asehdb
Device and circuit
Electrical wires are fixed to the body with plastic ties, and the connections are soldered.
In order to increase safety, prevent fire and short circuits, the wiring is packaged in a corrugated polymer sleeve. The mechanical activation button is located near the gear shift lever (scenes).
Related link:
Tips from experts on replacing the oil filter on Lada Vesta
Down to the smallest detail
But the all-purpose Vesta is not only good for its capacity. The highlight of the trunk is the double floor, divided into two sections.
Each section is a spacious organizer (grayish foam tray) for small things and a hard lid. The trays are of a similar size, and so are the lids. Therefore, they can be swapped, placed on top of each other, either vertically or completely pulled out, configuring the trunk at your own discretion. Underground capacity - 95 l..
I liked the lids the most: solid, strong. If you put one of these on two boxes, you will get a comfortable bench for a picnic.
Under the organizers is another floor, but this time soft. Underneath is a real spare tire, 15 inches in diameter. This means that for the SW Cross version, which has only 17‑inch wheels, such a spare wheel will play a temporary role. On the other hand, it lies freely, with gaps - a 17‑inch wheel will fit here.
The trunk lighting consists of a pair of lamps (one each on the left and right) built into the side panels of the trunk. Just in case, a 12-volt outlet was provided on the right panel.
There are hooks on the sides for securing bags and packages. In addition, there are loops on which three standard nets are hung: a huge square one for securing the load on the floor, a transverse mesh bag and a small mesh along the niche on the left side. Good decision!
A box located in the right wheel arch, closed with a lid, can be used to store a first aid kit or put tools in it. And in the left wing there is a niche for a five-liter canister - it’s comfortable to keep oil or washer fluid here.
Why doesn't the heated seats work?
There are only three reasons causing EPS malfunction:
- the seat heating fuse on the Lada Vesta has blown;
- break in the heating element circuit;
- The mechanical switch (button) has failed.
Most often, a chain break occurs due to frequent pressure on the corner of the seat with the knee.
First, determine if the fuse is working properly. It often happens that after dismantling the “seat” and disassembling it into its component elements, the cause of the breakdown was not identified.
If the fuse is faulty, the indicator on the dashboard will not light up when the engine starts. The factory fuse is marked F33, current 15A.
The fuse box is located at the bottom of the dashboard on the driver's side.
The heated driver's seat may not work due to failure of adjacent mechanisms and units. For example, electronic control unit, fuse box, battery, temperature sensor.
Defrost MAX mode
On luxury Vestas with air conditioning, the “Defrost MAX” mode appears. It allows you to most effectively clean all windows and exterior rear-view mirrors from fogging, freezing or icing. To enable this mode, you need to press the corresponding button (No. 24) on the climate control unit.
When the mode is activated, the air conditioning (if conditions permit), electric heating of the windshield and rear windows, as well as side mirrors will be forcibly turned on. The entire air flow is directed to the blower nozzles of the windshield and front side windows, and the maximum air speed and temperature are also set.
Signs of a malfunctioning heating system
- EPS randomly turns off;
- heating does not turn on when you press the mechanical button;
- the temperature sensor is broken;
- The indicator on the dashboard does not light up.
What does the seat assembly on a Lada Vesta car consist of?
It consists of a pillow and a backrest, which are supported by a frame. The connection of these parts is made with the possibility of adjusting the position of the backrest, height, and also the distance relative to the steering wheel with pedals. The side pockets on the car are designed for one of these adjustments.
To fix the rear sofa of the Lada Vesta, latches are used that can only be moved in two positions, so it is required that the backrests stand firmly without moving. The head restraints, which are mounted on a toothed slide, can optionally change their position. An armrest for the driver can be purchased by placing it near the handbrake. The seats are also removed by car owners so that covers can be put on.
You can, of course, use capes; they will be easier to remove to wash, but they bulge and look untidy; the covers are universal, but cannot be adjusted to fit.
Vest owners are mainly inclined to choose textile covers, among which there are magnificent, practical eco-leather covers that can be given an individual design. Unfortunately, the standard Vesta does not provide upholstery made of natural or artificial leather, so this step is the exclusive right to upgrade the interior to a high level of quality.
In addition, covers made of genuine leather can be ordered, then the master will “adjust” the dimensions exactly to your car.
Sequencing
- We place the car on a flat platform.
- We provide priority safety measures.
- We move the driver's (passenger) wheel back until it stops, unscrew the two mounting screws to “17”.
- Move it forward until it stops, unscrew two more screws.
- Remove the terminals from the battery and turn off the ignition.
- Disconnect the limit switches.
- We remove the seat from its regular place.
- We disassemble the plastic lining.
- Remove the metal brackets and remove the heating element.
- We carry out troubleshooting of foam rubber, the metal base of the seat, and the electronics control unit. We replace worn parts, elements, and consumables.
- We assemble the structure in reverse order. Self-heating repair is completed.
Related link:
Characteristics of brake pads on Lada Vesta.
Installation
First you need to remove the rear sofa cushion from Vesta and X-Ray, but it is not necessary to remove the backrest. The dismantling algorithm is slightly different.
Vesta
To remove the rear seat cushion from the Lada Vesta, you must first pull it up, due to which the 2 latches in the front part will come out of the grooves. Afterwards, you need to move the entire pillow back, towards the luggage compartment, and lift it a little so that the loop on the pillow comes out of the bracket on the car body.
The dismantling process is clearly demonstrated in the video.
In the case of X Ray, the algorithm is slightly different. First, you need to lift the pillow a little from the back, and then fold it forward. This will provide access to the hinges that secure the pillow, and it can be removed.
Everything is shown in more detail in the video.
Heating installation
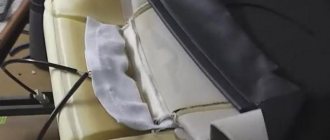
It is not difficult to install the rear seat heating of Lada Vesta and X-Ray yourself. First you need to remove the upholstery from the pillow, which is attached to metal rings. Instead, you can use plastic clamps.
Then the heating element itself is installed. If it doesn't fit, it can be trimmed, and there is no guarantee that the included wiring will be sufficient. In this case, the wires will have to be extended.
Trying on heating elements
IMPORTANT! The heated rear seat of Vesta or X-Ray must be secured with double-sided tape. Some people use glue for better fixation. However, these elements periodically burn out and in this case it is very difficult to remove the element glued with glue.
Connection is carried out according to the diagram
Connection diagram using Priora as an example
For example, in X-Ray, when connecting, the wires are pulled to the fuse box and connected directly to it. Of course, it is possible to connect to the front seat heating circuit, but there is no guarantee that the circuit will withstand such a load.
Connection to the Lada X-Ray fuse box
It is recommended to solder all connections and secure the wiring to the body with zip ties. In addition, it is strongly recommended that all wires be corrugated for greater safety.
As for the heating keys, they can be installed in a place convenient for a particular owner.
Good afternoon Winter still doesn’t want to go away, so I decided to install heating, maybe the well-known law will work and drive away the winter)) In general, all the components were purchased in the fall, but I only got around to installing them now, in principle, if only I had looked into the question earlier, then I would have understood that it was possible to install it earlier because all work can be carried out in the house, and this is warm, comfortable and good lighting. All the work took two evenings in the house with beer and very little work in the car. I took the experience of these guys 1, 2, 3 for guidance, for which I thank them very much! And I simplified the circuit a little, I didn’t pull the wire from ACC because... I took the power from the cigarette lighter, and we already have ACC. I also organized all the work so that it was carried out not in the car, but in the house. I assembled it on UAZ relays 456.3747-02, I bought the heating with buttons and USB here, the seller explained that these are original heating units, but still the heated seats had to be slightly altered and trimmed a little, the heated backrest fit as it should, there were also wires included in the kit, but they I also had to re-solder it to install the UAZ relays. I also modified the USB charging, I read about it here And so on the first evening I removed the seats, it took about 10 minutes and installed the heaters in them in two or three hours, in the morning I also installed them back in about 10 minutes. On the second evening I spent probably three hours fiddling around with the electrics and in the morning I made the connection in the car, all that was left was to connect to one wire; it took about 40 minutes or so. As a result, we have a heating mode of operation that turns out to be the following: when turned on, it heats up for about two or three minutes and you can already feel that the thermostat that is installed in the heating itself is starting to get hot at this time, turns it off, then cools down for about 5-6 minutes and turns on again, according to At this time, the seat feels neither cold nor warm (about 25-30C when the thermostat turns on), after switching on it quickly heats up and then the UAZ switch turns off (10 minutes). In general, the heating doesn’t fry at all, I’ll keep an eye on it, if I want to add a little, I’ll take it apart and leave less of the heating element under the thermostat so that it warms up longer before turning off. P/s/ I will later replace the 5A fuses with 2-3A ones, I just couldn’t find them in the store.
Seat heating buttons on Lada Vesta
Main stages during dismantling and disassembly:
- We place the car on a flat platform, platform. A roadside overpass or inspection hole will not be needed.
- We provide priority safety measures, squeeze the parking brake.
- On the driver's (passenger) side, move the seat all the way back and unscrew the two screws at the base.
- Similar steps, just move it forward all the way and unscrew the two screws.
- Turn off the ignition and reset the battery terminals.
- We disconnect the contact chips from the limit switches.
- We remove the seat from its regular place and place it on a workbench for preventative maintenance.
- We dismantle the plastic decorative insert and cladding.
- Unclench the metal brackets and release the heating element.
- We remove the foam rubber.
- We carry out troubleshooting of the EPS and detect mechanical damage.
- Based on the results obtained, we decide on the advisability of replacing or restoring the previous one.
- We assemble the structure in reverse order.
Review of Manufacturer Prices
| Catalog item | Price, rub.) |
| Kit "heated front seats" 6513010-03 | From 1200 |
| Mechanical heating control button 370971098 | From 250 – 350 |
| Relay 4-pin 3747259-10 | From 250 |
| Wiring | From 200 |
| Heated T-shirt cover “HEAT” HOT-650BK.D.GY | From 1580 |
| Modifications, various colors: HOT-650.D.BE.L.BE, HOT-650.D.GY.L.GY, HOT-700.D.BE.L.BE, HOT-700.D.GY. L.GY, HOT-700BK.D.GY | From 1600 – 2100 |
*prices are current as of 02/11/2019.
Standard front seats and rear sofa - article number and price
If for any reason you decide to replace the seats, get ready to look for them by catalog numbers:
- Right front assembly. 845-000-79-07. Price – from 5,300 rubles.
- Driver's license plate assembly. 845-000-79-09. Price – from 5,300 rubles.
- Driver's seat with armrest assembly. 845-000-79-12, priced from 6,000 rubles.
- Rear sofa cushion (assembled). 845-000-79-32. Price – from 5,300 rubles.
- Left back of the sofa. 845-000-87-06, priced from 2,300 rubles.
- Right back of the sofa. 845-000-87-05. Price from 3,400 rubles.
For your own convenience, you can replace the standard set with an anatomical one if you spend a lot of time behind the wheel. Orthopedic chairs are a rather individual issue, because if you lack the back support that is in the factory version, you will most likely rush to buy the first orthopedic chair you find.
Be patient and take your time: consult a doctor, describe the nature of the problem that worries you, and ask what it should be. Today the market is full of various offers where you can find “your” option.
Recommendations for repairs and selection of alternative options
Before dismantling the seat(s), carry out initial diagnostics and identify the source of the breakdown. Based on the analysis of the data obtained, calculate the number of necessary spare parts and consumables.
In order to optimize prevention, check the serviceability of the fuse box and the integrity of the electrical wiring. This can be done without dismantling the seats, which means you save time and money.
Some car enthusiasts, due to the fragility and unreliability of the Lada Vesta heating element, buy covers with a built-in heater. Everyone determines the effectiveness of an accessory individually for themselves.
More spacious!
The back seat is like a sedan. We only slightly changed the upholstery, correcting the seams and joints. Accordingly, the seat folds, like that of a sedan, in a ratio of 2:3 - the backrest simply rests on the cushion. There is no perfect loading area, but the small hump will be pressed against the languid things and leveled out.
At the end of the rear tunnel there is a 12-volt socket, a USB port and - a breakthrough for Lada! — buttons for heating the rear seats.
Since the station wagon’s roof is the most flat (this is noticeable by the changed window frames of the rear doors), the distance from the seat to the ceiling has increased by 25 mm, and this is significant! Tall passengers, of which I am one, will feel more comfortable, since the roof does not put pressure.
Reviews
| № | Positive |
| 1. | Ivan , 39 years old, Sverdlovsk: satisfied with the standard heating, the car is in its second year, no complaints. |
| 2. | Vladlen , 41 years old, Samara: bought a Lada Vesta secondhand, got it from the previous owner in good condition. All mechanisms are in good working order, including heating, heater, air conditioning. |
| 3. | Peter , 45 years old, Krasnodar: in three years of active use of the car, I replaced the heating fuse (FF33) once. I am pleased with the build quality of the domestic car. |
| 4. | Gennady , 38 years old, Rostov-on-Don: the “native” seat heating works effectively, without any comments. It heats up in just under a minute, the heating area is the outer perimeter of the seat. |
| 5. | Dmitry , 41 years old, Kursk: the temperature heats up quickly, consumes little energy. As a drawback, I would like to note the insufficient heat conduction when the covers are on. |
| 6. | Negative |
| 7. | Victor , 35 years old, Uralsk: after the first winter, the heated seats stopped working, so he contacted a service station. Based on the diagnostic results, it turned out that the wiring had burned out. They replaced it with a new one under warranty. For a car of this class, the quality should be higher. |
| 8. | Fedor , 42 years old, Moscow: my heating is unstable. I checked the fuse, it is working, apparently the reason is in the heating element itself under the casing. |
| 9. | Kirill , 32 years old, St. Petersburg: in general, I’m happy with the Lada Vesta car, breakdowns happen, I try to quickly fix them. Of course, domestic transport is far from its foreign counterparts. |
| 10. | Vasily , 42 years old, Pskov: dissatisfied with the build quality of the Lada Vesta, since the heated seats stopped working in the first year of “life”. In the workshop I discovered the cause - a defective temperature sensor. |
Recommendations
Comments 29
Were the connectors for the heating keys already in the armrest or did you install them yourself?
There is no wiring harness for the heating keys. You need to create them yourself. Available only for USB
I’m very interested in where they got the connectors for the keys and the pins for the connector of the unit where the wires from the keys go.
article number of the connector for the heating keys - AX3782 (Block for push-button switches 2113-2115, 2123, 2170-2172, 2190, with wires), cargen.ru/catalog/1_remon...ovoltnykh_provodov/18653/ The control connector is similar to the VAZ immobilizer connector, pins ( 4 pieces) took from it (there is also a CARGEN substitute, I found it on the market, there is no article, look in the catalog) Power connector - you need two pins, these are www.temperatura.by/montaz...eli/?product_id=10825286/ In Minsk I I found them from the air conditioning guys. This pin is called the Lyra type, 2.8 mm, it is used in almost all connectors, you can order it in almost all online stores
Thank you very much, you helped a lot. The car is from April and I was deprived of a heating unit, but I have all the wiring, so I decided to install the unit and immediately create heating for the rear sofa. Don’t you understand, in the prestige option, the heating of the sofa is only on the sides or also in the center?
)))Only two places - there are two keys! Regarding installation, read my blog, you need to connect using the traditional option
I’m very interested in where they got the connectors for the keys and the pins for the connector of the unit where the wires from the keys go.
Immobilizer connector. 4 pins from it are needed
I’m very interested in where they got the connectors for the keys and the pins for the connector of the unit where the wires from the keys go.
Pins type Lyra 2.8. 2 pieces required
Were the connectors for the heating keys already in the armrest or did you install them yourself?
There is no wiring harness for the heating keys. You need to create them yourself. Available only for USB
Keys - yes, the installation space is also standard, see my blog on that topic, part 1
Source: www.drive2.com