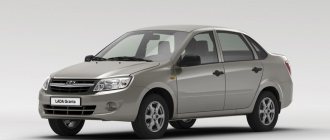
The safe parking system has become almost an integral part of the car, which is not surprising. Even simple cars already have a standard parking sensor—Vesta is also equipped with it from the factory. Parktronic Lada Vesta is a convenient, inexpensive gadget that was originally intended as an assistant in parking a car. The standard device on the Lada Vesta consists of several components. Parking sensors do not work most often due to dirt or wiring. However, it is not present in all trim levels. Built-in parking sensors of the Lada Vesta are available in the “Comfort” configuration and higher. The starting version of Vesta is ready to install any equipment you choose to measure the distance to nearby objects.
Checklist: Lada Vesta parking sensors - 5 faults, installation
The safe parking system has become almost an integral part of the car, which is not surprising. Even simple cars already have a standard parking sensor—Vesta is also equipped with it from the factory. Parktronic Lada Vesta is a convenient, inexpensive gadget that was originally intended as an assistant in parking a car. The standard device on the Lada Vesta consists of several components. Parking sensors do not work most often due to dirt or wiring. However, it is not present in all trim levels. Built-in parking sensors of the Lada Vesta are available in the “Comfort” configuration and higher. The starting version of Vesta is ready to install any equipment you choose to measure the distance to nearby objects.
Sound off
Some Lada Vesta owners complain about the lack of sound from the system, while the screen works quite normally. It should be noted that you can disable parking sensor alerts in the sound menu if it is very annoying. But this is not recommended, because looking in the mirrors and at the same time at the screen when parking is extremely inconvenient.
When operating a Lada Vesta with parking sensors, you should adhere to certain rules: monitor the condition of the sensors, avoid contact with a direct stream of water (especially when washing with high pressure), listen to unusual alerts. Then you can be sure that you will not accidentally encounter an unexpected obstacle due to a failure of the parking assist system.
How parking sensors work on Vesta
When the ignition is turned on and reverse gear is activated, Vesta's safe parking system is activated. This is indicated by a short high-pitched sound signal.
Active sensors send ultrasonic signals, which begin to return back from a distance of 100 m, pushing off from an obstacle. The control unit of this system processes the data received from the sensors and converts them into a signal or image in the Vesta cabin.
The “native” parking sensors of the Lada Vesta informs about approaching an obstacle with an intermittent high signal of increasing frequency. From a distance of 40 cm to the object, the sound becomes continuous.
The alarm unit issues messages not only when reversing, but also when Vesta is stationary. The sound, in addition to the distance to the obstacle, also indicates a malfunction of the safe parking system. The parking sensors turn off immediately when you turn off the reverse gear or turn off the car's ignition.
Rear view camera does not work
If the rear view camera of the Lada Vesta starts to connect to work every once in a while, or the multimedia system displays a white or black screen instead of an image, or even does not show anything at all, you need to carry out the following manipulations.
- The reset key in the lower corner reboots the multimedia system (MMS);
- The car radio must be set to RDS mode;
- Contact dealers if the MMC has old firmware and requires updating;
- Resetting the Lada Vesta to factory settings via the menu often solves problems;
If the camera does not work sometimes, for example, in severe cold, the reason may be due to moisture or dust getting on the contact of the rear motion sensor. A clean sensor and a warmed car are not susceptible to such problems. The device must be connected to the MMC via a mini-iso connector. Therefore, replacement of this contact, in case of visual transmission defects, is advisable.
Standard parking sensors - article number and price
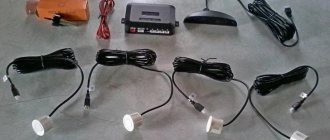
The original safe parking system of the Lada Vesta is presented under number 863012 (in catalogs). This includes:
- alarm and parking sensor control units, 8450008568 (from 10 thousand);
- parking sensors, article number 284422728R (from 1200);
- 8450008055 – holders for parking sensors (from 900);
- hardware 7703016573 and 7703046143 (30 rubles each).
The standard parking sensors of the Lada Vesta can be easily replaced with any four-point sensor with a sensor diameter of 18 mm. Popular are Valeo parking sensors with article number 8450000983 at a price of 550 per piece.
Basic faults
Parking sensors are in direct contact with the external environment, so the cause of most breakdowns will come from outside. The sensors are designed to help the driver assess the distance to the nearest objects behind them - therefore damage to the parking sensors is unlikely due to an impact. However, this happens more often than failure of the wiring or system control unit.
The main reason for the failure of Vesta’s parking sensors is simple dirt. The system itself will report the existing problem. You will hear a loud, long, continuous tone followed by a series of short beeps indicating the following:
- one short signal – the left parking sensor is faulty;
- two short beeps – center left;
- three high-pitched sounds – the central right parking sensor is broken;
- four – respectively right;
- Five beeps indicate problems in the control unit.
After this, the system turns off. You can try to clean the parking sensors with a soft cloth (in no case using sharp objects) and try to put the Vesta parking sensors back into operation. Usually, the system starts to operate in normal mode. If this does not happen, contact service or find the problem yourself. It could be:
- current leakage in the system, poor contact along the wire harness;
- the parking sensor control unit is broken;
- alarm unit is broken;
- sensor is damaged.
Problem with the control unit
If during diagnostics five beeps sound or the system is completely silent, then the fault lies in the control unit. It is located in the left rear fender, under the trim. To get to it, you need to remove part of the wing trim and unscrew the fasteners. Most often, blocks cannot be repaired and must be replaced. Since the luggage compartment is often damp and cold, this significantly reduces the life of the control unit. But let's leave this to the conscience of the engineers and move on to the next reason.
Removing and installing parking sensors
- Let's de-energize the car by removing the “-” terminal from the battery.
- On the inside of the rear bumper we will find the parking sensor connectors and disconnect them from the “braid” of wires.
- The released sensor is now held by a holder on the bumper itself. You need to release the latch and carefully remove the parking sensors.
- To remove the holder, the latch, on the contrary, must be squeezed and removed from the outside of the bumper.
- There is a mark (tooth, protrusion) on the parking sensor holder, which should be at the top when installed - squeeze the latch and insert the holder into the bumper.
- We fix the sensor in the holder.
- We connect it with a block to the rear bumper wire circuit.
- Alarm and control unit: it is located in the trunk, open the luggage compartment.
- Remove the plastic clips that hold the upholstery.
- On the left side on the sidewall we find a small round block fastened with self-tapping screws.
- We disconnect the wire block and the latch on the block.
- We unscrew two screws with a T20 star head.
- Install the component in reverse order.
Sensor wiring harness:
- After installation in the holders, the sensors are connected to a “braid of wires”. On the inner surface of the Lada Vesta bumper there are technological holes for retaining pistons for this “braid”. The wiring is crimped with a fastening ring for safety and aesthetics.
- Next, the wiring harness is routed through the fog light seal to the trunk.
- Along the way, it is again fixed with fastening rings so that it does not dangle.
- In the luggage compartment, the “braid” is connected to the control unit and the “braid” of the rear light wires (“powered”).
- Along the common wiring harness from the trunk of the parking sensors to the passenger compartment.
- We remove the rubber bands from the ceiling trim of the Lada Vesta car, run the wiring along the ceiling, and install the display on the rear view mirror (if necessary).
- We unclip the floor trim buttons and pass the wire through the bottom if you need to mount the LCD device on the left pillar.
- Beepers and Ice indicators are usually located on the rear shelf near the glass; this is the easiest way; the wire brought into the cabin almost immediately reaches the recipient.
- Don't forget to let the mass onto the body.
- Check system functionality.
- Replace all removed interior and trunk upholstery.
Parktronic is a very convenient device, but you should not blindly rely on its operation. Like any technique, it has its limitations.
Firstly, it cannot see obstacles that are outside its parameters (if the object is strictly below or above the sensor).
Secondly, the sensor is still not a camera; it works on the principle of echolocation.
The waves emitted by the parking sensors can be scattered or absorbed by certain objects (pointed, smooth, soft, thin). Coupled with the attentiveness and skill of the driver, the Lada Vesta parking sensors will become an excellent, indispensable mechanism when reversing for both a novice and an experienced owner.
Determining the cause of a parking radar failure and repairing it
Parking sensor malfunctions are often associated with the failure of one of its elements. An acoustic parking system consists of several important components.
- The control unit is its main part, which is responsible for the operation of the entire system.
Quite rarely, this particular element fails. How to check the functionality of the electronic control unit? You need to disconnect it first. Then you should attach the ohmmeter terminals to the terminals. If the ohmmeter does not show anything, then the cause of the malfunction lies precisely in the electronic control unit. If you are not an electrician and do not have sufficient experience working with such mechanisms, it is better not to repair parking sensors yourself. Here it is worth turning to specialists.
Incorrect settings of the control unit may also be one of the reasons why the parking radar does not work. If the control unit is configured to be more sensitive, the parking radar will respond even to non-existent obstacles. Or the opposite situation, he does not notice the existing obstacles. This may indicate that sensitivity is too low. In both cases, it is necessary to reconfigure the parking radar.
- Indication devices: monitor (data is transmitted to it regarding the presence of obstacles and the distance to them) and a sound warning system (it emits warning signals). These elements fail the least often, since they work in the most gentle conditions, inside the car.
- Sensors or metallized plates are transmitting devices that detect the presence of obstacles nearby. In a car there can be from 2, 4, 6 or even 8. The most often installed are 4 or 6. If 4, then they are all installed on the rear bumper. If 6 are installed, then 4 of them are on the rear, and 2 on the front bumper. The latter option allows you to control not only the space behind the car, but also in front. The operating principle of the transfer device is very simple. It emits ultrasonic signals, which return back when they hit an obstacle. The system reads the round-trip time of the signal, thus calculating the distance to the interference.
The parking sensor monitor fails less often than other elements, since it is located inside the car. Sensors fail most often, because they are the ones most exposed to the external environment. They are installed on the bumper of the car, and accordingly they can get dirt, snow or water.
How to determine that the parking sensor is not working? Simple enough. You should start the car and touch the sensor with your finger. A working one always vibrates slightly, and if you touch it, it should make a cracking sound. If this was not found, then this is the reason.
But before you go to a car repair shop, you can try to repair the parking sensors yourself. The first thing to do is clean and dry it. If after these manipulations the system does not work, then perhaps the cause of the breakdown lies in the membrane. In order to identify a membrane malfunction, the sensor should be opened. If it is faulty, it must be replaced. However, it is not recommended to change the membrane yourself; it is better to entrust this to an auto mechanic.
But sometimes a different situation happens: a pebble hits the sensor, which disables it. In such cases, repairing the parking sensor is no longer possible; it only needs to be replaced.
If the machine has metallized plates, then complete failure and the need to replace them will be indicated by the presence of any external damage.
How to replace the sensor or plate? Simple enough. You should buy a device suitable in size and technical parameters from a spare parts store and install it in place of the broken ones. If the sensor is different in color from what it was, then fixing it is quite simple; it should be repainted.
Sometimes sensors start to fire for no reason, signaling the presence of non-existent obstacles - the cause of the malfunction may be due to contamination, sticking of sensors or metallized plates. If you have sensors, you should clean them of dirt and snow; if there is moisture, remove it. If plates are installed, it is better to remove them, because water and dirt can accumulate not only on the surface, but also under them. After this, the bumper must be washed and dried. Only then can you put the dry and clean plates back.
If the parking sensors do not work after washing or in severe frost, then the problem may lie in the wiring, or more precisely, in the connections that get wet. Regular drying of the sensors and wiring connections will also help here.
Original equipment
The purpose of the device is to warn the driver about the presence of obstacles in a blind area. A safe parking system may contain a different number of sensors. Simple devices have 2 sensors, and the most effective and functional ones, in addition to 8 emitters, are equipped with a rearview video camera. The standard set includes:
- Control block. Serves to process incoming information and transmit it to a display device.
- Display (indicator). Informs the driver about the side of the obstacle and the distance to it. Emits a signal that changes in frequency as it approaches an obstacle.
- Sensors. Ultrasonic devices that emit and receive a signal reflected from an obstacle and transmit it to the control unit.
- Set of connecting wires.
Some models are equipped with a core drill bit for making mounting holes. Parking sensors work when reverse gear is engaged. It reports its status by sounding a signal and turning on the display. A working parking device will show the distance to the obstacle. If the sensors are covered with a layer of dirt or ice, a high-pitched buzzer will sound continuously.
Which device to choose
Service centers and dealers offer installation of various safe parking systems from Chinese “no-name” manufacturers to multifunctional systems of world brands. To select a suitable device, the driver must know some of the nuances of parking kits:
- installation location (front, rear or both bumpers);
- number of sensors;
- methods of warning about an obstacle;
- display devices;
- functionality and features of the system;
- manufacturers.
Most often, rear parking sensors are installed, since the space behind the car is poorly visible. However, when driving in city traffic during rush hour, it becomes important to keep your vehicle safe from the vehicle in front. If parking radars start working when you engage reverse gear, then the front ones start working when the speed decreases to 10-15 km/h.
Classic parking kits have 4 sensors. This is the optimal number, so it is not advisable to reduce their number, since the functionality of the device is reduced. An important feature is the method of conveying information about an obstacle to the driver. There are 4 types of alerts:
The form and functionality of the indicator used depends on this. In simple kits, a beeper is installed. It emits a warning signal. Many drivers are happy with this. More functional systems use LED displays. They reflect not only graphic, but also digital indication with an accuracy of 1 cm. No other information is displayed on the device.
Effective, expensive systems are equipped with more informative LCD indicators. In most cases they include all types of alerts. The display is more representative of the graphical image. The device shows not only the distance to the obstacle, but also the direction of its location. Changes in digital values are duplicated by voice.
Many models from global manufacturers are equipped with system self-diagnostic functions and the ability to memorize remote elements of the car.
If a towbar is installed on the car, the parking kit will determine the distance to the obstacle not from the sensor, but from the most protruding part.
Knowing this information, it will be easier for the driver to select the necessary device.
KIA RIO replacing standard speakers with JBL car speakers
KIA RIO 2022 PREMIUM package. We replace the standard speakers with JBL CLUB series speakers
We will install: JBL CLUB 6500С speakers (component acoustics 16cm) in the front doors JBL CLUB 6520 speakers (coaxial acoustics 16cm) in the rear doors
Removing standard acoustics
Component speakers JBL CLUB 6500C
Two-way component car speakers. Maximum power 180 W, sensitivity 92 dB. Plus One technology increases the usable area of the polypropylene cone, rubber surround for long-lasting performance, and PEI tweeters produce clear high notes without distortion. External crossovers.
Coaxial speakers JBL CLUB 6520
Car speakers, diameter 165 mm. Coaxial, two-way. Maximum power 150 W, sensitivity 92 dB. Plus One technology increases the usable area of the polypropylene cone, rubber surround for long-lasting performance, and PEI tweeters produce clear high notes without distortion.
JBL CLUB Speaker Set
To install speakers (on all doors), we will need spacer rings so that the speaker does not interfere with the operation of the window regulator.
The installation location of the tweeter is in the front door.
Installed JBL CLUB 6520 speaker (in rear doors)
Club coaxial and component speakers bring legendary JBL sound to even more vehicles. Their compact design allows them to be used in a wide variety of cars and trucks, and their high sensitivity ensures outstanding performance even with factory stereo systems. The rugged, polypropylene Plus One™ woofers deliver powerful low-frequency performance while being extremely durable. Balanced polyethyleneimine dome tweeters deliver smooth high frequencies. Speakers are available in a wide range of sizes - coaxial 90mm, 100mm, 135mm, 150mm, 165mm, 150 x 200mm and 100 x 150mm, 3-way 150 x 230mm and component sizes 135mm, 165mm and 150mm x 230mm - making them an ideal choice for those looking to upgrade from the factory speakers.
"Electropatazh" - center of automotive equipment
Make an appointment by phone
Installation and connection
To install parking sensors, it is necessary to mark the installation locations. The distance between the sensors is calculated based on the width of the body divided by the number of sensors, i.e. when installing 4 emitters, the width must be divided by 4. The counting starts from the middle of an imaginary horizontal axis connecting the 2 most protruding points of the body. The distance from the road surface to the center of the sensor should be 60-70 cm.
The holes are drilled with the supplied core drill. The sensors are installed in place, the wires are pulled inside the bumper and secured with standard fasteners. The markings must be as shown and start from the left (A, B, C, D). The wires are led into the trunk through the gland of the fog light power cable. The control unit is secured to the body wall with 2-sided tape and the sensor connectors are connected in accordance with the markings. The parking sensors are powered from the reversing light.
In most cases, the indicator is installed on the interior mirror. The LCD device is located on the dashboard near the left pillar. Depending on the placement of the device, the routing of the wires is selected - either along the door thresholds or under the roof lining. If the kit is equipped with a beeper, then it is mounted in the cabin on a shelf near the rear window. Some drivers also install LED indicators there, which are clearly visible in the interior mirror.
Installing parking sensors on the West with your own hands
Hello everyone) I decided to install another nichtyak on my Vesta) unfortunately it was not installed in my configuration from the factory, but as I already wrote, I am pleased with the fact that at the early classic starts there were practically no differences in comfort, but there was a difference of almost 30k) and one of the differences that was there was the absence of parking sensors. I’ve been planning to install it for a very long time, but somehow I didn’t get around to it, but then I decided to be puzzled, I looked at the price tags on Yulmart, but they don’t bite at all, I thought the price would be 2-2.5 rubles, but no, from 700 to 1100. I chose this option, which has a mounting diameter of the sensors of 18 mm, its price is 800 and a few kopecks rubles.
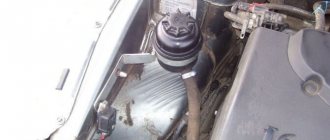
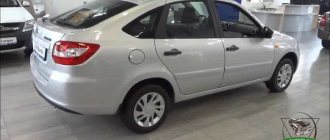
What is the advantage of the car, it is really prepared for the installation of parking sensors) there is no need to mark the bumper, drill it, etc., because there are special plugs from the factory, and it is enough to simply drill out the place prepared for this) on the back side.
And when laying wires in the bumper, there are special hooks for fixing them) I brought them into the trunk cavity through an elastic band into a special technological hole along with the wire from the rear fog light. To connect to the electrical wiring, there is no need to lead the wire to the reverse lamp, because There is already a factory block for this purpose. I read from someone here on the drive that the plus is taken from the white wire number 6, and the mass was thrown onto the body. And what, in my opinion, is the real advantage of a purchased parking sensor compared to a factory one, is the presence of a display that shows you on which side how many centimeters are from the obstacle. I attached it to the rearview mirror with double-sided tape from the kit, and it doesn’t look too collective farm, and is convenient)
I ran the wire from it into the trunk, where the parking sensor unit itself was located. It’s not too difficult to do this; I moved the rubber band away from the ceiling and threaded the wire. So far I’m pleased, how the non-original will show itself in terms of quality, we’ll see.
Removal and installation of components and parts of the safe parking system
LADA VESTA. Safe parking system sensor - removal and installation
Place the car on a two-post lift and brake with the parking brake (electrohydraulic lift type P-3.2 G with a lifting capacity of 3.2 tons).
Turn off the ignition, lift the hood, disconnect the earth wire terminal from the battery (spanner 10).
Raise the car to a height convenient for doing the work.
Disconnect the sensor connector 1, Figure 18-1, of the parking assist system from the rear bumper wiring harness 2 block.
Figure 18-1 — Parking Assist Sensors (on rear bumper removed):
1 — safe parking system sensor;
2 — rear bumper wiring harness;
3 — rear bumper
Release the clamps of the holder 2, Figure 18-2, of the parking sensor and remove the sensor 1 of the safe parking system.
Figure 18-2 — Elements of the sensor of the safe parking system:
1 — safe parking system sensor;
2 — parking sensor holder;
A - holder orientation mark
If necessary, squeeze the holder clamps and remove the parking sensor holder from the rear bumper.
Install the safe parking system sensor in the reverse order of removal.
When installing holder 2, Figure 18-2, of the parking sensor on the rear bumper, mark “A” should be in the upper position. 18.2.2 Control and alarm unit of the safe parking system - removal and installation Removal
Place the vehicle in the workplace and apply the parking brake. Raise the hood, disconnect the earth wire terminal from the battery (spanner 10).
Remove the two upholstery fastening buttons and unscrew the left upholstery 1, Figure 18-3, arches and side panels (flat-head screwdriver).
Figure 18-3 — Control and alarm unit of the safe parking system:
1 — left arch and side panel upholstery;
2 — block of the rear wiring harness to the control and alarm unit of the safe parking system;
3 — self-tapping screw;
4 - control and alarm unit for the safe parking system:
5 — left side panel
Disconnect block 2 of the rear wiring harness from control and alarm unit 4 of the safe parking system.
Unscrew two screws 3 of the self-tapping fastenings of the unit to panel 5 of the left sidewall and remove the control and alarm unit of the safe parking system (T20 attachment, screwdriver).
Install the control and alarm unit of the safe parking system in the reverse order of removal. Present the vehicle to the Quality Control Department. The quality control department checks the vehicle for compliance with the requirements of TU 017200-254-00232934-2006 pp. 1.19.21.3, 1.19.21.6 in the scope of work performed.
Noise insulation
- Anti-theft protection
- Car audio
- Engine preheater
- DVRs, radar detectors
- Sound insulation Complex materials
- Vibration-absorbing materials
- Thermal insulating materials
Anyone who had the opportunity to drive in a car with high-quality sound insulation will remember it for a long time.
And he will no longer want to travel in a car, where the cabin is so noisy that you even have to raise your voice to talk. It's not just the engine that makes noise during operation. Noise comes from wheel tires, especially studded ones, all kinds of removable equipment - mirrors, luggage racks, antennas, poorly balanced transmission units, loose tools and the contents of the glove compartment. It is possible to combat noise, although it is not an easy task. On its way it is necessary to install a barrier in the form of special insulating materials. It can be:
- Sound insulators that also provide thermal insulation for the body. All materials in this group have a foam structure, and the presence of air bubbles in their thickness makes it possible to reliably prevent the propagation of sound waves and thermal radiation.
Vibration dampers are bitumen or mastic sheets that are glued to metal parts of a machine and can dampen their vibration.
As a rule, an integrated approach to combating noise is required, so the first layer of vibration-absorbing sheets is glued to the car parts, and then sound insulators are applied on top of them. It is important to keep in mind that vibration isolators weigh a lot, and you must not overload the height parts with them. Porous sound insulators are not critical in this regard, since their weight is low.
How is sound insulation performed?
You can limit yourself to partial sound insulation, for example, by treating the inside of the car doors with appropriate materials. This will allow you to listen to music better and the cabin will become quieter. But the safest thing to do is to immediately insulate all the places through which noise can penetrate into the cabin.
The interior of the car has to be disassembled, at the same time restoring the damaged paint, removing corrosion and degreasing the body surfaces. Then the insulating materials are cut out according to the template and glued to the body parts. The materials are usually self-adhesive; no glue needs to be applied. Under the influence of a jet of warm air from an industrial hair dryer, the material adheres tightly to the surface and does not peel off in the future. The joints between parts of materials are carefully sealed.
When the work is completed, all that remains is to assemble the interior. Soundproofing work is difficult to do with your own hands; professionals will do it much faster and, most importantly, with better quality. For example, call Master Volt at (3412) 477-602.
Alarms with launch on Lada Vesta
Installing an alarm on a Lada Vesta is an extremely important procedure. It is quite difficult to imagine a modern car without a security, or security-anti-theft, system, which is due to the current crime situation. And although car owners are well aware of the current situation, many still want to save as much as possible on security equipment by choosing simpler systems for installation. Someone, on the contrary, is trying to equip their car with the most reliable and functional car alarm possible.
Installed on a StarLine A93 2CAN-LIN car
Connection points for car alarms on Lada Vesta
Connection points Lada Vesta model from 2015 equipped with manual or automatic.
Ignition switch: +12V – red thick Ign1 – pink/black ACC – red/white thin starter – yellow/blue
In the driver's threshold or under the fuse block: turn signals - blue/white and green/white brake - green thick
On the instrument panel: handbrake – blue (outmost)
On the BCM behind the glove compartment, gray connector: trunk - pink/white (39 pins) rear limit switches - green/white (40 pins) trunk release - yellow (31 pins)
On the BCM unit behind the glove compartment, black connector: driver's limit switch - orange (32 pins) front right - orange/white (30 pins) hood - orange (33 pins)
Central lock : soldered into the BCM block
Pulses - under the hood, upper ECU connector, white/black wire of medium thickness
Ground under fuse box
The plastic is very fragile and scratches are very visible - be careful.
Wire colors may vary. The connectors are one color on one side and a different color on the other. Check!
Replacement of elements of the Lada Vesta safe parking system
The vehicle parking system is designed to detect obstacles located behind the vehicle and warn the driver of the distance to the obstacle with an acoustic warning signal.
The system detects obstacles using four ultrasonic sensors operating on the principle of echolocation, which are located in the rear bumper of the car.
The parking system includes the following components:
— control unit for the safe parking system;
— safe parking system sensor;
— alarm unit for safe parking system;
— wiring harness for safe parking system sensors.
The system is activated automatically when the ignition switch is in the “I” position and reverse gear is engaged, and a short high-pitched beep is heard to confirm that the system has been activated.
If an obstacle is in the detection zone, the system informs the driver about the presence of an obstacle with an audible signal.
The signal may be intermittent or continuous, depending on the distance to the obstacle. The car can move in reverse or stand still.
When the vehicle approaches an obstacle, starting from a distance of about 100 cm, an intermittent high-tone alarm sounds, the frequency of which increases as it approaches the obstacle.
The signal becomes continuous when the distance between the bumper and the obstacle is about 40 cm.
When reverse gear is engaged, the parking assist system is automatically deactivated.
Features of operation and operation of the safe parking system
After turning on the system, the control unit conducts a comprehensive check to detect defective sensors or other system malfunctions.
If a defective sensor or other system malfunction is detected, after the power-on signal, a continuous high-pitched beep sounds for 3 seconds, then:
— if the left (in the direction of the car) sensor is faulty, the system signals the faulty sensor with one short high-tone signal;
— if the central left (in the direction of the car) sensor is faulty, the system signals the faulty sensor with two short high-tone signals;
— if the central right (in the direction of the car) sensor is faulty, the system signals the faulty sensor with three short high-tone signals;
— if the right (in the direction of the car) sensor is faulty, the system signals the faulty sensor with four short high-tone signals;
- if the control unit is faulty, five short high-tone signals are heard.
After signaling the presence of a malfunction, the system turns off.
It should be taken into account that due to the characteristics of the propagation of ultrasonic waves, the system does not always detect dangerous obstacles:
— located near the vehicle below the sensors;
- absorbing ultrasonic waves - down clothes, soft snow, etc.;
- scattering ultrasonic waves - thin objects, pointed objects, smooth walls.
In addition, heavy precipitation and/or other conditions that cause distorted sensor signals may interfere with the sensors' ability to detect obstacles.
When the vehicle is maximally loaded, it is possible to detect low-lying obstacles that are not dangerous for a collision.
When operating a vehicle with a trailer, the parking system can be disabled.
To prevent malfunction, sensors should be kept free of snow, ice and dirt.
When cleaning sensors, do not use hard or sharp objects.
Removal and installation of components and parts of the safe parking system
Safe parking system sensor - removal and installation
We prepare the car for the job. We place the car on the lift. Raise the hood and disconnect the negative terminal of the battery.
We raise the car to a height convenient for doing the work.
Disconnect the sensor connector 1, Figure 1, of the safe parking system from the harness block 2 of the rear bumper wires.
We release the clamps of the holder 2, Figure 2, of the parking sensor and remove the sensor 1 of the safe parking system.
If necessary, squeeze the holder clamps and remove the parking sensor holder from the rear bumper.
Install the safe parking system sensor in the reverse order of removal.
When installing holder 2, Figure 2, of the parking sensor on the rear bumper, mark “A” should be in the upper position.
Replacement of the control and alarm unit of the safe parking system
We prepare the car for the job.
Raise the hood and disconnect the negative terminal from the battery.
We take out the two buttons for fastening the upholstery and unscrew the left upholstery 1, Figure 3, arches and sidewalls.
Disconnect block 2 of the rear wiring harness from block 4 of the control and alarm system of the safe parking system.
Using a T20 nozzle and a screwdriver, unscrew the two screws 3 of the self-tapping fastenings of the unit to panel 5 of the left sidewall and remove the control and alarm unit of the safe parking system.
Install the control and alarm unit of the safe parking system in the reverse order of removal.