One day you wanted to find out the reasons why the parking sensors do not work. To begin with, let us once again mention what kind of device this is. It is used to measure the distance between your car and other objects on the road ( convenient for parking
).
While driving, parking sensors (parking radar) inform the driver about suddenly appearing threats, for example, another car, or smaller obstacles, such as pillars or large objects lying on the road.
But, alas, no one is immune from the breakdown of this device or its simply failure.
Selecting parking sensors
If parking sensors are not included in the vehicle, when purchasing the device you need to pay attention to the following characteristics:
- Installation location. Parking sensors can be built into the rear bumper; it turns on when you reverse. The devices installed at the front of the vehicle are activated when the speed decreases. Combined systems consist of sensors mounted on both bumpers.
- Notification method. When obstacles are detected, a sound indication may sound. More complex systems are equipped with a display on which color signals appear when approaching objects. If the parking sensor is equipped with a camera, the image is sent to a monitor built into the mirror or dashboard. Some devices combine several notification methods.
- Sensor sensitivity. The correctness of calculating the distance to objects depends on this parameter.
- Number of sensors. The system must include at least 4 sensors. Reducing the number of these parts creates blind spots, increasing the risk of colliding with an obstacle.
- Installation method. The sensors can be embedded into holes drilled in the bumper. There are also overhead models.
- Sensor color. Most parking sensors are available in various color options. If the car has a rare shade, the sensors can be painted. When the work is done correctly, the quality of signal transmission does not deteriorate.
- Display type. The screen can be LED or LCD. Each type has its own positive and negative qualities, so the choice is up to the user.
- Protection from dust and moisture. The ability to operate the system in conditions of high humidity and pollution depends on this indicator.
- Automatic fault detection function. The system notifies the user in a timely manner when problems occur. This helps save money spent on repairs.
Is it possible to paint a parking sensor?
There is a lot of discussion about the possibility of painting the sensors on the front rear bumper.
This is allowed, because the paint does not affect the performance of the device if several conditions are met:
- The sensor is painted before installation on the car.
- Before applying paintwork, the sonar surface is sanded with 300 or 400 sandpaper. This is especially important if there is mechanical damage on the surface.
- The surface is degreased and primed with an acrylic compound.
- Only after carrying out these procedures is it possible to stain the sensor.
Plastic sensors can be cleaned with fine sandpaper and primed.
If after painting the sensor stops working, this is due to a violation of the technology and the above rules.
Please note that it only takes a problem with one sensor for the entire system to function incorrectly or not generate signals at all.
How to install
The process of installing parking sensors on a Lada Priora sedan includes the following steps:
- Preparing the bumper. To do this, disconnect the negative terminal of the battery. Using a screwdriver, unscrew the fastening nuts located on the bottom of the car. Having opened the trunk, unscrew the 2 latches located near the rear headlights. After this, unscrew the nuts located near the arches and remove the mudguards. The bumper is dismantled by pulling it forward.
- Marking. Using a stencil prepared in advance, the sensor installation locations are marked. Using a drill of the required diameter, holes are made.
- Installation of sensors. Each sensor is inserted into the prepared hole. After this, they find the plug located under the left headlight and pull the wires through it that go to the parking sensors unit. If the cables do not fit, the hole is drilled with a drill of a suitable diameter. The wires are secured with electrical tape.
- Returning the bumper to its original position.
Refinement of the stove motor
This part, probably, would have been better called “Refinement of the heater motor activation mode”, since we will be talking specifically about eliminating a kind of “bug” - the operation of the interior heater when the ignition key is turned to the ACC position.
Indeed, the functionality of the interior heating system is in big question when the “stove” motor is turned on and the engine is not running - there is no circulation of coolant, and the coolant in the “stove” will quickly cool down and stop heating the interior.
The interior heating system of the Lada Largus can be modified in several ways
For Largus owners, there are two ways to change the operating mode of the heater motor. And both, unfortunately, require intervention in the electrical circuit of the car.
First
The first way to change the operating mode of the interior heater simultaneously with turning on the ignition is to move the wire that controls the heater relay from its standard location to any terminal that receives + 12V when the ignition is turned on. This could be, for example, a reverse switch or a fuel pump relay. That is, the thin yellow wire going to the “stove” motor relay is cut off and connected to any of the above locations.
For reference: all of the above actions are performed in the relay and fuse box located under the hood. The heater motor is controlled by a yellow wire, the reverse switch is controlled by a wire of a similar color, and the fuel pump has a beige marking.
Second
Almost similar to the first one, but the difference is that after all the manipulations we get a free fuse socket.
Again, we cut the thin conductor of the heater motor and connect it to the partially stripped yellow wire located nearby. After that, all damaged areas are isolated and fuse No. 39 in the interior fuse box is removed.
How to connect
The parking sensor connection process includes the following steps:
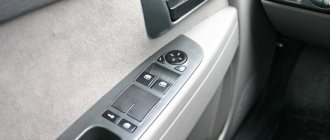
- Display connection. The cable is fixed to the dashboard using double-sided tape. The wire is laid on the left side of the cabin towards the trunk. You can make the job easier by attaching thick wire to the ends of the cables.
- Connecting the parking sensor unit. The element is attached to the body using double-sided adhesive tape. Sensor and display cables are connected to its connectors. To prevent the wires from coming into contact with metal parts of the car and creating extraneous sounds, they are tightened with clamps.
- Power connection. The red cable leading to the control unit is twisted with the green cable of the reversing light. It is recommended to make connections using special terminals. The ground wire is attached to the seat belt latch.
After completing the installation work, check the correct connection. If no faults are found, the installation was completed correctly.
Life hack: standard parking sensors of a Priora car - how to remove, price, article number
I'm driving in reverse, and the car starts to squeak, more and more often, as I get closer to the pole! Wow I thought! The standard parking sensors of a Priora car are a kind of auxiliary tool for parking. Old school drivers sometimes underestimate this tool, but still. The standard parking system kit in the Lada Priora is not so complicated - it consists of 4 sensors and a head unit. To avoid running into a minor obstacle, the car needs parking sensors. Priora received such a tool, if I'm not mistaken about the restyling. It’s clear that you can see everything perfectly in the mirrors, but sometimes you won’t see any little thing in the form of a pipe sticking out of the snow in winter, or some unnoticeable hemp in the mirror.
Modern parking is different from what was familiar just a few years ago. For each car there was more space in width when entering the “box” and more space when parallel parking. Since each time they had to practice their parking skills more and more carefully, car owners relied only on their experience.
Parking sensors on the Priora are not something surprising, because even the most experienced driver needs backup. For example, a pipe sticking out of the ground may not be noticed from the driver’s position, but the sensors will report it with a signal.
When a problem arises - the parking sensors on the Priora do not work, the driver has to get out of the habit for a while and again remember parking “without assistance”. Therefore, it is better to begin repairs immediately.
In this article I will list 5 reasons why the parking sensors on a Priora car do not work - so read it to the end, ask questions in the comments if something is not clear, or leave it on your VKontakte wall so as not to lose information!
[title_posts]
Parking sensors are one of the most convenient inventions that make parking your vehicle much easier. Nowadays there are quite a lot of cars on the roads of most large and medium-sized cities. In the midst of such chaos, you need to be able to park correctly, and parking sensors with a rear view camera will become your indispensable assistant in this matter. There is very little space, and an inexperienced driver will not be able to park competently without using parking sensors with a rear view camera.
Types of parking sensors
It all depends on individual preferences - you can use devices with a forced switching function or give preference to models with the possibility of constant operation. If we take a closer look at the types of parking sensors, then for urban conditions it is best to choose the first option, otherwise you risk getting very tired - the parking sensor indicators will constantly remind you of a threat that in fact does not exist.
If we consider the indicators themselves, they are often either special video monitors or ordinary sound alerts. Today, many car enthusiasts prefer entire complexes that successfully combine monitor indicators and sound signals.
There are a huge number of sensors that can help the driver in different ways, everything will depend on his experience and skills. Manufacturers recommend installing parking sensors with several sensors - this allows you to maximally protect a potential client from unpleasant situations when parking. A video monitor with sensors has succeeded in this matter - connecting parking sensors of this type will allow the driver to always see all obstacles and make informed decisions at the time of parking.
How car parking sensors work in the video:
Wireless parking sensors: the operating principle of such devices
Wireless parking sensors are a completely electronic device that allows you to monitor the distance between the body of your car and various obstacles. If you are at risk of hitting the bumper against any obstacles or objects, the parking sensors will begin to emit warning signals.
The indicator allows the driver to understand the situation in time and take appropriate measures to avoid an unexpected collision.
This electronic system is equipped with a huge number of sensors and indicators; the more such parts, the less chance you have of crashing your car. These sensors operate using ultrasound. These devices have a fairly sensitive design. It is very important to follow certain rules when connecting parking sensors. After all, the sensor must ideally transmit and receive a signal that is reflected from a variety of objects.
Installation of front parking sensors
To install front parking sensors, you need to properly prepare for work and only then proceed with further actions.
Installing parking sensors with your own hands is quite an interesting, but at the same time, serious and responsible process. You need to prepare a wire (about 10-12 meters). The wires will be used to connect the sensors, the main unit and the parking sensor button. A potential client will be able to order a special button, but he will have to take care not to forget the corrugation for the twisted pair, electrical tape, contacts and plugs - without all these elements, the installation of parking sensors cannot be completed successfully.
If your vehicle is already equipped with rear parking sensors, this greatly simplifies the task and you will have to install much fewer sensors.
To understand how to install parking sensors without contacting specialized car services, you need to understand some of the nuances of the installation procedure for this element.
- You need to remove the trunk trim, all the bumpers, and also unscrew the headlights.
- After this, you need to remove the dashboard, the right fender liner and the main glove compartment. It is very important to do everything very carefully so as not to damage your vehicle. For this, there is a special car circuit that allows you to remove the necessary elements without harming the vehicle itself.
- We stretch the wires to the beginning of the dashboard, on the left side. Near the dashboard there will be branches to the buttons and front speakers.
- The next step will be to pull the wire directly above the glove compartment, when it is in a special plug, you will need to create a special hole in it. It will serve as an excellent socket for a twisted pair; then the wire is pulled to the headlight through the fender liner. Cotton insulating tape is best suited for wrapping wires; ordinary tape looks rather poor and ugly.
Tips for installing parking sensors with your own hands in the video:
Installation of parking sensors using the example of the BEA 300 model
For those who are interested in how to install parking sensors using alternative methods, there is one such method.
https://www.youtube.com/watch?v=HJI8Y_caQuY
For example, you can take a fairly popular, in demand and inexpensive device called BEA 300. The sensors of this device are often mounted in the bumper, and the parking sensor itself will cost about 6,000-7,000 rubles.
1. Before starting work, you need to find all the necessary tools so that you don’t interrupt the process later. It is best to keep on hand special cutters that are used to create specific holes in a bumper made of plastic.
2. It is necessary to dismantle the bumper. Removing the plastic trims that are located in the trunk is also a fairly important step. You should also peel back all soft upholstery. This is necessary in order to see the bolts that are responsible for fastening the bumper.
3. Then remove the bumper trim, unscrew a couple of bolts from the luggage compartment, and also unscrew the mudguard screws. To do this, use a special 6 star key. To mark the places where the sensors are intended to be installed, you can use ordinary masking tape.
It is very important to maintain certain distances: 41 cm between each individual sensor, 124 cm is the distance between the first and last element.
4. You need to carefully check the markings and make sure that you will drill in the right place. To do this you need to use special drills. It is necessary to use water as a coolant so that the plastic is not damaged by the operation of the cutter.
It is best to use the services of a partner - he will be able to pour water on the plastic elements while you work with the drill. The minimum hole size is 18 mm, otherwise the sensor simply will not fit.
5. The bumper with drilled holes must be placed on a soft cloth bed, and all the necessary wiring must be laid. The surface must be thoroughly cleaned and dried. Next you need to use liquid from a special bottle to treat the areas for gluing.
6. Glue all the sensors. You need to install the bumper in its place, pull the wire through the pre-prepared holes.
7. Install the central control unit and connect it to the electrical circuit of your vehicle. It is best to install the tweeter in a place so that the driver can definitely hear this sound.
8. After completing all work, you need to test the entire system to make sure it is working.
DIY installation instructions for parking sensors:
Source: https://2auto.su/article/tuning/universalnaya-instrukciya-ustanovki-parktronika-svoimi-rukami/
Standard parking sensors - article number and price
Officially, the set of parts is called a “safe parking system” for Lada Priora. It contains:
- Alarm unit for a safe parking system (parking sensors unit) – 2172-03826030-00, price – 300 rubles. Also found with catalog number 2172-03826010-00.
- Sensor - 2172-03826020-00, cost - about 1000-1500 rubles.
Safe parking system fuse - F12. To access it, you need to remove the plastic plug - part of the car's dashboard trim - which is located directly opposite the driver's left knee. It is attached using three self-tapping screws, which you just need to unscrew and then pull the panel towards you.
Basic faults
Malfunctions in the operation of the parking sensors definitely cause discomfort: if the driver is accustomed to relying on the sound signal of the safe parking system, parking using the “traditional” method becomes quite difficult. Parking sensors may either not work or display data incorrectly.
The causes of malfunctions may be the following:
- Wiring problem. Wires connect the control unit with several sensors. However, their fastening is not reliable enough everywhere - for example, it can be attached to a bumper with metallized tape. One big drawback is that the sensors are often not firmly attached. While they are shaking, remaining in their position, the data is inaccurate.
- Wiring may melt or break. To prevent this, you will have to periodically inspect the wires of the safe parking system.
- Error in the control unit. This parking safety system unit is installed separately from the ECU. Inside it there is a special subsystem that detects the presence of malfunctions and reports this to the driver. Not all modern systems are equipped with such a subsystem, but it is not so difficult to suspect improper operation of the sensors.
- Dirt on sensor receivers. Dirt and dust will obscure the sensor's view. You can avoid this by regular washing. But if there is too much dirt and dust, the bumper will have to be disassembled and washed separately. Even worse, if a stone hits it at high speed, the sensor will break due to the high impact force.
- Dirt in the control unit. Circuits and boards don't like being covered in dirt - anything can lead to a short circuit. The probability of this event is extremely low, because the control unit is quite seriously closed from external sources of dust and dirt.
Why does not it work
The specifics of parking sensor malfunctions do not depend on the type and class of car where it is installed. Whether it is a passenger car or a heavy truck, there is no difference in breakdowns. There are the following reasons for system failure:
- Manufacturing defects. A low-quality parking sensor will begin to malfunction immediately after purchase, but may work for some time and then become unusable. If there is a warranty, you must take the damaged device to the store and demand monetary compensation or replacement of the device by a worker.
- Wiring faults. Often the parking sensors stop performing their functions if there are problems with the wires connecting the radars and the control unit. The metallized tape attached to the bumper also affects the efficiency of operation. If its fixation is not good enough, the sensor will become loose and the final result will be inaccurate. When installing the device yourself, you need to make sure that the connections and fastenings are secure.
- Failed power supply. This problem is rare, but it cannot be ruled out. Electronic units of modern parking sensors are capable of notifying the driver of failures. Therefore, in the event of a breakdown, a corresponding notification will appear indicating the need for repair.
- Penetration of water and dirt. Parking sensor malfunctions also occur when interacting with water or dirt, which can damage the sensors and metal strips located on the back of the bumper. Often the unit stops working due to a collision with a stone. Dust and dirt cause malfunctions not only of radars, but also of the electronic control unit. If they appear on the circuit, there is a risk of a short circuit.
After washing or in snowy weather
Many motorists often contact the service center with a complaint that the parking sensors turn off after washing or in snowy weather in winter. The reason is explained by moisture getting on the working elements of the system, as a result of which they stop working. You can fix this problem yourself.
Beeps when there is no obstacle
Often, parking radars begin to operate, making a corresponding sound, even if there is no obstacle. The reasons why sensors start beeping just like that are:
- Failures in the ECU.
- Damage to the wiring, causing the sensor to stop working properly or display data incorrectly.
- Mechanical damage to the sensor. The problem is eliminated by replacing the failed unit.
How to remove parking sensors from the rear bumper of a Priora and put it back
When purchasing a set of a safe parking system, you need to keep in mind that the set often includes a special attachment for a drill, with which you can drill the desired hole without causing unnecessary cracks. To install parking sensors on a Priora, you will have to work quite painstakingly with it.
Very often, Priora owners install sensors only in the rear - where there is really a chance of making a mistake. In fact, being able to see what's in front doesn't hurt. The installation of the front parts will not differ from that with which the rear sensors are installed. Even connecting the wiring will be much easier.
To begin with, it is worth purchasing a small piece of corrugated pipe to hide the wires in, as well as zip ties to tighten the connections and protect them from moisture, dust and chafing. The work should be carried out in stages. To begin with, the “grand” work with the bumper, and then the installation, so installing parking sensors on a Priora yourself is divided into the following 8 steps:
- Wash the car. Remove the bumper. Further work will require accuracy, so prepare a workspace.
- For convenience, place a line of masking tape under the curly line on the bumper. Use a marker (it is soft and will definitely not leave small scratches through the tape) where the sensors will be installed.
- On the back side of the bumper there is a plastic protection from the factory, which should absorb the impact in an accident. It will have to be removed.
- Drill the bumper at the marked points. Place sensors inside. As you move from hole to hole, be sure to clean the drill bit.
- Install the plastic insert, extending the wires to the inside of the bumper.
- When installing the bumper back, push the wires into the trunk. Lift the trim on the left side of the trunk and secure the wires to the wall.
- Plus connect to the reverse lamp using the connecting terminal. The parking sensors will turn on simultaneously with the lamp when the driver moves the lever to the reverse position.
- Connect the negative to the seat belt bolt. The wires are driven closer to the driver's seat to turn on a special sound signal or display information about the distance to an obstacle on the display (depending on the model).
Video “Guide for installing a parking radar on a car”
The “CarEra Auto is Easy” channel presented visual instructions for installing a parking device from scratch and connecting it to the car’s electrical network.
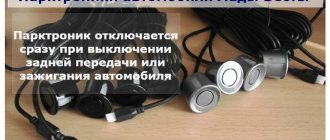
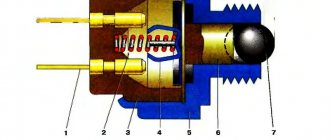
Parktronic is a transceiver device. The purpose of this device is to detect unexpected obstacles in front or behind the vehicle and warn the driver about it.
Parking sensors work on the principle of radar. That is, the device sends a sound signal in all directions, usually ultrasonic frequencies are used.
The signal, encountering an obstacle, is reflected from it and returns to the parking sensor receiving device. In the parking sensor control unit, the signal is processed and the driver is given a warning about an obstacle that has arisen.
Structurally, the parking sensors are made in three versions:
- In the first case, it consists of a control unit, sensors, and connecting wires.
- In the second case, there are no wires.
- In the third, metallized tape is used instead of sensors. It is believed that such tape parking sensors are devoid of dead zones. It is installed on the inside of the bumper.
You can learn about installing parking sensors with your own hands in a practical guide: how to install sensors, equipment and conduct testing.
Installing parking sensors on Priora
Are you familiar with the situation when there is a catastrophic shortage of parking spaces in your yard? The density of cars is such that literally every 20 - 30 centimeters of free space is an unaffordable luxury. The installation of such a device as parking sensors on a Priora comes to the rescue.
Considering the general increase in the number of novice drivers and the latter’s insufficient driving experience, a large number of incidents with transport occur (rubbing, scratches, collisions, etc.). Particularly difficult is driving in reverse at night (blind spots, incorrect calculation of the trajectory, lack of understanding of distances and dimensions of vehicles). There is a way out of the situation, and this is installing parking sensors on the Priora.
Purpose and characteristics of the device
The chamber is a special technical device, the operating principle of which is based on ultrasound. Ultrasonic signals come from sensors installed on the car, propagate in space and, when they encounter an obstacle, are reflected and read by the same sensors. The control unit processes and calculates the received data, as a result, information about the current distance to the obstacle is displayed on the screen. The device has the following features (may vary in different models): - operating temperature: from - 34 to +70 degrees Celsius; — distance for measurements: up to 2.5 meters; — equipped with several sensors (from 4 pieces), wires, control unit, information display; — some models contain a nozzle for drilling holes for sensors and double-sided tape.
Types of parking sensors
There are several types of devices that determine distance. For example:
- Mortise type (installed directly into the car bumper by drilling out part of it).
- Overhead or wireless type (glued or otherwise attached to body elements).
How to install parking sensors on Priora
The process of installing the device is quite simple, but it may have some nuances, which we will talk about. Let’s agree that we will install parking sensors with mortise-type sensors (since they are the most reliable in terms of durability and uninterrupted operation).
For installation we will need:
- set of equipment;
- installation diagram of Priora parking sensors;
- drill with a special attachment;
- flat and Phillips screwdriver;
- key to 10;
- double-sided tape (may be included with the device);
- template with markings for even and symmetrical installation of sensors (found in kits, or make it yourself);
- metal wire for ease of pulling wires;
- wire ties and (or) electrical tape;
- patience, 2-3 hours of free time.
Stage 1. Remove the rear bumper
First you need to prepare the rear bumper for installing four sensors. To do this, you will need to dismantle it and drill technical holes in it. So, in order to remove the bumper:
- Disconnect the negative terminal of the battery.
- From the bottom of the car, use a screwdriver to unscrew the two fastening nuts;
- Open the trunk and unscrew the two top securing nuts. They are located next to the rear lights.
- Now you need to position yourself opposite the wheel arches and unscrew 2 mounting bolts from each of them, plus remove the mudguards by unscrewing their fastenings.
- Grab the bumper with both hands behind the car and gently pull it towards you.
Stage 2. Install parking sensors on the Priora
- First, let's work with the bumper itself, apply markings to it using a previously prepared template.
- When the measurements are made, you will need a drill with an attachment installed on it corresponding to the diameter of the installed sensors.
- Carefully drill four technical holes around the entire perimeter of the rear bumper.
- We insert each Prior parking sensor into the corresponding hole.
- We find a special rubber plug on the left side of the wing (located under the left headlight).
- We stretch the wires from the sensors to the parking sensors unit through the plug. If all the wires do not fit, widen the hole a little (for example, with a larger radius drill).
- To prevent the wires from dangling, secure them together using electrical tape.
- Now is the time to return the modified bumper to its original position.
- Now we will connect the wire leading from the parking sensors display. Since it is attached directly to the dashboard using double-sided tape, it is most rational to lay the cable through the left pillar, and then through the left threshold in the direction of the trunk. For convenience and speed, use a rigid wire, which must first be attached to the end of the cable.
- We attach the chamber block to a metal part of the body using double-sided tape. We connect all the necessary wires to its connectors. To prevent them from dangling and creating extraneous noise when in contact with metal, we tighten them with ties in several places. Typically, the control unit contains the following connecting connectors: 4 - for sensors, 1 - for power, 1 - for the display (monitor).
- And lastly, the power connection. The red wire (power) connected directly to the unit must be connected to the wire (green) of the reverse lamp. It is better to use a connecting terminal for connection. The ground wire (black, in some cases red-black) must be securely attached to the seat belt bolt (or another, at your discretion).
- We check the functionality of the device. Turn on the car's ignition and shift the gearbox to reverse. We observe whether the device display works. If everything is in order, start the car engine and diagnose the operation of the parking sensors in real conditions when approaching and moving away from various obstacles.
- Installation is complete, enjoy using it!
The video shows a Lada Kalina car, but the installation principle is the same
Diagnostic methods
First of all, you need to decide on the diagnostic method. There are several of them, and one of them involves using a multimeter. If you get very close to the bumper-mounted controller, it should start clicking. These clicks may not be heard, but if you record them on a voice recorder, the sounds will be clearly audible.
The first thing you need to pay attention to when carrying out diagnostics is contamination of the sensors. The parking sensors will have to be carefully inspected and, if necessary, cleaned. During cleaning, you need to pay attention not only to the sensors, but also to the fasteners. The structure must be securely fixed. The reasons for sensor failure can be different, and not all of them can be identified independently.
Often sensors stop functioning normally due to moisture penetration into them. This may not be noticeable visually, so the device will have to be dismantled and dried. Then it is connected again and checked.
If performance is not restored, then the problem is something else. You can try checking the membrane located inside the sensor. There should be no visible damage to it, and if there is any, the membrane will have to be replaced.
The most accurate diagnostic results will be using a tester. The order of actions in this case should be as follows:
- First, disconnect the controllers from the power source.
- After disconnecting the wires, remove the sensors.
- We set the tester to resistance measurement mode with a threshold of 2,000 Ohms.
- We turn on the device. We connect the tester probe to the controller contacts.
- We read the readings from the display. The device works normally if the resistance displayed on the display is not zero and does not tend to infinity. Otherwise, it will have to be repaired or replaced.
Using a tester, we identify faults in the controller and the electrical circuit to which it is connected and analyze its integrity. Damaged wiring should be replaced or repaired by soldering, since normal current transmission through it is impossible.