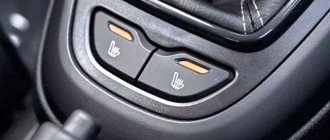
Replacing car seats is required in rare cases; they are usually removed when working on the interior, for example Shumka. As practice shows, disassembling and removing the rear and front seats on a Lada Vesta car is not difficult; it takes 10-20 minutes. But if you do everything for the first time, questions may arise out of ignorance. Sometimes a heating system is installed in the back seat of a Lada Vesta; it saves passengers in cold weather, even if the stove fails or does not work. Three-level heating is installed in the front. Read the article to the end and find out how to install it. The original car seats are comfortable, anatomical, with lateral support. Seat pockets were made for the first time on a car; they are on the side. My back generally suffers on long trips. Depending on the configuration, the seats on the Lada Vesta differ; the Vesta SV cross and sport versions are different. The interior of the Lada Vesta car turned out to be truly cozy, attractive and everything in it, from the seats to the upholstery, was created in accordance with modern requirements. The new seats show a big gap between the Lada models of the 2000s and the current flagship - now the cushions have become softer and more comfortable for seating.
The seats of the Lada Vesta received little support in the lumbar region and slightly noticeable sporty lateral support. But for driving around the city and on the highway, such fixation in the seat is enough. Their adjustment works according to three parameters, but if it does not work, they can be replaced. For ease of use of the trunk, you can fold or even remove the rear sofa.
The seats on the Lada Vesta are a real breakthrough in the development of car seats on the Lada car. The standard version is already equipped with the necessary additions to keep your back healthy and ensure a comfortable ride.
What does the seat assembly on a Lada Vesta car consist of?
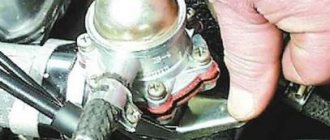
We prepare the car for work, disconnect the negative terminal of the battery.
Removing the front seat
Push lever 4, Figure 1, up and move seat 1 to the rearmost position.
Using a Torx T40 head, unscrew the two bolts 3 securing the slide 2.
We press the lever and move the seat to the extreme forward position.
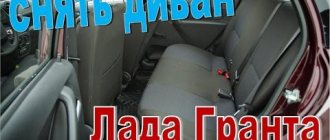
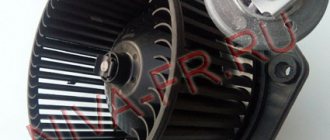
Removing the rear seat
We take our hands by the front edge of the cushion 1, Figure 3, of the rear seat and pull it up until the loop 2 of the cushion frame comes out of the hole in the latch 3 on the body. We repeat this operation on the other side of the seat.
Using a 14mm head, unscrew bolt 5, Figure 5, securing the right seat belt buckle and the lower mounting point of the middle seat belt.
Using a 14mm socket, unscrew bolt 3 securing the rear seat back bracket to the body floor.
We tilt the right backrest 4 and the left backrest 6 forward by pulling up the clamps 1 and 2.
Using a 14mm socket, unscrew bolts 1, Figure 6, securing the brackets for the left 2 backrest of the rear seat, remove the backrest.
Install the seat in the reverse order of removal.
When installing the front seats, apply Fiol-1 lubricant to the rubbing surfaces of the slide.
Removing the rear parcel shelf trim
Remove the rear seat cushion as described above.
Lower the rear seat backs.
Using a Torx 20 head, unscrew the self-tapping screw 2 on the right and left sides, Figure 7, fastening the trim 1 of the side window.
We disconnect the side window trim from the body by pulling the trim with a force that overcomes the force of the plastic holders.
We remove the plastic buttons 2, Figure 8, fastening the upholstery 1 of the luggage compartment shelf.
Using a flat-head screwdriver, remove the gaskets 3 of the right 4 and left 5 seat belts from the holes in the shelf upholstery.
Using a Torx T20 head, unscrew for each side three self-tapping screws 4, Figure 9, fastening the upholstery 1 and 2 of the side window to the upholstery of the 3rd shelf, and separate the parts.
Installation is carried out in the reverse order of removal.
It consists of a pillow and a backrest, which are supported by a frame. The connection of these parts is made with the possibility of adjusting the position of the backrest, height, and also the distance relative to the steering wheel with pedals. The side pockets on the car are designed for one of these adjustments.
You can, of course, use capes; they will be easier to remove to wash, but they bulge and look untidy; the covers are universal, but cannot be adjusted to fit.
Vest owners are mainly inclined to choose textile covers, among which there are magnificent, practical eco-leather covers that can be given an individual design. Unfortunately, the standard Vesta does not provide upholstery made of natural or artificial leather, so this step is the exclusive right to upgrade the interior to a high level of quality.
Removing the front seat
The lever is pressed up and the seat moves to the rear.
full position. Using a T40 Torx head, remove the two bolts securing the slide. The lever is pressed and the seat moves to the last frontal position. Using Torx T40 tools, unscrew the two bolts securing the slide at the back. The rear wiring harness blocks are disconnected from the seat and it is dismantled.
Currently, the most modern and functional seats among LADA models are the seats of the Lada Vesta sedan. They have height adjustment, lumbar support and even side airbags. Do you know how comfortable it becomes in the interior of this car if you unfold them for an overnight stay or rest?
How to remove the back seat on a Lada Vesta: photos and videos
Many Lada Vesta owners were faced with the need to dismantle the rear sofa and the entire seat. To do this, we contacted a car service. But, this procedure is carried out quite easily and simply with your own hands.
Video about dismantling all the seats on the Lada Vesta:
The video will show how quickly and without unnecessary hassle you can dismantle the rear seat, and will also tell you about some of the nuances and subtleties of the process.
Why remove the back seat?
General view of the rear seat.
Of course, before considering the issue of carrying out the process of dismantling the rear seat of the Lada Vesta, it is necessary to understand in what cases this procedure will be needed.
- To replace upholstery. This is often done when tissue elements are damaged. This could be holes burnt by cigarettes, spilled liquids, an accidentally torn surface, or, in extreme cases, a fire inside the car.
- Carrying out repair and restoration work on the body. It often happens that after a traffic accident, the rear part of the vehicle is damaged and deformations appear along the bottom of the cabin. This also includes side impacts in the area of the B-pillar and rear pillar.
- Replacement of upholstery or seats during the process of tuning and modification of the interior. In this case, you just need to remove the sofa and the back of the rear seat.
- Pasting soundproofing will also require dismantling the rear seat, since it is necessary to get to the bottom of the car.
- Other factors that will require dismantling the rear sofa and backrest.
Removing the rear seat of a Lada Vesta
Rear seats.
The process of removing the rear seat on a Lada Vesta is quite simple and quite typical for all vehicles of the VAZ family. This procedure can be carried out in one pair of hands and requires minimal tools.
Let's consider the sequence of actions aimed at dismantling the rear seat:
- Of course, the manufacturer recommends removing the negative terminal from the battery when carrying out all repair and restoration operations. But, in this case, this is not necessary, so we will skip this operation.
- Let's start dismantling.
First you need to dismantle the sofa. To do this, lift it up to remove it from the clamps. Location of the rear sofa seat latch. - We move the sofa towards the trunk, and then lift it up.
This is necessary so that the groove disengages from the body. The sofa has now been dismantled. Location of the rear sofa fastenings. - Let's start removing the seat back.
Rear seat back bolt locations. - To begin with, it is worth unscrewing the seat belt fasteners.
Then unscrew the lower fastenings of the seat back. We lift it so that it comes out of the fastening grooves, and we carry out the final removal. Location of the rear backrest fastenings.
The installation process is identical to the dismantling process in reverse order.
As you can see, there is nothing difficult in the process of removing the rear seat of a Lada Vesta, and it is carried out quickly and in one pair of hands. Installation, like dismantling, can be done independently in your garage or even on the street
Preparatory work
Before you begin dismantling yourself, you need to prepare the tools that will be needed for the work. The car must be placed on a flat, open area so that the seat can be freely removed from the car. It is advisable to disconnect the battery from the on-board network - just remove one terminal from it. After this you can start working.
Leather or velor, or maybe jacquard? Choosing material
Materials from which covers for Lada Vesta are made:
- Genuine Leather. Prestigious, solid and expensive. The material is durable and extremely pleasant to the touch.
- Faux leather. Very practical (easy to clean, breathable) and durable material. It looks representative, not much inferior to its natural counterpart. Of course, only high-quality leatherette has these advantages.
- Eco leather. The most modern and technologically advanced of all the materials discussed in this article. The prefix “eco” means the absence of polyvinyl chloride (a type of plastic) in the material for the covers. This unique material perfectly allows air to pass through, but at the same time retains moisture. Eco-leather does not deteriorate when exposed to extreme temperatures and does not have an unpleasant odor. The material feels pleasant and expensive to the touch.
- Jacquard. An interesting material, the result of a clever combination of natural and artificial components. Well ventilated, lasts a long time. Only the high price can push you away from jacquard.
- Velours. The most practical option, and it costs reasonable money. Durable and fits tightly to the seats. There are a lot of color options. The only drawback is the “old-fashioned” look.
- Synthetic polyester. Durable, dense and unpretentious material. A significant disadvantage is mediocre ventilation.
- Plush. Soft, pleasant to the touch material. Unfortunately, it wears out quickly.
- Fur. Fur covers perfectly protect car seats from wear and tear and keep the owner warm in the winter cold. They make the interior of the car more luxurious.
- Combined material (covers of one of the types given above, using various inserts).
Let's take a look at the results of a survey conducted on our website recently, dedicated to the operating features of Lada cars.
Visitors to our resource were asked the question: “What seat covers for Lada Vesta do you recommend?”
“Prize places” were distributed as follows:
- Eco leather.
- Genuine Leather.
- Jacquard.
- Combined material.
- Faux leather.
- Fur, velor.
Based on this rating, compiled by car enthusiasts themselves, we choose covers made from “eco-friendly” leather for today’s consideration.
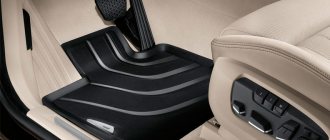
Floor mats and trunk of Lada Vesta
Products from the Dustershop77 range on the topic of the article:
| Image | vendor code | Name | Manufacturer | Price | Availability | Add to cart |
| DC709 | Gas pedal cover for Duster 2015 / Captur / Logan / Terrano / Vesta / Isk-Ray | Duster-Guard | 1000 / 800 rub. Discount: 700 rub. | >10 | ||
| DC985 | Clip for attaching the mat to standard fasteners | Original | 250 / 200 rub. Discount: 150 rub. | 8 | ||
| DC1198 | Floor part of fastening clip for interior mats | Analogue | 300 / 70 rub. Discount: 50 rub. | >10 | ||
| DC590-V053-1500403 | Carpet covers (6 pcs) Lada X-Ray | Pt GROUP | 2500 / 1900 rub. Discount: 1500 rub. | 6 | ||
| DC1901-99999210001282 | Fastening for interior mats Lada, Renault, Nissan 99999210001282 original 1 piece | Original | 150 / 100 rub. Discount: 70 rub. | >10 | ||
| DC494-1S.061.000 | Universal loading mat for trunk | Novline | 1900 / 1700 rub. Discount: 1500 rub. | 2 | ||
| DC885 | Armrest Kaptur, X-RAY, SANDERO 2, STEPWAY, LOGAN 2 | ArmAuto | 2200 / 1900 rub. Discount: 1700 rub. | 1 | ||
| DC1111 | Moisture-absorbing car mats with absorber, black, 60x40cm, 2 pcs. | RF | 500 / 300 rub. Discount: 150 rub. | 6 | ||
| V021-01400404 / LVE111703 | Tunnel pads for carpet (2 pcs) | Pt GROUP | 1500 / 1300 rub. Discount: 950 rub. | 2 | ||
| DC589-V054-1500404 | Tunnel pads for carpet (2 pcs) Lada X-Ray | Pt GROUP | 1900 / 1500 rub. Discount: 1000 rub. | 8 | ||
| V046 | Passenger carpet cover for Lada Vesta from 2016 | RF | 1200 / 900 rub. Discount: 900 rub. | 1 | ||
| DC1052 | Moisture-absorbing car mats 50x38cm (2 pcs) | RF | 400 / 250 rub. Discount: 150 rub. | 4 | ||
| DC1053 | Moisture-absorbing car mats 50x38cm and 25x38cm (4 pcs) | RF | 500 / 300 rub. Discount: 200 rub. | 3 | ||
| DC1624 | Driver's rubber mat with high side 2011-2015 2WD/4WD (Agatek) | Agatek | 1500 / 1300 rub. Discount: 1000 rub. | 2 | ||
| DC1036 | Interior moisture-absorbing mat 50×40cm (2 pcs) | RF | 300 / 150 rub. Discount: 100 rub. | 3 | ||
| V074 | Armrests for rear doors (2 pieces) | ArmAuto | 900 / 700 rub. Discount: 700 rub. | 4 | ||
| V135 | Trunk mat for Lada Vesta Cross (for configuration without raised floor) | RF | 1500 / 1100 rub. Discount: 1100 rub. | 1 | ||
| DC1039 | Moisture-absorbing mat 40x45cm (2 pcs) | RF | 300 / 200 rub. Discount: 150 rub. | >10 | ||
| DC1623 | Driver's mat polyurethane with high side Duster 2011-2015 2WD (Element) | RF | 1700 / 1400 rub. Discount: 1200 rub. | 1 | ||
| DC1968-ARM-7FLPVSWV-00 | Raised floor Lada VESTA SW/CROSS (upper) | ArmAuto | 2800 / 2200 rub. Discount: 1950 rub. | 2 | ||
| V139 | Raised floor Lada VESTA | ArmAuto | 2500 / 1900 rub. Discount: 1900 rub. | 1 | ||
| V134 | Trunk mat Lada Vesta 2015-sedan | RF | 1500 / 1300 rub. Discount: 1300 rub. | 1 | ||
| DC887-V059 | Armrest Lada VESTA | ArmAuto | 2200 / 1800 rub. Discount: 1700 rub. | 3 | ||
| V137 | Raised floor Lada X-RAY (bottom) | ArmAuto | 2500 / 1900 rub. Discount: 1800 rub. | 1 | ||
| DC1578-8450032518 | Deep cup holder for the new Lada Vesta interior 8450032518 | Original | 1500 / 1300 rub. Discount: 1100 rub. | 1 | ||
| DC1967-ARM-7ORGSVV-00 | Organizer box ArmAuto Vesta SW / Cross | ArmAuto | 3400 / 2900 rub. Discount: 2600 rub. | 1 | ||
| DC882 | Carpet door sill covers Sandero 2014/Stepway 2014/ X-Ray | Duster-Guard | 2600 / 2000 rub. Discount: 1700 rub. | 4 | ||
| DC1970-ARM-7ORGVSED-00 | Drawer organizers for the trunk of Lada Vesta sedan | ArmAuto | 6300 / 5900 rub. Discount: 5500 rub. | 2 | ||
| DC1708 | Tunnel linings for carpet Lada X-Ray 2015- | Duster-Guard | 2500 / 1700 rub. Discount: 1400 rub. | 2 | ||
| V045 | Driver's carpet trim for Lada Vesta from 2016 | RF | 900 / 650 rub. Discount: 650 rub. | |||
| V075 | Armrests for front doors (2 pieces) | ArmAuto | 1000 / 600 rub. Discount: 600 rub. | |||
| V086 | Rear seat carpet covers | ArmAuto | 1000 / 900 rub. Discount: 900 rub. | |||
| V136 | Trunk mat for Lada Vesta Cross (for configuration with raised floor) | RF | 1500 / 1300 rub. Discount: 1300 rub. | |||
| V047 | Tunnel carpet overlay for Lada Vesta from 2016 | RF | 900 / 650 rub. Discount: 650 rub. | |||
| V060 | Armrest for door Lada VESTA, SW (carbon) | RF | 1000 / 700 rub. Discount: 700 rub. | |||
| V130 | Organizer for standard armrest | ArmAuto | 700 / 500 rub. Discount: 500 rub. | |||
| V138 | Raised floor Lada X-RAY (top) | ArmAuto | 2500 / 1900 rub. Discount: 1800 rub. | |||
| V133 | Floor mats for Lada Vesta (4 pcs) | Analogue | 2000 / 1700 rub. Discount: 1700 rub. | |||
| DC1966-ARM-7ORGXRAY-00 | Organizer box ArmAuto Lada X-RAY | ArmAuto | 3200 / 2700 rub. Discount: 2450 rub. | |||
| DC889 | Armrest for door Lada VESTA, SW (carbon) | ArmAuto | 1200 / 1000 rub. Discount: 700 rub. |
Briefly what this article is about:
How to remove the front seats and rear sofa of Lada Vesta
Anything to add?
If you have something to add to the article, or you want to share your experience on this topic, please leave a comment. If you are the author of a report on the repair, modification of a Renault car, or recommend material for placement in the Knowledge Bank, please let us know this by email
What types of covers are there for Vesta?
Cases are different. There are “shirts” that usually cover only the front seats. There are covers that completely cover all seats.
Car covers come in different materials. And at different prices. From two or three thousand in the nearest market to several tens of thousands. There is also a complete refurbishment of the interior, but that’s a slightly different conversation.
Covers are made from leather, faux leather, synthetic fabric, velor, vinyl, Alcantara and even sheepskin.
Synthetic fabric covers are very comfortable and inexpensive. Easy to remove, wash and put back in place. But there are some disadvantages: they look simple, they slip in the heat, and they don’t absorb moisture well.
Velor covers are pleasant to the touch, beautiful, and do not heat up or cool down very much. It’s quite comfortable with them, but...there are also disadvantages. They wear out, velor is short-lived. Such covers often have to be replaced.
Vinyl covers are cheap, bright, but very uncomfortable. They overheat greatly and become tanned in the cold. No comfort.
Alcantara is artificial suede. Usually quite good quality. Doesn't overheat too much in the sun, holds heat well, and is ideal in winter. Pleasant to the touch. The downside is the high price. Appearance is not for everyone.
One of the newest types is eco-leather covers. Good eco-leather has better properties than leather. The price varies greatly, depending on the quality, density and thickness of the material. In essence, eco-leather is the same leatherette, but new production technologies put it on the same level as the most expensive materials.
Eco-leather allows air and steam to pass through, but does not allow water to pass through. The breathability of eco-leather is tens of times higher than that of genuine leather. The material “breathes”. These properties make it unique for the production of cases. Eco-leather is polyurethane on a cotton base. Do not confuse it with the old leatherette - PVC on fabric. Advantages of eco-leather: fairly affordable prices, does not cause allergies, pleasant to the touch, constant elasticity at plus and minus temperatures, a huge selection of colors, odorless, quite resistant to aggressive influences (cigarette ashes, liquids). Eco-leather is easy to care for - just wipe with a damp cloth.
There are also disadvantages. Eco-leather is easy to cut and scratch. In extreme heat, eco-leather covers can get very hot, just like leather ones. In winter, eco-leather is cooler than other covers, for example, velor or suede. Heated seats take longer to heat up.
Eco leather can be regular or perforated. With perforation they are usually used for the central inserts of covers for better ventilation.
Also, different types of materials are often used in the production of covers, for example, eco-leather is used on the sides and back of the seats, and a velor insert is used in the center.
This is interesting: What is the fuel consumption of the Lada Largus Cross?
How to put on rear covers
First of all, remove the rear sofa cushion. We simply pull the front part of the sofa up. There are latches. Here is the mounting bracket in the photo on the removed pillow, bottom view:
Thanks for subscribing!
And the mount itself. Rear seat strip. It may break when the bracket on the pillow is pulled out of it, then it must be replaced.
Then we move the entire cushion of the back sofa towards the back. There are hooks under the back that hold the pillow.
We spread the pillow cover in a convenient place - on a table or workbench, face down. Place a sofa cushion on top (upside down). We stretch the cover, fasten all the elastic bands, tie the laces.
The rear sofa cushion is ready. Let's put it aside. We take hold of the back of the rear seat.
Remove the three rear head restraints. Immediately put covers on them and put them aside. The smallest headrest is medium. The case on it is also smaller, keep that in mind.
Next up is most of the backrest.
Using a 14mm socket, unscrew the lower fastening of the middle seat belt. The belt remains on the back of the seat.
Unscrew the front two bolts and two more at the back. We use a 13mm head.
Carefully, so as not to hit the car body, we pull out part of the backrest from the car. We place it on the table.
Remove the isofix child seat mount, which is located on the back side of the backrest. To do this, pry up the fasteners with a flat screwdriver and pull the fastener out of the back.
It is better not to remove the cover near the back recline button unless necessary. Very delicate fastenings, can be broken. It's better to just slide the cover under it.
These covers have a flap around the seat belt. After putting on the covers, you just need to fasten it with Velcro.
Then we thread the headrest locks.
We insert the child seat mount back.
Where necessary, we tighten it, tie the laces, and fasten the clasps of the case. The backrest can be replaced. With the second, smaller part of the back, we repeat all the points. We also install it in place, tighten the backrest mounting bolts and fasten the middle seat belt. Place the sofa cushion in place.
That's it, eco-leather covers on the seats. If small wrinkles have formed, don’t worry; they will smooth out over time. But the more you tighten the covers during installation, the better. This is a relatively budget option. There are covers that are twice as expensive, they need to be tightened, stitched, etc. But these look not bad either, better than the standard non-luxury seat upholstery, although this is also not for everyone.
Now you don't have to worry about getting your seats dirty. By the way, during the installation process, these new covers got dirty with grease like grease, all the bolts were in it. So the grease was wiped off with a damp cloth, not a trace remained, which pleased me.
Here are photos to compare the standard upholstery and seats with covers.
Body painting
Comparing cars should start with this parameter, because the protective coating ensures the stability of body parts during constant contact with the external environment and other aggressive factors. The thickness of the paint layer tells you whether the car's finish is good or not.
The Vesta modification of the SV Cross is slightly inferior to the Kia Rio in this indicator. The layer that the Lada has is from 120 to 135 micrometers, versus 138-174 for the Korean. Therefore, here the last one gets an extra point.
On the other hand, Vesta is doing well with her palette. The buyer of SV Cross can choose one of 10 shades, and soon there will be even more options.
The quality of paint application is equal in both cases, and therefore Vesta Cross and Kia Rio look quite presentable. Even hard-to-reach and inconspicuous places are finished very carefully.
Chassis
What size are the wipers on the Lada Kalina (front and rear)
Passability in our realities is at least an important criterion. Here, a parameter such as clearance height is of great importance. Kia cannot stand comparison in this position. The Lada has a gap of 20.3 centimeters versus 17 for the Korean. With such good potential, the domestic car can easily overcome uneven roads and drive onto the curb, which is useful when parking in urban conditions.
Vesta's suspension is also very powerful - it is capable of jumping through quite impressive potholes at speeds of up to 40 kilometers per hour, without causing any inconvenience to riders. At the same time, Kia rides softer, but it requires good roads.
The Russian model SV Cross is equipped in any configuration with disc brakes at the front and drums at the rear. There is nothing to put up against the Korean hatchback; their product has the same components in the basic equipment. However, the most expensive version of Kia has discs installed on both axles.
Removal and reinstallation
The factory installation of seats on the Lada Vesta is similar to their installation on other cars belonging to the Renault-Nissan-Lada concern. The difference may be in the size of the bolt heads that secure the seats to the interior.
Driver and passenger seats
To determine the size of the bolts, the driver's seat must be moved as far back as possible - the heads of both bolts will be visible. On most AvtoVAZ models, including the Lada Vesta, for fastening the front seats, T40 cap screws from the Torx kit are used together with the standard M10 size. After selecting the tool, we begin dismantling.
- Leaving the seat in the rearward position, unscrew the left and right bolts securing the seat to the interior protrusions.
- By moving the seat back forward, we open access to the rear, left and right bolts.
- Slightly tilting the chair towards the adjacent seat, disconnect the winter heating wires, if any - the connector hanging under the chair.
After disconnecting the wires, the chair can be taken out of the car. While it is removed from the vehicle, it must be inspected to detect any malfunctions. At the same time, you can try to eliminate the squeaking of parts, if any occurs. Most often, serpentine springs creak where they are attached to the seat frame. You can try to eliminate the shortcoming by placing a cambric (plastic tube) on the spring at the creaking point. You can also avoid extraneous sounds by wrapping this place with 2-3 turns of electrical tape.
Considering that the front seats of the Lada Vesta are absolutely identical to each other, the installation and dismantling procedures are also the same. Reinstalling the chair is done in the reverse order, not forgetting to lubricate the slides.
Removing the rear seats
The rear seats of the Lada Vesta, like most passenger cars, are combined into one and are called the rear sofa. It consists of the seat itself and the backrest. According to the general concept of the Renault-Nissan-Lada concern, the rear sofa seat is a single whole. The back is divided into 2 unequal parts: 1/3 of the total area of the back is one part, and 2/3 is the other part. Disassembly begins with the seat.
- In the front of the sofa, you need to feel the fastening clamps and pull the seat up.
- Having thus released the latches, you need to lift the seat slightly in front and then move it towards the trunk.
- Putting your hand between the bottom and the back, pull the lower part up - the seat will come out of the hinges of the brackets and can be taken out of the cabin.
After dismantling the lower part of the seat, access to the heads of the bolts securing its back will open. To remove the backrests of the rear sofa, you need to prepare a set of keys from M14 to M17.
In the photo the numbers indicate:
- Latch of the right (larger) part of the back of the rear sofa.
- The same, left (smaller) side.
- Bolts securing both parts.
- Most of the back.
- Middle passenger seat belt bolt.
- The back of the smaller part.
To remove both parts of the back of the rear sofa (4 and 6), you need to unscrew the bolts 3. After that, alternately pressing the corresponding latch (1, 2), remove them from the passenger compartment.
Child restraint
The place for transporting children in any car is installed according to the operating instructions for the device itself.
Current rules require securing a child restraint in two ways: using standard seat belts and using special anchors additionally installed in the car’s interior.
AvtoVAZ installs special mounts for child seats on the Lada Vesta. They are located on the sides of the rear seat and are called the Isofix system. It implies the presence of latches into which the edges of the child seat slides fit.
There are pictograms next to the latches indicating that this is a child seat anchor. The highest point for attaching a child restraint system is located on the back of the rear sofa, on the trunk side.
When installing a child seat, remember that it cannot be installed in the front passenger seat, facing forward, with the airbag activated. If there is an urgent need to install a child seat on the front passenger seat, then you need to turn off the airbag or install the restraint device “rear-facing”.
Installation procedure
The assembly is performed in this order:
- Vertical backrests are placed and secured with bolts.
- Seat belts are attached. To do this, use the appropriate fasteners.
- The sofa is fixed in the brackets. If these actions are performed incorrectly, then over time it will rise.
- In order to fix it more firmly, you should lift one edge and press on it.
After installation, you should check whether the installation was carried out correctly.
Should I put covers on the seats or not?
This is the personal choice of the car owner. But generally, cases have more pros than cons. Of course, if you put cheap covers from the market on beautiful seats, the interior of the car will lose a lot in terms of appearance. But more often it’s the other way around - the standard seat upholstery looks so-so, but good covers give it a more expensive, beautiful look. Often already worn out seats are covered with covers.
Another undeniable advantage of covers is in terms of practicality. They can be removed and washed, wiped, vacuumed. And the standard upholstery underneath is like new. Before selling the car, you can remove the covers if they are frayed and sell the car with apparently new seats. The covers can be changed just like that if you get tired of them. Buy and supply a different color, a different material...
Salon
The interior design of the Vesta modification SV Cross looks quite stylish. Against this background, Rio doesn't look so good - its interior is downright boring.
Compared to the Lada, the Kia car is more comfortable. Its seats perfectly support the backs of passengers, the only problem is that the seats themselves are a bit short, although they are quite soft. In Vesta, on the contrary, they are excessively rigid, but on the other hand, passengers on the rear sofa are given noticeably more space.
Kia Rio and SV Cross have a common drawback - a low ceiling. Therefore, if a tall person can straighten up, he will cling to the roof with the top of his head.
The good quality of the Kia's interior trim and equipment gives it an edge. Vesta has a lot of disadvantages:
- harsh steering wheel;
- tight buttons;
- Difficult to read instrument dials.
At the same time, the SV Cross steering wheel is easily adjustable both in height and reach. The Korean has more limited functionality.
How to remove the door trim of a Lada Vesta
The inner door trim is made of cast or prefabricated plastic panels of ergonomic shape that enhance the interior of the car. These "door cards" in a car, to be clear, play the same role as the wall cladding in a house. It is not surprising that they are one of the favorite tuning options, because each car owner has his own ideas about beauty and comfort. Sometimes it is necessary to install additional equipment under them, heat and sound insulation, remove dents, speakers, replace window regulators and other things. Let's look at how to remove the trim of a Lada Vesta. To do this, first prepare the tool:
- Plastic mounting blades;
- Sprocket wrench TORX 20;
- A thin flat-head screwdriver with the blade wrapped in cloth. Dismantling of plastic cards occurs in the following sequence:
- In the lower front corner of the front window, a triangle is hooked (in the area of the upper corner), covering the mirror mount. The triangle is attached to the corner of the window with clips, and if a tweeter speaker is found underneath it, disconnect it. It is better to dismantle plastic elements with a spatula to avoid damage;
- There is a screw under the door mat in the door handle. We unscrew it with a TORX 20 key. For rear doors, these two points of our instructions are not relevant;
- Next comes the dismantling of the control panel for power windows and mirrors. It is pryed off with a plastic spatula or a screwdriver wrapped in cloth. Accuracy and slowness are very important here;
- After removing the specified panel, the terminals are disconnected;
- Behind the removed control panel there is a bolt that presses the plastic card to the door. He also gets out;
- Next, a plug is pryed off from the end of the door with a spatula or screwdriver, behind which another screw is found. To unscrew it, take a TORX 20 key;
- We do the same with three more clamping screws along the bottom edge of the door;
- Now the trim can be removed, which requires prying off four clips with a spatula, moving the spatula along both sides of the door from bottom to top.
We looked at how to remove the inner trim of the front doors. Those who are interested in how to remove the back door of a Lada Vesta, or rather its plastic card, should be guided by the following sequence:
- Use spatulas to remove the window handles;
- They also use the spatulas to snap off the trim on the door handle;
- The bolts holding the door handle are unscrewed;
- Use a TORX 20 key to unscrew the clamping screw at the bottom of the door card;
- The door card is pryed off with mounting blades and snaps off.
Assembly
After carrying out the necessary repairs on the Lada Vesta, the seat is assembled in the reverse order:
- Vertical backrests are installed and bolted;
- Fasten the middle seat belt;
- The sofa is fixed in brackets;
- Finally installed by gently pressing on the front edge.
In the presented video of disassembling the rear seat of a Lada Vesta, all stages are clearly visible.
Car seat covers are not just about protecting car seats. This is also an element of the car’s interior, and quite an important one. The appearance of the seats radically changes the appearance of the interior as a whole, depending on the covers. Some people select covers to match the color of the car, others to match the color of the interior, while others, on the contrary, contrast the color of the covers and the car.
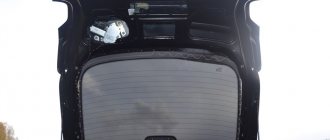
Luggage compartment
The Lada Vesta's storage compartment is more than fine - its volume is 480 liters. For comparison, Kia has a similar parameter, only 390 hp.
The domestic car also boasts better functionality - in the trunk there is a special organizer for small items and three more nets. All this allows you to securely secure and sort things.
LADA Vesta SW Cross build quality of the Russian station wagon
Moreover:
- the floor panel is easily removable, and underneath there is another additional compartment with a capacity of 95 liters;
- the rear sofa folds down and there is space for very large items (free space increases to 825 l);
- The Lada has wide handrails on the tailgate, which is convenient, while the Kia has only one stubby handle.
Price
Vesta and Kia have different configurations, which makes comparison much more difficult. The basic version of the Cross is equipped with a considerable number of good options, including:
- parking sensors;
- Cruise control;
- navigator;
- air conditioner;
- precipitation sensors;
- four airbags;
- rear-mounted video camera.
To get a Kia with approximately the same set, you will have to pay from 950,000 to a million. Interestingly, the Korean does not have cruise control at all, but there is such an option as a heated steering wheel. And yet, there are as many as six airbags.
Thus, by buying a Lada, you will get more goodies for a relatively modest amount.
Standard front seats and rear sofa - article number and price
If for any reason you decide to replace the seats, get ready to look for them by catalog numbers:
For your own convenience, you can replace the standard set with an anatomical one if you spend a lot of time behind the wheel. Orthopedic chairs are a rather individual issue, because if you lack the back support that is in the factory version, you will most likely rush to buy the first orthopedic chair you find.
Be patient and take your time: consult a doctor, describe the nature of the problem that worries you, and ask what it should be. Today the market is full of various offers where you can find “your” option.
Today we will install eco-leather covers on Vesta.
The central inserts are perforated. Since the car is silver, the covers are gray and black. Cases from the middle price category - without weights.
Let's start with the driver's seat, as it is the most difficult. First you need to remove it. You can put the covers on in place, but it will be more difficult and the result will be worse.
First of all, remove the headrest. We just pull it up.
Then we move the seat as far back as possible to get to the front bolts.
Use a Torx 40 wrench to unscrew these bolts.
After this, move the seat completely forward. Use the same torx to unscrew the two rear bolts.
Don’t forget to disconnect the connectors for heated seats and the passenger sensor (in the case of a passenger seat). The photo shows the connectors (bottom view):
Remove the lumbar support handle (if equipped).
To do this, you need to pull out the retaining bracket.
After this, you can remove the handle itself.
Depending on the weather, the seat can be taken home or to the garage for further action. You can continue to practice outside.
The seat lift handle can now be removed. The cover has a slot for a screwdriver.
We pry up and remove the decorative cover.
Under the cover we find two screws securing the handle.
Using a shaped screwdriver, unscrew them and remove the elevator handle.
The plastic cover on the side of the seat is held in place by latches. Carefully pry them off with a screwdriver and pull them out. Some latches need to be squeezed with pliers.
The casing does not need to be completely removed. Simply unclip the latches and thread the case using a ruler, for example, through the casing. If necessary, the casing can be removed; inside it is held on by a couple of latches.
On the other hand, the backrest reclining handle will interfere with removing the cover. It is held on a metal lever with a single latch. Bend it and remove the handle. Now you can remove this side panel.
We put the cover on the lower seat cushion. We thread, pull, tie and hook all the elastic bands and cords, depending on the model of the covers. Here we simply put rubber bands on the springs of the seat cushion, tightened and tied the main tightening cord of the covers. You can use special hooks from the cover set.
That's it, the bottom pillow is ready.
Assembling the seat. We install and snap back the plastic sides, put the elevator handle and the backrest tilt handle in place.
Next, we put the cover on the back of the seat. In some places, you may have to unfasten the standard seat trim. But there is no need to remove it completely. We tie all the laces and the cover is in place!
Find the location for installing the lumbar support handle.
Cut a hole large enough to fit the handle into place. The base of the handle should fit inside the cut out circle. It is better to cut with a scalpel or a stationery knife.
We thread the headrest locks into the finished holes of the covers. If necessary, we trim the holes or cut them out if they are missing.
Depending on the presence of the armrest and the hole for it in the cover, you may have to cut out this hole. This Vesta did not have an armrest.
So, the driver's seat is ready. We install it in place, tighten the bolts, and put on the connectors.
We carry out the same operations with the front passenger seat. Then we put the covers on the front headrests. We put the head restraints in place and adjust their height. To do this, there are clamps on the headrest locks that must be pressed when adjusting.
The front seats are ready, let's move on to the rear ones.
How do the front seats fold out?
Adjusting seats on Lada Vesta:
_x000D_
- _x000D_
- in height (adjustment stroke - 3 cm), distance from seat cushion to steering wheel from 18 cm to 21 cm. _x000D_
- in the horizontal plane (adjustment stroke forward/backward – 24 cm). _x000D_
- seat back (forward/backward). _x000D_
- lumbar support (if poorly fixed). _x000D_
_x000D_
To spend the night in the car, we move the seat forward and tilt the seat back as far back as possible until it rests against the cushion of the rear sofa.
How the front seats fold out on a Lada Vesta
In this position, the driver’s legs will be slightly bent at the knees (the pedal assembly prevents them from being fully extended). The passenger has more legroom:
How the front seats fold out on a Lada Vesta (passenger legs)
Removal and installation of Lada Vesta seats
On early VAZ models, the driver and passenger seats were removed and replaced so that more comfortable seats could be installed. To properly disassemble the seats on Vesta, you need to prepare the work area by spreading a cloth on the ground or floor on which you will place the chairs, which will protect the mechanisms from dust.
It is better to disassemble the structure in winter in a heated garage. Another secret to a small repair is that the levers hidden in the seat pockets must be removed carefully, trying not to damage the upholstery: to do this, press on the upholstery and press the latch - it will release the lever.
Rear sofa
Dismantling (removing) the rear seat of a Lada Vesta car is carried out in the following order:
- Raise the rear seat until you hear a characteristic click—the hinges are disengaged. Press down on this cushion and push it towards the trunk.
- Lift it again until it clicks - now the second loop is disengaged.
- Remove the seat belt fastenings on the right and left under the backrests, and remove the backrest fastenings from below. The latch on the right and left above the back of the rear seat concept is up and push it a little.
- Remove the remaining bolts and remove the backrest. The sofa is dismantled.
Differences between sport and cross version seats
The upholstery on the Lada Vesta SV Cross has changed - now it is combined. The textiles are diluted with eco-leather inserts, which are elegantly emphasized by stitching. On a Lada Vesta SV, removing the seat will also not be difficult, because the procedure is no different from the standard version of the model.
Vesta Sport is equipped with seats manufactured by Daewon from South Korea. True, assembly is carried out at the Izhevsk plant. The fit here is a little lower, and the pillow itself has become longer. The lateral support is insignificant, but here it stands out very much, working properly. To maintain health, a three-stage lumbar support adjustment is installed.