Below watch a video about how to fold the rear seats of a Lada Granta and express your opinion about it in the reviews of the article.
Video quality: DVD
The video was uploaded to the admin from the user Avtandil: for immediate viewing on the portal.
To give the correct answer to the question How to fold the rear seats of a Lada Granta, you need to watch the video. After viewing, you will not need to seek help from specialists. Detailed instructions will help you solve your problems. Enjoy watching.
Humor on the topic: Boys and girls, if you experience awkwardness and embarrassment during dating, then it’s better to immediately move on to sex.
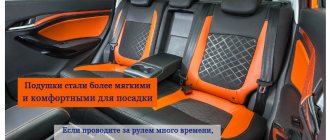
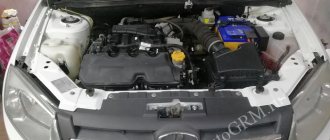
Any modification or tuning of a car begins with the disassembly stage. It is necessary to dismantle the seats in a number of cases, for example, to install additional sound insulation, install seat covers, etc. Below you will find instructions for removing the Lada Granta/Kalina 2 seats yourself.
Rear seat overview. Adjustment
In the back of the Lada Granta Liftback it’s already cramped for three, but there’s plenty of space for two. The sofa is flat, without ergonomics. For tall passengers, long trips will be painful.
Adjustment of the sofa is not provided, unless you move up and down around the perimeter yourself. Don't forget about the restrictions on the back of the seat back and roof lining.
In order to increase safety and reduce the likelihood of injury to passengers, the rear row of seats is equipped with seat belts.
Step-by-step installation instructions
I'll tell you in what order I worked:
- I unscrewed 2 bolts front and rear in the cabin.
- I pulled out the old seats.
- When installing a new seat from Solaris, I used the second internal hole. A standard bolt was screwed into it.
- The outer runners are a little tight, so I had to put a little pressure on them. But the tension is very small.
The inner runners fit well. The alignment with the original hole is one to one. But I had to put a washer in, since the hole is slightly larger than the required diameter.
The seats stood up like family. They are slightly worn, not new. As a result, the size of the seats takes up exactly the same amount of space as standard ones.
If you measure the distance between the seats, it is a little more than 12 cm. Standard armrests are 12 cm wide, so it turns out that they will be flush. But there is such an accessory from Granta Sport, which is 11 cm wide. I ordered such an armrest and want to install it.
Now the armrest will not interfere with the adjustment of the backrest - there are no twists. They are now on the outside, and not knobs, but levers. This is more convenient - you can quickly recline and fold the seat.
The driver's seat now has a lift that can be used to adjust the height. With minimal lowering, it turns out to be slightly higher than on Grant.
That's why I'm riding in the lowest position for now. The seat belts fit without any problems.
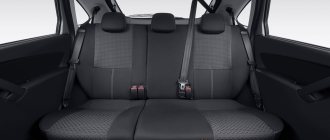
How to fold out the seats in a Grant Liftback
The rear backrest folds in a 60/40 ratio, which is very convenient and practical when transporting non-standard loads. Press the side clamps of the upper backrest and lower the desired side.
If necessary, the back row folds completely onto the floor, forming a flat platform without steps or bends. Folding the seats is easy: just press the side hinges of the upper backrest. The lower sofa is fixed with metal hinges at the base.
Removing the rear seat of Lada Granta
Required tools: 10mm wrench, flat screwdriver.
- Pull the front part of the rear seat cushion up.
- Remove the rear sofa of Grants.
Remove the pillow loops from the holders on the body.
To remove the backrest:
- Bend the edge of the carpet and remove the 3 bolts securing the backrest to the body.
- Tilt the backrest forward and remove the 3 rear bolts securing the backrest to the body.
- Remove the seat back.
Installation of the rear sofa and backrest is carried out in the reverse order.
Rear sofas - what to replace them with in the VAZ 2110?
If everything is approximately clear with the front seat options, then the rear sofas require a special approach. We are talking about an unconventional size and rather strange types of fastening of a sofa from AvtoVAZ. If you are far from automotive, it is better not to modify the rear seats yourself. For this you will need the help of specialists. It is important to find a car of the same size, as wider cushions and backrests will have to be redesigned. The installation process is quite complicated:
- you need to choose good rear sofas from models such as Volkswagen Polo, Hyundai Solaris, KIA Rio, Renault Logan, and you can also pay attention to Toyota Corolla;
- Next comes the dismantling of the seats of your car, which is not particularly difficult - just unscrew a few fasteners to get all the structural parts without any difficulties;
- Next, you should try on new seats, it is quite possible that you will have to order their re-upholstery at a studio, since it is very difficult, and sometimes impossible, to guess the size perfectly;
- the next step is the installation of fasteners, it is necessary to remove the fastening parts from the VAZ seats and rearrange them on the purchased pillows and backrests for high-quality fastening;
- after that, all that remains is to install the finished seats in place and enjoy the updated interior of your car, also don’t forget to take a photo and share it on the forums and in the logbook.
Owner reviews
| № | Positive |
| 1. | Kirill , 33 years old: I am completely satisfied with the original seats on the Granta Liftback, comfortable, ergonomic. Height is 175 cm, I don’t feel any discomfort. |
| 2. | Vitaly , 41 years old: I installed heating on the standard seats, nothing else is needed. It’s very nice that they installed lateral support, it was so lacking in Priora and Vesta. |
| 3. | Mikhail , 30 years old: my positive review of the back sofa. Comfortable, practical, good material, easy to clean. |
| 4. | Gennady , 29 years old: the quality of the seats is average, I’m satisfied, I put on the covers. I'm going to install heating. |
| Negative | |
| 1. | Victor , 24 years old: I don’t like standard seats, I bought a second generation Opel Astra at the market and installed heating. My advice to motorists. |
| 2. | Peter , 36 years old: everything is good in the Grant Liftback, except for the seats, they are not comfortable, too soft, the fabric is the cheapest. Replaced from third generation Ford. |
| 3. | Vitaly , 28 years old: my height is 185 cm, my original seats are not equipped with height adjustment, it’s so lacking. Replaced from Opel Astra. |
How to remove the window lifter handle on a Grant
In order to remove and install a new window lifter handle, you will need to obtain:
1) Flat screwdriver;
2) A handle I just bought, complete with a washer and a latch.
No special pullers or rare tools are needed. That is why repairing the window lifter mechanism will not be prohibitively expensive from a financial point of view.
Important points
- It is necessary to remember that there are also plastic latches under the fastening screws of the casing. And after unscrewing all the screws, you will have to overcome the resistance of these latches, literally tearing the trim off the door. It will not be possible to pry these clips with any tool - they are too far away. So it is not uncommon for situations when, after removing the casing, half of the clips are broken. There is only one way out: have a set of spare door latches on hand;
on cars with electric windows, control units are located only in the front doors. Therefore, when removing the rear door trims, you will not have to disconnect all kinds of wires from the connectors;
The locking button has a left-hand thread only on the earliest Granta models released in 2022. On later machines, the threads became right-handed.
So, removing the door trim from Granta is not a difficult task. Even a novice car enthusiast can do it. And an experienced car owner needs no more than 10 minutes to deal with one door. The picture is spoiled only by the internal plastic latches, the breakage of which, it seems, has never been possible for anyone.
How to properly adjust the driver's seat
Any trip, even a short one, begins with the correct driving position. Not only does the comfort and fatigue of the driver depend on it; first of all, correct seating affects safety and health. Therefore, always devote some of your time to this moment.
How to properly adjust the seat?
Everyone knows that it is very pleasant to sit imposingly in a soft chair. However, the driver's seat should be treated primarily as a place of work.
Of course, driving a car with a properly adjusted seat should be comfortable.
Below we will look at the main adjustments that are available on all modern cars, there are only two of them:
1. adjustment of the longitudinal position of the seat; 2. seat back tilt;
We will also mention additional adjustments that are not always found:
3. adjusting the height of the seat cushion (“seat lift”); 4. adjusting the angle of the seat cushion; 5. lumbar support adjustment,
Let's say a few words about the head restraints (6) , as well as about adjusting the steering column (not on all models).
The simplest options - almost without modifications
There are legends on the Internet that many seat models fit the VAZ 2110 without any modifications at all. But in fact, without any special modifications, you can only install Recaro from old Opel. All other options will have to be redone and digested. There are also arguments that this is not a safe process at all and could lead to disaster. Let's draw a definite line under all that has been said and give specific recommendations so that nothing bad happens:
- you will still have to weld the slides on the seats, but you don’t have to do it yourself, it’s better to order this work from a good welder, maybe not even a car mechanic;
- after welding, no further alterations are needed if you have chosen the seats correctly, that is, you have not bought too wide or high seat options because of beauty and cheapness;
- it is more difficult to change the rear sofa due to its rather specific size, but there are model options on the market with identical widths; you just need to look for offers at a disassembly site;
- you can keep all the functions of the seats from the foreign car - height adjustment, lumbar support adjustment, electrical adjustments (but they will have to be connected separately from the wiring);
- The conversion is not only possible, it is really worth it, since AvtoVAZ does not install the best seats, with the only exceptions being Vesta and X-RAY.
These are the conclusions that can be drawn from installing foreign-made seats on a VAZ 2110 car. This is a good idea that should result in positive emotions during the trip. In almost any foreign car, the seats are much more comfortable than in domestic cars. It makes no sense to install seats from Kalina or Priora in the Ten, you won’t feel a significant difference, and you’ll still have to struggle with modifications. So it’s better to find a good foreign car.
We invite you to watch a video of remaking seats for a VAZ 2110:
Longitudinal seat position
Sit tightly in the driver's seat, so that your lower back is pressed against the backrest. Press the clutch pedal all the way down. When adjusted correctly, the leg should remain slightly bent at the knee. It should not reach the pedal with the toe of the foot, but it should not be too bent.
If you have a car with an automatic transmission, then press the brake and gas pedals alternately with your right foot. Try to find a seat position that allows you to press down comfortably without the heel of your foot leaving the floor.
There is another way. Place your left foot on the floor to the left of the brake pedal. In the place where the clutch pedal is usually located (well, if there was one). As in the first case, the leg should remain slightly bent at the knee. And if possible, don't move too close forward. You most likely won’t see the front edge of the hood anyway, but it’s advisable to be at a greater distance from the airbag hidden in the steering wheel itself. Of course, airbags are not hidden in all steering wheels.
The stomach and thighs in this position should not be in contact with the steering wheel. If this cannot be achieved, then either change the car or go on an urgent diet
Seats from which foreign cars can be viewed for the Tens?
Fits almost all seats from cars of similar size. This could be a B or C class car, which is famous for its comfort. Thanks to the abundance of disassemblies, buying used chairs will not be a problem. All that remains is to choose the chair model directly. For such a selection, it is worth focusing on already successfully completed projects, which car owners are happy to brag about in in-flight magazines. Here are just some popular examples:
- BMW E60. The seats in these models of Bavarian cars were mostly leather, and also equipped with an electric drive and other additions that the car owner would obviously like.
- Hyundai i40 or Hyundai i30. The seats are very comfortable and well thought out, and the ones from the i30 are preferable, as they leave more space in the cabin. The appearance is good and the side supports also work very well.
- Skoda Octavia A5. The seats are very comfortable and compact, there are the necessary adjustments, and well-defined lumbar support. The quality of the upholstery in this model is also pleasing, so you will definitely be satisfied with these chairs.
- Ford Focus. The alterations will be quite complex, but nevertheless, you will get excellent results. Especially if you can find seats from more expensive trim levels of this car, they are very comfortable and beautiful.
- Recaro. Many sports style lovers would like to see Recaro seats in their car. The easiest way is to find Opel proposals, but there are also solutions from other models; altering them will not be difficult even with your own hands.
This list goes on with most compact models from Volkswagen, Mercedes and other brands. There are a lot of interesting ideas on the market. But before buying chairs, you should find out if anyone has performed such an operation on their Ten before you. This can be found on the Internet, since most owners will definitely boast about such a change. However, you can try something new by posting your experience on the Internet to help others.
Steering column and seat height
If the steering column is adjustable, it should be installed so that the hands holding the steering wheel in the “10 and 2” position are slightly below shoulder level. Typically, the lower the steering wheel, the more comfortable it is to hold and the less your hands get tired, but it should not block the instrument panel or rub against your legs.
If a car has a seat cushion height adjustment (the so-called “seat lift”), then, as a rule, beginners strive to raise the seat higher for a better view. And it really doesn't improve the view much. And there is nothing wrong with this, the main thing is that the other adjustments are normal.
If the seat cushion angle (where you sit) is adjustable, adjust the front edge slightly higher than the back edge. This will create optimal support for your hips and also press your body against the backrest.
Cons and pros
Pros according to reviews from car owners:
- Good, energy-intensive, indestructible suspension;
- Large trunk of 520 liters, but 10 less than the Datsun;
- Nice, warm stove;
- Cheap and available spare parts;
- Maintainability, any service will take on the job;
- Low fuel consumption, about 7l. per hundred for manual transmission and 87 hp;
- Large ground clearance, convenient for parking;
- Japanese automatic transmission of good quality, reliable;
The disadvantages include:
- Reverse gear on a manual transmission sometimes does not engage the first time; you need to press the clutch again;
- Poor sound insulation;
- Poor paintwork - rusts on chips;
- Weak wheel bearings from the factory;
- Cheap, squeaky plastic;
Adjusting the headrest
While driving, the driver's head should not touch the head restraint. Its main purpose is not to constantly support the head, but to protect the cervical vertebrae from fracture in the event of a possible impact in the rear of the car in the event of an accident.
Moreover, the higher the headrest and the closer it is to the back of the head, the more effective the protection of the neck from injury.
Therefore, it is advisable to install the headrest higher so that when you throw your head back, the middle part of the back of your head touches its middle. Or do it simpler: align the height of the headrest with the top of your head and bring it as close to your head as possible.
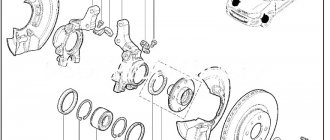
How to remove the front bumper on a Priora in 7 steps? Instructions, tips
On previous models of the domestic Lada car, metal bumpers were installed, which prevented engine damage if the car was involved in an accident. In modern models, bumpers serve a more aesthetic function and cannot protect the engine in the event of a serious accident. Since the bumper is the most protruding part on the front of the car, it often receives damage in the form of scratches, cracks, and dents. For repairs or tuning, the bumper must be removed.
Carrying out repair work at a service station is expensive, so often all manipulations are carried out at home. In order to carry out repairs yourself, you need to know how to remove the front bumper on a Priora.
What is required for withdrawal
When dismantling the bumper, you only need two tools:
- Phillips screwdriver;
- key to 10.
Some car enthusiasts find it convenient to remove the part on a raised car using a jack, but there is no need to use it. If your car is equipped with fog lights, you may have to remove them first.
When removing the PTF, additional tools may be required depending on the design features of the parts.
If fog lights are installed on your car, you must first remove them. It is also better to remove all the wires that went to them
After removing the PTF, it is important to disconnect the terminal from the battery. All bumpers on Priora are attached in a standard way; to remove them you will need to do the following
- First of all, you need to open access to the screws. To do this, remove the engine mudguard.
- Next, you need to unscrew 3 screws on each of the fender liners to remove the protective elements. Most likely, when performing the manipulation, your hands will get dirty from the rubber, so it is better to do this with gloves with a protective rubberized layer.
- Remove the plastic covers. Each of them has 4 screws that secure them.
- Next you will have access to 2 screws that secure the bumper to the body. You need to unscrew them.
- From the bottom you need to unscrew the 5 nuts that secure the part to the motor protection. It is most convenient to do this with a socket wrench. Before performing work, you must make sure that the car is on the handbrake, and if you use a jack, place stands under the body.
- You also need to unscrew the 3 side nuts that hold the part in place.
- After dismantling all hardware, you must carefully remove the bumper. For this purpose, it is better to involve an assistant, since a slight distortion can lead to damage to the part. The bumper is carefully and evenly dismantled from its place so that in the future it will be possible to repair or upgrade it for further use.
If all the work is carried out without using a jack, then it is better to stock up on bedding first, since some hardware is located under the car, which will require you to crawl under the car. The entire dismantling procedure takes no more than 10 minutes, so you can replace a damaged bumper yourself.
How to install the part
Installing the bumper also does not require much effort. The part is mounted in the reverse order. A small number of fasteners allows you to avoid getting confused and securely fix the bumper.
If the part was completely replaced, then before purchasing a new bumper you need to make sure that all the holes match.
It is better to carry out installation using a jack, since it is not very convenient to fasten the nuts while lying under the car. Instead of a jack, a trestle or a garage with a pit can be used.
Adviсe
Before installing the bumper in its place, it is recommended to treat the metal parts of the body with special compounds, since water most often flows under the bumper during rain and from puddles while driving.
To keep the body in good condition, it is recommended to treat all problem areas with anti-corrosion agents, as well as additionally coat them with protective compounds.
If corrosion has already appeared, then it must be cleaned and the body treated with anti-corrosion agent.
If you don’t pay attention to the part with rust and fasten the bumper on top, then most likely there will be nothing left of it the next time you remove it
Professional secrets
When driving, try not to wear “thick” winter clothing, which creates a bulky layer between the driver’s body and the seat.
Why?
The driver reads uneven road surfaces, road slopes, acceleration, wheel locking, car skidding and much more with his back and “fifth point” from the seat.
Therefore, winter clothes or thick covers deprive the driver of timely and important information about the car. For the same reason, it is extremely undesirable to increase the seating height by placing anything on the seat.
And further:
Get in the habit of wearing your seat belt immediately after getting into your vehicle and adjusting your seat, especially if it has airbags. Remember that even in the event of a minor accident, the airbag can injure an unbelted driver or passenger.
Nuances
Depending on the design of the car, the landing can be:
- high, sitting, (as on a chair): VAZ classic, SUVs, etc.
- low, reclining, (as in a chair): VAZ-front-wheel drive, sports coupe, etc.
The first option gives a slightly greater overview, which is important for city trips with numerous parking lots and maneuvering in heavy traffic.
The second is more suitable for cars with a sporty character, where a low center of gravity plays an important role. The low seating position also allows you to feel the car better.
For this reason, it is still advisable to lower the seat “lift” as low as possible.
For rear-wheel drive cars and long trips, backrest adjustment is more suitable, in which the steering wheel is grasped at the 12 o'clock position with a straightened arm.
In preparing this article, various authoritative sources were used, including materials from the “Useful Pages” of the Za Rulem publishing house.
Did you like the article? Follow our channel for new ideas of useful car tips. Subscribe to us in Yandex.Zen. Subscribe.
A properly adjusted driver's seat will make the trip more comfortable and safe, delay the onset of fatigue and help avoid pain in the back and limbs from improper seating. If the car is used by several people, then before each trip you should adjust the seat position to suit you.
Experience of portal readers
I decided to buy a split rear seat with a grant immediately after the birth of my daughter, I carried her in a cradle in the back seat. since in the “norm” configuration the rear seats are not separate when traveling to the country, only a roof rack if you need to transport something long. I started looking on different sites and dismantling sites in Ryazan. Ryazan showrooms offered rotten seats with dented foam moldings at the price of new ones. There were many offers on the sites, including sports seats. The price range for ordinary seats is from 4,000 for a complete set of one-piece seats in obscene condition to 20,000 thousand for good-looking sports ones.
Driver's seat settings
You can customize the chair for yourself and change settings without getting up from the seat. All adjustment handles are located within easy reach. In which planes can the position of the driver’s seat be changed:
- Move the seat forward and backward, making it further or closer to the steering column.
- Change the backrest angle. You can even lie on the backrest as reclined as possible.
- The height of the pillow changes. Depends on the height of the driver. Serves to improve visibility.
- Lumbar spine support. When driving for a long time, this particular area of the back begins to ache and ache.
- The height of the headrests is adjustable. With the headrest at the correct height, the neck muscles become less tired.
- The position of the steering column is adjustable. It is set after the chair is adjusted in relation to the pedals.
Adjusting the front seats of the car
longitudinal: to adjust, pull the lever under the seat up. Move the seat, release the lever.
Note to the driver!!! Do not adjust the seat while the vehicle is moving. Even the slightest jerk with your hand will provoke an accident.
vertical : adjustment with the handle located on the left side of the seat. By rotating your hand, you select the most optimal position for the backrest.
Related link:
Review of manufacturers and tips for installing parking sensors on the Lada Granta Liftback
head restraints: by mechanically pressing your finger on the bracket on the right side, set the appropriate height.
It is important to know!!! The natural position of the head restraint is when the upper perimeter is at the level of the driver’s (passenger’s) head.
Optionally, the owner can install heated seats on the Grant Liftback. The process is not complicated and will take no more than half an hour.
How to adjust the seat correctly
First of all, the distance between the seat and the pedals is set. After this, the remaining settings are set. We get into the car and press the clutch pedal all the way. It is bad when the leg is completely straightened or strongly bent. We move the seat forward or backward so that the leg at the knee is bent 110-120 degrees.
If your leg is fully straightened, you will have to reach for the pedal and the clutch will not disengage completely. If your leg is bent 90 degrees, your legs will become numb on the road and you will experience severe discomfort. To check that the seat is correctly positioned, turn on the engine, press the brake pedal several times to build up pressure, and fully depress the pedal. The leg at the knee should be slightly bent.
Lada Granta: fine tuning
The shipment of commercial Lada Granta samples will begin only at the end of the year, but we have already managed to drive a pre-production copy and identify the behavioral features of the main novelty of the Russian automobile industry
Lada Granta “Lux” Coming soon, Lada Granta “Standard” RUB 229,000.
Lada Granta “Lux” Coming soon, Lada Granta “Standard” RUB 229,000.
In May of this year (see GZR, No. 9) we already told our reader many details about the Lada Granta: why this car was designed, which outdated models it will replace in the AvtoVAZ line, how the car was created.
And, most importantly, we tried to convey the feeling of change that visited us three months ago in Tolyatti - then the public was shown a new model exhibited in the design center of the car plant. For the first time in many years, the product presented to us made an extremely favorable impression.
It became clear that VAZ, with the participation of Renault, made a high-quality car “for their own money.” Perhaps the most interesting and most important stage remains - to find out how the Granta behaves on the road.
How we drew her
In the “On the way” section, our artist several times imagined what the new VAZ model would look like. Agree that we hit the bull’s eye: a “living” car differs from our fantasies only in small details! The same can be said about the interior - except that the designers also decided to take the ventilation deflectors in the center of the dashboard from Renault Logan.
Sketch of GZR, No. 15, 2010
Sketch of GZR, No. 15, 2010
Sketch of GZR, No. 9, 2011
Sketch of GZR, No. 9, 2011
Of course, it’s nice to be a journalist to whom AvtoVAZ managers entrusted the first test of their, without exaggeration, premiere of the decade! On this occasion, the management again sent me to Togliatti - the local test site is perfectly suited for testing Russian people's cars. The access roads here are like everywhere else in Russia: potholes, cracked asphalt, transverse swellings from time to time - in general, a sad picture familiar to every compatriot.
In the basic version, all windows are with a paddle drive. The “Norma” has electric windows at the front. In “Lux” all door windows are motorized. Air conditioning is only available in the Luxury version. The microclimate control unit is the same for all versions, but in the “Lux” the temperature knob is graduated
In the basic version, all windows are with a paddle drive. The “Norma” has electric windows at the front. In “Lux” all door windows are motorized. Air conditioning is only available in the Luxury version. The microclimate control unit is the same for all versions, but in the “Lux” the temperature knob is graduated
So, the Granta project is based on the thoroughly modernized Kalina. We know the advantages and disadvantages of the “donor”. The advantages are relatively modern power units, a solidly welded and well-assembled body. The disadvantages are also obvious - the design is from the last century, the interior was made clearly without any love for the buyer, the finishing materials are unsightly in appearance and touch. And most importantly, the Kalina shakes harshly on uneven surfaces; it suffers from oversteer, which has to be combated with the help of a “long”, uninformative and very light steering wheel.
The GLONASS navigation system has replaced fuel level and temperature indicators from the display - separate scales are provided for them
The GLONASS navigation system has replaced fuel level and temperature indicators from the display - separate scales are provided for them
I sit in Granta with excitement: can our current designers make a good car? The interior is put together quite well, although all the plastic is, naturally, hard. There are no obvious ergonomic shortcomings inherent in the Renault Logan. Why did I remember him?.. Of course! Round ventilation deflectors are taken from a French car. In addition, it is the closest foreign analogue and direct competitor.
Setting the backrest angle
Get in the car. Place both hands on the steering wheel at the highest point. Your arms should be slightly bent at the elbows. You should not reach for the steering wheel and should not be pinched between the steering wheel and the seat. Adjust the seat so that your arms are slightly bent at the elbows and your back is in contact with the backrest at the shoulder blades, lower back and tailbone.
From this position, extend your hand to the gear shift lever and to the headlight and turn signal switches. Switching should not be uncomfortable. You should be able to reach any lever easily.
Setting the position of the head restraints
Some drivers think that the function of head restraints is to create comfort while driving and allow them to rest their head on them. The main mission of the headrest is to protect the cervical vertebrae from fracture in the event of a sharp impact. The height of the headrest is adjusted to the level of the back of the driver's head. While driving, the distance from the headrest to the back of the head should remain no more than 3 cm. A properly adjusted seat will not only create driving comfort, but will also protect drivers from developing occupational diseases that arise from sitting for a long time behind the wheel.