Until the end of the 90s of the 20th century, all domestic cars were not spoiled with technical innovations that simplified the life of the driver. The braking system (TS) was no exception to the general rules.
For example, the driver of a VAZ-2109, one of the most popular cars of that time, could not boast of having active safety systems (ABS, EBD, SBC, HBA, etc.) and enjoy their benefits when braking. However, front-wheel drive VAZ cars represent a whole driving era, satisfying the post-Soviet hunger for owning your own vehicle.
General structure of the vehicle
Speaking about the braking system of the VAZ-2109 car, it should be recognized that it would be more correct to use the term “VAZ-2108 braking system”. It was on the G8 that the scheme of the specified vehicle was implemented. The components, parts and assemblies of the new product have been refined and optimized. But the new braking system was not fundamentally different from the braking system of Russian rear-wheel drive cars.
The “nine” vehicle is represented by a working and a parking vehicle.
The structure of the working vehicle includes:
- a brake mechanism, the functions of which include direct braking;
- a brake actuator that serves to convert and deliver the driver’s command to brake and the effort he exerts for this.
The operation scheme of the VAZ-2109 brake mechanism is based on the operation of friction mechanisms that implement the principle of friction of parts.
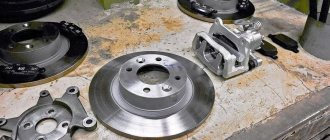
The brake mechanisms themselves are located in the wheels and are made up of a rotating part (disc or drum) and a stationary part (special pads). Domestic cars of the VAZ family use a disc principle on the front wheels and a drum principle on the rear. The latest VAZ-2109 models began to be equipped with an electronic system for monitoring the wear of the front pads.
Cost of work
| Services | Cars, minivans | SUVs |
| Replacement of rear brake discs (per pair) | 2000 rub. | 2700 rub. |
| Replacement of rear brake discs + rear pads (per pair) | 2000 rub. | 2700 rub. |
| Replacement of front brake discs (per pair) | 2000 rub. | 2700 rub. |
| Replacement of front brake discs + front pads (per pair) | 2000 rub. | 2700 rub. |
| Replacement of rear brake pads (drum) | 1250 rub. | 1500 rub. |
| Replacing rear brake pads (disc) | 800 rub. | 1200 rub. |
| Replacing front brake pads | 700 rub. | 800 rub. |
| Replacing the brake master cylinder | 2000 rub. | 2000 rub. |
| Replacing the vacuum brake booster | 2500 rub. | 2500 rub. |
| Adjusting the parking brake | 500 rub. | 500 rub. |
| Replacing the parking brake cable (central) | 700 rub. | 700 rub. |
| Replacing the parking brake cable (left) | 800 rub. | 800 rub. |
| Replacing the parking brake cable (right) | 800 rub. | 800 rub. |
| Replacing the rear brake cylinder (drum) | 700 rub. | 700 rub. |
| Replacing the front brake cylinder (caliper) | 1000 rub. | 1000 rub. |
| Replacement of rear brake hose/tube | 700 rub. | 700 rub. |
| Replacing the front brake hose/tube | 700 rub. | 700 rub. |
| Replacing brake fluid with bleeding and flushing | 1500 rub. | 1500 rub. |
| Caliper bulkhead | 1000 rub. | 1000 rub. |
| Bleeding the brake system | 1000 rub. | 1000 rub. |
A vehicle's braking distance is a fundamental feature in preventing serious accidents.
If you feel any discomfort in the brake pedal and feel an intermittent connection between the vehicle and the road surface, then you immediately need to pay attention to the integrity of the brake hoses and pads. . With constant use of the car and urban travel cycle, the car wears out faster
After all, an infinite number of traffic lights and traffic congestion on the streets enhance the operation of the braking system, endlessly using its services. If the metal alloy wears out, the pads must be completely replaced, because this can result in serious trouble for you and those around you. For an experienced specialist, such work is not difficult and familiar. Beginners will need to watch several videos to understand the whole process and its sequence. When purchasing new spare parts, pay attention to the integrity of the structure and its uniform thickness. Sometimes markets may offer secondary raw materials, i.e. repaired, soldered pads, which cannot provide you with complete safety on high-speed roads, especially when turning and complex maneuvers
With constant use of the car and urban travel, the car wears out faster. After all, an infinite number of traffic lights and traffic congestion on the streets enhance the operation of the braking system, endlessly using its services. If the metal alloy wears out, the pads must be completely replaced, because this can result in serious trouble for you and those around you. For an experienced specialist, such work is not difficult and familiar. Beginners will need to watch several videos to understand the whole process and its sequence
When purchasing new spare parts, pay attention to the integrity of the structure and its uniform thickness. Sometimes markets may offer secondary raw materials, i.e.
repaired, soldered pads, which cannot provide you with complete safety on high-speed roads, especially when turning and complex maneuvers.
If you have a car with a manual transmission, the stopping system works longer. For automatic transmissions, brake pads are replaced more often. The first sign of wear or malfunction of this system is the squeaking of metal every time you press the brake pedal. At our service points, you will be provided with qualified assistance in any matter, brake repairs, replacements, and consultations. You can trust us with both vehicle diagnostics and subsequent maintenance. We work quickly, efficiently and at mutually beneficial rates. Everything is done exactly on time, without delay. All spare parts provided by our company are accompanied by quality certificates. We work for the client, so we are responsible for the quality of the work done and, of course, we provide a guarantee. Contact our service stations at any time convenient for you.
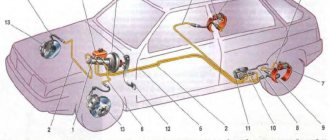
Brake device VAZ 2108,09,10-15
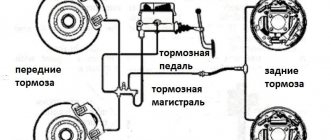
The brake drive of the VAZ-2109 car has a classic version, based on a dual-circuit hydraulic (liquid) operating principle.
The drive circuit includes:
- brake pedal;
- expansion tank (with liquid level sensor);
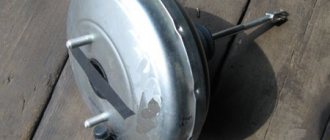
- vacuum brake booster;
- master cylinder;
- hoses and pipelines;
- wheel cylinders;
- pressure regulator.
Compared to rear-wheel drive models, the VAZ-2109 brake system has some improvements in components and assemblies - master and working cylinders, vacuum booster, pressure regulator, mechanical parts, etc.
However, these changes are of a highly specialized nature and are understandable only to professionals who provide car service and repair.
Although there is a more significant innovation. Unlike “classic” models, the VAZ-2109 brake system has a slightly different operating principle for the drive.
The service braking system of domestic front-wheel drive cars uses a diagonal division of drive circuits: one of the circuits is responsible for the operation of the right front and rear left mechanisms, and the other - the front left and right rear.
Such a scheme for the functioning of independent circuits significantly increases the safety of braking and minimizes the possibility of a general failure in the operation of the braking system. It allows you to compensate for faults in one circuit by redistributing functions to another circuit.
The parking brake system of the VAZ-2109 (in driver's parlance - “handbrake”) is based on the mechanical cable principle of extending the rear shoes and blocking the brake drums. It has some improved technical solutions (compared to the “classics”), which greatly facilitates its repair.
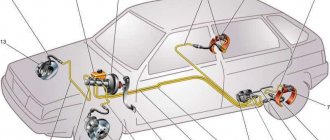
Scheme
The diagram of the VAZ 2109 brake system is quite simple and does not have any complex parts. This simplifies its repair and makes it an ideal car for novice car owners.
Generally speaking, it consists of:
- Main brake cylinder;
- Working mechanism of the brake;
- Brake booster of pneumatic vacuum type;
- Contact pipelines with high pressure;
- Expansion tank into which brake fluid is poured;
- Wheel brake discs located on the front axle;
- Brake drums for wheels located on the rear axle.
Below is a drawing of the VAZ brake system.
Basics of vehicle operation
Malfunctions of a vehicle's braking system fundamentally undermine road safety. For example, inadequate braking can cause an accident, making the distance to the vehicle in front insufficient for an accident-free stop.
But what if there is a need to use emergency braking? That is why the operation and repair of the brake system is an important part of the driver’s responsibilities.
The most popular malfunctions of the VAZ-2109 brake system include:
- inefficiency (both working and parking vehicles);
- brake fluid leak;
- increasing the idle speed of the hydraulic drive pedal;
- withdrawal (displacement) of the car from straight-line motion at the moment of braking;
- increasing the required force on the brake pedal.
Most often, vehicle repairs are caused by wear and failure of pads, discs or drums, hydraulic drive elements (main or wheel cylinders, hoses).
The driver must constantly monitor the braking system, promptly detect and eliminate deficiencies, and carry out the necessary repairs in a timely manner.
To do this, you should not neglect periodic visual analysis of the components and assemblies of the system that are in direct contact with the environment for mechanical damage and corrosion.
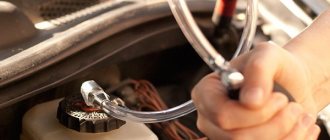
Monitoring the level of brake fluid in the expansion tank is facilitated by the presence of a mechanical sensor and an electrical (light) alarm located on the dashboard (in the form of a red lamp with an exclamation mark).
Bleeding brakes on a VAZ 2022, preparation and sequence of actions
Bleeding the VAZ 2109 brakes is carried out in a sequence strictly determined by the design features, namely:
- Rear right wheel (farthest wheel in the system);
- Front left (connected by the system to the already pumped rear right wheel);
- Rear left;
- Front right.
The sequence is this way because of the diagonal placement of the contours. All steps must be completed when pumping along the full circuit. You can only upgrade one at a time.
To work you will need:
Note. Brake fluid is quite aggressive; it should not come into contact with the skin and should be washed off immediately. It is also undesirable for it to come into contact with plastic parts, wires, or in the eyes; TJ vapors are poisonous.
Preparing to bleed the brakes
To properly bleed the brakes on a VAZ 2109, as necessary, you will need competent preparation according to the following scheme:
- Be sure to check the system for leaks and inspect all pipelines and parts. The machine is installed on a pit or raised with a jack. Tubes, connections, hoses must be carefully cleaned with a rag, then press the brake several times and secure. When inspecting, connections and hoses must not be wet. Detected leaks are eliminated by tightening the fasteners or replacing problematic parts.
- Make sure that the fluid level in the tank is maximum; if not, top up. The level will have to be checked after bleeding each mechanism, otherwise air will enter the system again.
- Pour a little liquid into the draining container so that the bubbles escaping from the system are visible.
- The fittings must be loosened before starting work.
- You also need to remember that the VAZ 2109 has a rear wheel drive pressure regulator. When pumping, it is necessary to create high pressure in the system. To prevent the regulator from blocking the flow of fluid to the rear wheels, when working without a pit, on a jack, you need to open its valve and keep it in this form until the end of work. To do this, it is enough to install, for example, a flat screwdriver between the plate and the regulator rod, pushing the rod all the way. The screwdriver is removed upon completion of work.
It is more convenient to pump the brakes on a VAZ 2109 with two people; if you work independently, the cost of brake fluid, time, and effort will increase, but it is possible to cope with the task.
How to bleed the brakes on a VAZ 2109, working together
If you have a partner (no qualifications are required from him), the action plan is as follows:
- The driving partner creates the required pressure in the system by depressing the brake pedal (5-9 presses are needed), then holds the pedal in the lower position until the bleeding is completed.
- The one under the car puts a hose on the fitting of the right rear cylinder and completely releases the fitting so that the liquid flows. The end of the hose must first be lowered into a container for draining. By the bubbles in the liquid you can judge the state of the system and notice when all the air has been removed.
- After complete cleaning, the fitting is tightened and the pedal is released, you can move to the next wheel, the diagram is the same, the front left wheel.
- The level of brake fluid in the reservoir will decrease as pumping progresses and will need to be restored to the maximum level.
- After bleeding along a full (or one, as necessary) circuit, the fittings must be finally tightened and the protective caps must be put on.
If you have to work independently, the scheme and sequence of actions are almost the same. You can press the pedal yourself, or you can use an aerator (price up to 150 rubles).
- The aerator adapter is connected to the pump, possibly with an inflated tire;
- The required wheel is removed from the jacked up car;
- Instead of its own lid, the aerator lid is screwed onto the tank;
- After loosening the fitting, pumping is performed according to the general scheme.
When pumping in this way, the wheel spool is used instead of a compressor, and in extreme cases, the brake is squeezed out and pressed down with a stone until the pumping is complete.
Upon completion of the work, a check is made, first of all, of the brake pedal travel; it should not be too soft, and the pedal should not fail. The parking (hand) brake must also be checked and adjusted once every 15,000 km.
How to bleed the brake system alone
If at the moment you cannot afford an assistant and you work alone, then without any problems you can bleed the brake system of the VAZ 2109 alone, see how to do this in the picture below, and also watch the video.
Video on how to bleed the brake system alone
Traffic regulations requirements for the serviceability of a vehicle
Traffic regulations exclude the possibility of driving if the service brake system is malfunctioning (ineffective or leaking). The driver must repair the working vehicle on site or refuse to operate the vehicle altogether, using towing (if permitted by Section 20 of the Rules) or transportation (transportation by tow truck).
The ineffectiveness of the handbrake is determined by specific fixed indicators associated with the stationary state of the vehicle. Thus, a VAZ-2109 car with a full load must remain stationary on a slope of at least 16%, and in equipped condition (ready for movement - with a driver, but without load) - at least 23%.
If the specified requirements are not met (and, consequently, the parking brake system is malfunctioning), the driver is also obliged to refrain from operating the vehicle. However, at the same time, he is allowed to move, subject to precautions, to the place where the car will be parked or repaired.
Thus, the braking system of the VAZ-2109 has proven its effectiveness during operation. That is why it was extended to other front-wheel drive models of the famous domestic brand. Thus, the braking system of the VAZ-2110 and the entire family of “tenths” is an exact copy of the “nine” vehicle.
Introduction.
.
The safety of vehicles at high speeds is largely determined by the effectiveness and safety of the brakes. The effectiveness of the braking distance is determined by a certain estimate of the braking distance or the time it takes the vehicle to come to a complete stop. The more effective the brakes are, the higher the safe speed that the driver can allow, and the higher the speed of the car along the entire route. Braking is necessary not only to quickly stop the car when obstacles suddenly appear, but also as a means of controlling the speed of its movement.
The structure of the vehicle's brake control and the requirements for it are determined by GOST-22895-95.
According to this standard, the brake control must consist of four systems: working, spare, parking and auxiliary. Systems may have common elements, but at least two independent controls.
REPAIR OF THE BRAKE SYSTEM OF A VAZ 2109 CAR
The VAZ 2109 car is equipped with a working brake system with diagonal separation of circuits, this increases safety when driving the car. The operation of the front right and rear left brake mechanisms is provided by one circuit of the brake hydraulic drive, the right rear and left front - by another brake circuit. In case of untimely failure of one circuit in the brake system, the second one can be used, and it provides sufficient operational efficiency. The hydraulic brake drive includes a vacuum booster pos. 6, dual-circuit regulator pos. 9 rear brake pressure. The hand brake provides braking of the rear wheels. Repair of any brake unit of a VAZ 2109 car is carried out after detection of malfunctions.
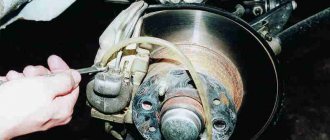
Replacing brake pads
If the thickness of the friction linings on a VAZ 2109 car has become less than 1.5 mm, the rivet connection with the base has become weak, there are chips or deep scratches on the surfaces of the linings, they must be removed.
Tip: The pads need to be changed on each side in pairs. Do not install old parts, which may result in uneven braking. This is especially dangerous for front-wheel drive vehicles.
Work order:
- The car is fixed in a stationary state.
- The battery is disconnected.
- Check the brake fluid level. To prevent it from spilling when the pistons are squeezed, it must be pumped out to about.
- The wheel is removed.
- The surfaces of the caliper and brake disc are cleaned of dirt.
- At the stand, the seal is removed from the bracket, which also serves as a brake hose holder.
- The antennae of the lock washer of the guide pin fixation bolt are bent.
- The bolt is unscrewed and the body is folded back.
- The brake pads are removed.
- When replacing pads, use a caliper to check the thickness of the friction linings; it should not be less than 1.5 mm.
- Assembly is performed in reverse order.
Replacing the master brake cylinder
Repairing the main brake cylinder on a VAZ 2109 most often does not lead to the desired result. Therefore, it needs to be replaced with a new one. So:
- The car is de-energized. The negative terminal is disconnected from the battery.
- The block with wires is disconnected from the sensor indicating the brake fluid level.
- The brake pipes are loosened without unscrewing them.
Replacing the master brake cylinder
- The fixing nuts to the main brake vacuum booster are unscrewed, the brake pipes are unscrewed and disconnected.
- The brake cylinder is removed from the studs.
- If necessary, remove the brake fluid reservoir. To do this, you need to slowly rock the device's leg out of the socket bushing.
- After inspection, elimination of defects or replacement, the cylinder is installed in place.
- Once the new assembly is installed, the nuts can be fully tightened.
- The reservoir is put in place, brake fluid is filled to the “MAX” mark.
- All the air present there is displaced. To do this, the hole for installing the front brake pipes is closed with fingers. An assistant gently presses the brake, which creates pressure in the system until air comes out of the holes.
- Without lowering the brake pedal, when fluid appears, put on and tighten the brake pipes.
- The rear tubes are connected in the same way.
- The job ends with bleeding the brakes.
Repair of breakdowns in vehicles
To avoid emergency situations on the road, it is necessary to monitor the vehicle and carry out diagnostics in a timely manner. If damage is detected, carry out repairs.
Malfunctions in the vehicle and ways to eliminate them on VAZ 2108, 2109 and 21099 vehicles.
| Increased brake pedal travel | |
| Liquid leak from cylinders | Replace failed cylinder parts, wash and dry pads, discs and drums, and also carry out preventative maintenance on the hydraulic drive system |
| Air in the vehicle | Remove air from the system |
| The rubber sealing rings in the GTZ are damaged | Replace the rings and bleed the system |
| Damaged rubber hydraulic hoses | Replace elements and bleed the system |
| Increased runout of the brake disc (more than 0.15 mm) | Sand the disc. If its thickness is less than 10.8 mm, it will need replacement |
| Fluid leakage through the sealing rings of the RD pusher | Replace O-rings |
| Insufficient braking performance | |
| Oiling of linings on mechanism blocks | Clean the linings with a wire brush using warm water and detergent. Eliminate the cause of liquid or grease getting on the pads |
| Jamming of pistons in cylinders | Remove the causes of jamming, replace damaged parts and bleed the system |
| Complete wear of linings and pads | Replace pads |
| Overheating of mechanisms | Stop immediately and allow the machinery to cool down. |
| Using pads with mismatched linings | Use pads only recommended by the manufacturer |
| Incorrect RD adjustment | Adjust the RD drive |
| Loss of tightness of one of the circuits (accompanied by partial failure of the pedal) | Replace damaged parts, bleed the system |
| Incomplete release of all wheels | |
| There is no free play of the pedal | Adjust pedal free play |
| The protrusion of the adjusting bolt of the vacuum booster rod relative to the mounting plane of the master cylinder is impaired | Adjust the protrusion (1.25-0.2 mm) of the adjusting bolt |
| Swelling of the rubber seals of the master cylinder due to gasoline, mineral oils, etc. entering the liquid. | Thoroughly flush the entire system with brake fluid, replace rubber parts |
| Master cylinder piston jamming | Check and replace the master cylinder if necessary |
| Braking one wheel when the brake pedal is released | |
| Rear brake pad tension spring is broken or weakened | Replace spring |
| Sticking of the piston in the cylinder due to contamination or corrosion of the cylinder body | Disassemble the cylinder, clean and wash parts, replace damaged ones |
| Swelling of the cylinder sealing rings due to gasoline, mineral oils, etc. getting into the liquid. | Replace the rings, flush the hydraulic drive system with brake fluid |
| Violation of the position of the caliper relative to the disc when loosening the bolts securing the pad guide to the steering knuckle | Tighten the fastening bolts, replace damaged parts if necessary |
| Incorrect adjustment of the parked vehicle | Adjust the parking brake system |
| The car skidding or pulling to the side when braking | |
| Cylinder piston jamming | Check and eliminate jamming of the piston in the cylinder, if necessary, replace damaged parts, bleed the system |
| Blockage of any steel tube due to dent or blockage | Replace the tube or clean it and bleed the system |
| Contamination or oiling of discs, drums and linings | Clean mechanism parts |
| Incorrect adjustment of the RD drive | Adjust drive |
| RD faulty | Repair or replace the regulator |
| Wheel alignment angles are incorrect | Adjust wheel alignment angles |
| Different tire pressures | Set normal pressure |
| One of the vehicle circuits does not work (accompanied by deterioration in braking efficiency and increased pedal travel) | Replace damaged parts |
HOW TO REPLACE REAR BRAKE CYLINDERS
Smudges on the brake flap or the inside of the wheels most often indicate poor condition of the seals, less often the failure of the piston - the formation of scratches on it, which caused a seal failure. Repairing the brake cylinder is possible, but most often it needs to be replaced.
Work order
So:
- The VAZ 2109 is placed in first gear and the wheel is removed.
- The drum and brake pads are removed, which can only be disconnected, and the upper spring tie is removed.
- Using a metal brush, remove dirt from the bolts that secure the cylinder to the brake flap and the brake pipe. The bolts are loosened.
- The brake pipe is plugged with a rubber cap or a piece of wood.
- The tube unscrews completely.
- The bolts securing the brake cylinder are unscrewed, while holding it with your hand from the reverse side. The part is removed.
- The new cylinder is installed in the reverse order.
- After completing the work, it is necessary to bleed the rear brake circuit.
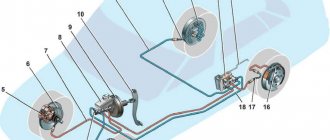
Bleeding the brakes
If during the repair process the components of the brake system were removed or disassembled: the vacuum booster, brake cylinders or lines, air may enter the system. When replacing elements in one circuit, you can bleed only in this circuit; in other cases: when removing the master cylinder or replacing brake pipes, the entire system requires bleeding. When performing work, you need the help of another person, brake fluid, rubber and vinyl tubes, and a plastic bottle. Leveling sequence:
- Right rear and left front wheel; left rear and right front:
- The caps are removed from all fittings. Their tightening is weakened.
- New fluid is poured into the reservoir.
- An assistant should press the brake pedal seven to nine times to
Increase system pressure:
- Continuing to press the pedal to the floor, a rubber hose is put on the fitting, its tightening is loosened, and air is released from the system along with the brake fluid. It is clearly visible by the air bubbles escaping into the plastic bottle. One end of the hose is lowered into the liquid, as shown in the photo.
Bleeding brakes VAZ 2109
- The fitting is screwed in and the pressure is built up again.
- This operation is carried out until the entire system is pumped until all the air comes out of it. During pumping, the liquid level in the tank is periodically checked.
- All fittings are pulled through and rubber caps are put on to protect against contamination.
- Brake fluid changes when its lubricating properties deteriorate. This subsequently leads to increased wear on the caliper cylinders in the brake system, which push the brake pads out and press them against the rotor. The instructions recommend replacing the brake fluid after two or three years.
Replacing brake fluid
Tip: When working with liquid you need to be very careful. The toxic composition must be washed off immediately with soap and warm water. When adding to the tank, make sure that the solution does not get on the plastic.
So:
- When pumping the brakes, air is displaced from the system; when replacing old fluid with new fluid, pumping continues until clean fluid comes out of the fittings.
- You need to drain the old one from all wheels, crosswise. During operation, it is necessary to periodically add brake fluid.
Brake fluid leak
You can find out where the brake fluid goes only by visually inspecting the brake valves, front calipers, and rear cylinders. The presence of drips will indicate a leak. If the fluid leaves, but no traces of it are visually visible, most likely the master brake cylinder is to blame, which allows fluid to pass into the vacuum brake booster chamber. This problem also does not arise instantly and before reaching a critical point, when the pedal goes to the floor and the brakes do not work, it will lose elasticity for some time until air enters the system.
HOW TO REPAIR THE HANDBRAKE LEVER
Repairing the device consists of replacing the worn mechanism with a new one after removing it from the VAZ 2109 car. Damage can be: wear of the locking teeth, jamming or breakage of the lever, failure of the locking mechanism. So:
- The battery is turned off.
- Under the car, the nuts securing the equalizer to the drive cable are unscrewed, first the lock nut is unscrewed, then the adjusting nut.
- The equalizer is removed from the handbrake lever rod.
- In the car interior, all decorative trim between the front seats is removed. The plastic cover of the tunnel is removed, before this the cover is removed from the handle for shifting gears. The hatch into the tunnel is removed.
- The carpet is moved to the side.
- The retaining ring and drive rod are removed from the axle.
Repair of handbrake drive lever
- If necessary, the handle is unscrewed and removed, and the tension spring is changed.
- Assembly of the mechanism is performed in reverse order.
Replacing rear brake pads on VAZ 2108, 2109, 21099 and VAZ 2113, 2114, 2115
Replacing rear brake pads begins with removing the wheel. Please note that when replacing rear brake pads, the handbrake must be released, the car must be in first gear, and thrust blocks must be installed under the front wheels.
First (before jacking up the car), loosen all four wheel bolts. Next, we hang the rear of the car on a jack.
and unscrew the four cone bolts securing the wheel, and then remove it.
Removing the brake drum is carried out as follows. We unscrew the two guide pins with a socket or a 12-mm open-end wrench.
These pins are screwed into the hub and attract the brake drum to it. After unscrewing them, remove the drum. If it cannot be removed, then you need to screw the pins into the holes corresponding to their diameter (M8). Only now the thread should be on the brake drum.
We screw in both guide pins until they stop or until the drum begins to move. Now, one by one, we screw them in further, thereby pressing the drum off the brake pads.
Now you need to release the parking brake cables. To quickly loosen, you need to use an extended 13mm socket, two extensions and a ratchet wrench. This will allow you to relax the parking brake cables within a minute, without resorting to removing the muffler and other labor-intensive procedures. Using two 13mm open-end wrenches, loosen the locking nut and twist it:
Now we install the prepared extension cord, as shown in the figure, and twist the nut almost to the end.
Now we proceed directly to removing the brake pads. We take out the plinth from the pin holding the parking brake lever and push this pin deep into:
Using pliers, remove the lower tension spring.
Using pliers, release the spring at the front brake pad, which keeps the pad from moving horizontally.
We release the pads from the upper tension spring using pliers or a screwdriver.
Remove the front pad.
Remove the spacer plate.
Remove the drive lever by removing it from the cable end.
Using pliers, release the spring at the rear brake pad, which keeps the pad from moving horizontally.
And remove the brake pad.
We install everything in the following order. First, we connect the new pads together using the upper compression spring, and then insert the spacer plate into the groove.
Now, slightly expanding the upper compression spring, insert the spacer plate into the opposite groove. It is necessary to insert the securing pin of the parking brake drive lever into the connected pads.
We install the assembled pads, passing the compression spring and plate between the hub and the brake cylinder. Please note that there is a concavity on the plate; when installing, it should be directed towards the hub.
Having inserted the pads into the grooves of the brake cylinders, we also install them in the lower grooves:
Install the lower compression spring.
We use pliers to install springs that prevent the brake pads from moving horizontally.
We press the finger inside, holding it so that it does not fall out. We insert the drive lever into the eye of the cable, insert it into the slot in the plate and bring it to the pin.
From the reverse side we squeeze the finger out, it should go through the hole in the lever. We put the washer on top and install the pin.
We remove the dowel pins from the brake drum and place the drum on the brake pads.
Holding the hub with your hand, rotate the drum so that the unthreaded holes on the drum coincide with the threaded holes on the hub. Screw in the mounting pins.
Install the wheel. Please note that the mounting screws must be tightened crosswise. After some time, check the tightness of the screws and, if necessary, tighten them.
We tighten the lever cables in the same way as we used to loosen them. The parking brake is considered tight if the number of clicks when lifting its lever is 2-4.
Please rate the article
If only the pads need to be replaced, I would do the following: jack up the car, unscrew the central nut and pull the wheel, drum, hub and bearing assembly off the axle. All that's left in front of you is the axle and pads, change them for good measure. and unscrewing the wheel, removing the drum (if it’s still stuck), and then the hub gets in the way - an extra headache, plus time. and with smoke breaks and chatting with a neighbor - about 40 minutes, no more (good luck to everyone on the roads!).
Dear Andrey! How would you pull off the wheel if the drum is stuck))) Even after unscrewing the hub nut, you would not be able to remove the wheel together with the hub because... the drum must be knocked down! :)))))) Everyone would do that, look!)
Dear Konstantin! Maybe everyone does this?))) The drum is stuck to the hub, so remove it with the hub and bearings, as Andrey advises!
REPLACING THE VACUUM BOOSTER
The mechanism on the VAZ 2109 car is changed after confirmation of its inoperability. In other cases, the vacuum booster assembly is dismantled during body repairs. The work is performed under the hood and inside the car:
- The vacuum hose is disconnected from the brake booster.
- The brake fluid level sensor and the block with power wires are disconnected.
- Then the work is carried out inside the car. The locking bracket is removed from the pin that connects the brake pedal and the vacuum booster rod. The parts are separated.
- Under the hood, the nuts securing the main cylinder brake are unscrewed. The cylinder is removed and set aside.
Advice: Care must be taken to ensure that the brake pipes are not deformed.
- The nuts holding the bracket and amplifier to the car body are unscrewed, and the entire assembly is removed.
- After repair work, assembly is performed in the reverse order.
Checking the vacuum booster check valve
A malfunction of the vacuum booster is determined by difficult movement of the brake pedal. This degrades braking performance and can ultimately affect driving safety. Before replacing the old amplifier, it is necessary to check its operation and the operation of the check valve. The functionality of the mechanism is checked by pressing the brake pedal several times. This will create increased pressure in the system. The brake pedal should be in the highest position. When the pedal is not lowered, the engine starts. If there are no faults, the pedal goes to the floor. Otherwise, it is necessary to check the tightness of the check valve and the quality of the hose connection.
The procedure for checking a check valve on a VAZ 2109
So:
- The tightness is checked at the junction of the hoses and the fitting on the inlet pipe and the check valve.
- The valve itself is checked. Before this, the hose is disconnected, and the valve is removed from the amplifier using a screwdriver.
- A sealed bulb is pulled onto the fitting, and by squeezing it, air is released through the valve. After releasing the bulb, if it does not unclench, then the valve is in good condition and holds the vacuum. Otherwise, it needs to be changed.
Frequent breakdowns
In the “nine”, each of the vehicle malfunctions can lead to irreparable consequences that threaten human life.
Main problems:
- The brake pedal does not work. When you press it, the load is slightly increased. Even if the driver does not press the pedal hard, the braking becomes too noticeable. In this case, the car moves “in a jump-like manner”: at first it goes quickly forward, and then returns back.
- The car skids to the side. Sometimes when braking, the car behaves differently than usual. He either drifts to the side, or quickly leans forward. There is a solution to this problem. It is required to carry out a complete diagnosis of the car at a car dealership.
- Long braking distance. In this case, when you press the brake pedal, it may not occur.
- The wheels do not brake at the same time. This case is quite rare. The braking distance increases several times, and the car begins to wobble.
- The vacuum booster has failed. The main sign that tells the driver about the failure of this element is difficult pedal movement. This is fraught with poor braking, which can lead to an accident in an emergency. On the “nine”, replacing the vacuum booster must be carried out. This can be done either at a service station or in your personal garage with your own hands.
HOW TO REPLACE THE BRAKE PRESSURE REGULATOR
The distribution of the load, in other words, across the brake cylinders of the brake fluid, when turning, is carried out by the VAZ 2109 brake pressure regulator. The appearance of body skids during braking may indicate a malfunction of the regulator, if the remaining components are in working condition:
- The elastic lever must be disconnected from the rear suspension beam. For this purpose, the locking ring is removed, then the finger and earring are removed.
- All brake pipes are disconnected from the regulator using a special wrench. After disconnection, all tubes must be marked. This will make the work easier when assembling the unit. To prevent oil leakage, all holes are plugged.
- The bracket is removed from the studs on the body along with the regulator.
- The regulator is disconnected from the bracket and a new one is installed in its place.
- Assembly is performed in reverse order.
Periodic maintenance and timely repair of all components of the brake system will ensure the reliability and safety of the VAZ 2109 car. You can watch the video on how to properly carry out repair work.
Sources
- masteravaza.ru/tormoza/remont-tormozov-tormoza/vaz-2109-remont-tormozov-392
- znanieavto.ru/stop/tormoznaya-sistema-vaz-2109.html
- drive2.ru/l/4899916394579103916/
- twokarburators.ru/shema-rabochey-tormoznoy-sistemy-2108-2109/
- ladaautos.ru/vaz-2109/sxema-prokachka-i-remont-tormoznoj-sistemy-vaz-2109.html
Repair and maintenance
Brake system repair is usually a very common job. This list includes bleeding the brake system, lubricating the brake system, replacing pads and much more. This requires special tools, but maintaining the brakes in working order is still required by the rules of the road. As they say: the movement of the car is prohibited if the brake or steering mechanism is faulty
It is important to know that checking the brakes should be done daily, just like checking the oil and other manipulations during daily maintenance. So, when checking the oil level, it is important to look into the brake master cylinder.
The lack of fluid there is the first sign that something has happened.
First of all, we will look at how to bleed the brake system. Why this particular operation? Because after any, even the smallest repair, you always have to bleed the brakes. Also, the working fluid can simply be replaced during maintenance. It is worth knowing that pumping is carried out exactly in a certain order: rear right, front left, rear left and front right. Now let's move on to the procedure.
First of all, we fill the liquid into the tank to the maximum level and select the tools for the operation. Next, you need to hang the rear axle and unlock the pressure regulator (this can be done using a regular screwdriver). Now you need to find the air outlet valves and clean them of dirt; they are also called fittings. We find a hose that can be put on the fitting. The other end should be lowered into any reservoir, an ordinary plastic jar will do, the main thing is that the hose there should be lowered into the brake fluid at the bottom of the bottle. Now let's move on to the operation itself, here we will need an assistant. He will have to sit in the car and press the brake pedal up to 5 times with an interval of 2 seconds. When the last press is made, the pedal must be fixed in this position; the assistant must be warned about this in advance. Now you need to unscrew the air valve half a turn and watch how the air leaves the system. This will be indicated by bubbles in the jar; when the bubbles run out, you need to screw the fitting back and release the pedal. This procedure must be carried out over and over again, moving from wheel to wheel. After each pumping, you need to check the level in the brake cylinder and top it up if the level approaches the minimum. On average, you will have to carry out this manipulation four to six times. When the liquid comes out of the air, you can tighten the fittings tightly. And put the previously removed protective caps on them.
The most common problem is a brake fluid leak. This is due to the fact that repairs to the brake system are rarely carried out, and all pipes and hoses are under the direct influence of all atmospheric phenomena. Replacing them is not very difficult, but a labor-intensive operation. This also requires draining all the fluid, then adding new fluid and bleeding the entire system before use. All operations with this system must be done on an overpass or in a garage with a pit, because some operations require being under the car.
GTZ: what is it and why is it needed
The GTZ or master brake cylinder is one of the components of the car's brake system, responsible for creating pressure in the pipes. It is implemented by a cylinder with a piston, which is responsible for pumping brake fluid. To prevent leakage of the fuel fluid during operation, two rubber seals are used. This unit is characterized by high reliability and durability, which are achieved through the use of high-quality components.
In order to avoid any problems with the brakes throughout the entire time the vehicle is used, the car owner must constantly monitor the level of coolant in the GTZ. In addition, experts recommend periodically replacing it completely, since during operation it is exposed to high temperatures, as a result of which some of the additives included in the fuel fluid and giving it the necessary viscosity evaporate. Thus, over time, brake fluid loses its properties.
Examination
The operation of the VAZ-2109, 2110 and other AvtoVAZ models is checked on the move, in closed areas. To do this, accelerate the car to a speed of 40 km/h and sharply press the brake. The rear wheels should lock ½ second later than the front wheels.
The wheels are monitored by an assistant located outside the car. If wheel locking occurs noticeably later or does not occur at all, and also if the rear axle is locked simultaneously with the front, the sorcerer adjustment procedure is repeated.
Many drivers have heard about such a detail as a sorcerer, but they do not know where he is and what tasks he is responsible for. In today's article we will look at what the sorcerer 2114 is and how to properly adjust it.
Rear brakes
The brake design, which is located on the rear wheels, has approximately the same design. Only instead of a disk a drum is used. It is made of aluminum alloy, inside of which there is a steel cage. The pads are made of metal, the outer part of which is in contact with the drum, and special linings are glued on. They are made from various friction materials. The pads are driven by brake cylinders.
This element allows, under the influence of pressure created by the main brake cylinder of the VAZ-2109, to release the pads. The service life of the rear drums and pads is much higher than that of similar elements of the front brakes. The reason lies in the fact that the rear wheels account for no more than 30% of the load during braking. The service life of the rear elements of the braking system is approximately two to three times higher than that of the front ones.
Signs and causes of malfunction of the VAZ 2110 brake disc
Brake discs on the VAZ 2110 are cast iron. The minimum permissible disc thickness during wear is 17.8 mm for ventilated discs and 10.8 mm for non-ventilated discs, the maximum runout along the outer radius is 0.15 mm. Incorrect selection of brake pads leads to damage to the disc; cheap pads with high-resistant linings lead to accelerated wear. Using the pads until they are completely worn out and metal-on-metal friction occurs also reduces the life of the brake discs.
In most cases, discs are thrown away after such “exploitation”, but sometimes they are reanimated on a special machine using a groove. Discs with deep potholes and burrs on the working surfaces, obvious traces of rust, and wave-like wear on the working surfaces are also sent for grinding.
Signs of a brake disc failure may include:
- beating during braking is a symptom of incorrect installation or poor quality disc;
- beating while driving is an indicator of inaccurate manufacturing of the disc or violation of the symmetry of the disc;
- small cracks that form on the disc after braking are an attribute of using a cheap cast iron alloy with low density;
- increased disc wear indicates the use of a low-density alloy and/or low-quality pad;
- the appearance of beating after braking of medium intensity indicates a low-quality cast iron alloy (it lacks the necessary additives).
Use a 17mm wrench to remove the front wheel bolts.
Source m.etlib.ru
We will show you the correct instructions for replacing the front brake discs in a VAZ 2110 2111 2112. The work is performed by an experienced technician, everything is shown from convenient angles, all actions are commented on.
First, unscrew the wheel and place the car on a lift or jack. We turn the steering knuckle outward and clean the stubborn dirt from the brake caliper. Using some handy object, even an ordinary flat screwdriver is suitable for this, we unbend the pads. We remove the brake cylinder, having previously unlocked the lower bolt, this is done using a hammer and screwdriver:
We remove this bolt with a 13mm wrench. We roll the cylinder along the upper guide and take it out, simultaneously removing the brake hose from the bracket. We remove the pads. At the same time, we evaluate the condition of our brake system, look at what the hoses, boots, pads, etc. look like. We clean all seats using a brush with metal bristles.
I think if you are watching this video instruction, then most likely you do not have a special tool that presses the cylinder piston; you can replace it with improvised means:
Up to this point, we have done all the steps from our material on replacing the front brake pads in a VAZ 2110 2111 2112, but now we have to change the brake discs, so we continue.
We unscrew the two 17 bolts holding the bracket, take them out, remove the bracket:
We clean the hubs and brake disc from stubborn dirt. To make it easier for us to remove the brake disc, apply WD to the mounts and wait a few minutes. The screws that hold the disk in place very often become sour; to make them easier to unscrew, tap the disk around them with a hammer through a chisel:
The screws are unscrewed with a socket head 7. Carefully without damaging the hub, tap the brake disc with a hammer. Next we use a special puller, but you can do without it:
Don't forget to apply a coat of copper or graphite grease to the hubs. It is better to degrease the new brake disc before installation. We assemble everything in reverse order.
Video of replacing front brake discs in VAZ 2110 2111 2112:
Source vazhelpgid.ru
Front brake disc of a VAZ 2112 car
Brake discs are an indispensable part of the braking system. They, together with the pads, when slowing down and stopping the car, convert kinetic energy into thermal energy, which arises from friction against the pad discs. The maximum braking effect occurs after the brake pads and discs have been worn in. The period for running in the elements is from five hundred to one thousand kilometers. During this period, you should not brake sharply to allow the working surfaces of the disc and pads to grind in. On a VAZ 2112, the front disc brakes can wear out faster or slower, which is influenced by the driving style of the car. Typically, the metal used to make parts is cast iron, but sometimes ceramics or carbon are used on sports cars. This article describes how to correctly replace the front brake discs of a VAZ 2112.
Replacement or repair?
The price of the VAZ-2109 master brake cylinder is about 1000 rubles. The repair kit will cost half as much. But the feasibility of its installation is highly controversial. When repairing, you will need to do the following:
- Drain the liquid from the expansion tank.
- Remove the expansion tank.
- Unscrew the pipes that are located on the brake cylinder.
- Remove the two nuts that secure the master cylinder body to the vacuum booster.
- Loosen the locking bolt that holds the first piston in place.
- Pull the piston out of the cylinder. This must be done carefully so that the spring does not jump out. Try not to lose all the elements.
- Loosen the locking bolt holding the second piston and remove the element from the cylinder.
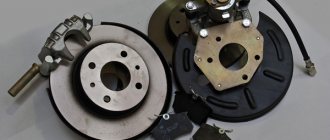
Front brake
A metal disc is rigidly fixed directly to the hub. The brake disc is secured using:
- Small conical studs that serve as guides for the wheels.
- The bolts that secure the wheel to the hub.
The rotation speed of the disk and wheel will always be the same. Therefore, in order to brake a car, it is necessary to stop all its wheels. To do this, you need to clamp the disc using pads and brake calipers.
The calipers have two parts - external and internal. On the inside there is a cylinder, a steel piston is installed in it. Under the influence of the pressure created by the main brake cylinder of the VAZ-2109, this piston moves and acts on the block located from the inside. At the same time, the outer part of the caliper moves towards. When the pressure in the system decreases, the pads return to their original position under the action of springs.
Installing a new cylinder
The layout of the VAZ-2109 master brake cylinder is the same as on classic series cars:
After this, you need to install new cuffs and pistons and fix the device in place. But it is much better to change the main brake cylinder of the VAZ-2109. How to do it yourself:
- Secure the cylinder body with two nuts on the vacuum booster.
- Install the brake pipes.
- Secure the expansion tank to the cylinder.
After this, it is necessary to fill the system with fluid and bleed the brakes. If this is not done, there will be air pockets inside the system that will not allow maximum braking efficiency to be achieved.
Source
Hand brake
The handbrake can be considered a secondary means of braking, since very few drivers regularly use this element. Moreover, there is also a category of motorists who do not monitor the condition of the handbrake at all and do not maintain it in good condition. This phenomenon is explained by the habit of setting the vehicle at speed. Nevertheless, in the winter season this approach turns out to be even useful, since if the car is placed on the handbrake for a long time, the brake pad may simply freeze to the drum, which can lead to the destruction of this brake system unit when trying to move.
The meaning and essence of vehicle maintenance and repair
To ensure the operability of the car throughout the entire period of operation, it is necessary to periodically maintain its technical condition with a set of technical influences, which, depending on the purpose and nature, can be divided into two groups: influences aimed at maintaining the units, mechanisms and components of the car in working condition for the longest period of time. period of operation; influences aimed at restoring the lost performance of vehicle units, mechanisms and components.
The set of measures of the first group constitutes a maintenance system and is preventive in nature, and the second is a restoration (repair) system.
Our country has adopted a planned preventative system for vehicle maintenance and repair. The essence of this system is that maintenance is carried out according to plan, and repairs are carried out according to need.
The fundamental principles of the planned preventative system for the maintenance and repair of automobiles are established by the current Regulations on the maintenance and repair of rolling stock of motor transport.