Hello everyone, today I want to look at how to turn on and off the low and high beam lights on a Lada Granta car. The GRANTA headlight control unit is located on the left under the air duct.
To activate the size, you need to set the switch to the middle position. The size will work whether you have the ignition on or off.
To turn on the low beam headlights on the Lada Granta, you need to move the switch to the extreme right position; it works when the ignition is on. If you turn off the ignition in this state, only the side lights will remain on.
The high beam control on the Grant is located to the left of the steering wheel; the steering column switch is responsible for this.
To turn on the high beam, you need to press yourself under the steering lever, and it is worth remembering that the high beam will turn on only if the low beam is on. To turn on the high beams, you press the switch as if it were operating on its own, regardless of whether you have the ignition on or not.
It is worth noting that after turning on the low or high beam lights, special warning icons light up on the instrument cluster. Well, that's all, we looked at turning on and off the high and low beam dimensions on a Lada Granta car. Goodbye everyone.
For complete or partial copies of information, a link to the site is required. All materials on the site are presented for informational purposes only. The user is responsible for all risks associated with using the site. Site age category 16+
Adjusting the Lada Granta headlights is necessary if you do not have enough factory lighting settings. Do you need to turn the hydraulic corrector as far as possible? It's time to adjust the headlights. We’ll tell you how later.
Recommendations for use
To prevent big problems from arising and fix minor problems when it's easiest to do so, you need to follow a few simple rules:
| Periodic inspection | It is necessary to check the functionality of the lighting devices before each departure, in addition, at least once a month inspect the engine compartment and pay special attention to the reliable fastening of the wiring harnesses and all connections; very often problems arise due to the fact that the car’s wiring dangles and rubs against moving parts. elements |
| Monitoring the status of devices | If you hear extraneous sounds when you turn on the lights (relay clicks), or a button or steering column switch begins to work poorly, then it is better to immediately deal with the problem, without waiting for the moment when the unit fails. Also, you should not drive with damaged headlight lenses, as this will allow moisture to get inside and the internal elements will deteriorate. |
| Use of quality spare parts | If you purchase light bulbs, then you should not choose options with too much power, this will not significantly improve the luminous flux, but the wiring and other elements of the system will be subject to increased loads, which can even lead to short circuits. You shouldn’t skimp on quality either - a low price is most often an indication of low reliability, and in the end you will still overpay due to frequent replacements |
| Accuracy of repairs | If you do the work yourself, it is very important not to damage connections, wires and other elements. You need to do everything correctly and not try to solve problems with electrical tape and twists - these are the connections that are the least reliable, do not spare money and do everything as it should be |
Advice! When choosing a paw or any other element from the electrical equipment system, you must be guided not only by the seller’s advice, but also by information from the Internet, for example, on our portal there are descriptions of most manufacturers, which is very convenient.
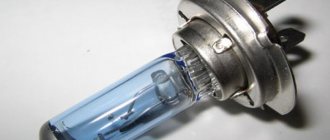
The low beam bulb on the Grant must be of high quality, this is the only way to guarantee its durability
Do-it-yourself adjustment of Lada Granta headlights
Let's look at what you need to quickly and smoothly adjust the headlights on a VAZ 2190:
- a room with a flat wall at a distance of at least five meters from the machine;
- Phillips or hex screwdriver;
- tape measure or long ruler;
- Place a weight equal to yours on the driver's seat (a person of your height or 2-3 bags of plaster - cement - nearby).
Step-by-step adjustment of low beam headlights on Grant
First, let's place the car in front of a flat wall at a distance of 5 meters from the headlight to the wall. Only on a flat surface.
Second, we measure the height from the low beam bulbs to the ground. We mark it on the wall in front of each lighthouse - this is the upper limit of the light beam.
Third: move 35 mm and make another sign. For what is shown in the picture.
Grant's Lighthouse falls into this mold. The upper edge of the beam has a bend - its upper edge should be equal to the height of the headlights from the ground. The bottom edge of the crack is at the same height minus 35 millimeters
Fourthly, we close the projector so that the light does not block the near beam. We turn on the neighbor.
Fifth: Use the lamb to adjust the light, adjust the height of the light. The goal is to have the top edge line up with the marks on the wall. See the example in the photo above.
Access to adjusting the headlights on the Grant is easy. This connector only adjusts the height of the light
Sixth: close the other beacon and configure the second one.
Seventh: if you need to correct the left-right light, use the long valves located on the headlights themselves.
Rotate these knobs to adjust the light horizontally - left/right
Turning on the headlights
As in foreign cars, the headlights of the Lada Granta immediately light up when the key is inserted into the ignition. Since Russia has a law against driving with headlights on everywhere, this is a nice bonus since the headlights turn on automatically when you are about to drive somewhere. It also solves the problem of forgotten headlights: when the key is removed from the ignition, the headlights go out. You've probably already seen cars abandoned by their owners with low beams on and the battery quietly discharging.
By the way, it was noticed that when the starter is moved, the headlights go out so as not to torment the battery.
To turn on the headlights yourself, switch from high to low, you need to find the switch (in the image below it is marked in yellow):
How are the headlights designated?
In the USA headlights
are marked with the abbreviation “DOT” (Department Of Transport/Ministry of Transport), and “European” - with the letter “E” in a circle with a number - the code of the country where the
headlight
is approved for use (“E1” - Germany, “E2” - France, and etc.).
Interesting materials:
When will the heating be turned off in apartments? When to submit a declaration after purchasing an apartment? When do the apartment bills arrive? When should the seller move out of the apartment? When is the advance payment for the apartment due? When are military personnel given an apartment? When is the apartment transfer acceptance certificate issued? Who can be registered in an apartment under a social tenancy agreement? Who cannot be evicted from the apartment without his consent? Who is the owner obliged to allow into the apartment?
Let's summarize
- To adjust the headlights of the Lada Granta, you need five meters of space, a machine, a Phillips screwdriver and a tape measure;
- to turn on the light in the trunk, turn on the adjacent one and open the trunk;
- You can repair the hydraulic corrector yourself, or you can buy a new one for up to a thousand rubles.
More articles on renovations and maintenance grants here.
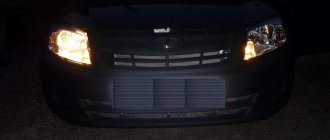
Having driven a VAZ2109 for 9 years and gotten used to its dim headlights (high beam is the same as other models), I was surprised by the quality of the Lada Granta headlights. It should probably be of this standard, but I came out of the trees recently and for me it was a nice bonus for such a good car.
When do you need to adjust headlights on a Grant?
The main reason for working with headlights is insufficient street lighting. There are many reasons for this:
- The car comes from the factory with a driver weight setting of 75 kg. This is a universal setting - if you have a different weight, you need to adjust it immediately after purchase;
- the hydraulic corrector has failed: when it fails, the headlights light up incorrectly or are not adjusted at all;
- movement over unevenness and potholes over time leads to changes in the settings of the light beam;
- I’ll buy a car second-hand - it’s not known exactly how the light was installed by the previous owner.
What is a hydraulic corrector and how does it work?
The hydrocorrector of the headlights on the Grant starts up. This device adjusts the headlights up and down depending on the vehicle's load.
You will have to configure it yourself - there is no automatic adjustment.
The corrector control is located under the light switch. Position 0 corresponds to a car with one person: the driver.
Operating principle:
- the handle controls the corrector hydraulic cylinder;
- the cylinder regulates the pressure in the hoses going to the pushers;
- buttons are installed in the headlights - the higher the pressure in the pipes, the stronger the liquid inside the pusher presses on the rod;
- The position of the deepest/furthest rod controls the adjustment of the highest/lowest headlight.
The operating principle of the hydraulic corrector is shown below:
Visual representation of the hydraulic headlight leveling system
What to do if the hydraulic corrector is broken
Have both headlights or one of them stopped responding to the corrector at the same time? Most likely your pushrod is broken.
If you want to secure the pushrod, there are two ways.
Table 1. Repair options for the headlight depth adjustment button.
Option 1 is barbaric.
No additional settings.
Link to a detailed description of the second method with comments here.
A set of concealer costs about 700 rubles - it may be easier to replace it
How to replace a hydraulic corrector with an electromechanical one
Do you want to replace the hydraulic corrector with an electric corrector (EMKF)? The process is simple, as there are ready-made solutions from the factory.
Replacement requires only straight arms, depending on the EMCF manufacturer:
- disassemble the old hydraulic corrector;
- instead of the cylinder, we install a new control unit from the corrector - we transfer the wiring according to the instructions;
- we pull the threads through the elastic band through which the plumbing pipes passed;
- We put the regulators in the regular places in the headlights.
Here the process is described step by step, based on personal experience.
Adjusting the angle of incidence of light from the headlights
There is also a special switch for adjusting the headlight angle (marked with a red arrow in the picture). It has many positions and is very tightly adjustable (in theory, it doesn't need to be adjusted very often, once set and forgotten).
When adjusting, I set the angle as large as possible so that there is more illuminated space. While this may blind oncoming cars, other foreign cars have an even more brash attitude towards other drivers.
Related posts:
- DIY wing stealth
- Wiper connection diagram gas 31 10
- Chevrolet Niva brake system with abs
- UAZ seat heating does not work
| |
| Option 2 is human. We return the corrector to fully working condition. |
|