Every driver may be faced with the need to answer the question of how to remove a headlight on a Chevrolet NIVA.
This may be required in a variety of cases, and this does not necessarily mean failure of a given element. A similar procedure may be needed when repairing adjacent components, for example, if you need to repair the body or change the bumper. The task is somewhat complicated by the fact that the process is quite complex. To be more precise, in general there are no difficult actions, but you will have to tinker, unscrewing various parts from the car. Moreover, at first glance, they have absolutely nothing to do with the headlight. Therefore, this work confuses many novice drivers. How to remove a headlight on a Chevrolet NIVA is a rather interesting question. The fact is that the engineers who developed the car seemed to set out to make life as difficult as possible for drivers, as well as car service workers. Therefore, they tried very hard to hide the fasteners. As a result, it turns out that you have to disassemble half of the “face” of the car to install a new headlight.
Correct setting
During the operation of the car, over time, a natural misalignment of the headlight unit occurs, and the light begins to shine worse. Adjusting the Niva Chevrolet headlights is carried out in several ways:
- With the help of a specialist;
- Independently, using a special technique;
- Independently by reflective spots on the road.
As a rule, the second option is most often used. Before making adjustments, the car is fully equipped (spare wheel, jack, full tank), the tire pressure is checked, for the Chevrolet NIVA the required value is 1.9 bar. The transmission and springs must also be in good condition. The car is driven onto a flat surface where there is a wall on which special markings are applied.
From inside the car, the light regulator is set to the desired position as follows:
- The optics are thoroughly washed;
- Each headlight is adjusted separately, so one should be closed; this can be done with a piece of dense material;
- The hood opens and, using two adjusting screws located on the headlight block, the beam of light is adjusted in a horizontal position as shown in the figure;
- The other headlight is adjusted in the same way.
At this point, all work can be considered completed.
Algorithm for adjusting headlights of Niva Chevrolet
Before starting, you should thoroughly wash all Niva optics. It is necessary to wipe it, and if there are defects or damage, replace it with a new one. The slightest crack or chip will not give the desired result in adjusting the light.
From the inside of the hood we find two adjusting bolts on the body. One is responsible for horizontal adjustment, the second is responsible for vertical adjustment. Alternate twisting will lead to precise alignment of the light beam to the proper level. Sometimes it happens that a few millimeters are missing from the long-awaited level.
In this case, you should place several washers at the base of the housing mount. To do this, you need to dismantle the headlight, put a couple of washers on the plug mounts and install the optics again in their original place. Step-by-step instructions on how to adjust Chevrolet Niva headlights:
- We find a flat area with a flat wall;
- prepare tape and chalk for drawing lines on the wall;
- we drive up to a distance of 2 meters to the wall;
- do not turn off the engine, turn on the low beam;
- squeeze the handbrake for safety;
- set the headlight range control to the middle position, if available;
- Mark the center of the light beam of each headlight with chalk. This can be done either with chalk or in the form of crosses with tape;
- we drive away to a distance of 5 meters;
- We connect the previously obtained points exactly with a line;
- exactly in the middle of the resulting segment we draw a vertical line, indicating the middle of the body part of the technical device;
- below, at a distance of 7 centimeters, draw a line called a secant;
- turn on the low beam;
- in the hood we find adjusting screws in the headlight plastic housing. We begin to twist them little by little so that the light beam lies exactly between the horizontal line and the secant line;
- Now that the low beam is set, let's move on to the high beam. Ideally, the high beam will not have to be adjusted;
- Under normal operating conditions, the lighting quality should improve. If this does not happen, then look for the reason for the violation of the body geometry. There may have been an accident or accident that you don't know about.
Dismantling
In some cases, in order to correctly adjust the light beam or as a result of mechanical damage, you need to remove the headlight, this is also due to the fact that over time the lamps become cloudy, as a result the power of the luminous flux deteriorates. If you don’t know how to remove a headlight on a Chevrolet Niva, you need to prepare a standard set of tools and do the following:
- Remove the terminals from the battery;
- The decorative lining of the radiator is removed; to do this, self-tapping screws are unscrewed from its mounting, which is located under the license plate;
- The power wires are disconnected from the light element;
- The wires from the hydraulic light corrector are disconnected;
- The front and right mounting screws are unscrewed from the headlight; for this, a ten key is used;
- The screws that secure the decorative trim of the headlight are unscrewed, after which it is removed;
- Unscrew the screws that are located under the cladding;
- The headlight is removed from the seat; if the fastenings are difficult to press out, you can use a screwdriver.
At this point, all work can be considered completed. Assembly is carried out in reverse order.
You should know that when replacing halogen lamps, it is not advisable to touch the bulb with your fingers, so you need to work with clean gloves, otherwise they will begin to become cloudy; if you do touch it, you need to wipe it with an alcohol rag.
Source
In what cases is replacement needed?
It also makes sense to figure out when dismantling and replacement will be required. After all, some repairs can be performed directly on the car. In this case, there is simply no point in removing the headlight.
Most often, the unit is removed if it malfunctions. In some cases, problems with the reflective surface may occur, which negatively affects the lighting's performance. In this case, you will have to completely replace it. The problem may also arise with glass. They become cloudy quite often. You can try to polish them, but this is not a guarantee that it will help. In this case, you will also have to replace the entire assembly.
Mechanical damage is worth mentioning separately. They are also a common reason for part removal. Here you need to look at the amount of damage. It’s one thing when the glass simply shatters from a stone flying out from under a passing car, but the consequences of an accident are another matter. In each of these cases, the level of damage must be taken into account. After an accident, dismantling can be complicated by damaged body parts.
Also, in some cases, you will need to remove the headlight for tuning. It should be noted that lighting is modified quite often.
Chevrolet Niva Manual
Chevrolet Niva Removing headlights, replacing glass
We remove the headlight unit to replace it or replace the glass. The work is shown on the right headlight; the left headlight is removed in the same way. Disconnect the wire terminal from the negative terminal of the battery. Unscrew (see Removing the front bumper): — the front bumper mounting bolts located under the license plate; — self-tapping screws for attaching the bumper to the upper cross member of the radiator frame; - screws located under the cover of the headlamp to be removed; - nuts and self-tapping screws for the lower bumper mounting, as well as self-tapping screws for its fastening to the bumper mudguard - on the side of the headlight unit being dismantled.
Squeezing the two block latches, disconnect the wire block from the headlight connector. We move the front bumper so as to gain access to the lower bolts of the headlight mounting...
...and use a 10mm head to unscrew the two bolts.
Using the same tool, unscrew the two bolts of the upper headlamp mounting. Moving the headlight forward...
... use a screwdriver to pry up the block retainer, disconnect the wire block from the turn signal lamp socket...
...and remove the headlight block. To replace the headlight glass...
...remove the seven glass fastening latches.
The connection between the glass and the headlight housing is sealed with a rubber gasket. Replace a torn or lost elasticity gasket with a new one. We install the glass and headlight unit in the reverse order. After installing the headlight unit, we adjust the direction of the headlight beam.
Source
All about low and high beam lamps on a Chevrolet Niva car
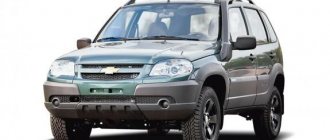
Chevrolet is a popular SUV in the budget segment. The car was developed taking into account long trips over rough terrain and adapted for the city.
Until 2009, lensless designs were used in head optics. Since 2009, the Niva Chevrolet low beam lamp is a single-filament halogen design with a power of 55 watts.
The luminous element is installed statically, which allows the use of a 99% reflective surface.
When replacement is necessary
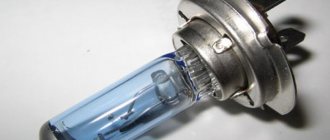
The factory equipment assumes the installation of halogen class H7 12v/55W. The marking stands for:
- base 7;
- works from an on-board network of 12 volts;
- power 55 W.
Low beam lamps provide comfortable lighting at dusk and provide optimal illumination in rain and snow. Since the Niva car is designed for driving on difficult roads, reinforced plastic is installed in the optics housing, which is less susceptible to scratches and chips.
During typical operation, the front part of the Niva is subjected to significant mechanical loads: shaking, driving over potholes, etc. Constant increased vibration reduces the life of the running lights. Part that will need to be replaced:
- if the power of the element has decreased and the road is not illuminated enough;
- the element flashes periodically;
- The consumable is completely non-functional.
Change the bulbs in both headlights at the same time. After replacement, it is recommended to adjust the optics unit.
Lamp selection
Among the large assortment, it is easy to determine which lamps are on the Chevrolet Niva. The car is standardly equipped with a lamp with an H1 socket, 60 W for long-range lighting, and a halogen H7 standard, with a power of 55 W for low beam. The service life of each element is 3500 hours.
Optics from different manufacturers differ in brightness level and color temperature: white, yellow light. The lamps illuminate the road well in fog, rain, and snowfall.
The near-halogen lighting from Philips H7 12 55 has a precisely calibrated filament point placement, which allows for good visibility at night. Popular manufacturers of low running lights:
- Osram H7 12;
- Philips H7;
- Bosch H7 55W.
General characteristics for all classes of low beam lamps:
- service life more than 2,500 hours.
- easy to install by yourself;
- clear fixation of the light beam;
- full power until the end of operation.
It is not recommended to install fluorescent lamps with a power of more than 55 W on the Niva: the lampshade may overheat and the wiring may burn out. In addition, the battery efficiency increases, the battery discharges 20% faster.
In addition to standard halogen ones, LED and xenon lamps are installed in Niva optics. When installing xenons, the wiring is completely re-equipped and an ignition unit is installed in the engine compartment. Replacing halogens with xenon and LEDs is prohibited by traffic regulations.
DIY lamp replacement
An advantage in car maintenance remains replacing the low beam lamp on a Chevrolet Niva yourself. The work takes up to 20 minutes both for self-installation and in a car service. To work you will need:
- open-end wrench 10;
- rags;
- flashlight, mirror (if replacement is being done for the first time).
When replacing the optics, it is recommended to check the contacts and operation of the Chevrolet Niva fog lamp, which is also easy to replace with your own hands. The process of installing a new element step by step:
- Using a 10mm wrench, unscrew the nut and remove the terminal from the battery.
- Unscrew the washer reservoir clamps and move it to the side.
- Clean the protective cover of the headlight unit.
- Remove the cover.
- Disconnect the lamp contacts and remove it from the housing.
- Install new one.
To properly disconnect the contacts, pull on the connector, then disconnect the wire ends from the terminal. At the same time, the latch moves up, the spring latch moves back.
When installing a new consumable, proceed in the reverse order:
- Hold the lamp only by the base.
- Install the element exactly into the groove of the diffuser.
- Tighten the latch.
- Connect contacts.
- Secure with latch.
- Connect the wiring to the battery and check operation.
Replacing it yourself does not require any skills. It is important to follow the procedure for assembling or disassembling the headlight and not touching the glass with your hands. A microscopic fingerprint will remain on the bulb, which sooner or later will lead to incorrect operation of the optics.
Source: https://InfoKuzov.ru/remont/blizhnij-svet-shevrole-niva
Chevrolet Niva - headlight tuning (photo report)
You just need to be extremely careful and follow the instructions that will be described below: If you are not sure of the accuracy of your actions, do not try this method.
I present to your attention a photo report on the topic of Removing the headlight of a Chevrolet Niva. And…
Therefore, let’s touch on the topic of removing such a headlight for a Chevrolet Niva.
If you are not sure of the accuracy of your actions, do not try this method. They press it away from the body, so they gain access to the headlight screws and unscrew them; Remove the optics.
Difficulties from the factory Every driver may be faced with the need to answer the question of how to remove a headlight on a Chevrolet NIVA.
9.8.12 Replacing the headlight (2002-2009 onwards)
This may be required in a variety of cases, and this does not necessarily mean failure of a given element. A similar procedure may be needed when repairing adjacent components, for example, if you need to repair the body or change the bumper.
The task is somewhat complicated by the fact that the process is quite complex. To be more precise, in general there are no difficult actions, but you will have to tinker, unscrewing various parts from the car.
Did you manage to remove the headlight on a Chevrolet Niva?
Moreover, at first glance, they have absolutely nothing to do with the headlight. Therefore, this work confuses many novice drivers. The fact is that the engineers who developed the car seemed to set out to make life as difficult as possible for drivers, as well as car service workers.
Therefore, they tried very hard to hide the fasteners. Design features First, it’s worth understanding what the headlight unit on this car is.
This will allow you to understand how to properly dismantle this equipment, as well as why this work is considered quite difficult. The head light on the Chevrolet NIVA is mounted in a block that is installed on the front wall of the engine compartment.
But, the radiator grille and also the bumper are attached here. These parts cover the headlight fastening elements.
Without removing the grille and bumper, it is almost impossible to remove the headlight, which leads to difficulties during the work process.
It is worth noting that in services this is why the cost of repairing and replacing the unit on this model is usually more expensive than on other cars. It is also worth considering that you can find two versions of headlight units on sale.
There are restyled ones, as well as old ones. Check which ones are installed on your car. This can be determined by the year of manufacture. Restyling was carried out in the year, that is, from that time on, all headlights on cars were installed of a new type.
If you purchase a part of a different type, it simply will not fit in terms of fastenings and dimensions. The block contains halogen bulbs.
Low beam lamps for Niva Chevrolet: instructions for selection and replacement
A burnt-out lamp is one of the main reasons why the low-beam headlights stopped working on a Chevrolet Niva. Let's consider which light bulbs are standardly installed on a car of this model, how to choose the right replacement for them, what to look for when choosing and how to install it yourself, as well as what other reasons can lead to this malfunction.
What kind of lamps are in the low beam of a Chevrolet Niva
In the low beam headlights on a Chevrolet Niva, regardless of the year of manufacture, a single-filament lamp of type H7 12V/55W is installed as standard. This is a universal incandescent light bulb designed for installation in the advisory module of the block section of the head optics of the car. You can buy it at almost any specialized auto store.
Note! You should not choose lamps that are more powerful than those installed standardly (55 watts), as this will lead to overload of the generator and the car's wiring system and their rapid failure.
Lamp selection
When choosing a lamp for reinstallation in the low-beam headlights on a Chevy, you must first of all be guided by its type and lighting performance indicators. Let's look at them in more detail.
Type
For head optics of modern cars, there are two types of lamps - single-H7 and double-filament H4. On Chevrolet Niva of both the first and second generations, only light sources of the first type are installed.
Different headlight modules are responsible for low and high beam lighting. At the same time, the service life of the lamps is approximately the same. Therefore, it is better to purchase them as a set at once - for the left and right sides.
In addition, this is necessary for their lighting compatibility.
What to look for when choosing
The most important parameter influencing the choice of low beam lamps on a Chevrolet Niva is the strength of the luminous flux. Its value directly depends on the type of lighting device.
| View | Power, lumen/watt |
| Incandescent lamp | 11-12 |
| Standard halogen | 15 |
| Halogen lamp with quartz bulb | 25 |
| Xenon with arc | 90 |
| Ice source | 130 |
| Sodium gas discharge | 200 |
Naturally, the price of each type of low beam lamp also differs from its analogue. The cheapest is halogen, and the most expensive are LED and xenon.
Halogen lamps for Chevrolet Niva are ideal as an alternative to replacing the standard installed ones, not only because of their low cost, but also due to their good luminous flux density (which is important in bad weather) and ease of installation. A halogen lamp is installed in the same way as a regular light bulb; on the other hand, xenon requires the installation of an ignition unit, and the LED requires a special optical system.
Instructions for self-replacement
You can replace the low beam lamp on a Chevrolet Niva as quickly and technically competently as possible by following the following instructions:
- Open the engine compartment and disconnect the terminals from the battery.
- For convenience, when working with the left headlight, you can completely remove the battery, and from the right - the windshield washer system tank.
- Remove the wire clip above the headlight compartment.
- When the casing is removed, you need to disconnect the block with wiring from the base part.
- Then you should remove the latch holding the base in the headlight (squeeze it with your fingers and pull it out).
- Replace the old lamp with a new one.
- Next you need to install all the elements in reverse order.
- After connecting the battery, check the serviceability of the installed light source.
Replacement (removal and installation) of headlights
Page 2
What kind of bulbs are used in the headlight?
Low beam lamp: H7 – 55W High beam lamp: H1 – 55W Side lamp lamp: W5W – 5W
(used lamps in a car)
| Make it a habit to regularly change your bulbs (especially your headlights). Over time, the lamp bulb becomes cloudy and the brightness of the lamp decreases. Moreover, this process occurs quite slowly and the driver does not notice the gradual deterioration in road illumination. |
| Recently, more and more cars are appearing with headlights that shine like a Christmas tree in various shades of blue. All this is called “xenon” and is considered very cool. There is no doubt, xenon headlights, installed as standard on the latest models of foreign cars, illuminate the road much better, and the car looks much more impressive with them. It is not surprising that many are also trying to improve their car, especially since now a lot of “xenon” lamps of various manufacturers (most often Chinese) have appeared on the shelves. Don't buy cheap - these lamps have nothing in common with real xenon discharge lamps, which do not have filaments. These are ordinary lamps with painted glass. The light transmission capacity of such glass is significantly lower than that of standard lamps; the filaments of fakes, as a rule, are set out of focus, and a headlight with such a lamp, while outwardly effective, illuminates practically nothing, and additionally mercilessly blinds oncoming drivers. In addition, manufacturers of such lamps, in order to compensate for the decrease in luminous flux, increase their power beyond the norm. Often their installation leads to melting of the wire insulation and burnout of the printed circuits of the mounting blocks. And a fire is also possible. It’s better not to buy a “headache” with your money, but buy high-quality ordinary lamps. |
| 2. Disconnect the wire from the negative terminal of the battery. |
| 3. Unfasten the spring holder of the headlight cover and... |
| NOTE Shown is replacement of left headlight bulbs. The lamps in the right headlight are located symmetrically and are replaced in the same way. |
| 5. Disconnect the block with wires from the high beam lamp socket. |
| 7. ...remove the high beam lamp. |
| Do not touch the lamp bulb with your fingers, as the halogen lamp gets very hot and grease stains will cause the bulb to darken. Handle the lamp by the bulb only with clean gloves or a clean cloth. If there are still grease stains on the lamp, remove them with alcohol. |
| 8. Replace the lamp, insert the socket into place and secure it with the spring holder. |
| 9. Connect the wires to the socket. |
| 10. Disconnect the block with wires from the low beam lamp socket. |
| 12. ...remove the low beam lamp. |
| 13. Replace the lamp, insert the socket into place and secure it with the spring holder. |
| 14. Connect the wires to the socket. |
| 15. Remove the side light (the holder is installed in the headlight housing with interference) and... |
| NOTE: A baseless lamp A12–5–2 is used as a side light lamp, installed in a holder with interference fit. |
| 17. Insert the new lamp and place the holder in place. |
| 18. Replace the headlight cover and secure it with the spring holder. |
Page 3
What lamp is used to illuminate the glove box?
(used lamps in a car)
| 1. Open the glove compartment. |
| 2. Use a screwdriver to press out the flashlight housing and... |
| 4. Press the plastic latch towards the center of the lamp and... |
| 6. After overcoming the force of the spring contacts, remove the lamp. |
| 8. Insert the edge of the lens into the slot on the lamp body and secure it with the latch by pressing the other edge of the lens. Then install the light on the car in the reverse order of removal. |
Page 4
Page 5
Page 6
Page 7
Lamp selection
First of all, it must have the following qualities:
- comfortable and bright light
- long service life
- favorable price
You should also pay attention to the manufacturer. Products from a well-known brand may be more expensive, but they will use high-quality materials.
You should also not pay attention to lamps with increased functionality, for example, the most durable ones - this is usually achieved by reducing the brightness, which can be unsafe in the dark.
Replacement
Replacing the low beam lamp on a Chevrolet Niva can be done by service station specialists, but this procedure is quite simple, so many car owners do it themselves.
To do this you will need a standard set of tools and materials:
- key for 10
- flashlight
- small mirror
- rags
- bulb H1
- gloves
Need to get an old lamp
When installing a new lamp, do not hold it by the glass. It is necessary to use gloves and carry it by holding it by the base. If marks accidentally appear on the lamp while working, you need to remove them with a clean cloth.
When installing, you need to pay attention to the position of the lamp. It must fit into a special groove in order to be at the desired point under the diffuser.
- Then the new one is pressed with a clamp and the contacts are installed in place.
- Then close the protective cover and proceed to installation on the other side
Source: https://djeeprus.ru/shevrole-niva/elektrooborudovanie/zamena-lampy-blizhnego-sveta-na-shevrole-niva
replacing the front headlight — Chevrolet Niva, 1.7 l., 2012 on DRIVE2
Finally got the opportunity to install a new headlight
I went to the service center to find out the details and when I heard about the complete removal of the bumper, I realized that I would have to look for everything myself. Agree, it’s stupid to disassemble the whole face because of the headlights, hours on the Internet and reading various rubbish gave a vague idea of how it will be. And off we go, as they say, the eyes are afraid, but the hands do...
- First, we unscrew the three upper bolts securing the radiator grille; you will need a T30 key, which I did not have; it was easily replaced with a slotted screwdriver selected to size (you must unscrew it with a screwdriver carefully so as not to tear off the edges)
- Then, using the same screwdriver, press the plastic retainer of the headlight trim into the gap between the radiator grille and the trim itself.
- Carefully, so as not to break the trim, tear it off from the double-sided tape and remove it from the grooves in the bumper, moving it to the side.
- Using a T30 wrench (slotted screwdriver), unscrew the two screws securing the bumper to the bumper cross member.
- Using a T20 wrench, unscrew the two screws securing the bumper to the wheel arch.
- By sliding the bumper forward and down, we gain access to the last fastener of the headlight trim, use a Phillips screwdriver to unscrew the screw and remove the trim.
- Using a 8mm socket with a 1/4 square, unscrew the two upper headlight mounting bolts.
Having pressed on the headlight, use the same head to unscrew the two lower bolts using a magnetic extension. We disconnect the pads from the headlight and lift it forward and remove it.
- I would like to say a huge THANK YOU to the engineers who stuffed the air intake under the headlight, prudently making a “pool” in front of it.
Adjusting Niva fog lights
The Niva's fog headlights are also adjusted manually. To do this, we rotate each headlight vertically and horizontally until it meets our standard. Of course, you should first unscrew the mounting bolts a little for practicality and ease of setup.
After completing the procedure, do not forget to tighten the bolts again. Remember that it is strictly forbidden to adjust the light beams so that they blind oncoming drivers. For such an act, you can safely receive an administrative fine for obstructing the driving of oncoming traffic. The fine starts from 500 rubles. The amount is not large, but the human factor plays a greater role here.
Remember the main thing is that if the body of the Chevrolet Niva is not damaged, the optics are intact, then there is no special need to adjust the headlights. Sometimes they resort to tuning when the owner intends to tune the car with non-standard equipment.
In such cases, a new mounting socket can be cut out, optics with a completely new shape can be installed, and new electrical power cables can be pulled. But that's a completely different story.
The video below shows how to adjust the headlights of a Chevrolet Niva with your own hands, taking into account the angle of incidence of the headlights.
Did you like the article? Follow our channel for new ideas of useful car tips. Subscribe to us in Yandex.Zen. Subscribe.
Burnout of low beam lamps on any car, including the Niva Chevrolet, is a common occurrence, since they are subject to the greatest wear and tear. There is no point in contacting a service center to replace them, since performing this operation yourself will only require a few minutes of free time. In this article we will take a detailed look at how to replace a low beam lamp on a Niva Chevrolet.
How to remove a headlight on a Chevrolet NIVA? Difficulties from the factory » diabloarea.ru - Your autopulse
DIY LED headlights for a Chevrolet Niva
remove the decorative radiator grille; disconnect the block with wires from the headlight; to do this, press the latch; in the same way we turn off the power from the hydraulic corrector; the top screws that secure the block are unscrewed; remove the decorative trim on the headlights; under it we find a pair of lower fasteners to remove the Chevrolet Niva headlight, these are ordinary screws.
The article discusses in detail the process of removing headlights on a Chevrolet Niva car. under the cladding there are...
In each of these cases, the level of damage must be taken into account. therefore, this work confuses many novice drivers. The task is somewhat complicated by the fact that the process is quite complex.
you can try to polish them, but this is not a guarantee that it will help. To use it in the truest sense of the word, you need to disassemble almost the entire front body kit.
Unscrew the front bumper mounting bolts, which are located under the license plate.
Unscrew the screws on the bumper near the radiator frame. Unscrew the screws under the headlight trim. We also unscrew the screws fastening to the bumper protective shield. disconnect the block with wires from the connector. We move the bumper so that it does not interfere with unscrewing the lower headlight mounting bolts.
Unscrew the upper headlight mounting bolts.
Chevrolet Niva 2012, 80 l. With. — self-repair
Move the headlamp a little forward. Pry up the pad retainer using a screwdriver. Carefully remove the headlight without touching its front part with your hands.
You can try to polish them, but this is not a guarantee that it will help. In this case, you will also have to replace the entire assembly. Mechanical damage is worth mentioning separately. They are also a common reason for part removal.
Here you need to look at the amount of damage. It’s one thing when the glass simply shatters from a stone flying out from under a passing car, but the consequences of an accident are another matter. In each of these cases, the level of damage must be taken into account.
After an accident, dismantling can be complicated by damaged body parts. Also, in some cases, you will need to remove the headlight for tuning.
It should be noted that lighting is modified quite often.
It has already been mentioned that the procedure is quite labor-intensive. Therefore, many novice drivers do not undertake to do it themselves.
It is worth considering here that there are several methods that can be used in practice. There is a method recommended by the manufacturer, it is quite labor-intensive and frightening for drivers.
To use it in the truest sense of the word, you need to disassemble almost the entire front body kit.
It has disadvantages, for example, it can damage eyelashes, but the procedure speeds up significantly. Below we will consider both of these dismantling options. It is important before starting work to be sure to remove the negative terminal from the battery, thus de-energizing the car.
Official method Prepare all the necessary tools.
Dismantling is carried out in the following order: Remove the decorative radiator grille; We disconnect the block with wires from the headlight; to do this, press the latch; In the same way, turn off the power from the hydraulic corrector; The top screws that secure the block are unscrewed; Remove the decorative trim on the headlights; Underneath we find a pair of lower headlight mounts, these are ordinary screws.
We unscrew them; Carefully remove the headlight from its seat. As you can see, there is nothing complicated here, but you need to perform quite a lot of different actions.
9.8.12 Replacing the headlight (2002-2009 onwards)
Therefore, simply replacing optics can take half a working day. It is worth paying a little attention to the installation features.
In general, everything is done in reverse order. But, in practice, there is one nuance that can greatly affect the quality of lighting. Often drivers, when installing the headlight in place, grab the glass with their hands.
Fingerprints significantly impair transparency, which negatively affects the efficiency of the lighting fixture. If you do touch the glass with your hand, be sure to wipe it with alcohol after finishing work.
Before you start using the method, keep in mind that there is a risk of breaking the plastic body kits. If you are not sure of the accuracy of your actions, do not try this method. Before starting work, disconnect all connectors from the headlight.
Replacing headlights on a Chevrolet Niva
Partially unscrew the radiator grille. They press it away from the body, so they gain access to the headlight screws and unscrew them; Remove the optics.
Garage option
Now let’s look at a simplified version, often called the “collective farm” version. Before you start using the method, keep in mind that there is a risk of breaking the plastic body kits. If you are not sure of the accuracy of your actions, do not try this method. Before starting work, disconnect all connectors from the headlight. The procedure is as follows:
- Partially unscrew the radiator grille. Wring it out and unscrew one of the screws securing the “eyelashes”;
- Unscrew the top screws of the headlight;
- Twist the upper bumper mounts. They press it away from the body, so they gain access to the headlight screws and unscrew them;
- Remove the optics.
Conclusions . Problems with optics on cars arise quite often. As you can see, the answer to the question of how to remove a headlight on a Chevrolet NIVA is quite simple. But, at the same time, you will need to tinker to carefully remove this part; in practice, several methods are used to solve this problem.
How to remove and replace tail lights on a Niva Chevrolet
Each car is equipped with rear lights from the factory. The main function of this product is to indicate the dimensions of vehicles. The Chevrolet Niva tail light performs such basic functions as:
- Warns with a light signal during braking
- Warns with a light signal about turns to the left or right
- Gives a light signal while moving backwards
- Shows vehicle dimensions while driving at night
All of the above points warn cars that are driving behind. In addition to warning, they give the car a stylish look.
- 1 Rear headlight arrangement
- 2 Replacement and removal
Rear headlights
There are two types of rear lights, right and left, which have a design:
The right and left lights have the same design. On the Chevrolet Niva, these elements have a non-separable design, which allows only replacing the bulbs.
Their base consists of plastic, in which there is a socket where the light bulbs are installed, and there is also a diffuser that distributes the luminous flux; if it were not there, then the light would not be filled in the headlight cell.
Glass is the final element and is painted in various colors:
This glass is connected to the body using glue, so it is considered non-separable, but on previous models, for example VAZ-2123 and Niva 4X4, collapsible lights are installed, which makes it possible to clean from the inside. But thanks to good sealing, the headlights do not need to be cleaned. Excellent light transmission is achieved due to the fact that the headlights are made of polycarbonate.
Replacement and removal
Due to the fact that the body and glass of the headlights take all the impacts, mechanical damage may occur, which can be eliminated by replacing the element, so their removal may be necessary.
The left and right rear lights are removed as follows:
- Disconnect the negative terminal from the battery
- In the trunk we bend the decorative trim to gain access to the fastenings
- Take a ten-point socket screwdriver and unscrew the nuts that secure the light to the body
- After the elements are unscrewed, take out the flashlight and disconnect the power wires from it.
- We carry out replacement or other actions you need, after which everything is installed in the reverse order of removal.
- If you only need to change the light bulb, then you do not need to remove the entire product; it is enough to remove only the decorative trim, remove the socket manually, which is secured with plastic clips, and replace it.
- At this point, the process of replacing the rear lights can be considered complete, it should be understood that they have such an important understatement in the car, like the front optics, but, despite the fact that vehicles can move without them, at night their absence can lead to to an emergency.
Other possible faults
If the low beam headlights on a Chevrolet Niva do not light up after replacing the lamps, then the causes of the malfunction may be the following:
- Blown fuses;
- Poor contact of the connectors - in this case, the connector is easily put on the contacts and is poorly fixed, or there is noticeable oxide on the contacts;
- Break in the car wiring in the area from the headlight to the fuse box;
- Faulty low beam switch or relay - unlike previous cases, with such faults two headlights do not light up at once.
- Poor contact of the ground wire in the headlight itself - in this case, all light sources in the headlight do not light up.
In all these cases, restoring the lighting will not be difficult. The main thing is to correctly determine the cause of the malfunction. To do this, you may need a multimeter, which will allow you to determine the area of the open circuit.
Headlight unit on Chevrolet Niva
During the operation of the car, breakdowns occur not only with its mechanical parts, but also with its appearance. The beauty of appearance is given not only by the car body, but also by additional means.
These tools include, in particular, the headlight unit. It is also designed not only to make the car look beautiful, but also to illuminate the road at night.
The headlight unit is also used to provide light signals for attention.
The name speaks for itself. A block means containing many elements that perform different functions. Headlight means road illuminator. In ordinary words, this is a device designed to illuminate the road and additionally perform various functions. Let's take a closer look at these functions on a Chevrolet Niva car.
What does it consist of?
The headlight unit is not installed on all car models. In particular, cars began to be equipped with such a device in the last decade. The old-style Niva was equipped with conventional round headlights, which performed only one function. In the new generation of Shniv, multifunctional lighting devices are installed.
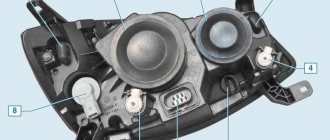
The main design features of the lighting device include:
A universal scanner for self-diagnosis of any car...
- Glass or special transparent plastic. Located on the outside. Transparent plastic is a more durable and cheaper material. Glass is susceptible to damage from small stones hitting it. It is also a more expensive material compared to plastic. Therefore, manufacturers give preference to a plastic diffuser.
- Frame. It consists of special soft plastic and contains various holes and mounts for lighting lamps. The body also has lugs for attaching the device to the car body.
- A reflector is an element that helps transmit a flow of light to a specific place, in this case the road. The intensity of light depends on the color of the reflector, so reflectors are made of a special silver-colored material.
- Lamp holders into which lighting lamps are screwed.
- Connection block. Output the contacts from each light bulb to a block to which a plug with power wires is connected.
The headlight unit may contain lenses that create a more powerful stream of light. The Chevrolet Niva is not equipped with such lenses, but you can install them yourself.
To reduce fuel consumption on a Shnivy you just need...
Main functions performed by this device
The headlight unit has the following purposes:
- Illumination of the road with low and high beams in the evening or at night.
- Signaling the overall dimensions of the car in the dark.
- Dimensions alarm during rain or fog.
- Indicating turns with a light signal.
- Emergency stop signal.
- Additional high beam lighting signal for oncoming vehicles.
All these functions are performed by four light bulbs in one headlight unit. The main parameters of the lamps used in the lighting unit are listed in the table for ease of viewing.
| Name | Type | Base | Rated power, W | Power, V |
| Low beam lamp | Halogen, installation of xenon and LED is allowed | H1,H7 | 55 | 12-15 |
| High beam lamp | Halogen, xenon can be used | H1,H7 | 55 | 12-15 |
| Side light bulb | Halogen, LED | T10 | 5 | 12 |
| Hazard warning lamp | Halogen, LED - orange | BA15S | 20-21 | 12 |
The main characteristics of the Niva Chevrolet headlight also include its weight, which is 2.4 kg, and the cost of this kit is 4500-5000 rubles, depending on the configuration.
Removing the headlight unit from a Niva Chevrolet car
Sometimes moments arise that force you to remove the headlight unit from the car. This may be caused by dust or insects getting inside, installing additional lighting elements (lenses), replacing the reflector, or simply needing to change the glass.
Removal is carried out in the following order:
- First, the power from the battery is turned off by disconnecting the negative terminal. The bundle of wires suitable for the block is disconnected.
- The fastening bolts are unscrewed. To do this, you need to unscrew the front bumper fastenings located near the license plate. Unscrew the bumper mountings from the radiator housing. The screws under the cover are unscrewed. The screws and nuts are unscrewed on the lower headlight mount.
- The weakened bumper is moved down a couple of centimeters. The two headlight mounting bolts are unscrewed with a wrench. The top two mounting bolts are also removed.
- The kit can be carefully removed from its installation location. Having moved the headlight a couple of centimeters, it is important not to forget about the wire that powers the hazard warning lamp. Disconnect it from the block.
- The removed headlight unit is sent for modernization, repair, cleaning or replacement of elements.
- Installation is carried out in the reverse order of removal.
The following algorithm for connecting daytime running lights can be distinguished.
- When starting the engine, the tachometer pulsates. When this signal occurs, the side lights turn on. At this moment, the engine may warm up at idle speed. The next stage will begin only when the movement begins.
- When a signal from the speed sensor appears, the low beam mode is switched on
- After turning off the speed, a timer is activated, which breaks the low beam/running lights circuit
- While driving, power to the DRL circuit is restored
- After the engine is turned off, the low beam and DRLs are turned off.
- If the car stops and the parking brake is raised, a special controller turns on, which turns off the low beam and activates the timer. If the handbrake has been raised for less than 2.5 minutes, then the low beam turns on immediately, if more time has passed, then only after the start of movement.
- While driving, the controller operates on the speed sensor, which powers the low beam lamps regardless of the position of the parking brake
- To connect the kit, it is better to use an additional set of wires so that the system works in parallel. Also on the instrument panel it is necessary to additionally place keys for turning on the dimensions.
Also, if necessary, you can make a diagram that will provide for movement with the lights and other light sources turned off. This may be necessary for various types of cases, for example when moving, hunting or fishing, when the presence of headlights would be undesirable. In this mode, with the engine running, it is enough to raise and lower the parking brake three times. After this, the headlights and low beam are switched off forcibly. After this, you can continue moving without attracting unnecessary attention. The no-light mode turns off automatically after the engine is turned off. If you need to continue driving after this, you need to raise the handbrake at the moment the engine starts and the headlights will not light up.
You can implement this DRL operation by connecting the wires according to the diagram:
Replacing the lamp
Replacing the low beam light bulb on a Niva Chevrolet, as mentioned above, is quite simple.
The main thing is to follow the following sequence:
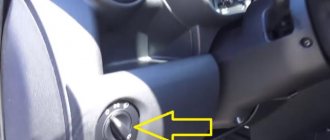
- First of all, you need to open the hood and disconnect the “-” battery terminal. If work is being done on the left headlight, then for convenience the battery can be completely removed. On the right side, you can remove the glass washer reservoir, which will also provide more working space.
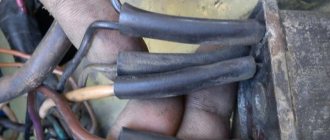
- Then you need to remove the headlight plug, which is secured with a latch made of hardened wire. Some modifications use two round plugs installed above the low and high lighting compartments. In this case, you just need to unscrew the plug (number 6 in the photo).
- After dismantling the casing, you need to disconnect the block with wires from the base with your own hands.
- Next you need to remove the latch that presses the base to the headlight base. You just need to squeeze the spring with your fingers and remove its edges from the base.
- Now you can remove the burnt out light bulb and install a new one in its place.
- Then the work is done in the reverse order - install the fixing spring, put the block on the contacts of the base and then install the casing, which is fixed with a latch, or a round plug.
Note! When replacing the light bulb, do not touch the glass bulb, as fingerprints will remain on its surface. They will lead to an increase in temperature in this place and rapid burnout of the lighting element.
Here, in fact, are all the instructions for replacing the lamp. (See also the article Niva Chevrolet wiring diagram: features.)
Video instructions: how to disassemble a Chevrolet Niva headlight
I never thought that everything would go so quickly and so easily. I was afraid that the headlights would sweat, but I had no reason to worry, the seal is normal.
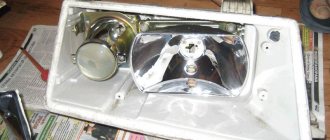
Replacing plastic (glass) on the headlight of a NIVA CHEVROLET
There is also damage on the rear headlight glasses, but the system there is slightly different, and the damage is not so severe that I need to replace it. If your headlights still sweat, you will have to coat the glass around the perimeter with sealant, and then let it sit for a day and only after that install the headlights in place.