Automotive low and high beam lamps used on the Lada Priora in the restyled and pre-restyling versions are almost the same. The difference is in the layout of the headlight itself on the Priora.
The lamp used in the dimensions of early cars has disappeared. The rear lights are distinguished by a diode insert in the brake lights; now there is a circuit with diodes, but before there was a light bulb.
Turn indicators, daytime running lights, low and high beam headlights, side lights, fog lights and reversing lights are very helpful to both the driver and other road users.
For example, the switched-on low beam lamp in a Lada Priora will indicate, for pedestrians and other drivers, the dimensions of the car and help to approximately determine the speed of movement. Lamps for a Lada Priora car should be selected with special meticulousness, with a long service life and moderately bright light.
For example, in the headlights of a Lada Priora you can find from 4 to 5 different lamps at the front. Their markings are indicated by the factory, and it is not difficult to find light bulbs - they are manufactured by several manufacturers, from which you can choose. The power of a good headlight with mirror-clear illumination should exceed 58 W, otherwise visibility at night will remain the same, but I would like to give Priora the kind of lighting with which it would be pleasant to drive.
What standard lamps are used in Priora headlights?
The Priora headlight unit is equipped with:
- low beam lamp;
- high beam/running light lamp;
- turn signal lamp;
- side light lamp.
Designations
- Low beam, for example, is marked 55H7, where 55 is the power in Watts, and H7 is the designation of the base;
- The main beam is designated 55N15;
- turn signal – 21PY21W;
- side light – 5W5W.
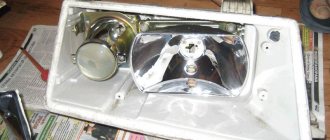
The lamps are in the headlights in a single unit, and the headlight unit is not always replaced - only the bulbs are changed. And not in vain - the factory headlight produces a cloudy light. Prior owners try to install the best lamps so that the headlights shine longer.
Light show – Autoreview
— In five to seven years, there will be no halogen or xenon headlights left in the auto industry: they have no advantages over LEDs!
Where does the Volkswagen engineer come from with such confidence? But it’s not for nothing that journalists were gathered in Wolfsburg for a seminar on lighting technologies: the Germans have something to cover. And most importantly - what.
To test lighting technologies, automakers have long used not primitive “certification” screens, but computer modeling and special tunnels where they can simulate any situation. Volkswagen has been operating this 100-meter light tunnel near the head plant in Wolfsburg since 2014.
The main characteristic of a headlight (regardless of its type) is the luminous flux, the power of optical radiation. Luminous flux is measured in lumens. And illumination is how effectively a headlight directs light onto the road, in lumens per square meter, or lux (lx).
In 1971, the two-filament halogen H4 revolutionized the world of car headlights thanks to a dramatic increase in luminous flux. No other lamp before it could provide low beam with a flow of 1000 lumens!
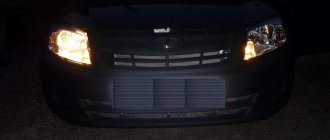
LADA Priora LOW AND HIGH BEAM MISSING
H4 halogens (with a different base they are now called H19) are still used on inexpensive cars. They are installed, for example, on the Lada Granta (H4 before restyling and H19 after) and on the Kaluga Volkswagen Polo in the initial configuration.
The H7 single-filament lamp with 1500 lumens that appeared next gives one and a half times more light. That’s why the old Kalina and Priora, with “sevens” in the headlights, illuminate the road much better than the Granta with H4! And the palm in terms of generated luminous flux among halogens now belongs to H9 high-beam lamps (for example, they are used by Nissan Patrol) - 2100 lumens!
What a one and a half times difference in luminous flux is is clearly demonstrated by Kalina (H7 lamps, 1500 lumens) and Granta (H4 lamps, 1000 lumens)
Xenon headlights debuted in 1991 - lamps, where a gas-discharge arc burns in an inert gas environment of xenon instead of a halogen filament, provide up to 3200 lumens of luminous flux! However, xenon quickly revealed inherent disadvantages: the large physical dimensions of the arc create problems with glare, which are aggravated when the headlight is dirty. Because of this, in the USA, xenon was allowed to be used only for high beams. But in Europe, manufacturers of gas-discharge lamps lobbied for softer glare standards for low-beam xenon beams. Illumination in the eye area of the driver of an oncoming car for xenon (UN Rule can be 20% more than with halogens (UN Rules 20 and 112): 0.5 versus 0.4 lux. And in order to reduce the negative effects, European legislators obliged manufacturers equip xenon headlights with a cleaning system and automatic corrector.
The full version is available to subscribers onlySubscribe now
Layout of the restyled version
In the Priora, little has changed after restyling - small details invisible to the eye, the center console, the dashboard. The headlights have also changed - they have become quite a bit larger. The principle of their design has remained virtually unchanged, except that there is now one plug at the back to isolate the contacts.
The design of the headlamp unit has become more complex: now in place of the usual high beam lamp there is a light consumable, combined with daytime running lights, which switches between operating modes. PTF fog light bulb, everything is also mounted depending on the configuration.
Checking and adjusting the operation of the mechanism
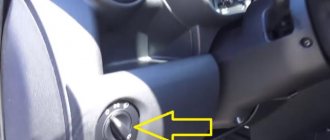
Regular preventative examinations will help you avoid sudden breakdowns. According to the manufacturer's recommendations, these are carried out at least once every 3 months. Unscheduled, you will need to look under the hood if the Priora's light has become dim. Regardless of the reason, a key at “6” is required for operation.
The car owner must check the air pressure in the tires. Even a slight deviation from the norm will negatively affect the efficiency of lighting devices. After this, the vehicle is installed on the most level surface of the garage. Lada Priora is placed at a distance of 5 m from a smooth wall. The further procedure is as follows:
Direct adjustment is carried out in the vertical and horizontal plane. In order to adjust the position of the light spot as accurately as possible, you should first turn on the low beam. The setting is made for each headlight separately. In order to comply with technical recommendations, when adjusting one of the headlights, the second one must be covered with material that does not transmit light.
If you don’t have one at hand, then you just need to turn off the power. Only after this does the transition to high beam adjustment take place. The lighting adjustment process ends with a mandatory check. A vehicle rolls out of a garage onto the street at night.
The high beam turns on, and then the low beam. A visual inspection is carried out. If asymmetry of the light spots is noted, then the adjustment is made again. In some cases it is necessary to visit a service station.
How to change the low beam light bulb on a Priora
First of all, it is necessary to remove the battery, otherwise access to the headlight will be limited. And even if you stick your hand inside, working under the hood will be uncomfortable. The process of replacing a light bulb is described in several steps:
- Remove the rubber cover, the outermost one (it is located closest to the front fender of the car). At the same time, try to be careful with fastening the headlight housing;
- Disconnect the block with contacts from the lamp itself;
- We press the latch and remove it from engagement with the hooks carefully and without sudden movements;
- We take out a 55H7 light bulb;
- We do everything in reverse order with the new lamp.
It is recommended to do the entire mechanism according to the clockwise principle - first remove the old light bulbs from both sides, and then install new ones. Lamps used at the factory do not perform very well, even in terms of durability, and may require repairs a couple of months after purchase.
Replacing Priora high beam lamps
It all starts again with removing the battery - you can’t do without it now. The high beam lamp is located a little deeper and is not easy to get to. The sequence of actions when replacing a high beam lamp is as follows:
- We disconnect the rubber cover (it is larger than the one designed to protect the low beam lamp);
- Disconnect the block with wires;
- Unclench the spring clamp and disengage it from the reflector hooks. We release the light bulb.
- We remove the lamp socket from the headlight unit.
In fact, everything is simple: they opened the lid and took out one lamp. However, such minor operations will put a lot of strain on your wrist and palm - don’t forget to warm up, otherwise the new part may treacherously slip out of your hand when you don’t expect it.
Popular options for organizing daylighting in a car
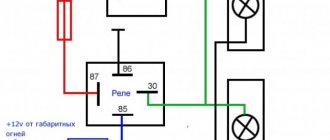
After reading all of the above, some motorists may be upset. But in vain - there is a way out of this situation, because it is not necessary to use branded LED headlights. Light sources that you can install yourself, taking into account the technical tolerances of a certain car design, are quite suitable. There are many electrical circuits with which the system will be activated, including connection from a generator - everyone chooses their own option.
For example, you can make DRLs into standard headlights with your own hands from fog lights or at the place where their installation is planned. You don’t need permission to do this, all you have to do is connect the system as follows:
- When you turn the ignition key, the running lights turn on automatically.
- When the headlights are turned on, the running lights turn on, except in cases where the headlights are turned on briefly.
Budget ways to implement daylight lights
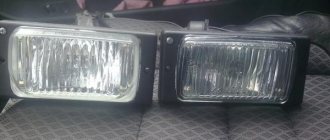
- LED running lights Eagle Eye HD-202b are mounted in standard PTF plugs.
- A flexible strip of LEDs secured around the fog lamp using double-sided tape.
- Installation of round lensed lamps in the places of standard PTF mounting.
- The use of an electronic relay to control the power of standard lamps, which allows them to be used as running lights.
The last option is quite simple to implement, so it is worth considering it in more detail.
Replacing lamps in Priora taillights
Replacing the rear light bulbs is complicated by the fact that the combination unit inside supports the operation of the parking lights and brake signal. But it all starts just as simply, when replacing the bulbs in the rear headlights of the Priors, as well as the front ones:
- Remove part of the upholstery opposite the headlights;
- Unscrew the screws that support the protective housing of the rear light. In Kalina, there were nuts in place of the screws, and unscrewing them was even more fun - they fell into a huge gap and were lost in the car body forever;
- Turn the brake light and clearance holders counterclockwise. Do not remove the socket, take it out together with the light bulb;
- It is easy to press down the lamp, turn it clockwise and remove it from the socket with a slight movement (it will almost fall out on its own);
- Carry out the operation in reverse order.
Brief description of the model
Production of the Priora model began in 2007. Compared to the VAZ-2110, the new car featured a modern body, different chassis settings and steering with an electric pump.
The Italian engineering company Creative Engineering worked on the interior of the cabin. The body structure has undergone not only external changes, but also received new welds, as well as enhanced passive safety elements.
The old engine from the VAZ-2110 was seriously reworked, installing a new piston with shortened skirts and lightweight connecting rods. The result of the work done was increased efficiency and environmental friendliness. There was only one gearbox available - a 5-speed manual.
Basic equipment included airbags, seat belt pretensioners, and a smart ABS system. Additionally, it was possible to install heated front seats and mirrors, air conditioning, a multimedia system, parking sensors, and electric drive of all windows.
Based on sales results in 2010, Priora became the absolute leader among all models from. Car owners appreciated the work of Russian engineers in modernizing the interior, chassis and power plant.
Dorestyling
The life of the owners of pre-restyling cars was darkened by the fact that, in addition to the reduced service life, even then it was darkened by the fact that when replacing some light bulbs it was necessary to remove the socket along with the bulb - this, for example, happened when the owner wanted to replace a side light bulb. Owning a Priora became increasingly expensive; rarely did anyone think about buying another headlight - developed by other companies. Installing light bulbs from foreign manufacturers solved the problem of poor lighting well and for a long time.
Turn
The turn signal signal is located the highest (in relation to the hood), and to remove it you don’t even have to wrap your hand under the hood.
- Remove three screws and a self-tapping screw from the plastic cover, pry it up with a flat-head screwdriver and remove it;
- Turn the cartridge strictly counterclockwise;
- Remove the cartridge;
- It is easy to press down on the lamp and rotate it counterclockwise until it begins to fall out of the socket.
When choosing a turn signal PY21W (Voltage 21 W), you should be careful - a lamp with a similar marking - P21W - will not have orange, but colorless glass, and will not be suitable as a turn signal.
Difficulties with replacement
The most convenient thing is to replace the turn indicators. In other cases, you have to twist very tightly and stand in this uncomfortable position for a couple of minutes until the job is done. This is not very convenient, because the light bulb is a consumable, but the engineers could make sure that replacing it was as easy as the plastic steering wheel insert on the “ten”.
Another inconvenience is that you have to remove the battery. Nobody argues that it is better to turn off everything before starting work. But the battery is removed for reasons of rationality - the battery takes up a lot of space and interferes with working with your hands while you stand in an awkward position.
Why the headlights don't light up - reasons
The most common reason for headlights not working is a burnt out light bulb. Its service life is indicated in hours on the packaging. For a low beam bulb, this limit can be 400 hours of operation. The second extremely possible reason could be a wiring malfunction due to water leakage, or the wire simply frayed. This problem is already more serious, because you will have to fuss with it much longer than with a regular replacement of consumables.
Often, car enthusiasts are too lazy to change light bulbs, driving out onto the road in “one-eyed” cars. This is very unsafe - it is recommended that immediately after a malfunction is noticed, you go for a spare part to replace a new lamp.
Technically difficult stages
More difficulties will arise at the next stage. If the luminous flux is lost due to a short circuit, you will need to remove the glass from the headlight. It is fixed using a fairly dense sealant, so you will need an installation cutter. A standard industrial hair dryer will not work here. Prolonged thermal exposure will destroy the structure of the lighting element.
Use a cutter to carefully pry off the surface of the glass and slowly cut the sealant. After this, both parts are separated. The work is completed by replacing the failed element and restoring the integrity of the headlights.
To check, you need to turn on the lighting device, making sure that it is working correctly. If for some reason the high or low beam does not turn on, you need to make sure the wires are connected correctly.
Correctly setting the headlights is the key to the safety of the driver and other road users. The slightest failure will significantly impair road visibility at night. In many ways, this contributes to an increase in the number of possible accidents.
Fuses and relays in Lada Priora, electrical diagrams
Lada Priora is another car in the line of new VAZ cars, which is gaining popularity among segments of the population. External similarities with the 10th model attract the attention of young people; the relatively low price is also a reason for purchase for most car enthusiasts.
Along with the growth in popularity, the owners of this model are gaining experience in repair and maintenance, which is becoming more and more every year.
If your Priora has electrical problems, do not rush to get upset; first, check the fuses and relays in your Lada Priora. These are the ones that will be discussed in this article.
Fuse box in the passenger compartment of VAZ-2170, -2171, -2172
The fuse box in Priora is located at the bottom of the dashboard, on the left side of the steering wheel. To get to it, you need to open the cover, which is held on by three latches. Rotate each locking knob 90 degrees and pull the lid down and it will snap open.
Fuses in the interior mounting block
F1 (25 A) - radiator cooling fan.
- If your fan does not work, check its motor by applying 12 V directly to it from the battery. If the engine is working properly, then most likely the problem is in the wiring or connectors. Check the serviceability of relay K1.
- The fan in the Priora usually turns on at a temperature of 105-110 degrees. Do not allow the engine to overheat, watch the arrow of the temperature sensor.
- If the fan runs constantly and does not turn off, check the coolant temperature sensor located on the thermostat.
- If you remove the connector from the working sensor, the fan should turn on. Check the wiring to this temperature sensor, as well as the contacts of relay K1, move this relay, clean the contacts. If this is the case, replace it with a new relay.
F2 (25 A) - heated rear window.
- Check together with fuse F11 and relay K2. If the rear window does not fog up, the heating element threads may have broken. Inspect all the threads and if you find a break, seal it with special glue or varnish, which can be bought at car dealerships for 200-300 rubles.
- Check the connection contacts at the terminals to the heating elements at the edges of the glass, as well as the switch on the dashboard and the wiring from it to the rear window.
F3 (10 A) - high beam, right headlight.
F4 (10 A) - high beam, left headlight.
- If the headlights do not shine on high beam, check the K7 relay and the headlight bulbs. The steering column switch, wiring or connectors may also be faulty.
F5 (10 A) - sound signal.
- If the signal does not work when you press the steering wheel button, check relay K8. The signal itself is located under the radiator grille; you can get to it by removing the plastic casing from above. Test it by connecting 12V voltage.
- If it doesn't work, try turning the adjusting screw, or replace it with a new one.
F6 (7.5 A) - low beam, left headlight.
F7 (7.5 A) - low beam, right headlight.
- When replacing lamps, be careful; there are separate lamps for the low and high beams, so they can be easily confused. It is better not to install lamps in high-power headlights; the reflectors may melt and the desired effect will not be achieved.
- Most low beam headlight problems that cannot be corrected by conventional means can be related to the light control module (LCM).
- The low beam relay is only available in cars equipped with a light sensor, it is located in the place of relay K1; on most cars this relay is not in the mounting block; the low beam circuit goes through the MUS block.
- It happens that the tracks in the block burn out; if there are problems, it is better to replace it with a new one.
- If the windshield wipers turn on spontaneously when the low beam is not working correctly, the problem is most likely in the windshield wiper control unit, located in the center of the dashboard, the topmost block, next to the radio, is best reached from the glove compartment, or by hand through the removed console covers at the feet.
Wiring
First of all, when the low beam stops working, check the reliability of the connections in all the blocks involved in the low beam electrical circuit. Their contacts often simply oxidize and after cleaning the problem is eliminated. Sometimes also due to vibration the connectors come loose and the circuit breaks.
The contact groups need to be cleaned of oxides - a needle file or a school eraser is suitable for this. A nail file will also work (this tool will probably be found in any car lady’s purse).
Sometimes the light does not come on because the button that turns it on fails. There are contacts inside it, which, in turn, can also be damaged by corrosion. It is not difficult to verify that the starting device has failed - just disconnect the wires from it and short-circuit them. If this is the reason, then the light will come on. There is no point in repairing a button that has become unusable - it is easier to replace it with a new one.