VAZ 2110 Location of units in the engine compartment
2.3. Location of units in the engine compartment
| GENERAL INFORMATION |
Location of units in the engine compartment of the 2F engine
| 1. Ignition coil 2. Oil dipstick 3. Windshield washer reservoir 4. Ignition distributor 5. Air filter 6. Spark plugs 7. Brake booster 8. Manufacturer's certificate plate | 9. Brake master cylinder reservoir 10. Clutch hydraulic reservoir 11. Fan 12. Power steering reservoir 13. Coolant reservoir 14. Engine filler cap 15. Oil filter 16. Radiator cap 17. Battery |
Location of units in the engine compartment of the 3F-E engine
| 1. Air filter 2. Windshield washer reservoir 3. Junction box 4. Ignition coil 5. Oil level dipstick 6. Automatic transmission dipstick 7. Spark plugs 8. Manufacturer's certificate plate 9. Brake master cylinder reservoir 10. Brake booster | 11. Fan 12. Headlight washer reservoir 13. Engine filler cap 14. Coolant reservoir 15. Ignition distributor 16. Oil filter 17. Power steering reservoir 18. Radiator cap 19. Battery |
Location of units in the engine compartment of the 1FZ-FE engine
| 1. Oil level dipstick 2. Brake master cylinder reservoir 3. Automatic transmission dipstick 4. Fuse box 5. Battery 6. Power steering reservoir 7. Ignition distributor | 8. Crankcase ventilation valve 9. Engine filler cap 10. Radiator cap 11. Coolant reservoir 12. Windshield washer reservoir 13. Air filter |
Bottom view of the front of the car
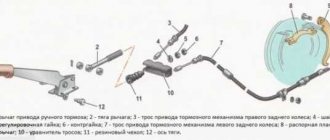
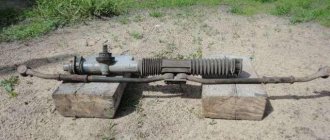
| 1. Filler plug for the front gearbox 2. Drain plug for the front gearbox 3. Cross rod 4. Steering gearbox 5. Spring 6. Shock absorber | 7. Anti-roll bar bracket 8. Engine drain plug 9. Automatic transmission pan 10. Front driveshaft 11. Exhaust pipe 12. Steer limiter |
Bottom view of the rear of the car
| 1. Cross rod 2. Exhaust pipe 3. Caliper 4. Shock absorber | 5. Rear gearbox inspection and filler plug 6. Rear gearbox drain plug 7. Muffler 8. Rear driveshaft |
Messages 7
1 Topic by 4istoff 2015-12-15 20:40:30
- Registration: 2015-12-13
- Messages: 85Thanks: 7
- Car: VAZ 2111
Topic: Resolved: The hood latch latches on the first click but does not close completely
The hood latch latches on the first click but does not close completely((what should I look for the reason? Thank you
- Denis Artyukhov
- Local
- Inactive
- From: Penza
- Registration: 2015-10-21
- Messages: 1,391Thanks: 279
- Car: VAZ 21124
Re: Resolved: The hood latch latches on the first click but does not close completely
4istoff, lift it up a little.
3 Reply from 4istoff 2015-12-15 21:50:29
- Registration: 2015-12-13
- Messages: 85Thanks: 7
- Car: VAZ 2111
Re: Resolved: The hood latch latches on the first click but does not close completely
- klimashov.roman
- Connoisseur
- Inactive
- From: Kasimov
- Registration: 2014-04-21
- Messages: 743Thanks: 143
- Car: GAZelle 33023 dv 405.22, 2.4 16kl 140hp
Re: Resolved: The hood latch latches on the first click but does not close completely
Lock.
5 Reply from 4istoff 2015-12-16 05:07:00
- Registration: 2015-12-13
- Messages: 85Thanks: 7
- Car: VAZ 2111
Re: Resolved: The hood latch latches on the first click but does not close completely
Ok, I'll try it today, thanks
6 Reply from Denis Artyukhov 2015-12-16 10:30:27
- Denis Artyukhov
- Local
- Inactive
- From: Penza
- Registration: 2015-10-21
- Messages: 1,391Thanks: 279
- Car: VAZ 21124
Re: Resolved: The hood latch latches on the first click but does not close completely
4istoff, at the same time center the lock. Or maybe it goes sideways.
- Registration: 2015-12-13
- Messages: 85Thanks: 7
- Car: VAZ 2111
Modifications of the VAZ-2112 car
VAZ-21120. Modification with a 16-valve injection engine with a volume of 1.5 liters and a power of 93 horsepower. 14-inch wheels were installed on the car. This modification has a problem with valves bending when the timing belt breaks. The problem can be solved by increasing the depth of the grooves in the piston bottoms.
VAZ-21121. The car was equipped with a VAZ-21114 8-valve injection engine with a volume of 1.6 liters and a power of 81 horsepower.
VAZ-21122. Budget modification with an 8-valve injection engine VAZ-2111. The car was produced without electric windows, the wheels were 13 inches in size, and the brakes were unventilated from a VAZ-2108 car.
VAZ-21123 Coupe. Three-door, five-seater hatchback. The only two doors for entering the car are 200 millimeters wider than those of the five-door hatchback, and they are mounted on new, durable hinges. The rear arches of the car have become wider. The engine was installed with a 16-valve injection engine with a volume of 1.6 liters and a power of 90 horsepower. The car was produced from 2002 to 2006 in small quantities, the reason for this was the high cost of the car.
VAZ-21124. Modification with a 16-valve injection engine VAZ-21124 with a volume of 1.6 liters. Produced from 2004 to 2008. For this type of engine, the problem with valve bending was solved. To do this, the depth of the grooves in the piston heads was increased (up to 6.5 mm). In addition, the design of the cylinder block was changed to achieve a working volume of 1.6 liters, for which its height was increased by 2.3 mm, and the radius of the crankshaft was increased by 2.3 mm accordingly. There were also a number of other minor changes.
VAZ-21128. The luxury version of the car, produced by Super-auto JSC, was equipped with a 16-valve VAZ-21128 engine with a volume of 1.8 liters and a power of 105 horsepower.
VAZ-2112-37. A racing modification of the VAZ-2112, prepared for the “ring” in the Lada Cup qualifying group. The car was equipped with a 1.5-liter VAZ-2112 engine with a power of 100 horsepower. The racing car was equipped with a safety cage, an external aerodynamic kit and a front extension of the strut support cups.
VAZ-2112-90 Tarzan. All-wheel drive modification with a VAZ-2112 body on a frame chassis with transmission and suspension parts from a VAZ-21213 Niva. It was also equipped with a 1.7 or 1.8 liter engine from the Niva.
Dimensions and features of modification 21102
Let's look at the technical characteristics of the VAZ 21102: overall dimensions, engine, transmission, suspension. Let's start with the dimensions.
| Aspects | Indicators |
| Length | 4.265 m |
| Width | 1.676 m |
| Height | 1.42 m |
| Wheelbase length | 2,492 m |
| Front track width | 1.41 m |
| Rear track | 1.38 m |
| Clearance | 16.5 cm |
The body type of the car 1102, like the entire line, is a sedan. The car is front-wheel drive, has 4 doors and 5 seats. The luggage compartment volume is 430 liters. The fuel tank holds 43 liters of gasoline. The curb weight is 1020 kg, and the total weight is 1495 kg.
Modification 21102 is the second oldest among all the “ten”. The opinion that this version is a successor to car 21101 is erroneous. In 1996, AvtoVAZ launched the first model of the VAZ 2110 into mass production. The pilot version of the “ten” was experimentally equipped with a carburetor fuel supply system. But a few months later, the company's leading engineers introduced a new version of Lada. It was decided that a modern car, which is the Lada 110, should have the injection principle of gasoline injection.
In the same 1996, an engine with an injector was introduced into the next version of the Lada - 21102. However, the number of valves was not increased from 8 to 16. This modernization “overtook” only the VAZ 21103 in 1997. But model 21101 is the youngest of the entire line. The version went on sale in 2004. It is a copy of the first “ten”, but has undergone restyling and modifications to the engine.
In the case of the VAZ 21101, repairs are less urgent, because the car is newer than 21102.
Hood lock of a VAZ 2110 car.
Hood lock
non-demountable design. Only two return springs can be replaced. The lock springs are the same.
You will need a key "10".
1.Remove the radiator trim.
2.Mark the position of the washers relative to the body. This will make it easier to further adjust the lock position.
3.Unscrew the two bolts securing the lock. Spring washers are installed under the bolts.
4. Rotate the lock 180° and remove it from behind amplifier 1 with a spacer to gain access to the place where the rod is attached to lever 2 of the lock. Disconnect the rod from the lever.
5.Replace broken, cracked or stretched springs. To do this, use a screwdriver to disconnect the spring first from the lever and then from the hinge on the lock body. Install the new spring in the reverse order of removal. In this case, it is more convenient to connect the spring to the lever with pliers.
6.Install the lock
in the reverse order of removal. After this, check the ease of opening and the reliability of locking the hood lock and, if necessary, adjust the position of the lock.
7. To replace the hood safety hook, mark the position of its bracket relative to the hood. This will make it easier to further adjust the hook position. Unscrew the two hook mounting bolts (there are spring washers underneath them) and remove the safety hook. When installing the hook, adjust the position of the hook using the enlarged holes in the bracket before final tightening the bolts. Finally tighten the bolts after making sure that the hook holds the hood securely in the closed position and that the hood opens freely when the hook handle is pressed.
Adjusting the position of the hood lock of the VAZ 2110.
1.The position of the hood lock is adjusted due to enlarged holes for mounting bolts in the bracket on the body. To adjust, loosen both mounting bolts.
2.If there is a hard impact when closing the hood and it is difficult to open, move the lock across the car.
3.If there is a lot of force when closing the hood or there is vertical play in the hood in the closed position, move the lock vertically (up or down, respectively). After adjustment, tighten the lock bolts.
Your reviews, comments, questions and answers on LADA-10.ru
Everyone is welcome to participate in the discussion about the causes of the malfunction and other problems. If you know what to answer, write and thereby help other VAZ 2110 owners in searching for the truth.
Comments on LADA-10.ru from VKontakte were launched in August 2013
We also have Lada
The site was created in 2010 — 2019
gg. In accordance with the law on copyright and related rights, reprinting of any site materials is possible only with the permission of the administration (Contacts)
and when specifying a direct link
lada-10.ru
Transmission and suspension
Lada 21102 has a built-in five-speed manual transmission (MT). This box is used on all versions of the 2110 line. It has good noise insulation, the lever stroke is comfortable, and the smoothness of switching is much better than that of Zhiguli and Samara.
The body (casing) of the box is made of aluminum alloy. Inside the casing there is a primary (drive) and secondary (driven) shaft. The shafts are combined with the differential and final drive. The five forward gears are equipped with synchronizers, which improve smooth shifting.
Gear ratios: 1st gear - 3.636, 2nd - 1.95, 3rd - 1.357, 4th - 0.941, 5th - 0.784. For reverse gear - 3.5. The final drive ratio is 3.7. The operating instructions state that you need to change the transmission oil every 75 thousand km.
What should a car enthusiast do?
First of all, carry out a complete diagnosis of the car's cooling system. This can be done in the garage, without complex devices and without special knowledge and skills. But you need to carefully remove the smell of antifreeze. Open the hood, check the pipes, hoses and covers for visible damage. Absolutely all system conductors must be checked. We replace damaged parts.
Another cause of a leak may be a malfunction in the engine crankcase. Failure leads to disruption of the functionality of the power unit. To diagnose, just look at the oil tank cap from the inside. If coolant gets on the engine crankcase, a white coating forms on the cover.
As a result of the leak, coolant can penetrate directly into the passenger compartment. This indicates a malfunction of the radiator. If a leak forms in it, some of the coolant penetrates into the cabin, where a characteristic sweetish smell is felt. We replace the radiator with a new one and remove the liquid. This can be done by placing newspapers on the puddle, which we throw away as they become soaked. Someone uses a plastic bottle. We make a hole in its lid, then squeeze the bottle to release air from it and apply the hole to the spilled moisture. In 3-4 passes, you can “suck out” the entire puddle in this way, and wipe off the remaining moisture with a rag.
The cause of the leak can be difficult to determine. If the source of suspicious traces cannot be identified, look at the radiator of the heating system. Coolant may also leak from the heater. Then an unpleasant burning smell is felt in the cabin. Leaking liquid will get under the mat. To fix the problem, you will have to replace the stove radiator by first disassembling its body.
The reason may not be in the radiator itself, but in the tubes connected to it. The joints can be treated with sealant. But it is better to immediately replace the problematic tubes with new ones.
To prevent the appearance of coolant vapors in the cabin, you need to check the level in the radiator from time to time. The evaporated liquid should be replenished, and if the evaporation is too intense, the cause of the problem should be urgently determined.
On thematic forums, it is advised to use the coolant of the brand that is recommended for use in your specific car model. It is not recommended to mix coolers of different types. Timely diagnostics of the cooling system will allow you to identify faults and increase the service life of the power unit elements.
↑ Cylinder block
The cylinder block is made by casting from special high-strength cast iron. The holes for the cylinders are bored directly in the block and additional inserts (liners) are not used in the cylinders. To obtain a special profile and surface cleanliness, the cylinders are honed. By diameter, cylinders are divided into 5 classes every 0.01 mm, designated by the Latin letters A, B, C, D and E. The class of each cylinder is marked on the bottom plane of the cylinder block.
The holes for the main bearings of the crankshaft are bored together with the bearing caps. Therefore, they are not interchangeable either with each other or with the covers of other cylinder blocks. In order not to confuse the lids, markings are made on them. The bearing caps are attached to the cylinder block with self-locking bolts, the replacement of which with any other bolts is unacceptable.
The auxiliary drive shaft rotates in two bushings pressed into the cylinder block. The front bushing is steel-aluminium, and the rear bushing is metal-ceramic, bronze-graphite. Spare parts are supplied with bushings of nominal and repair sizes with an internal diameter reduced by 0.3 mm.
Necessary tool for replacement on VAZ-2110
For dozens of older pre-2003 editions, the replacement is a little more complicated than the upgraded post-2003 2110 edition, but in any case, for the replacement we will need the following tools and supplies:
- container for draining antifreeze (with a wide neck);
- a set of screwdrivers with a square, extension and ratchet;
- Screwdriver Set;
- four new screw clamps;
- if you plan to replace antifreeze, use new antifreeze;
- correctly modified heater core (not interchangeable).
Replacing the heater radiator of the tenth family of a new model
Before disassembling, drain the antifreeze into a prepared container - if you have not completely replaced the fluid, you only need to drain it from the cylinder block by unscrewing the cap and placing the container under the engine. If you are replacing it, also drain the antifreeze from the radiator.
If a complete replacement of antifreeze is not planned, it can be partially drained, as shown in the photo (the expansion tank cap must be closed).
Before draining, remove the expansion tank cap and get to work:
- After draining the liquid, you can and should disassemble the expansion tank - loosen the screw clamps, remove the hoses, and unscrew the bolts securing the tank.
- The hood gasket should be in the way, remove it.
- Remove the sound and heat insulation from the engine casing. To do this, use a Phillips screwdriver to unscrew all the screws on the insulation from above. From below, the insulation is attached to the body with two bolts with a 10-mm head. It is more convenient to unscrew them using a high head with a cardan and an extension.
- Unscrew the plastic clamps from the insulating layer.
- We remove the finishing elements.
- Disconnect the connectors from the brake fluid level sensor on the reservoir cap.
- Remove the power steering vacuum tube from the body and set it aside.
- Using a 17mm socket and a ratchet, unscrew the master cylinder and carefully turn it forward without disconnecting the brake hoses.
- Go inside and disconnect the brake light switch connectors.
- Using a high head (13), unscrew the nuts securing the brake pedal and vacuum booster.
- From under the hood we take out the power steering with the pedal. There is no need to remove the plastic trim at the bottom of the windshield; everything can be lifted without it. Lift the vacuum unit and pull the pedal out through this hole. Move the vacuum valve to the side.
- The heater housing of the new copy is assembled from two parts, which greatly simplifies its dismantling. All you need to do is unscrew the three threaded bolts and first remove the right and then the left part. Remove the heater housing.
- Gain full access to the heater hoses by unscrewing the screw clamps on the inlet and outlet hoses and one steam vent.
- The radiator is installed at four points - a screw on top at the edge of the glass, two nuts at the height of the collector and one on the left near the filter. Find the screws that secure the radiator and remove them.
- Remove the old radiator, clean and rinse the cavity from dust and dirt, install a new or repaired old radiator. Assembly is carried out in reverse order. Pull out the old radiator. Clean the heater body from dirt.
- Remove the cover gasket and threshold plate.
- Remove the hose from this fitting.
- Remove the brake master cylinder.
- Remove the brake pedal mounting nuts.
- Remove the heater housing.
- Disconnect the connectors from the old radiator.
- Find the screws that secure the heating element and unscrew them.
After reassembly, check the operation of the heating element; the joints should be hot. If they do not heat up in the air seal system, remove it and check again.
We are replacing the stove 2110 of the old modification
Therefore, after draining the fluid and disconnecting the fan hoses, remove the frill, wipers and windshield trim. The radiator is held in place by clamps, 4 of which need to be removed.
Removing the windshield trim and heater casing clips.
After that:
- Unscrew the cabin filter mounting bolts; when unscrewing the bolts, remember their position (among them there are 4 long ones).
- Remove the fan with part of the casing. Remove the front part of the casing along with the fan.
- Pull out the filter housing and the back of the fan housing.
- Loosen the clamps and remove the three hoses (inlet, outlet and exhaust). Disconnect the hoses and pull out the old radiator.
- Pull out the heater core.
- When unscrewing the screws, remember their position (4 of them are long).
- Remove the front part of the case with the fan.
- Pull out the filter housing and the back of the fan housing.
- Disconnect the hoses and pull out the old radiator.
Do it yourself lighting of the engine compartment on VAZ 2112, 2111, 2110
Many people are faced with the problem that domestic cars do not have engine compartment lighting. This phenomenon greatly disturbs the driver when the engine needs to be repaired at night and the parts are not visible at all. Naturally, a thought immediately arises. Often, many motorists had breakdowns at night and there was no lighting at all. In this case, you had to use flashlights or lighters, which were held in one hand, and the other hand needed to repair the part, which is not a very convenient way to repair.
Everything was done, but time and effort wasted. After such unforeseen situations on the roads at night, it is best to install backlighting on the VAZ 2112, 2111, 2110. So, the work begins.
This article will talk about installing backlighting with LED bulbs or regular halogen ones. To successfully complete the job, you need to have the following tools and materials.
1. Engine compartment lamp from VAZ 2113 -2115 cars 1 pc. 2.Two-core wire, with a cross-section of 1 mm, approximately five meters long. 3.On and off button 1pc. 4. Hanging fuse 1 pc. 5. Flat fuse for five amperes 1 pc.
The installation begins. To install the light bulb, you first need to remove the hood trim, if there is one. Then you need to choose the place where the backlight will be attached. It is best to install on the left side, because that is where all the very important elements of the motor are located. You need to make a mark in this place. You need to make a hole in the hood trim. You need to do this in order to install a light bulb there.
We make a hole and install the entire structure back to see how everything will look, after which we remove everything back. Then, using a thin drill, you need to make a small hole in the hood stiffener rib, into which the lamp fastening element will then be screwed. Then you need to lay the wires. The wire must be pulled under the factory casing. The wiring must be routed to the switch. You need to run the wiring in the plastic part of the hood, after making a hole there. Then we solder all the wires and install them on sealant for installation in a longitudinal hole.
Now we install the light bulb and secure it with wires. One wire must be connected to the positive of the battery; the wire must first be connected to a 5-amp fuse, which will thus increase the life of the light bulb. In this case, the second wire can be easily connected to the hood terminals. In this case, the limit switch will automatically turn off the backlight, even if the button on the dashboard is turned on. Instead of simple and traditional incandescent lamps, it is best to install LEDs or LED strips. In this case, you need to do the work exactly as described above, but the result will be much better. This is how the backlight will look if you install an LED strip.
Why is this happening?
The main source of this problem in a car is moisture. Moreover, it can happen not only in wet weather. In combination with cold glass, moisture produces condensation. As a result, small drops of water form on the inside surface of the window and windshield. Of course, this negatively affects visibility and, as a result, traffic safety.
Often, excess moisture is removed from the interior by turning on the heater or blowing on the windshield. But this does not always give the desired result. Condensation still forms on the windows. If your car windows sweat, there may be different reasons. Let's look at ways to solve this problem.
How to repair the heating system of a VAZ 2112
An indispensable device for any car in cold weather is the stove. Sometimes it is necessary to replace the radiator heater on a VAZ 2112 with all the elements. The interior of the VAZ 2112 has built-in supply and exhaust ventilation. Air enters the cabin through special holes made in the windshield linings. Air can be supplied spontaneously or forcefully. In the second case, the supply is provided by the heater fan. It can exit the passenger compartment through cracks between the panels located inside the doors and holes in their ends. Built-in valves allow air to pass out and prevent it from getting in, which improves thermal insulation in the cabin. If necessary, the heater radiator preheats the air before entering the cabin.
What are the features of the VAZ 2112 heater radiator?
- The heater radiator of a VAZ 2112 car is located in a plastic casing under the dashboard in a horizontal position.
- The design consists of two rows of tubes made of aluminum with two plastic tanks pressed onto them. On the left there are two fittings: one for draining, the other for supplying coolant.
- The position of the dampers regulates the flow of part of the air that is taken in by the radiator. Its main flow passes by the radiator. If the damper is in its extreme positions, no air flows at all.
- A design feature is the absence of a tap, which should shut off the flow of coolant, which ensures constant heating of the heater radiator when the engine is running. In this case, the required temperature in the cabin is achieved faster, and the absence of a tap reduces the number of joints, places that can leak and create a lack of tightness in the entire system.
Dismantling the heater radiator of a VAZ 2112 car
If the heater radiator leaks, it must be replaced. Replacing the heater radiator in a VAZ 2112 begins with dismantling the entire dashboard and steering column. The work must be carried out carefully, which is due to the manufacture of most connectors from fragile plastic latches and clamps that can easily be broken. The radiator can be removed without dismantling the panel. Replacing the heater radiator on a VAZ 2112 is easier to do with the evaporator removed, but this requires preliminary depressurization of the main air conditioning system and removal of the refrigerant. The radiator removal instructions suggest:
Disconnect the battery.
- Disconnect the hoses installed on the heater bulkhead from the engine compartment side.
- Push the rubber seal on the partition into the interior of the cabin. To do this, you need to disconnect the edges of the seal from the edges of the hole in the partition.
- Remove the cover, the ashtray, the receiver, for the center pillar, and the front panels.
- Remove the heater and air conditioning control panel.
- Remove the electronic control unit without disconnecting it from the connector block.
Dismantling the control unit of a VAZ 2112 car
- Unscrew the bolts securing the left pillar to the base of the body and the bolts securing the ground wires; you do not need to completely remove the pillar.
- Unscrew the bolts that hold the right strut, then it is removed from the car.
- Use a Phillips screwdriver to unscrew the self-tapping screws that secure the stand to the front plastic panel from its reverse side.
- Remove the central air duct duct.
- Above the heater core, slightly shifted forward, there is a dividing damper, which must be removed along with the air duct section to increase the working space.
- Loosen the nuts on the studs that secure the left side of the evaporator housing.
- Unscrew the nut on the stud located near the upper pedal lever for controlling the throttle valve.
- Remove the bolts holding the lower right corner of the heater housing.
- Remove the heater lugs from the studs.
- Move part of the air conditioner evaporator housing to the side.
- Remove the heater from under the front panel; its general appearance is shown in the photo.
General view of the heater of the VAZ 2112 car
- Remove the clamps holding the heater pipes to the housing.
- Remove the radiator from the housing.
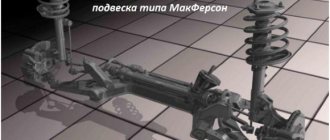
↑ Suspension
To install the engine assembly with gearbox and clutch, a three-point suspension scheme is used. The two front supports are located on either side of the cylinder block and are attached to the cross member of the vehicle's front suspension. The rear support is located on the gearbox and rests on a cross member fixed under the floor of the body.
The elastic cushions of the front supports consist of rubber with vulcanized steel washers and mounting bolts. To increase the rigidity of the supports, there are springs in the central hole of the cushions, supported by insulating rings, and to soften impacts, rubber-metal buffers are located inside the springs. The cushions are attached to the brackets using intermediate plates. The right cushion is protected from heating from the side of the exhaust pipe of the mufflers by a protective casing.
The rear support is also rubber-metal, it consists of three steel plates with rubber separating them. The middle plate is attached to the gearbox, and the outer plates are attached to the cross member of the rear engine mount. Steel spacer bushings are placed between the crossbar flanges to protect the flanges from deformation when tightening the fastening bolts.
Sound insulation of the hood of VAZ 2110
First you need to prepare not only materials, but also important tools. So, let's begin:
- Soundproofing material must be purchased in quantities of at least two sheets.
- You will definitely need sharp scissors or other suitable cutting tools.
- You will need good glue, not quite ordinary, but heat-resistant. In a store before purchasing, it is better to ask the seller in advance.
- A set of common motorist tools, including screwdrivers, pliers, wrenches, etc.
- Pieces of cardboard or thick paper.
- Any detergent.
- A flat table or floor on which the manipulation will be performed.
Removing the hood
So:
To carry out all work at a high quality level, it is necessary to dismantle the hood.
Removing the hood
This way we also get full access to the engine compartment.
Factory insulation
After removing the hood, you need to look for the factory insulation. If there is one, you will have to remove it. The plastic casing must also be dismantled.
Sample
So:
- Paper and cardboard are needed to make a template of the required hood planes. The forms are then transferred to cardboard and then onto insulating material.
- We cut out pieces from the soundproofing material carefully and as accurately as possible.
Sound insulation on the hood
- Next you will need to lubricate the material with glue. It is necessary to lubricate from the reverse side, where there is no foil.
- We wait until it dries (about an hour).
https://youtube.com/watch?v=p_CpOs64yas
Complete sound insulation
The above instructions are not the only one of their kind. You can make sound insulation with your own hands in other ways. The main thing is to study photos and videos, diagrams and drawings during the work process. Thus, the cost of repairs will be significantly reduced.
Engine valves VAZ 2110, 2111, 2112
The content of the article:
Adjusting engine valves VAZ 2110 8 valves
I decided to adjust the valves. On cylinder 2, the clearances of 2 valves (intake and exhaust) were not included in the ratings 0.2 and 0.35 0.35 (intake), exhaust (0.25). On cylinder 3, the intake valve was clamped (0:908
To adjust, I made a diagram of the intake and exhaust valves:
To adjust the valve, the camshaft tooth must point upward. This achieves a more accurate measurement of the gap between the camshaft and the washer.
The procedure for adjusting the valves is extremely simple: 1. Remove the crankcase gas pipes from the valve cover. 2. Unscrew the throttle cable from the receiver. I did not remove the cable completely, I just unscrewed the bar securing the cable to the receiver and moved it to the side. 3. Remove the valve cover,
4. We buy (if anyone doesn’t have one) a device (not a desiccant) for pressing on the valve plates to move them down. I took it for 200 rubles. The kit includes a clamp and the device itself. And a set of probes from 0.05 to 1 in increments of 0.05
Device c. 200 rubles
5. We hang up one wheel (I hung out the left one and turned it clockwise). We look at which camshaft teeth have turned upwards - on those we begin adjustment 6. We measure the gap (for intake ones - 0.2 + -0.05), for exhaust ones 0.35. for example, we measure the intake: - take a feeler gauge of 0.2 - it is inserted - we take more than 0.4 - it is not inserted - but let’s say 0.3 is inserted - the intake gap is not included in the nominal value (more by 0.05) - then press the washer with the device — insert the lock and remove the washer).
7. We calculate the height of the required washer, with the washers already removed and the gaps measured, the height of the old washer is written on the back of the washer.
Calculation of a new washer (from Murzilka): – determine the thickness of the new washer using the formula: H = B + (A - C), where A is the measured gap, mm; B—thickness of the removed washer, mm; C—nominal gap, mm; H—thickness of the new washer, mm. 8. buy new washers
Bent valves VAZ 2112
Hello everyone. I'm telling you. After recently replacing the timing belt, due to a poorly tightened intake shaft pulley bolt, the vibrations caused the pulley itself to slip halfway and cut off the pin. The result was that 4 intake valves in the 1st and 2nd cylinders were bent (as an autopsy showed after compression 0). I repaired the cylinder head, photo below.
We remove the timing belt, rollers, pulleys, intake manifold, all wires, thermostat and exhaust pipe. in general, everything that is attached to the cylinder head
remove the valve cover, unscrew the 10 bolts that secure the cylinder head to the block
This is the picture after removing the head. As you can see, the 4th piston is in the dig, but the cylinder mirror is without scoring
A lot of oil got in there and it burned out - that is, the valve stem seals need to be replaced
We put a brush on the drill and work it until it shines (turning the crankshaft a couple of times)
carbon deposits in the combustion chamber
in the photo of the valves closest to us, gaps of 2 millimeters are visible - these are the same evil valves
there was carbon deposits in the channels under the intake valves (it’s hard to see, but you can see it), we just remove it with a screwdriver
I cleaned it with a soft type of thick sandpaper (sanding felt), I don’t remember what it’s called. looks like a piece of cut felt boots)
We dry out the valves with a special device that clamps the valve spring and allow it to be removed with tweezers.
Spread a pea-sized amount of paste with diamond chips onto the edge of the valve, insert the end of the valve into the rubber pipe and begin to turn the valve with both hands, while pulling it down a little for more friction.
Next, we assemble everything in the reverse order, degreasing and coating with sealant. The bulkhead cost the following amount:
laying the intake pipe with sealant 58r. intake pipe nut 10x1.25 6x10r 60r. anaerobic sealant 50ml 529 rub. block head bolt 10x98 10pcs x 33r 330r. valve set 16 pcs. AvtoVAZ 2190 rub. head gasket 16kl 198r. rear crankshaft oil seal 99 RUR front crankshaft oil seal 1 piece x 83r 83r. front camshaft oil seal 2pcs x 83r 166r. oil scraper caps 16pcs 190r. ABBRO gasket sealant black 85 RUR. oil pump AvtoVAZ 1400 rub. front cover gasket 15r. Timing belt BRT Russia 1045r. timing tension roller VBF Russia 595 rub. intermediate roller VBF Russia 595 rub. timing pulley small 108r. timing belt key 50r. motor oil ELF 5l 5W30 1650r. NORD antifreeze red 5 l 1350 rub. service rental 2000 rub. Spark plugs NJK 4 pcs. 529 rub. OMEGA ignition module 1590 RUR.
VAZ-21124 engine control circuit
Connection diagram of the VAZ-21124 engine control system with distributed fuel injection under Euro-2 toxicity standards (controller M7.9.7): 1 - ignition coils; 2 — nozzles; 3 - controller; 4 - main relay; 5 - fuse connected to the main relay; 6 — cooling system electric fan relay; 7 - fuse connected to the cooling system electric fan relay; 8 - electric fuel pump relay; 9 - fuse connected to the electric fuel pump relay; 10 — mass flow and air temperature sensor; 11 — throttle position sensor; 12 — coolant temperature sensor; 13 — solenoid valve for purge of the adsorber; 14 — oxygen sensor; 15 — knock sensor; 16 — crankshaft position sensor; 17 — idle speed regulator; 18 — immobilizer control unit; 19 — immobilizer status indicator; 20 - phase sensor; 21 — vehicle speed sensor; 22 — electric fuel pump module with fuel level sensor; 23 — oil pressure warning lamp sensor; 24 — coolant temperature indicator sensor; A - block connected to the wiring harness of the ABS cabin group; B — diagnostic block; B - block connected to the air conditioner wiring harness; G - to the “+” terminal of the battery; D — to the side door wiring harness block; E - block connected to the instrument panel wiring harness; G1, G2 - grounding points; I - the order of conditional numbering of plugs in the block of the immobilizer control unit; II - the order of conditional numbering of contacts in the diagnostic block.
Connection diagram of the VAZ-21124 engine control system with distributed fuel injection under Euro-3 toxicity standards (controller M7.9.7): 1 - ignition coils; 2 — nozzles; 3 - controller; 4 - main relay; 5 - fuse connected to the main relay; 6 — cooling system electric fan relay; 7 - fuse connected to the cooling system electric fan relay; 8 - electric fuel pump relay; 9 - fuse connected to the electric fuel pump relay; 10 — mass flow and air temperature sensor; 11 — rough road sensor; 12 — throttle position sensor; 13 — coolant temperature sensor; 14 — idle speed regulator; 15 — control oxygen sensor; 16 — diagnostic oxygen sensor; 17 — solenoid valve for purge of the adsorber; 18 — knock sensor; 19 — crankshaft position sensor; 20 — immobilizer control unit; 21 — immobilizer status indicator; 22 - phase sensor; 23 — vehicle speed sensor; 24 — electric fuel pump module with fuel level sensor; 25 — oil pressure warning lamp sensor; 26 — coolant temperature indicator sensor; A - block connected to the wiring harness of the ABS cabin group; B — diagnostic block; B - block connected to the air conditioner wiring harness; G - to the “+” terminal of the battery; D — to the side door wiring harness block; E - block connected to the instrument panel wiring harness; G1, G2 - grounding points; I - the order of conditional numbering of plugs in the block of the immobilizer control unit; II - the order of conditional numbering of contacts in the diagnostic block.
What's under the hood of a car
Battery - designed to power electrical equipment when the engine is not running or at low engine speeds. When the engine is running, the power supply is mainly provided by the generator, which also recharges the battery
The battery is one of those items that should be under special attention. Air filter - serves to clean (process) the air entering the engine cylinders. It consists of a housing with an inlet pipe, a cover and a paper filter element
Know that the correct “air” supply to the engine depends on the condition of the filter element. If there is severe clogging or destruction, quite strong losses in power are possible (poor traction). Radiator - serves to remove high temperature from the engine, thereby preserving and reducing wear of engine parts (after all, when the engine is running, temperatures up to 2500 ºС arise, and such a temperature causes strong heating of the parts and their expansion, which can cause intense wear). Radiator cap - hermetically closes the radiator filler neck and serves to automatically regulate the temperature and pressure of the coolant. Structurally, it has inlet and outlet valves. Ignition distributor (distributor) - refers to ignition devices, designed to supply high current to the spark plugs. It consists of a low voltage current breaker and a high voltage current distributor combined in one housing. Gasoline pump (or fuel pump) - serves to supply gasoline (fuel) from the fuel tank to the carburetor under excess pressure. Diaphragm type. Expansion tank - it contains a certain amount of coolant, designed to compensate for the constantly changing volume of liquid in the cooling system of a running engine (by the way, the “supply” of liquid is regulated by a valve in the radiator cap). Windshield washer reservoir - serves to store a certain amount of water, which is supplied to the jets, which, if necessary, clean the glass. Structurally combined with an electric pump. Relay – designed for switching (turning on, turning off, switching...) electrical circuits from an external signal. Structurally, it consists of a relay element (usually a coil) and a group of contacts that open or close depending on the state of the relay element. There are a large number of relays - electrical, optical, thermal, etc. Mounting block - it contains fuses for electrical circuits that protect the car’s electrics from possible short circuits. In addition, it contains relays for switching headlights (high/low), turning on the sound signal, etc. Engine – serves to set the car in motion. Spark plugs - used to ignite the working mixture in the cylinders with a spark. Structurally, it consists of a metal casing, inside of which a ceramic insulator is placed. Inside the insulator there is a central electrode, the upper part of which is steel, and the lower part consists of an alloy of nickel and manganese. Brake fluid reservoir – serves to compensate the brake fluid in the brake system. Structurally, the nutrient tank is combined with a brake fluid level sensor. Clutch fluid reservoir - serves to compensate for the volume of clutch fluid during operation.
Why does the windshield constantly sweat from the inside: the main reasons
The windows in the car fog up from the inside due to the fact that the temperature in the cabin exceeds the outside temperature. As a result, the moisture contained in the cabin condenses on the glass. If the air humidity is high, then the windows cease to be transparent at all. This is why the inside of the windshield fogs up especially heavily when it rains (although this can happen in dry weather).
WATCH THE VIDEO
From all of the above, it follows that in order to eliminate condensation in the car interior, it is necessary to minimize the moisture content in the air. Its amount may be increased for several main reasons:
- Water on rugs or damp shoes
- Large number of passengers (breathing releases a lot of water)
- Wet interior
Most often, the windows in the car's interior sweat because of this. The recommendations in this case are simple: you need to take care of your shoes and cleanliness in the car, and also, in case of fogging, wipe the windows. In addition, before accepting passengers, you should warm up the car. However, there are other reasons why car windows sweat.
The cabin air filter is dirty
- Google+
- LJ
- Blogger
Foggy glass may be a sign that the air filter needs to be replaced. If it is dirty, moisture simply cannot escape from the car. In addition, air pollution appears in the cabin, and when the ventilation is turned on, no air flow is felt. Experts recommend not to wait for such consequences, but to replace the element every 10,000-20,000 km.
Problems with climate control
Due to a clogged drain hole, the moisture content in the cabin increases. This is what causes the car windows to sweat. All that needs to be done in this case is to clean the system.
Water entering the cabin
Moisture can enter the car not only through the doors, but also through the ventilation. All cars have drainage holes under the hood. If they become clogged, water will accumulate and enter the ventilation system. Because of this, the windshield sweats from the inside.
Wet sound insulation
Materials used for sound insulation in cars can absorb water well. This is especially common after driving through puddles or in rainy weather. To prevent the windows from sweating in the car, it is necessary to dry the material.
What to do if the glass sweats when the air conditioner is running
Quite often, motorists experience windows fogging up when the air conditioner is running for a long time. In this case, moisture forms outside. In fact, this process is normal (again, there is a large temperature difference). Therefore, there is no need to worry in this case.
The windows of the VAZ 2109 are sweating
Fogging of car windows is a common occurrence, which makes itself felt in the rain and when cold weather sets in. The reason for glass fogging is when it is blown by moist air. Moreover, a well-functioning stove does not always prevent fogging. If some compromise can be found regarding the rear window and side windows, then fogging of the windshield is a serious problem that directly affects road safety. Absolutely nothing is visible through foggy glass; constantly wiping it is also not an option. This problem is especially aggravated at night, when the headlights of oncoming cars begin to glow in the foggy spot. And if the car is not warmed up and there are a couple of passengers sitting in the back, then you are guaranteed to have foggy windows. Some drivers warm up the engine until warm air comes out and only then start driving, because blowing cold air does not prevent fogging.
The VAZ windows are sweating
The main reasons for fogging up the windows of a VAZ: - The cabin filter is clogged. Because of this, there is insufficient air flow to the windshield. After shaking out or replacing the filter, the air flow will increase and the glass will fog up less. This point is relevant for VAZ drivers starting from 2110, since older models, including the Nine, do not have a cabin filter. — Insufficient stove fan performance or problems with the air ducts. This point can be easily checked by stretching your hand forward and checking the intensity of the windshield blowing. — High humidity in the cabin. If the car is parked on the street and is not driven much, then the inside will be damp. Because of this dampness, the windows sweat more. As a rule, to correct this issue, the rugs are dried. — Cooling system leaking on the passenger compartment side. Sometimes you can even see not air coming out of the air ducts, but fog. In this case, it is necessary to check the heater faucet, heater radiator, and pipes for leaks. — Water getting into the car interior during rain. Perhaps due to bad door rubbers, clogged gutters, or holes in the bottom, water enters the interior and wets it. If you have gone through all these steps, but the windows are still sweating, then special anti-fog liquids will come to your aid. After treatment with this liquid, glass sweats significantly less. The problem of glass fogging is especially pressing for the VAZ 2110. PS As you already understand, the key word in the fight against glass fogging is dampness. In many foreign cars with air conditioning or climate control, when the glass blowing mode is turned on, the air conditioner automatically turns on. Why do you think? During operation, the air conditioner DRYS the air for blowing, so fogging of the windows disappears instantly. Unfortunately, VAZ air conditioners are installed only in new models.
Weak spots
What weak points does the body of the domestic nine have? Let's try to find out.
If rotten or deformed elements of the car body are detected, they must be removed and appropriate measures taken to restore the integrity of these areas.
The most vulnerable areas of the VAZ 2109 body include:
- Front floor, reinforced sills, doors, fenders and rear underbody;
- The hood has relative endurance, but over time it begins to lose its former properties. The area above the battery is especially affected. This is where Nine owners most often notice the formation of rust;
- A noticeable problem that many drivers face is the fuel tank floor;
- Optics reflectors and a muffler also cannot boast of a long life without the appearance of signs of rust.
Corrosion is obvious
Dealing with problems in general terms
To get rid of the problem of rust formation on the body, you need to do some work. On your own or with the help of specialists, decide for yourself.
- Disassemble the engine compartment, drain the coolant and remove the radiator.
- Remove all doors.
- If there is an amplifier (TV) in front, then it will also have to be disassembled.
- Using a grinder, all damaged areas are cut off;
- If the wings or panels are rusty, they will have to be cut off.
- If holes or holes have formed due to corrosion, they can be welded or patches can be used.
- It is recommended to additionally cover areas that are not highly resistant to corrosion with metal inserts.
- Experts advise strengthening mudguards with additional inserts and then securing them with spot welding.
- New body parts that are installed in place of rusted ones must be adjusted in accordance with the standards.
- After processing, the wings and sills are secured with screws, bolts and welding.
- Restoring the geometry of the body is a mandatory activity, on which most of the time is spent. To do this, you will need a bench machine on which the machine is fixed and adjusted in accordance with the norms of the control points.
- The next stage is welding a new floor, if required as a result of assessing the condition of the body. When restoring the floor, patches, connectors and amplifiers are used. At the final stage, the floor is covered with anti-corrosion compounds.
- It is easier to purchase new arches than to try to restore old ones. They can be coated with resin and waste oil mixed together. This mixture is excellent at resisting rust. Just do not use this composition to treat the bottom under any circumstances.
During body repairs, it is often necessary to jack up the car. If the jacking areas are rusty, use a support beam to lift the car.
Holes, rust
Often, the body is repaired independently if small areas are damaged, dents or holes are formed due to the effects of rust. In addition to correcting the geometry, painting and polishing are performed.