Technical description and interpretation of error P0343
The camshaft position sensor is an electronic device used in the engine to record the speed of the camshaft. This information is used by the engine control module (ECM) to control ignition and fuel injection.
The camshaft position sensor monitors the operation of the camshaft to identify a specific cylinder and determines the position of the piston. A sensor system consists of a rotating part, usually a disk, and a static part, the actual sensor.
When the engine is running, the high and low parts of the teeth cause the gap with the sensor to change. A change in the gap causes a change in the magnetic field. And a change in the magnetic field causes a change in voltage across the sensor.
When the crankshaft position sensor (POS) system fails. The camshaft position sensor provides various controls to engine parts. By synchronizing the cylinder identification signals.
Automotive trouble code P0343 is one of several common trouble codes related to the camshaft position sensor (CPS). It means that the sensor signal is too high, beyond the permissible parameters set by the car manufacturer.
P0343 refers to the Bank 1 "A" sensor. Bank 1 is the side of the engine that contains cylinder #1.
A little theory
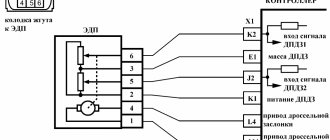
The camshaft position sensor (hereinafter referred to as CPR) is used to determine the angular position of the timing belt in accordance with the position of the crankshaft. The signals that the sensor sends to the ECU are necessary for correct fuel injection and ignition control.
DPRV is also called a Hall sensor, since its operation is based on the Hall effect, and a phase sensor (PD). All these names are correct, it’s just that in my diagnostic application on my phone it’s called the camshaft position sensor and I’m already used to calling it that.
The principle of operation of the DPRV is based on the change in voltage in the semiconductor when the magnetic field crossing it changes. I know - it’s not clear. Simply put, there is a metal tooth on the camshaft, which is called a reference, and in the DPRV there is a permanent magnet. When the benchmark passes by the sensor, an impulse arises in it, which is transmitted to the ECU.
Based on these very signals, the ECU already understands what position the camshaft is in, finds out when the first piston will be at top dead center, when to supply fuel to the cylinders and ignite the air-fuel mixture.
As you can see, a lot depends on one sensor for the correct operation of the engine.
Symptoms of malfunction
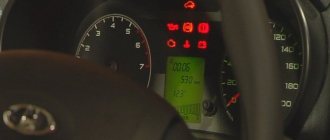
The main driver symptom of P0343 is the MIL (Malfunction Indicator Light). It is also called Check engine or simply “check light”.
They can also appear as:
The vehicle will most likely run with this trouble code. But it may be difficult to start, and there may also be a drop in power and unstable engine operation. To avoid damage to other engine components, if this code is detected, it is recommended that the problem be repaired as soon as possible.
How to Troubleshoot or Reset Trouble Code P0343
Some suggested steps to troubleshoot and fix error code P0343:
Often replacing the sensor will correct the P0343 code, but not necessarily. Therefore, it is important to check all points.
Diagnosis and problem solving
The problem with code P0343 can occur on different machines, but there are always statistics on which brands this error occurs more often. Here is a list of some of them:
With fault code P0343, you can sometimes encounter other errors. The most common are: P0030, P0036, P0124, P0332, P0335, P0336, P0340, P0341, P0342, P0345, P0346, P0347, P0348, P0349, P0365, P0366, P0367, P0368, P0369, P039 0, P0391, P0392, P0393 , P0394, P0606, P2122, P2138.
Where is the unit located?
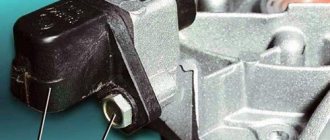
The sensor is located on the engine in two versions: on an 8-valve engine it is installed on the cylinder head, and on a 16-valve engine it is installed on the side of the drive camshaft in the area of the generator. It can be easily found and dismantled without visiting a car dealership, although the second option will require more effort and skills.
Phase sensor connector VAZ 2114 (8 valves)
Features of phased injection
The phase sensor on the Kalina and Priora engines is located in the upper part. It's next to the air filter housing. The operation of phased injection is characterized by the following features: an impulse is sent from the phase sensor to the electronic engine control system. The latter controls the fuel supply, as a result of which the injector opens and the fuel-air mixture enters the combustion chamber immediately before the intake valve begins to open. As soon as the valve opens, air is sucked in and the fuel mixture enters the combustion chamber.
p0504
Also, many owners of a Lada Priora with 16 valves have questions about the appearance of error p0504. She tells the owner that there is a malfunction in the brake pedal sensor. To find out the exact reason for the appearance of p0504, you need to remove the sensor and disassemble it. Pay attention to its springs, one of them could burst - replace the damaged part.
Another reason is copper contacts, which can burn. Inspect them and clean them if necessary. Sometimes error p0504 pops up due to the incorrect position of the brake pedal sensor on Priora 16. Twist it and check whether codes p0504 remain on the screen or not.
Error 0422
The efficiency of the Priora 16 neutralizer has fallen below the normal level - this is what error p0422 reports to the owner of the Lada Priora 16 valves. As practice shows, codes 0422 pop up quite rarely. If code 0422 appears on the on-board computer screen, then you need to perform the following steps:
To get rid of 0422 you will need to reflash the cathode collector. If you have the equipment to set the settings, you can do the work yourself.
Replacing the phase sensor on a Lada Kalina with your own hands
First of all, a little about the tools that will be needed to perform this type of repair. Fortunately, here you can get by with just a 10mm wrench. But it is best to use a socket with a crank, or even more conveniently, a ratchet. It will just be quite inconvenient to do this with a regular key.
First, it’s worth showing clearly where all this is located:
So, first you will need to disconnect the power plug, after first squeezing the plastic latch and lifting it up a little:
Then use a ratchet to unscrew the bolt securing the Kalina phase sensor:
And now you can freely remove it by pulling it towards the windshield:
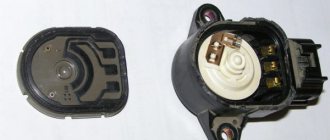
And this is what this part looks like when removed from the car:
After this, we replace the camshaft sensor and put the new one in its original place. There are absolutely no difficulties during the work process.
Its retail price ranges from 250 to 300 rubles, depending on where you buy it. Of course, this part fails quite rarely on Kalina, but still, these instructions will not hurt anyone.
About the so-called phase sensor on Kalina with 8 cells. 1.6 liter engine. Mileage 180 thousand. The engine is in perfect order. The signal indicating a malfunction of this particular sensor came on (the tester did not detect any more problems). First, CHECK went out after 10-15-20 minutes. drive. Then this time extended to half an hour, an hour. But still - it went out. Now it doesn't go out at all. I've been driving like this for about two to three months. I just did the diagnostics yesterday. Why ? The car has moved! The dynamics have clearly improved in all (.) modes. Fuel consumption decreased from 8.3 to 8.0 liters. The driving mode is standard and does not change from year to year. It is clear that it is now closer to summer, and consumption should decrease. But according to the physics of the matter, if the dynamics can improve, it is really due to an increase in fuel consumption. Reference: the average (multi-month) consumption has never fallen below 8 liters. What kind of standby modes are these that, in fact, seem to be better than the standard one? A friend, an excellent motor mechanic, albeit on marine diesel engines, suggested that due to the lack of afterburning (or whatever) exhaust in the cat. neutralizer - because the standard one has fallen apart, and naturally there is an empty collector in its place - the engine is well fed, everything is good, and everything that it doesn’t need goes straight into the atmosphere, without any extra hassle. Diagnostics does not show a malfunction of the lambda probe. He is the only one in the state, naturally on site. Straight up, miracles. Or would you say, replace this sensor? Should I go even better? But I repeat, the driving mode is absolutely standard and less than 8 liters. Over the 10 years of operation, the display showed very rarely, and not for long.
p1558
This error usually occurs on cars with a 127 engine. It is associated with the throttle valve, the quality of which in this power plant leaves much to be desired. P1558 does not interfere with normal engine operation, but you can still try to fix it. Some people solve the problem by flashing it, but we offer a simpler method.
Remove the throttle valve, and then remove the cover - this can be done using a hexagon. We find a plastic gear inside - this is the working part. Lubricate the gear thoroughly and reassemble in reverse order. Most likely, error p1558 will disappear after these manipulations.
How is self-diagnosis performed?
We have sorted out the main errors on the Priora, now it’s worth finding out how self-diagnosis is performed. The VAZ 2170 with 16 valves has a special controller with which diagnostics are performed. If you have an on-board computer installed, then diagnostics are performed on it. There is also special equipment that allows for a more in-depth check of Priora 16 class systems.
Since most Priora 16 cars already have an on-board computer, we will consider the option without the use of special devices. Diagnostics begins with activation of the test mode. The work proceeds according to the following scheme:
Replacing the device
If the device breaks down, there is no point in repairing it. It is much easier to replace the phase sensor, fortunately you will spend a few minutes on it. To carry out repairs you need a 10 mm socket and a ratchet. The procedure looks like this:
- Disconnect the negative terminal from the battery.
- Unscrew the sensor fixing bolt on the engine block and disconnect the block with which it is connected to the electrics.
- Clean all contacts on the block and install a new sensor.
If the wiring is completely intact and there were no problems during installation, all errors will disappear on the on-board computer. The engine will switch to phased injection mode.