Actually, the idea is not mine and has been sucked up many times on the Internet. I just finally got around to doing such a modification, since the old voltage regulator began to lower the voltage to 13.4 V. Which is not very good in winter and leads to undercharging of the battery. In addition, the mileage approached 60 thousand km. and according to the service book at this mileage it is necessary to “Clean the contact rings of the generator, check the wear and fit of the brushes.” Those. Please remove the generator.
The point of the modification is that the new voltage regulators, used for example on the Chevy Niva, measure and maintain the voltage in the vehicle's electrical system, and not on the alternator's auxiliary diodes, as was the case with the old voltage regulators. By the way, the voltage on the additional diodes can be quite different from what happens in the car’s on-board network and, together with thermal compensation, can significantly underestimate the on-board voltage. Hence the undercharging of the battery and its earlier death, especially for new calcium batteries, which require a slightly higher voltage for charging.
So, I purchased this voltage regulator from Chevy Niva - 94.3701. You can use similar ones, but with two terminals.
The connectors were cut off from the voltage regulator and screw terminals were installed instead. In the figure below: on the left - for an 8 mm bolt, on the right - 6 mm.
Next, install the voltage regulator in place, connect the right contact (6 mm) to the bolt to which the capacitor is connected. In the photo there is a circle with the number 3.
We connect the left wire (8 mm) to the terminal of one of the windings. In the photo there is a circle under the number 1. There is a slight subtlety here; under the bolt there is a textolite washer, designed to prevent the bolt from contacting the winding terminal. So you need to install the terminal so that there is no electrical contact between the bolt and the winding terminal. After installation, be sure to ring the tester to prevent a short circuit. Otherwise, failure of the diode bridge and even fire may occur.
Well, you also need to turn off the additional diodes. In the photo in circle 2. We bite off the metal plate leading from the additional diodes to the terminal on the tidy and bend it (the strip) to the side, or you can even bite a piece out of the metal strip.
That's all, install the generator in place and enjoy the results obtained. During subsequent checks on a warm engine, at idle speed with the load on (side lights, low beam, heater at 1st speed, heated rear window), the voltage does not drop below 14 V. No load - 14.2 V. The results are quite decent
another's computer
VAZ 2114 | Official community
return to page
Sasha Matveev pinned post
Is the Priorovsky generator suitable for four?
Like Show list of ratings
Old ones first
Will work with minor modifications.
Like Show list of ratings
Yes, there and from 2109, 2010 2011 they are all standard, just the amperage is different
Like Show list of ratings
It will work, I set it to 115 from the Priors without any problems, only the terminal doesn’t seem to fit, minor modifications and all is fire
Like Show list of ratings
Of course it will fit, the fastenings are perfect. But the terminals will have to be redone, on the standard one to 6, on the Priora to 8 and the excitation wire, to wire 1 on the Priora generator chip
Why 90A? Priorovsky is 115A.
VAZ 2115 generator from Priora
Therefore, the subject, since a friend had a Prior in 3 years, nothing happened to the generator; there was 13.9 volts of charge and it remained.
I know more current, but the battery must withstand it,
besides, I’m not running around on the highway right now; the car is mainly used in the city, so there won’t be high revs and, accordingly, recharging the battery with boiling over and other delights)))
But when the service technician did it for the first (and last) time, he said that it was a disease of tags.
As far as I know, a two-pin chip is inserted into the Prioro generator. One wire is to the charge control lamp, and the second input is from the tachometer. But they say you don’t have to connect the second one.
Install KZATE 9402.3701-03 with a new model LV and you will be satisfied.
and fastening to the bridge by SOLDERING (this is about the often pop-up question about burnt terminals of phase windings due to loose screws)
As far as I know, a two-pin chip is inserted into the Prioro generator.
In general, I’ll look at the store directly (which is used for priors) number like 9402.3701-04
So is it better to take KZATE or PRAMO?
I just lost all my brains. What have I done with it, two horseshoes, three regulators, and it has never happened since the new 14th century. In winter we had to recharge the battery. And in the end the lamps began to flicker, not much and only on a hot generator. While you remove it, it will cool down and you will ring it all together. The car was already shaking in time with the flickering. Now I have KZATE. I forgot about the voltage problems. 14.5 for cold and 14 for hot with main consumers. Finally the battery was charged to 100%. So it's a lottery I think. what is PRAMO what is KZATE.
Look for topics on the KZATE 9402.3701-03 generator, it can be modified to 90A.
So is it better to take KZATE or PRAMO?
Is the generator suitable for Priora VAZ 2114
But when the service technician did it for the first (and last) time, he said that it was a disease of tags.
As far as I know, a two-pin chip is inserted into the Prioro generator. One wire is to the charge control lamp, and the second input is from the tachometer. But they say you don’t have to connect the second one.
Install KZATE 9402.3701-03 with a new model LV and you will be satisfied.
and fastening to the bridge by SOLDERING (this is about the often pop-up question about burnt terminals of phase windings due to loose screws)
In general, I’ll look at the store directly (which is used for priors) number like 9402.3701-04
So is it better to take KZATE or PRAMO?
I just lost all my brains.
What have I done with it, two horseshoes, three regulators, and it has never happened since the new 14th century. In winter we had to recharge the battery. And in the end the lamps began to flicker, not much and only on a hot generator. While you remove it, it will cool down and you will ring it all together. The car was already shaking in time with the flickering. Now I have KZATE. I forgot about the voltage problems. 14.5 for cold and 14 for hot with main consumers. Finally the battery was charged to 100%. So it's a lottery I think. what is PRAMO what is KZATE.
Look for topics on the KZATE 9402.3701-03 generator, it can be modified to 90A.
So is it better to take KZATE or PRAMO?
Kzate I haven’t heard a single good review about Pramo
As for reliability, it really depends on your luck.
I just lost all my brains.
What have I done with it, two horseshoes, three regulators, and it has never happened since the new 14th century. In winter we had to recharge the battery. And in the end the lamps began to flicker, not much and only on a hot generator. While you remove it, it will cool down and you will ring it all together. The car was already shaking in time with the flickering. Now I have KZATE. I forgot about the voltage problems. 14.5 for cold and 14 for hot with main consumers. Finally the battery was charged to 100%. So it's a lottery I think. what is PRAMO what is KZATE.
Installation of a generator from Priora on a VAZ 2114
Below you can see the technical specifications of how to connect a generator from a Priora to a VAZ 2114. Express your opinion about the car in the comments.
Original name: . . . . ?? . . . priors' ?? . 2114
Release date: 07/17/2022
Posted by admin: at the request of Demid
Reasoning of a car owner named Toros: I bought it, sat down and drove 600 miles without reading the instructions, etc., everything is harmonious and convenient - it’s German.
Laughter on topic: - Mom, I'm going for a walk! - Who are you going with? Where will you be walking? When will you return home? What will you go on? - Dad, I'm going for a walk! - Okay.
Description: Dimensions are as follows: length - 3977, width - 1100, height - 1989 mm. The wheelbase is 2845 mm. Ground clearance 199 mm. The car is equipped with a hybrid power unit. The 2-cylinder engine is equipped with a system that provides engine power output. There are 4 valves per cylinder. The diameter of one cylinder is 76 mm, the piston stroke is 79 mm. The engine crankshaft accelerates to 8000 rpm. Maximum torque is maintained up to 4000 rpm.
The generator's task is to ensure the functionality of the entire electrical circuit of the car. In this case, we are talking about the VAZ 2114 model. The system facilitates the distribution of electricity. It cannot be called perfect and trouble-free, so sometimes certain problems may arise.
When to change the alternator on a car: main factors
In a car, the generator is a repairable part, so if the standard device malfunctions, you should not rush to buy a new mechanism to replace it. The process of repairing devices will be discussed in a separate article, but first it should be noted that the most common reasons for their malfunction are:
- worn brushes;
- voltage regulator malfunction;
- malfunction of the diode bridge (contacts oxidize or diodes fail);
- collector wear.
Failure of bearings or oxidation of contacts also leads to incorrect operation of the device for generating electricity in the car. However, all these defects can be eliminated without the need to replace the device. There are also situations when it is necessary to replace the generator. Such situations include:
- malfunction of the windings, that is, their damage, burnout, etc.;
- mechanical damage to the housing;
- insufficient device power.
Interesting! If voltage sags are detected, the first step is to check the belt tension.
If it becomes necessary to replace the generator on a Priora, you should first find a suitable option. Today, such devices are offered by different manufacturers, so car owners have plenty to choose from. Below are suggested dimensions of the generator for Priora
(using the example of ATEK brand devices).
Diagram of a Priora generator with dimensions
Next, we will analyze what types of generators were installed on Prioras from the factory, as well as the types of devices to replace standard mechanisms.
Replacement
Now let’s talk directly about how we can remove our ill-fated generator. We recommend that you study the relevant videos in order to better understand the nuances of dismantling.
If you follow the instructions, there should be no problems with removal and replacement.
- Find a place where there is a lift or pit. That is, an ordinary garage may be quite suitable.
- Remove the protection from the power unit.
- Loosen the drive belt tension roller slightly.
- The upper bolt responsible for fastening the generator should be unscrewed.
- By analogy, we work with the lower fastening element.
- Next, be sure to disconnect the air conditioning compressor fasteners.
- Then remove the drive belt.
- Now you can remove the generator from its seat and move it slightly to the right in relation to the battery.
- Remove the bolt on top of the air conditioning compressor. Remove the compressor and hang it up. Don’t worry, the tubes used are quite reliable, so they can easily handle the weight.
- Remove all bolts from your generator holder.
- When you disconnect the terminal, calmly pull down the generator along with the holders.
- Reinstallation of the new device is carried out in strictly reverse order. In this case, adjusting the drive belt is a must.
It is not difficult to remove and replace such a unit yourself. But you will definitely need certain skills and preliminary study of the instructions. Use only high quality and efficient replacement parts to ensure that your generator does not cause problems in the future.
A generator in a car is a device that ensures stable operation of the vehicle’s on-board electrical network, in particular the VAZ-2114. This system of generating and supplying electricity has its advantages and disadvantages. In this article we will look at the main malfunctions of this unit, as well as the process of replacing the part with a new one.
Basic device malfunctions
On a VAZ-2114, the generator may fail for the following reasons:
- The fuse has blown. To solve the problem, it is enough to install a new element, having first determined why it failed.
- A break in the circuits that go to the devices. Be sure to make sure that the neutral conductor is connected to other contacts.
- Malfunction of the ignition switch.
- The control lamp has burned out.
- Problems with generator brushes. To fix the damage, you need to install a new brush holder and brushes. Additionally, clean the slip rings, which are probably already oxidized, using WD-40.
- Damage to the voltage regulator.
- Problems with the belt.
- The bearing has failed.
The above breakdowns are quite common and if the problem is not solved in time, the generator may fail and will have to be completely replaced. In terms of costs, the car owner will lose much more money compared to repairing minor faults.
If you need to replace a part, you shouldn't do it yourself unless you have the proper experience in car repairs. In this case, it is better to seek help from a service station.
Basic problems
There are several main problems specific to a generator. If you study them, it will be quite possible to carry out repairs even on your own.
We will list them and also tell you about the necessary additional actions to eliminate them.
Your actions
To fix this problem, simply replace the old fuse with a new one. But be sure to determine the reason why the problem arose
The circuit supplying the devices has broken
In this situation, be sure to make sure that the neutral wire is connected securely to the other contacts
Having problems with the ignition switch
Check if the ignition switch board is working
The control lamp has failed
Just change the device to a new one if the lamp just burns out
You will have to change the brushes themselves, as well as their holders. Check the contacts for oxidation. They can be treated with WD40 or cleaned with gasoline
Voltage regulator does not work
This unit must be replaced. It is impossible to repair it
The alternator belt is damaged or faulty
You can try to adjust the belt tension if this is the problem. If the unit is damaged, it must be completely replaced.
Only its complete replacement will help here.
Such breakdowns occur quite often, so they cannot be ignored at the first sign. Having understood the structure of the generator, solving problems with its malfunction becomes much easier.
Where is he located
Before removing the generator, you need to at least figure out where this device is located.
This is exactly where the desired element is located.
Functionality check
If the generator does not work correctly, the consequences can be unpredictable. If the charge coming from the device is low, the battery will quickly run out and your VAZ 2114 will simply stall. High voltage is even more dangerous because it damages the entire electrical circuit of the car.
The power indicators of the generator can be measured using a tester.
- Turn the ignition on and make sure all the lights on the dashboard come on. After this, start the power unit.
- If the battery icon lights up on the panel or blinks dimly, there is damage to the alternator circuit.
- Warm up the engine to approximately 90 degrees, then turn on all volatile devices.
- Connect the tester directly to the battery. The second person at this moment will press the gas pedal and keep the speed in the region of 3.2-2.5 thousand revolutions.
- When the tester reads 13V, the generator is working properly.
- Now turn off all power consumers and take measurements again. The revolutions are kept the same. If the generator is working properly, the tester readings will be 14.7V.
- At the same time, we recommend paying attention to the sounds that come from the generator. If there is a hum, there is a high probability of bearing wear, which should be replaced.
Generator for VAZ 2110 which injector is better
thx was just wondering
07.26.2017 — 14:29 Alexander Menshchikov
I bought it in 2013 at the eleventh volt start, died a week later, passed it under warranty
07/05/2017 — 22:00 Denis Kamozin
start volts is complete crap the bearing fell apart after 7 thousand km.
Hello, could you tell me one thing? When many devices are turned on, the voltage drops. If you power the relay regulator with a plus to the power terminal +, and not with the add. diodes? Does the minus of the relay need to be moved? Or can I leave it on the body?
05/13/2017 — 04:44 Alexander Selivanov
my drain outputs 14.5. So I shouldn’t bother?
05/06/2017 — 23:00 Murat Karaketov
Replacing brushes
During regular maintenance, few people pay attention to minor generator malfunctions. Subsequently worn brushes are always a surprise. However, you should not rush to replace these parts. Initially, you need to determine why this happened, and only then disassemble the case.
The brush replacement process is as follows:
- Disconnect the wires from the generator.
- Remove the cap from the wires going to +, unscrew the nut that secures it, and remove it from the block.
- Remove the plastic casing by first releasing the clips.
- Disconnect the voltage regulator clamp and do not forget to disconnect the wire block.
- Replace the brushes and reassemble in reverse order.
Please note that you need to check the wear of the brushes by the degree of wear of the length of the rod, the value of which can be less than 0.5 millimeters. If the length of the brushes is normal, then the reason for the lack of charge is a faulty voltage regulator.
Which generator to install
Most car enthusiasts strive to install a part with more power than the standard device recommended by the manufacturer. In this case, the most suitable options would be the Priora or Kalina models. The power of such devices is 115A, while the factory equivalent is only 80A.
However, if you install another generator, you will need to install a different pulley. This procedure is simple and does not require large financial expenditures.
Experienced drivers recommend installing an Eldix generator on the VAZ-2114, the power of which is the same 115 A. But such a device has a significant drawback - it is difficult to find spare parts for repairs.
Which generator should you choose?
Before we get to the story about which VAZ 2114 generator is better, it’s worth saying - why shouldn’t you buy a battery native to the 14th model? The fact is that it is designed for a fairly low current - only 80 A.
Considering that while the car is running, the generator has to not only charge the battery, but also power electronic devices, this current is simply not enough to fully charge the battery (we should also add, albeit small, current losses in the circuit). That is why it is advisable to install a more powerful generator.
When choosing a generator in a car store, it is better to give preference to more expensive models. As the practice of many drivers shows, the cheapest models of generators fail almost immediately.
So, what devices can be installed on the VAZ 2114?
Firstly, without any modifications you can install 37.3701 from the 15th model. It is completely interchangeable with the original 14th generator, but the problem is that its amperage is even less - only 55 A. Therefore, it should be installed only as a last resort.
The second acceptable option is a generator from Priora or Kalina - it creates a current of 115 A, which is enough to charge the battery and operate all on-board electronics. True, you will have to replace the device pulley with a more suitable one.
The third option is a generator from PRAMO, which has an amperage of 120 A. This is the most optimal option of all for 2114.
And finally, generators from Eldix with a current of 80 or 115 A - they are completely identical to the 14th model generator in terms of external dimensions and pulley parameters. The only thing worth remembering is that they are practically not repairable. Even if there is a minor breakdown, the entire device will have to be replaced.
What kind of generators are installed on Priora: without air conditioning and with air conditioning
In this material we will consider only the types of generators that are installed on Prioras, as well as their varieties offered by modern manufacturers. We will not delve into issues of product repair, as this will be the subject of a separate article.
From the factory, different types of generators were installed on VAZ-2170 or Priora cars. They differ not only in current ratings, but also in manufacturers. Below is a description of the purpose of the generator on a Priora car, as well as some of its characteristics.
Some sources claim that generators were installed on the Priora, which were marked 5102.3771. This model is shown in the photo below.
This is partly true, but not entirely, since over the entire period of production of these cars, devices from different manufacturers and modifications were installed on them.
VAZ-2170 or Priora cars were equipped from the factory with the following generator options:
- The first Prior models of the pre-restyling type were equipped with generators from KZATE, Pramo-Electro and SAP with a rating of 80A, 90A and 100A, respectively. Devices with a rating of 80A and number 9402-3701 from KZATE were installed on Priora without air conditioning.
- Units from SAP (Samara Auto Pribor) with code 4302.3771 were installed on Prioras without air conditioning with a similar rating of 80A.
- Priors with air conditioning were equipped with 90A 9402-3701 generators from KZATE.
- On Prioras with Panasonic air conditioning, there are also 90A units marked 4302.3771.
- Luxury pre-restyling Priora configurations were equipped with 100A Pramo-Electro devices with code 5102-3771-10.
- On Priors with air conditioning, generators from the BATE company (Belarus) were also installed, with code 3202.3771 for 90A.
- In 2013 (6 years later), an updated version of Priora was released. External changes were minor, but the technical components were improved. This also affected the generator, in which the nominal value has changed. On Priora with air conditioners, units with a nominal value of 115A manufactured by KZATE and marked 9402.3701-14 began to be installed.
- Pramo-Electro 5162.3771 115A generators with code 2170-3701010-12 were also installed.
In theory, the power of such generators should have been enough to ensure stable operation of electrical appliances, as well as charge the battery. In reality, this did not work out, and therefore today car owners of restyled Priors are gradually switching to a modernized version of units with a current rating of 140A.
Interesting! Some modifications of Priora cars were also equipped with Bosch generators from the factory.
The disadvantage of such generators (from Bosch) is that when moisture gets in, they often begin to fail. The reason for this is the specific design, where the winding terminals are connected to the diode bridge by crimping, rather than welding or soldering.
Sequence of replacing the generator on a VAZ-2114
To replace, follow these steps:
- Place the machine on a pit or lift it with a lift.
- Remove the engine protection.
- Next you need to loosen the tension roller for the drive belt.
- Unscrew the top bolt that secures the generator.
- Remove the bottom bolt.
- Disconnect the air conditioning compressor retaining fasteners.
- The drive belt is removed and the generator can be removed from its seats by moving the device closer to the battery.
- Next, unscrew the top bolt that secures the air conditioning compressor.
- Now you can completely remove the compressor and hang it on its own tubes. The pipes are quite strong, so they can easily support the weight of the block.
- In this step, unscrew the generator holder bolts.
- Disconnect the terminals and the generator, disconnect the holders that can be pulled down.
- Installation of the new part occurs in the reverse order, followed by adjusting the belt.
To summarize the article, we note that we told you about the main malfunctions of the generator on the VAZ-2114, and also examined the process of replacing the device. If you have never encountered this kind of repair work, then the best solution would be to contact a service station.
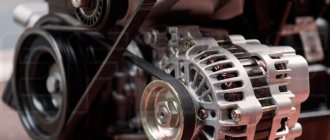
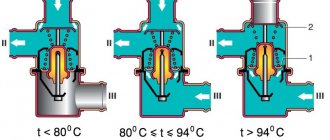
The device of a car generator
A generator is a device driven by a car engine through a system of pulleys and a drive belt. Thanks to this rotation, an electric current is generated inside the device, which serves to charge the battery and operate on-board devices.
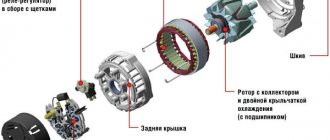
All car generators consist of the following elements:
- aluminum cover with slots for mounting bearings, terminals and other elements;
- a stator with power windings connecting it to a rectifying device;
- rotor;
- diode rectifier block;
- relay-regulator.
Speaking about which generator is installed on the VAZ 2114, we should immediately mention its performance characteristics:
- output current - 80 A;
- generated voltage - from 13 to 14.7 V;
- sagging of the drive belt under a load of 10 kg is no more than 0.8 cm.
When choosing a new generator for the 14th model, you should give preference to devices with increased current strength - not 80, but 100 or even 120 Amperes. This will help with the operation of the on-board electronics and will allow the battery to be charged to 100%.
Generators for VAZ 2106 and 2107
The generator on the VAZ 2106-2107 costs the same as on the VAZ 2101 - G221. If you install additional external current consumers that operate constantly, this will lead to undercharging and insufficient current will be supplied from the relay regulator. These additional devices include:
- powerful audio systems;
- fog lights;
- TV;
- preheater;
- additional heater;
- fridge.
Any similar device will lead to greater power consumption and, consequently, to premature battery discharge, even when the engine is running at high speeds. Standard devices for 2106 were developed a long time ago and are not designed for modern energy-consuming add-ons.
In this case, it is recommended to replace the standard generator with a more powerful unit.
What to install?
G 222
It can be installed on a VAZ 2106 G222 with a standard regulator, but then it is necessary to change the connection diagram of the electrical machine.
On 2107 everything is installed without problems.
Check the voltage at medium engine speeds at the battery terminals, if it is 14 V at 2500 rpm, then everything is fine. You can drive with a more powerful unit by connecting additional options.
Generator 2108
This installation has greater efficiency, delivering a current of 55 A. It is installed on both 2106 and 2107.
It is useful to make some more minor modifications. Instead of the old relay, install a regular power one. Then the light comes on only when the engine starts and at low speeds.
On 2107 you only need to add a power relay.
2107-3701010
When installing this equipment on 2106, it is better to modify it: replace the relay regulator with a similar one from G 222.
Regardless of which generator is installed on the Priora, the owners of these cars often replace the unit due to the fact that not all devices allow connecting various equipment to the on-board network. Which manufacturer is good and which device is better to install on the Lada Priora?
You can supply generators of the following brands:
- BATE 90 ampere;
- KZATE 115a;
- BOSCH 120 amp;
- devices manufactured by VAZ for 120 or 115a.
Generator unit for Priora
In principle, other models of generator devices for domestic cars can be found on sale. When purchasing, the main thing is to check the integrity of the unit so that there are no signs of damage on the body. It is better to install high power so that there is a power reserve, thereby the device will last longer. In addition, it should be taken into account that it is not recommended to install less powerful generators, especially if many devices are connected to the vehicle’s on-board network.
Generator repair for VAZ 2113-VAZ 2115
Disassembly
1) First you need to remove the generator; the article will help you understand the procedure: “Replacing the generator on a car.” Then remove the voltage regulator from the generator and the rectifier unit, the publication will help you with this: “Replacing the generator rectifier unit on a VAZ.”
Note! The roller can be removed using an 8mm hex key. If you don't have one, try finding a flat-head screwdriver of the appropriate size. Be careful not to strip the thread when unscrewing the nut. The removal mechanism is as follows: a hex wrench stops the shaft with the installed roller from turning, and the roller fastening nut is unscrewed with a spanner (photo 1). Remove the unscrewed nut and its spring washer. By the way, this washer is of an unusual shape; examine it carefully: on one side it has a convex shape, and on the other it is flat. The convex part must be installed to the nut (photo 2).
2) We proceed directly to the repair. Use a marker or chalk to mark the two generator covers, noting their location relative to each other - you need to install them exactly as they were. Proceed to unscrewing the four bolts located around the circumference of the generator (photo 1). Next, use a flat-head screwdriver to separate both covers from each other (photo 2). Disconnect the cover located on the side of the slip rings (photo 3, rings are indicated by arrows). Now remove one of the important elements of the generator - the stator, by pulling it and removing it (photo 4).
Note! Be sure to check the removed stator for integrity; the condition should be acceptable, the inner surface (indicated by the arrow) without scratches - signs of touching the armature. The presence of marks and damage is a sign of faulty bearings or deformation of the generator cover.
3) Separate the cover from the rotor, and remove the rotor itself - simply grab the rotor with your hand and pull out the shaft (photo 1, the rotor shaft is indicated by a red arrow) from the bearing (indicated by a blue arrow). If the shaft does not pull out, screw the nut that previously secured the roller onto it. There is no need to install the roller, just screw on the nut. Then, having started to knock out the shaft, the rotor will not fly out of the bearing and will not hit the asphalt. Do not tighten the nut all the way, just screw it a little onto the thread. Using a hammer and a wooden spacer, knock the shaft with the rotor out of the bearing, controlling the effort. After removing the rotor, inspect the cover (photo 2). Pay special attention to the bearing; rotate it by hand: rotate the inner part in the direction where the rotor shaft was inserted. If you notice jamming, play, or rolling, replace the bearing. Take a screwdriver and remove the four screws securing the metal washer (photo 3), remove them from both sides of the cover. The bearing is knocked out using a hammer and a socket or mandrel of suitable diameter (photo 4).
Note! Check the cover for defects and if there is significant damage (large cracks, dents, etc.), replace the cover with a new one.
4) Let's move on to actually checking the generator. First, be sure to look at the contact rings (indicated by arrows in photo 1). The presence of marks, burrs, scratches is a sign that the rings need to be polished to a shine. This can be done using fine-grained sandpaper or a lathe. use the machine in extreme cases, for example, if nicks, marks and scratches cannot be removed with sandpaper. When working on the machine, erase the minimum layer of metal, and then sand it a little with sandpaper. Now take a multimeter and turn on the ohmmeter function on it. Check the resistance of the rotor winding by connecting the leads from the multimeter to the contact rings (photo 2). The infinity sign means that there is a break in the winding and the rotor must be replaced. Check whether the rotor winding is short-circuited to the housing: connect a multimeter to one of the rings, and throw the other lead onto the rotor housing (photo 3). The infinity sign in this case means that everything is in order and the winding does not short-circuit to the housing. Finally, check to see if the bearing on the ring side rotates easily (photo 4). The presence of play, wobbling, jamming during rotation, and rolling is a sign that the bearing is unsuitable for further use.
Note! Let's explain the bearing replacement procedure:
- be sure to stock up on a special bearing puller and press the bearing from the shaft (photo 1);
- install a new one;
- Find a mandrel (cap head) of a suitable diameter and hammer the bearing until it stops (photo 2).
By the way, try to choose a mandrel of such a diameter that it applies force only to the inner ring, indicated by the red arrow in photo 1).
Assembly
It is carried out in the reverse order of disassembly, taking into account some nuances:
- any bearing is pressed in with a hammer and a mandrel of the required diameter (photo 1)
- covers are carefully inspected for defects;
- the covers are connected relative to the previously made marks;
- an o-ring will be installed on one of the covers (photo 2), which must be replaced in case of defects (cracks, breaks).
Note! Install the adjustment washer located between the generator roller mounting nut and the cover bearing with its convex side facing the nut and tighten it to a torque of 39–62 N·m (3.9–6.2 kgf·m) using a torque wrench.
The best generator for VAZ 2110-12
FAQ on generators (automotive)
What is the service life of a car generator? The service life of a generator varies greatly and depends on the quality of its performance. For example, a standard generator can last 140 thousand km, which is almost 10 years of operation.
How to replace the generator on a VAZ of the tenth family? Replacing the generator is shown here.
Is it possible to repair a generator with your own hands? Self-repair of generators is possible (for example, replacing the slip rings of the generator) Approximate cost of spare parts:
- Winding 600 rub.
- Anchor 850 rubles.
- Generator diode bridge 250 rub.
- Generator brushes 100 rub.
- Generator bearing 150rub/set.
At these prices, repairing generator malfunctions is much more profitable than buying a new generator.
What is the price of a generator for a ten? The cost is from 2500 rubles to 5000 rubles. By the way, in order to save money, a generator from Volga (406 engine) is installed on the VAZ 2110, the price of which is 2200 rubles. No alterations or modifications are required.
So, let’s vote and leave reviews about the VAZ generators of the tenth family:
- What generator did you buy?
- Impressions and comments on the operation of the generator?
- How long did the last generator last?
ps Off-topic comments will be deleted.
Which generator is better to choose for the VAZ 2110-12?
If a dozen is standard with small additional consumers, then what should the generator current be?
How long did your standard VAZ 2110-12 generator last?
Possible malfunctions and ways to eliminate them
The operation of Lada Priora generating devices may occasionally fail.
For what reasons may a generator from Priora not work correctly:
- Elements F12 have burned out on the fuse diagram. In this case, the devices on the dashboard will stop working, and the lamp will not light up when the ignition is turned on. Replacing the part will solve the problem.
- There has been a break in the power supply circuit of the instrument devices; the symptoms will be similar to those described above. To fix the problem, you need to check the connections, as well as the contacts from the orange wiring.
- The ignition switch refuses to function. Regardless of what kind of lock it may be, it needs to be changed.
- Souring or wear of the mechanism brushes, oxidation of slip rings. Symptoms of malfunction will be the same. To solve the problem, you need to change the voltage regulator on the Lada Priora, and also clean the contacts. Many priority drivers today use a three-level voltage regulator - three levels allow you to always control the voltage level in the network.
- The excitation winding leads have broken. The problem can only be solved by replacing the rotor of the unit.
- If the drive belt slips, the battery discharge lamp will indicate this - adjusting the tension will solve the problem.
- Another reason why the Priora Lux generator may be faulty is damage to the valves of the rectifier device. The block itself will have to be replaced.
- The battery discharge lamp may appear when the diode batteries of the excitation winding are damaged. In this case, the rectifier unit will also have to be changed.
- A short circuit or break may occur in the stator winding - it will be necessary to repair the latter or install a new one instead. Also, the stator needs to be changed in case of an interturn short circuit or a short circuit to ground.
- The bearing elements have worn out - the car owner will be informed about this by third-party sounds when the generator unit is operating. In the video below you can familiarize yourself with the procedure for repairing a mechanism at home (the author of the video is Repair and Tuning).
Generator - performance check
Many car enthusiasts are interested in how to test a new generator that has just been installed on a car? Or how to check that the old one has already failed, although it seems to be working normally? After all, driving with a faulty generator can have a number of unpleasant consequences, the easiest of which is completely discharging the battery and stopping the car, and the most severe is damage to the on-board network and devices.
In order to test this device, you will need a tester (multimeter).
The diagnosis itself is performed in the following order:
- Turn on the ignition.
- Check to see if the generator/battery lights on the instrument panel come on.
- Start the engine - if the light goes out, then everything is in order, if not, then there is a malfunction.
- Wait until the engine warms up to operating temperature.
- Turn on ALL electrical consumers - lights, fans...
- We bring the engine speed to 3500.
- Turn on the multimeter in voltage measurement mode and connect the probes to the battery.
- If the generator is working, the multimeter will show 13 volts, if less, then there is a malfunction.
- Without turning off the engine and maintaining speed, turn off all electricity consumers - the multimeter should now show 14.7 volts or slightly higher - this also indicates that the device is working properly.
By performing the test according to the specified scheme, you can quickly and accurately determine whether the generator is working. But, there are a number of indirect signs that may also indicate a malfunction of this device.
These include:
- the battery charging icon is constantly lit;
- interruptions in the operation of electrical equipment, flickering headlights;
- boiling of the electrolytic solution in the battery;
- Generator operation is too noisy (as a result of bearing failure).
If you detect even one of these signs, you should immediately perform a full check (according to the scheme described above). If it turns out that the generator is faulty, a new one should be installed instead. But we’ll look at which generator is better to put on a VAZ 2114 below.
Stories from our readers
“Fucking basin. "
Hi all! My name is Mikhail, now I’ll tell you a story about how I managed to exchange my two-wheeler for a 2010 Camry. It all started with the fact that I began to be wildly irritated by the breakdowns of the two-wheeler, it seemed like nothing serious was broken, but damn it, there were so many little things that really started to irritate me. This is where the idea arose that it was time to change the car to a foreign car. The choice fell on the melting Camry of the tenth years.
- HUCO-130512
- Febi-17202
- Bosch-1197311028
- Hella-5DR 004 242-061
- Beru-0 190 005 004
The modification process begins with the removal of the relay regulator. Required:
- Standard voltage regulator (160r.)
- Voltage regulator from a foreign car for 14.5V.
The box contains the catalog code for the spare part. Price 420 rubles, a cheaper brand will cost 220 rubles. In general, any company will do, the main thing is that the shape is identical to ours.
We separate the tablet from the standard voltage regulator; this is done simply and does not require demonstrations. As a result, we just get a bare body with brushes. We separate the 14.5V tablet from the LV of the foreign car. Be careful not to damage the tablet. Now we are trying to combine the tablet of a foreign car and our body with brushes.
- The photo shows a dismantled tablet with a foreign car's pH and a body with brushes.
- Because it is a little larger, it is not that easy to install. This is what a combined foreign-made 14.5V tablet looks like with our PH housing.
- And a standard pH and a 14.5V tablet assembled and ready for use.
Next, we solder the leads of the foreign tablet to our RN body. The terminals will have to be slightly bent to fit the outputs of the LV housing. We place the tablet on the standard PH body and screw the tablet to the body with bolts.
Next, solder the terminals of the tablet. We clamp the lead at the very base to dissipate heat and place the solder so that the lead of the tablet is completely covered with tin. We cover the nuts to prevent self-loosening due to vibration. We get a standard pH and a tablet from a foreign car at 14.5V. Now all that remains is to install a reinforced generator on the car.
As a result, our high-power generator showed:
- On a warm car, the voltage at the terminals is 14.4V
- With an average network load, the voltage was 14.2-14.3V
- When all devices were turned on, the generator voltage dropped to 14-14.1V and remained the same when the internal combustion engine warmed up to 90C o.
Another way to increase the car's network voltage is to install a diode in the generator or other voltage regulator. If after such modifications the generator still cannot cope, then think about how to put the electrical equipment in the car in order.
The generator is responsible for the functioning of the complex of accounting programs for the electricity of the VAZ 2114 car. This system of dispersing electricity has its shortcomings, both purely personal and more widespread.
- The fuse has blown. To fix this problem, you just need to change the fuse. But first you need to find out the reason.
- The circuit supplying the devices is broken. Be sure to check the connection of the neutral wire with other contacts.
- Damage to the ignition switch. Make sure the ignition switch circuit board is in good condition.
- Indicator lamp malfunction.
- Brush malfunction. To eliminate the malfunction, you need to change the brush holder and the brushes themselves, just clean the oxidized contact rings in the presence of gasoline, or treat them with WD-40.
- Malfunction in the voltage regulator.
- Damage, as it is also called, is a malfunction of the alternator belt.
- The bearing is faulty or broken.
The described malfunctions often occur, if you ignore them and do not make the necessary repairs in time, the generator will be completely destroyed, and then it will have to be completely replaced. Which in monetary terms is even more costly than repairing small problems.
Connection diagram for the VAZ 2114 (2113, 2115) generator
Several generators of both domestic and foreign production are installed on VAZ 2113, 2114, 2115 cars. In addition, generators from other models of front-wheel drive VAZ cars are suitable for installation on 2113, 2114, 2115.
The electrical connection diagram for these generators is almost the same. Using the 5102.3771 generator as an example, let’s see how it can be connected to the on-board network.
Connection diagram for the generator of VAZ 2113, 2114, 2115 cars
Connection diagram for a generator on a VAZ 2114 (2113, 2115) car