02/04/2022 19 431 VAZ Kalina
Author: Ivan Baranov
The cause of misfires in the operation of the power unit may be not only damage to the high-voltage wires, but also to the ignition module. The article gives recommendations on how to check the ignition coil on a Lada Kalina car with an 8 and 16 valve engine.
[Hide]
Engine VAZ 21114
This power unit is an injection gasoline engine with a displacement of 1600 cm3. This is a modernized version of the VAZ 2111 engine. The cylinder block is cast from cast iron, four cylinders are located in one row.
The valve train of this engine has eight valves. The injector made it possible to significantly improve the car’s dynamics and fuel economy. Its parameters comply with Euro-2 standards. The valve mechanism drive uses a toothed belt, which somewhat reduced the cost of the power unit, but requires high-quality, timely maintenance of the timing drive. The design of the piston head provides recesses that completely eliminate the possibility of damage to the valve mechanism if the timing belt is damaged or installed incorrectly. Manufacturers guarantee a motor life of 150 thousand km; in practice, it can be more than 250 thousand km.
Let's sum it up
If the results of the diagnostic actions of the LADA Kalina car reveal that the ignition coil is faulty, then replacing this unit is a very simple undertaking. To implement the process, you will need a hex wrench. Before dismantling, we recommend that you remember the location of the high-voltage cables at the corresponding coil terminals. This will eliminate switching errors when installing the device.
The car jerks, there is no traction, vibration is felt, or the engine is rough; all these are symptoms of improper operation of the individual ignition coil (IIC). Other signs of a faulty ignition coil are the presence of errors 0301, 0302, 0303 and 0304, indicating misfire in one of the cylinders. Let's look at a few simple ways to check the ignition coil with your own hands.
It is worth noting that the process of checking IKZ on modern Lada cars (XRAY, Vesta, Largus, Granta, Kalina and Priora) does not have significant differences. All actions are performed in the same way.
Removing the timing belt
You will need: remove the generator belt, the right wheel and the plastic shield of the engine compartment, prepare a “10”, “17” key, a “19” socket, and a screwdriver.
- Remove the plastic engine cover.
- Remove the timing drive protective cover by unscrewing the three fastening bolts.
- Timing diagram.
Set the piston of the first cylinder to the top dead center position:
- Turn the crankshaft clockwise by the bolt until the mark on the toothed pulley aligns with the antennae on the rear timing cover.
- Remove the window plug at the top of the clutch housing and make sure that the mark is not located opposite the scale slot.
- Secure the crankshaft from turning by inserting a screwdriver through the window between the flywheel teeth.
- Remove the bolt securing the generator drive pulley while holding the screwdriver. Remove the generator drive pulley.
- Loosen the tension roller nut. Remove the timing belt by turning the pulley so that the belt is loosened as much as possible.
- Remove the tension roller by unscrewing the nut securing it.
Have you noticed that the timing belt is eating or slipping? The reason may be a defective belt, rollers, or a pin that is overtightened.
conclusions
The appearance of Check Engine on the dashboard indicates a malfunction or error in engine operation. The article discussed the main causes and methods of eliminating this phenomenon. Of course, not all motorists are able to check, much less repair, the Lada Kalina, so in such cases it is recommended to contact a car service center, where they will do everything efficiently and quickly, although not very cheaply.
Almost every Lada Kalina car owner has encountered the problem that the engine idles intermittently. But not everyone knows the reasons for this effect. In this article we will look at the problems that cause a malfunction, as well as methods of elimination.
Replacement procedure
The method can be used if there is no need to change the rollers.
- Cut off half of the old timing belt with a utility knife.
- Remove half of the old timing belt.
- We put a new timing belt on the crankshaft pulleys.
- We cut the second half of the old timing belt and remove it.
- Pull the new timing belt onto the crankshaft pulleys until the end.
The operation is not particularly difficult, does not require any special equipment, and can easily be done by the hands of the machine owner. In addition to a standard set of wrenches, you will need a good slotted and flat-head screwdriver. Car jack, car body stand, wheel chocks, key for turning the roller in the tensioner.
When replacing, you can use any flat horizontal platform on which the machine is installed. The vehicle operating instructions recommend replacing the belt at 50 thousand km, but many owners perform it earlier, at approximately 30 thousand km.
Replacing the timing belt Kalina 8 valves will take place in the following order:
- With the vehicle installed, apply the hand brake and install wheel chocks under the rear wheels. Use a wheel wrench to remove the wheel bolts of the right front wheel.
- Using a car jack, lift the front side of the car on the right side, install a stand under the body sill, and remove the front wheel on this side.
- Open the hood of the engine compartment, since further work will be carried out there.
- To dismantle the timing belt in the timing drive, it is necessary to remove the plastic protective cover, which is secured with three 10mm socket bolts.
- The next step is to remove the belt in the generator drive. You will need a “13” wrench, which is used to unscrew the tensioner nut of the generator set and move the generator as close as possible to the cylinder block body. After such actions, the drive is easily removed from the pulleys.
- Now install the timing drive according to the marks. You will need a socket wrench or a “17” socket, which is used to rotate the pulley on the crankshaft until they match.
- To dismantle the belt in the timing drive, it is necessary to stop the crankshaft pulley from turning. You can ask an assistant to engage fifth gear and press the brake pedal.
If this does not help, open the plug on the gearbox housing.
Insert the blade of a flat-head screwdriver into the hole between the teeth of the flywheel and the gearbox housing, and unscrew the bolt securing the pulley to the crankshaft.
- To remove the belt, release the tension roller. The bolt securing it is unscrewed, the roller rotates, the tension weakens, after which the old belt is easily removed. It is recommended to simultaneously change the tension roller, which is removed from the block, at the same time as the drive. There is an adjusting washer installed under it, which some “repairers” lose.
- Inspect the pulleys on the crankshaft and camshaft, paying attention to the wear of their teeth. If such wear is noticeable, the pulleys should be replaced, as the contact area with the belt teeth is reduced and they can be sheared.
- Install the new tension roller in its place. Do not forget about the adjusting washer between the cylinder block and the roller, otherwise the belt will move to the side when rotating.
- Installation of a new belt is carried out in the reverse order, but before that, check again how the gas distribution marks match. You need to start the installation with the camshaft pulley, then put it on the crankshaft pulley and the pump pulley. This part of the belt should be tensioned without any possible sagging, and the opposite side should be tensioned with a tension roller.
- Installing the pulley on the crankshaft will again require securing it from possible rotation.
- Next, put the protective covers in place and adjust the generator drive.
After installing the timing drive, be sure to turn the engine crankshaft several revolutions, while checking that all installation marks match.
Setting marks
The efficiency of the motor depends on the correctness of this operation. There are three of them on the engine, which are located on the camshaft and rear protective shield housing, crankshaft pulley and cylinder block, gearbox housing and flywheel. There is a pin on the camshaft pulley that must be aligned with the bend on the rear timing cover housing.
The tension roller is an important part of the gas distribution system on the Lada Kalina. If you tighten it, this will greatly accelerate the wear of the mechanism; if the tension is weak, ignition failure may occur due to the belt slipping. The amount of tension is adjusted by turning the tension roller on its axis.
“Craftsmen” act differently; they use drills or nails with a suitable diameter, which are inserted into the holes. A screwdriver is placed between them, the handle of which is used as a lever to turn the tension roller to the left or right until the desired result is obtained. The correct tension will be when the body of the belt between the pulleys can be turned 90 degrees with your fingers, and after releasing the belt returns to its original state. If this condition is met, tighten the fasteners in the tensioning device.
The procedure for checking the short circuit
So, there are signs of a malfunction, you should check it.
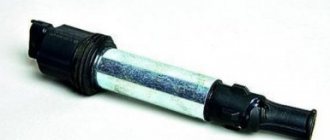
First of all, the coil must be dismantled. For this you will need:
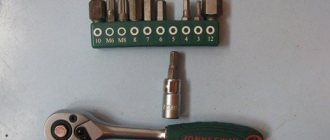
- prepare a ten-point socket wrench;
- disconnect the terminals on the battery;
- open the protective casing covering the motor;
- press the locking device out of the plastic, disconnect the wiring from the coil terminal;
- remove the fastening bolt;
- pull out the ignition coil.
An inspection is now underway. It should not show any cracks, melts or leaks on the caps and body parts. Only slight smokedness is allowed. Electrics can be checked in several ways. Having installed a working spark plug, we check the device for the presence of a “spark” on the car body. If there is no spark from the coil, then it is quite possible that the short circuit has lost its functionality. In such a situation, you should check the gap in the spark plugs. All work should be performed with rubberized gloves to completely prevent contact of the body or tool with the car body or engine. The fact is that the coil is capable of generating voltage in the range of 20 - 40 kV. Another option is to remove the coil and install it on a good cylinder on another car to perform a drive test. If the short circuit is faulty, it will immediately appear. The third method is instrumental.
The main reasons why the ignition coil breaks are considered to be high temperatures or overheating, which contribute to the formation of cracks. There is a high probability of short circuit failure due to the accumulation of moisture or the formation of corrosion, frequent switching on of the ignition without subsequent starting of the engine, prolonged overloads when an unsuccessful attempt to start the engine.
How to install and tension the timing belt
- Place the timing belt on the crankshaft pulley.
- By tensioning both branches of the belt, we put the rear branch on the pump pulley and wind it behind the tension roller.
- We put the front branch on the camshaft pulley.
- Tension the timing belt by turning the tension roller counterclockwise and inserting a screwdriver (as in the photo).
- Tighten the bolt securing the generator drive pulley and turn the crankshaft by the bolt 2 turns clockwise.
- We check the coincidence of the crankshaft and camshaft marks. If the marks do not match, repeat the operation to install the belt.
Selected aspects of technical operation
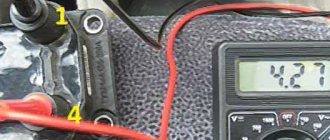
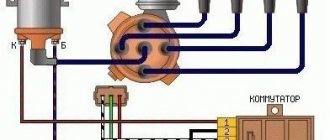
Often the reason for many calls to the service station is not so much malfunctions in the high-voltage wires, but rather the incorrect operation of the Kalina ignition module. To carry out diagnostics, you can go to a service center or pick up the tools yourself. One of these is a multimeter used to measure the actual resistance level on the 8-cell pins. engine. To obtain correct measurement results, it is necessary to carry out 2 times.
The ignition system can be damaged in any part of the circuit, so monitoring must be careful. It all starts with checking that the winding is properly connected to ground. It is necessary to carefully insert the contacts, focusing on the indicators of the device. Then one of the contact terminals of the device is connected to the central contact of the spark plug coil. In this case, the second contact is attached to ground.
If an infinity symbol is visible on the multimeter screen, this indicates that there is no short circuit in this area. This should tell the car owner that the ignition circuit is in perfect order. Car owners without sufficient experience in car maintenance should be guided by the following fact. If, in addition to the infinity icon, there remains a “1” on the monitor, which was there before connection, this indicates that the section is working properly.
Which belt to buy
The efficiency of the car engine depends on the quality of the parts used in the timing mechanism drive (tensioner roller, belt). When repairing or servicing a car, it is advisable to use original parts, but in some cases, non-original spare parts for automobile components have worked well.
The article number of the original timing belt is 21126-1006040, which is produced by the RTI plant in Balakovo. Experts recommend confidently using parts from Gates, Bosch, Contitech, Optibelt, Dayco. When choosing, you should be especially careful, since under the brand name of well-known manufacturers you can buy a fake.
A little about prices
We have already noted which switch and transistor are used when repairing the ignition module of a dozen. The first costs about 3 dollars, and for the second you will have to pay about 6 dollars.
Some craftsmen use a domestic analogue of the transistor - model KT848A . Of course, it costs less. But its problem is its lower quality and larger size, which somewhat complicates the repair process.
Adjusting the ignition timing
Il. 9.1. Tools and equipment required to check and adjust the ignition timing: stroboscope and wrenches with appropriate sockets, extension inserts and ratchet drives required to unscrew the clamping bolt or nut securing the ignition distributor
Il. 9.2. Read the data on the sticker under the hood of the car or in its maintenance manual that regulates the ignition timing and engine operating mode when checking and adjusting it.
Il. 9.3. Locate, clean off any dirt, and use a marker to mark the alignment mark, which is usually located on the vibration damper located on the front side of the engine. To make the alignment mark easier to see, highlight it with chalk, correction fluid, or paint.
Il. 9.4. Connect the power wire and ground wire of the strobe light to the positive and negative terminals of the battery, respectively.
Il. 9.5. Place the pliers of the inductive strobe sensor on the high-voltage spark plug wire of cylinder No. 1
Il. 9.6. The ignition timing test procedure for this 5.0L Ford 8-cylinder V-twin engine requires that the SPOUT connector be located and disconnected. This connector is located next to the ignition distributor
Il. 9.7. Remove the SPOUT cable connector from the mating part. Through the contacts of this connector, the signal from the sensor installed in the ignition distributor is transmitted to the computer, which uses it to correct the initial ignition timing.
Il. 9.8. Most ignition timing test procedures written for engines equipped with a vacuum ignition timing control valve state that the vacuum hose to the ignition distributor vacuum control valve must be disconnected and tightly closed.
Il. 9.9. On most GM vehicles equipped with carbureted engines and a computer control system, such as this eight-cylinder V-twin engine, you must unplug the four-pin connector located next to the ignition distributor.
On some GM engine models, to set the ignition timing, you must first connect pins A and B of the data link connector (DLC) to each other. Be sure to study the procedure for checking the ignition timing, compiled for the model of car you are servicing
Il. 9.10. Start the engine and point the strobe light at the timing marks. Be careful not to accidentally come into contact with fan blades or drive pulleys.
Il. 9.11. Alignment marks in the pulsed light of a strobe, synchronized by the ignition of cylinder No. 1
Il. 9.12. If the ignition timing angle is outside the established limits (the installation mark does not coincide with the specified fixed mark), loosen the clamping bolt or nut of the ignition distributor using a wrench. Special curved wrenches are available to make this operation easier.
Il. 9.13. Do not completely unscrew the clamping bolt or nut, but only loosen it enough so that the ignition distributor can be turned
Il. 9.14. This is the most difficult operation. While observing the position of the alignment mark, smoothly turn the ignition distributor until it reaches the correct position. The clamp of the ignition distributor must be loosened enough so that the distributor can be turned, but at the same time it cannot turn spontaneously
Il. 9.15. After the installation mark is set to the specified position, smoothly tighten the clamping bolt (nut) securing the ignition distributor. After this, check again that the alignment mark remains in the correct position, because when tightening the clamping bolt, the ignition distributor may rotate, which will cause a change in the ignition timing
Il. 9.16. Connect the SPOUT connector
Il. 9.17. Disconnect the strobe light from the high-voltage spark plug wire of cylinder No. 1 and the battery terminals
Il. 9.18. For “high-quality” adjustment of the ignition timing, you can also use a vacuum gauge. It may happen that the torsional vibration damper is damaged and the alignment mark is knocked out of the correct position relative to the fixed mark or the alignment mark is missing on the engine
Il. 9.19. The procedure for adjusting the ignition timing using a vacuum gauge begins by connecting the vacuum gauge to the vacuum sampling port in the engine intake manifold.
Il. 9.20. Loosen the clamping bolt (nut) securing the ignition distributor. The SPOUT connector and no other connectors are disconnected. The best result of adjusting the ignition timing using a vacuum gauge is achieved when the computer continues to adjust the ignition timing
Il. 9.21. Start the engine and allow it to warm up to normal operating temperature. Slowly turn the ignition distributor (in the direction of increasing the ignition timing) until the maximum vacuum is reached according to the vacuum gauge readings (in this example it is 19.5 inches of mercury)
Il. 9.22. Upon reaching the maximum vacuum as measured by the vacuum gauge, the ignition distributor is turned in the opposite direction (in the direction of decreasing the ignition timing) until the vacuum gauge reading decreases by 2 inches of mercury compared to the maximum reading obtained in the previous adjustment step
Il. 9.23. When the vacuum gauge needle reaches 2 inches below the highest reading (in this example, 17.5 inches Hg), tighten the ignition distributor clamping bolt (nut). Although this method of adjusting the ignition timing does not provide accuracy to guarantee the achievement of a mode that ensures minimal exhaust gas toxicity, it is accurate enough to establish a safe engine operating mode that prevents engine damage.
Il. 9.24. After completing the ignition timing adjustment procedure, recheck that the distributor clamp bolt is properly tightened and reconnect any vacuum hoses or connectors that were disconnected during this procedure.
Symptoms of a problem
The main symptoms of 3D damage are most often obvious:
- The Kalina ignition key does not turn. You should not think that it can only jam in the “0” position. Sometimes, on the contrary, the car cannot be turned off because the key does not return to the neutral position.
- A number of devices do not work, including the indicator lamps on the panel do not light up.
- The starter does not turn.
- There are constant interruptions in movement, with the disappearance of readings from control devices.
- The instrument panel lamps light up after several turns of turning the key in one direction or the other.
As with any problem, some symptoms do not necessarily point to a lock. Therefore, before disassembling it, you need to exclude all other options. This can often be done based on indirect evidence. For example, if the starter does not rotate, but when you turn the key to position “2”, the relay clicks, then the lock is working.
How to set the ignition on a VAZ-2114 8 valves: injector, video
The second Samara became the first car among VAZ front-wheel drive vehicles with an injection power system initially. The first copies of the VAZ-2114 were still going on sale with an eight-cylinder injection engine and a contactless ignition system, and the following engines already had a fully electronic system with the same 8 valves. Before you set the ignition, you need to find out what system is installed on the engine, which is what we will do now.
Ignition systems of the 8-valve injection VAZ-2114
It is quite simple to calculate the cost of the ignition system on a VAZ-2114 - if a breaker is installed, an analogue of the distributor of a contact ignition system, this means that the system is non-contact, but with a breaker-distributor. In this case, the ignition timing is set by turning the distributor to a certain degree. The accuracy of the adjustment depends on the experience of the technician, as well as the equipment used. Nevertheless, such a system will allow you to flexibly and accurately set the ignition using a strobe light.
Contactless electronic ignition system
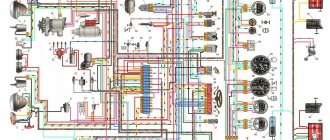
On most engines that were installed on the second Samara and VAZ of the tenth family, the ignition system is contactless electronic. There is no distributor here, so the ignition timing is adjusted automatically in real time and exclusively by means of the engine control system and electronics. The system does not require maintenance, and its diagram is shown in the photo below.
Setting the ignition on an injection engine
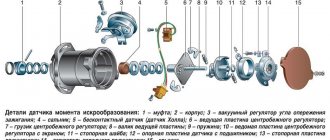
As can be seen from the above diagram, which is implemented in eight-valve injection engines, for the correct operation of the ignition system, the electronic engine control unit must be supplied with the necessary information from the sensors. The main sensor for system operation is the crankshaft position sensor. It is located on the ebb of the cylinder block next to the generator drive pulley, to the left of it, when looking at the end of the crankshaft.
Crankshaft position sensor
A timing gear disk is installed on the crankshaft pulley, which generates electromagnetic oscillations, and the sensor converts them into a pulse, this pulse is supplied to the computer. The control unit, based on the position of the crankshaft, sends a signal to the ignition module, which distributes the spark between the spark plugs.
Repair or buy a new one
There is no clear answer to this question. The fact is that it is very difficult to find a new contact group on the Kalina ZZ, in contrast to the classics, Samara and the tenth family. Therefore, you have to repair it, which without experience, skills and desire is not the best idea. Most often, owners install a new ZZ by purchasing it assembled.
In this case, it is necessary to take into account that the Kalina ignition switch has an immobilizer that will not respond to the new key and the car will not be able to start. Of course there is a way out. You can retrain the immobilizer for a new key. In this case, you will also have to change the cylinders on the door locks.
You can do it easier - carry two keys with you. True, it is not clear whether it is worth keeping them on one bundle. Therefore, the most reasonable thing would be to make a new “tip” and install it on the old key. By the way, it may be included in the delivery of a new lock.
Replacing the timing belt on Kalina
The Lada Kalina timing belt is an annular toothed belt made of rubber reinforced with nylon threads. Its role is to transmit torque from the crankshaft pulley to the camshaft sprocket, reducing the speed by half.
The smooth operation of the engine's gas distribution mechanism depends on the condition of the timing belt and its settings.
Basic faults
There can only be three main faults with the timing belt:
In the first case, the belt may simply delaminate, as evidenced by dangling reinforcing threads. In addition, belt teeth are often cut off. These problems are the result of mechanical damage, improper adjustment:
The tension roller is designed to tension the belt by rotating around its own eccentric axis. If it is not adjusted correctly, the belt may be too tight, which will sooner or later render it unusable. The same problem will occur if the belt is loose.
The most unpleasant surprise, especially on the road, is a broken timing belt. In this case, the engine will immediately stall, and it will be possible to start it only by installing a new belt.
Why is replacement needed?
The manufacturer recommends replacing the timing belt in a Lada Kalina car every 50 thousand kilometers. However, this figure is provided for a standard part, and given the quality of spare parts in our stores, it is better to replace it every 30 thousand km.
It is advisable to visually inspect the belt at least once a month by removing the protective cover. If the slightest mechanical damage or deformation is detected, it must be replaced immediately.
A deformed or damaged belt can cause failure of the water pump (pump), bent valves and tension roller. It also happens that its detached parts (threads) are wound around the generator shaft, blocking its operation.
To the great joy of the owners of any eight-valve Lada Kalina (except for new eight-valve engines), we inform you that when the timing belt breaks in their engines, the valves do not bend and the cylinder head does not hit. In other words, the worst thing that can happen if it breaks is that the engine will stall. All you need to do to move on is to replace the belt and adjust it correctly.
Cost of replacement work
Prices for Lada Kalina timing belts in our auto stores vary from 400 to 1000 rubles per unit. If you also need to replace the tension roller, be prepared to shell out another 400-600 rubles.
The cost of replacing a belt is 500-800 rubles. With a roller - up to 1000 rubles.
When buying a timing belt, it is better to give preference to a branded VAZ product. If this is not possible, you can purchase an analogue produced by a well-known brand. Below are samples showing the catalog numbers of the original belt and worthy imported analogues.
| MANUFACTURER | CATALOG NUMBER OF SPARE PARTS |
| TIMING BELT VAZ 2110 (8 VALVES) | |
| AVTOVAZ | 2112-1006040 |
| BOSCH | 1987949559 |
| CONTI | CT996 |
| CONTITECH | CT 996 |
| GOODYEAR | G1535 |
| GATES | 5539 |
| FLENNOR | 4428 |
| LUZAR | LTB0112 |
| LYNX | 136CL254 |
| PILENGA | CTP0996 |
| OPTIBELT | ZRK1538 |
| TENSION ROLLER | |
| AVTOVAZ | 21120-100612000 |
Belt replacement
Required tools and tools:
If the belt is not broken, we start by setting the gas distribution mechanism settings according to the marks.
1. Place the car on a flat surface, engage the gear, and jack up the right front wheel.
2. Raise the hood, use a 10 mm wrench or socket to unscrew the 3 bolts securing the timing belt casing.
3.Using a 13mm wrench, unscrew the generator belt tensioner nut. We remove the belt.
4. Visually look for a mark on the camshaft sprocket. It looks like a rectangular protrusion on the inside edge of the gear.
5. Turn off the gear and, turning the front right wheel with your hands, ensure that this mark coincides with the upper protrusion of the casing mounting plate.
6. Using a screwdriver, pry off the rubber plug on the gearbox housing (behind the 4th cylinder) and open it. There is a flywheel under it. There is also a mark on its gear, which should coincide with the triangular protrusion located on the left.
7. If the gas distribution phases are set correctly, then in this position both the mark on the timing sprocket and the mark on the flywheel will coincide with the pointers. If the marks do not match, you need to release the tension roller, remove the belt from the timing sprocket and, by turning the crankshaft pulley, make sure they match. We carry out the same procedure if the belt has been broken.
8.Fix the position of the flywheel by locking it through the hole for the plug with a screwdriver. Unscrew the tension roller if it has not yet been relaxed.
9.Remove the front right wheel.
10.To remove the old belt and install a new one, you need to dismantle the generator drive pulley. After making sure that the flywheel is securely locked, use a 17mm wrench to unscrew the bolt securing this pulley. Let's take it off. We remove the generator belt to the side.
11.Remove the old belt from the crankshaft pulley and throw it away.
12. Install the new belt in the reverse order, checking the position of the marks.
13. We tighten it by rotating the tension roller with a special key to the right and left. A timing belt is considered ideally tensioned if its plane can be rotated horizontally by a maximum of 90 degrees (1.5-2 kgf) in the middle between the timing sprocket and the crankshaft pulley.
14.Clamp the tension roller in this position.
15.Remove the screwdriver from the flywheel and close the plug. We are not installing the belt cover yet.
Conclusion
Start the engine and, without closing the hood, listen to its operation. If everything is done correctly, there should be no extraneous noise in the operation of the motor. If the belt tension is too high, a noise from the tension roller may occur. In this case, it must be released by unscrewing the fastening with a screwdriver and turning it in one direction or another. Upon completion of work, do not forget to reinstall the belt cover.
Where is it used?
Past and present owners of VAZ “classics”, who understand the design of such cars, are well aware of the weak points and operating principles of the contact-type ignition circuit.
Its peculiarity lies in the distribution of voltage to the combustion chambers of the engine through contact connections (hence the name).
Modern cars are equipped with more modern (electronic) ignition, which is controlled by a microprocessor.
The main systems operating on the contact principle include:
- KS3 (KSZ) is the most common type of circuit, the structure of which contains a distributor, a coil and a breaker.
- KTS3 (HKZ-2, JFU4, HKZk) - ignition system with a contact sensor and preliminary energy storage.
- KTC3 (TSZi) is another type of system that operates on the contact principle. It contains a transistor and contacts, as well as an inductive energy storage device.