- In simple words
With heavy words
Where is the brake pressure regulator on a VAZ?
On many VAZ cars, the sorcerer is located mainly in the rear of the car, but so that you understand immediately and in the future you do not have questions about this, we note that on VAZ cars with the ABS system the sorcerer is not installed.
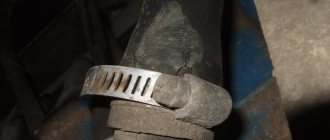
If we take cars of modern production, such as: “Priora”, “Kalina”, “Granta” as well as “VAZ 2108-VAZ 2115” and other modern cars, then on them the sorcerer is mainly located on the left side, the detailed location of the sorcerer is indicated in the photo below:
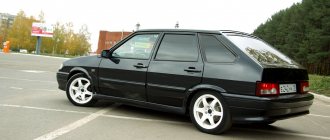
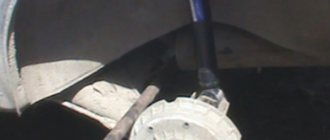
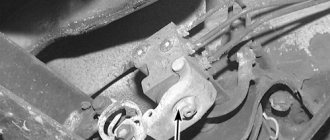
If you take cars of the classic family, people also call them “Classics”, then on them the sorcerer is located in the right rear part of the car body, see the photo below for more details:
Note! The location of the sorcerer is indicated by the number “1”!
When do you need to change the brake pressure regulator on a VAZ?
Usually, when it fails, the car begins to pull to the side when braking sharply. But with a working regulator, this is no longer observed and the car slows down exactly along its trajectory.
But even with a working regulator, the car can go into a skid during sharp braking, and why you ask! Yes, because in some cases, for the regulator to work properly, it simply needs to be adjusted.
Note! The regulator will need to be adjusted under the following circumstances: Firstly, if the car's shock absorbers or springs were replaced with new ones, and also if the rear suspension beam was changed or simply removed. Simply put, it is subject to adjustment for any significant changes in the vehicle's ground clearance!
How does the brake pressure regulator work when braking a car?
In simple words: When you press the brake pedal sharply, the rear of the car rises and the front lowers, and in connection with this the sorcerer begins its work. After the sorcerer has started working, he thereby prevents the rear wheels of the car from immediately starting to brake after pressing the pedal, but why is this necessary?
The whole point is that if the rear wheels of the car start to brake at the same time as the front wheels, then there will be a very high probability that the car will skid. And if the rear wheels of the car work with a slight delay, then in such a situation there will be much less chance that the car will skid.
Note! You can also study the sorcerer’s work in more detail in the video clip that you will find at the very bottom of the article!
In heavy words: When a car brakes, in the rear part of the car the distance between the bottom and the rear axle of the car increases. While the distance increases, the lever from the bridge releases the piston that is located in the sorcerer and thereby this piston blocks the access of brake fluid to the rear wheels. What will happen if access to brake fluid to the rear wheels is blocked? Everything is simple, the wheels will not block but will continue to spin.
Note! But in the regulator itself there is also a small spring, thanks to which the piston does not block all the brake fluid, but only part of it, and in connection with this, the rear wheels of the car will still slow down, but will not be completely blocked!
How to replace and adjust the brake pressure regulator on a VAZ?
- How to replace and adjust the sorcerer on cars of the Samara family?
Additional video: Do you need a brake pressure regulator or not? If you are interested in this, then watch the video below:
Adjusting the braking forces of Lada Vesta
The operating principle of the system that regulates and distributes brake fluid pressure on Lada Vesta cars is fundamentally different from previous models, and there is no “witchcraft” in it. The Lada Vesta brake pressure regulator is directly connected to the ABS system and is electronically regulated depending on the speed of each wheel.
The ABS control unit transmits signals from speed sensors and analyzes the situation. The system “understands” any skidding and allows you to distribute the braking force with maximum efficiency. The pressure is controlled by the valves in the ABS hydraulic block, and there is no need for any magic. In addition, the electronics itself detects all malfunctions and reports them to the driver using a special lamp on the dashboard.
The purpose of the "sorcerer"
The so-called sorcerer on the VAZ-2109 is necessary to automatically change the fluid pressure in the rear brake cylinders depending on the load acting on the car when the speed decreases. This element is used in both hydraulic and pneumatic drive systems.
The main purpose of changing the pressure is to prevent possible wheel locking and skidding of the rear axle of the car.
In some car models, in order to maintain their controllability and stability, a regulator is additionally installed in the brake drive of the front wheels.
In addition, on the VAZ-2109 the sorcerer is used to increase the braking efficiency of an empty car. The traction force of a loaded car and an empty one is different, so the force on different axles must be adjusted. In the case of a loaded and empty machine, static type regulators are used. Automatic solutions are installed in trucks.
In sports cars, manufacturers often install a screw adjuster. It is located inside the car and adjusts the balance of the brake system directly during the race. It is adjusted based on weather conditions, road conditions, and tire quality.
Brake force regulator device
It is mounted on a body bracket and connected on passenger cars to the rear axle beam via a rod and torsion bar. The second end of the last element acts on the regulator piston. The regulator input is connected to and the output is connected to the rear. The device is controlled by a drive connected to the rear beam. As for the design, the brake force regulator consists of a housing divided into several cavities (usually two). One of them is connected to the main cylinder, the other to the rear system. There are also pistons and valves that block access
When work starts, the pressure in the two chambers is the same. However, in the first, the liquid acts on a smaller area of the piston, while in the second, on a larger area. The piston strives to move, but cannot do this due to the centering spring. If the pressure in the master cylinder begins to increase, then the piston can easily overcome the force of the spring, causing the valve to block the flow of fluid. This is the classic principle of operation of the brake force regulator. Today there are hydraulic elements, pneumatic, and electronically controlled.
Mechanism design
The Sorcerer is the ancestor of the modern ABS system. It also prevents the wheels on the rear axle from locking during braking.
The device is connected to the rear beam by means of a rod and a torsion lever. This very lever acts on the sorcerer’s piston. The regulator input is connected to the brake master cylinder. The output is connected to the rear working cylinders.
The device consists of a housing, pistons, and valves. The body inside is divided into two cavities. The first interacts with the main brake cylinder. The second is connected to the rear brake mechanisms. When performing emergency braking, when the front part of the car tilts, using pistons and valves inside the regulator, the access of fluid to the rear brake mechanisms is blocked.
In this way, the force on the wheels of the rear axle is automatically controlled and distributed. The distribution of forces depends on how the axial load changes. Automatic sorcerers speed up the process of unlocking the rear wheels.
How does a sorcerer work?
The regulator itself consists of a cylinder, valve, spring and rod. The latter is connected to the rear beam, which ensures the operation of the VAZ-2109 sorcerer. Also, brake fluid circuits pass through the rear brake pressure regulator. For their mounting on the device there are 4 threaded entries. » alt=»»> How does the sorcerer regulator work on a VAZ? During emergency braking, the front of the car is pressed to the ground, and the rear is raised. This causes the regulator rod to move, which blocks the flow of fluid to the rear cylinders. A spring located under the valve prevents it from closing completely. Therefore, the rear mechanisms still work, but later and weaker than the front ones.
Operating principle
During braking, the distance between the axle and the body increases at the rear of the car. As the distance increases, the lever mounted on the bridge releases the sorcerer piston, and it blocks the flow of fluid to the rear brakes. What happens if the fluid can't get to the rear brakes? The wheels will not lock, but will rotate.
In simpler terms, the operating principle of the VAZ-2109 sorcerer is as follows. When the driver pushes hard, the rear of the car will rise. The front one, on the contrary, will go down. This is where the sorcerer begins to work. It will not allow the rear pair of wheels to brake immediately.
The fact is that if the wheels on the rear axle begin to brake along with the front ones, then there is a huge probability that the car will skid. In this regard, the rear brakes will start working a little later than the front ones. The risk of skidding is reduced.
Lada Granta adjustment of the sorcerer
Lada Kalina Hatchback › Logbook › HOW TO ADJUST THE SORCERER? HELP
help me how to adjust the new type sorcerer
Lada Kalina Hatchback 2011, petrol engine 1.6 l., 87 l. p., front drive, manual transmission — breakdown
Cars for sale
Lada Kalina, 2011
Lada Kalina, 2013
Lada Kalina, 2012
Without a sorcerer
Knowing what the sorcerer's job is on the VAZ-2109, it is not difficult to guess what will happen if it is absent from the brake system. And the following will happen. The car will brake with all four wheels together. The wheels are blocked sequentially - first a pair of wheels on the rear axle, and then the front ones. The risk of an accident increases, since the driver moving behind is unlikely to react in time to a sudden maneuver. A collision will be inevitable.
A sorcerer in the car is very necessary. A VAZ-2109 car without a sorcerer can be very dangerous not only for others on the road, but also for the driver himself. This car is practically uncontrollable in a skid.
Only those who know exactly and understand well what they will get in the end remove the sorcerer. This is mostly done by professional racing drivers.
But some car owners still remove the sorcerer. At the same time, there are even claims that the car began to brake faster and better. Experts say it only seems so. In fact, everything is a little different. The problem here is that in the event of sudden braking, both pairs of wheels will jam in succession.
Replacing the sorcerer with a VAZ 2114 tee
Among some car enthusiasts, such a technical procedure as replacing the standard brake force regulator with a so-called tee is popular. The reasons for this replacement are constant complaints from car owners about problems with the sorcerer, for example: - Initially incorrect operation of the new product; - For souring of the element. As a result, failure or improper operation of the braking system; - Other problems.
In other words, driving with a faulty sorcerer is fraught with consequences in the form of skidding, which at high speeds can lead to serious accidents and overturning of the car. Conversely, driving without a brake force regulator is safer (compared to a faulty regulator) due to the fact that only two front wheels are involved in braking, the rear wheels are not blocked at all.
Some car owners simply get rid of the sorcerer. In this case, only the front wheels are used for braking. Other car enthusiasts install a tee instead of the sorcerer VAZ 2114. The tee ensures simultaneous blocking and, accordingly, uniform distribution of braking forces between four wheels. This approach has its pros and cons.
Here's the diagram
Disadvantages of using a tee: — Uncomfortable and dangerous braking in winter conditions (icy conditions); — Possibility of skidding (in cases where the rear wheels lock faster than the front wheels).
Pros: — Sharper and more responsive brakes; — Lower cost of the part; — Increased service life.
Both cars and trucks consist of many components. One important component is the brake force regulator. Not all motorists know how this element works and works. But if it is faulty, an unpleasant surprise may occur for the driver during emergency braking. Car owners call this component of the braking system the “sorcerer”. This node received this name because its work was very mysterious and unpredictable. Let's try to understand the structure, operating principle and adjustment of this regulator.
Typical faults
There are very few malfunctions that occur in this part. These include stuck valves, misalignment, and leaks.
If the sorcerer is upset, he can be adjusted. And they determine whether adjustment is needed by the behavior of the car. If the setting is off, then when braking the car will throw from side to side. If the valves are stuck or the brake fluid is leaking, the part needs to be replaced. Theoretically, repairs are possible, but the complexity and cost make it unprofitable.
The regulator may fail to operate only in two cases - at the maximum possible load and at a speed limit above 80 kilometers per hour. In this situation, the speed does not drop quickly, so the rear axle is not unloaded.
How to bleed the brakes on a VAZ-2110 if the fitting is broken
If the fitting cannot be unscrewed, screw in the fitting and the hose on top. This will allow air and old fluid to bleed off.
If the bleeder fitting is broken or the edges of the key are hopelessly licked, you need to unscrew it using an extractor or drill it with a 6 mm drill, and then install a new one. If the old one had to be removed by drilling, you need to cut an M10 thread and install a fitting under it (for example, from a Gazelle).
To bleed the brakes on a VAZ 2110, if the fitting is broken, you can use the connecting fitting (fitting) of the brake cylinder with a pipe. The procedure will be exactly the same as for normal pumping (described above), but instead of a fitting you need to unscrew a tube or hose .
Partial bleeding after replacing the brake cylinder
The repair manual recommends replacing brake parts in pairs on both sides so that the braking forces on the wheels of the same axle are equal. But if only one element of the braking system was repaired or replaced, and the level of fuel fluid in the tank did not fall below the minimum, it is permissible to limit oneself to de-airing one circuit. In this case, bleeding the VAZ 2110 brakes after replacing the brake cylinder is only possible for the rear right and front left or rear left and front right wheels.
If the level of fuel fluid in the tank drops to the bottom as a result of a breakdown or repair, it will not be possible to limit yourself to pumping one circuit. After all, there is a great risk that all 4 tubes managed to pick up bubbles. Since it is impossible to bleed the rear brakes on a VAZ 2110 without the front ones due to the diagonal connection of the circuits, when replacing cylinders or tubes in pairs on one axle, a complete de-airing procedure is required. Likewise, bleeding the front brakes of a VAZ 2110 without the rear ones is unacceptable.
Tubes to GTZ
How to check and adjust?
If during the braking process the car slows down ineffectively, the car is pulled in one direction, the car often skids, then this is a signal that you need to check the unit and adjust the sorcerer on the VAZ-2109.
To check, the car is driven into a pit or overpass. Defects will be detected visually. Most often, the inspection shows that repair is not possible.
If we talk about adjustment, it is better to do it on an overpass. The adjustment greatly depends on the position of the body. Adjustments must be made after each maintenance. Adjustment is also necessary if something from the suspension has been changed. If there has been repair work on the rear beam or it has been changed, this also requires adjustment.
How to adjust the brake force distributor of a VAZ 2110
With the screwdriver inserted and further pumping, the chambers in the sorcerer will be maximally open. When pumping, the screwdriver prevents the rod from coming out and blocking the chambers. This ensures complete removal of air bubbles both from the sorcerer and from the tubes and RTC. This is called effective pumping! And let’s learn the device and work of a sorcerer. I don't want to argue with you anymore.
Added after 4 minutes
It's not about the clicks, my friend, it's about the head! )))
| legoo user menu |
| View profile |
| Find more posts by legooo |
| NaPriore user menu |
| View profile |
| Find more posts by NaPriore |
__________________
| User menu |
| View profile |
| Find more posts by Buiny |
The sorcerer is adjusted using an adjusting bolt.
First, loosen the locknut with a 10mm wrench.
After this, use a 10mm wrench to unscrew the adjusting bolt so that it moves away from the lever and releases it.
The lever should spring back when you press firmly on it in the direction of the red arrow.
After this, tighten the adjusting bolt by hand until it stops in the lever, and tighten it one more turn. We tighten the locknut and go to the primer to check the adjustment.
One site recommends tightening the bolt 2 turns.
ADJUSTMENT METHOD
1) By rotating the adjusting bolt, set the moment of contact with the regulator piston - it is set at the moment the ordinary newspaper paper stops slipping at the point of contact of the lever with the bolt. 2) From this position, tighten (screw) the adjusting bolt two turns, for ease of reference, having previously placed a mark on the bolt. This will be the average adjustment value! 3) Having driven out onto a dirt road, check the correctness of the adjustment, performing emergency braking until all wheels are locked at a speed of 40 - 50 mph. The optimal operation of the regulator is considered to be the position of the adjusting bolt, which ensures stable straight-line braking with a delay parameter for locking the rear wheels after the moment of skidding of the front wheels (not less than 2 meters). If the set position of the adjusting bolt does not correspond to these data, then tighten the adjusting bolt discretely by an amount of no more than 14 turns and unscrew it accordingly to advance the lag of the rear wheels locking.
Added after 2 minutes Checking the adjustment of the “sorcerer”. We accelerate on the dirt road to a speed of 30-40 km/h and hit the brakes hard. We turn off the engine, put the car on the handbrake, get out of the car and check the result. I got it right the first time.
If the rear tracks are very short, or the rear wheels are not locked, loosen the lock nut and screw in the adjusting screw half a turn, tighten the lock nut and check.
In my case (the front tracks are longer than the rear ones by about 1 m): If you think that my rear wheels are locked too early (the difference between the length of the front and rear braking marks is small), you need to unscrew the adjusting bolt half a turn.
Replacement
Replacing the sorcerer with a VAZ-2109 is performed as follows. You will need a 13 mm wrench, a powerful screwdriver, and a special wrench for unscrewing the brake pipes. Before work, you need to clean the part from rust, pour it with WD-40 or a similar liquid and wait.
You need to start by unscrewing the bolt that secures the bracket to the spring. Then unscrew the brake pipes. Having unscrewed the fittings, unscrew the bolts securing the part to the body and the sorcerer can be removed.
Sorcerer repair
In order to repair the brake force regulator, you need to perform a number of actions:
Thanks for subscribing!
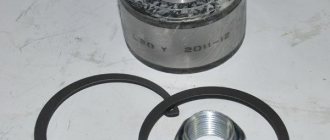
- Dismantling. We remove the entire assembly, using wrenches 10 and 13. The brake pipes are unscrewed, the brake fluid is drained and plugs are installed in the pipes. Next, the “sorcerer” body is removed, which is attached to the bottom with two nuts.
- Diagnostics and replacement of “sorcerer” parts. Carefully examine the surface of the “Sorcerer”. If necessary, replace faulty parts (sealing rubber bands) using a repair kit. A soured piston cannot be repaired and requires a complete replacement of the unit.
- Installation of the sorcerer. Reassemble and adjust the part in reverse order and bleed the brake system. Add brake fluid.
Repairing this unit is a rather dubious decision. Therefore, we strongly recommend that in case of any malfunction, you perform such an action as replacing the brake force regulator.
Is a sorcerer really necessary?
If you remove a part from a car, various unpleasant situations may arise. So, a car can brake with four wheels at once, the wheels can be blocked sequentially, and the car will go into a skid.
However, many VAZ owners, when servicing their car, sometimes notice that the sorcerer was removed by the previous owner. Some don't even notice his absence. Others remove it themselves, since it does not work and reduces the effectiveness of the braking system.
The thing is that AvtoVAZ engineers took someone else’s idea and used it to equip domestic cars, but these are completely different cars. Without a doubt, this product is very necessary, but in the case of VAZs it is disposable.
Improvement of the braking system
Many VAZ 2110 owners agree that the factory brake system is far from perfect. Therefore, they decide to modernize and improve the unit using technical tuning.
A popular solution to the issue of brake efficiency is to replace drum mechanisms with disc ones. Of course, in the case of the “ten” we are talking about the rear wheels. When replacing brakes, be sure to take into account the fact that the rear wheels must brake more softly and somewhat later than the front wheels. This way the car won't skid and you won't fly off the road.
Another option is to remove the factory brake master cylinder and vacuum booster. Instead, units from Priora are excellent. Such tuning will eliminate vibrations and also allow you to use the brake pedal effectively and without excessive effort.
checking and adjusting brakes on VAZ 2110 cars | VAZ 2111 | VAZ 2112
Checking pipelines and connections
To prevent sudden failure of the brake system of the VAZ 2110, VAZ 2111, VAZ 2112, carefully check the condition of all pipelines and connections, paying attention to the following: metal pipelines should not have nicks, scratches, burrs, active foci of corrosion and should be located away from sharp edges, which can damage them; brake hoses must not have any cracks on the outer shell or signs of chafing visible to the naked eye; they should not be exposed to mineral oils and lubricants that dissolve rubber; by pressing the brake pedal firmly, check to see if any swelling appears on the hoses, indicating their destruction; all pipeline fastening brackets must be intact and well secured; loosening or destruction of brackets leads to vibration of pipelines, causing their breakdowns; Do not allow fluid to leak from the connections of the master cylinder with the tank and pipelines; if necessary, replace the tank bushings and tighten the nuts without subjecting the pipelines to deformation. When tightening the pipeline nuts, use wrench 67.7812.9525. Eliminate any detected faults by replacing damaged parts with new ones. Flexible hoses, regardless of their condition, should be replaced with new ones after 125 thousand kilometers or after five years of operation of a VAZ 2110, VAZ 2111, VAZ 2112 to prevent sudden ruptures due to aging.
Checking the functionality of the vacuum booster VAZ 2110, VAZ 2111, VAZ 2112
Press the brake pedal 5-6 times with the engine off to create equal pressure close to atmospheric in cavities A and B (see Fig. 6-2).
At the same time, by the force applied to the pedal, make sure that the valve body is not jammed. Keep the brake pedal depressed and start the engine. If the vacuum booster of the VAZ 2110, VAZ 2111, VAZ 2112 is in good working order, the brake pedal should “move forward” after starting the engine. If the brake pedal does not “go forward”, check the fastening of the hose tip, the condition and fastening of the tip flange in the booster, the hose to the tip and the fitting of the engine intake pipe, since loosening the fastening or their damage sharply reduces the vacuum in cavity A and the efficiency of the booster. rice. 6-2. Vacuum booster: 1 - vacuum booster housing; 2 — amplifier housing cup; 3 - rod; 4 — adjusting bolt; 5 — rod seal; 6 — sealing ring of the main cylinder flange 7 — diaphragm return spring; 8 — amplifier pin; 9 — tip mounting flange; 10 - valve; 11 — hose tip; 12 - diaphragm; 13 — amplifier housing cover; 14 — sealing cover; 15 - piston; 16 — protective cover of the valve body; 17 — air filter; 18 — pusher; 19 — pusher return spring; 20 — valve spring; 21 - valve; 22 — valve body bushing; 23 — rod buffer; 24 - valve body; A - vacuum chamber; B - atmospheric chamber; C, D - channels Adjusting the brake drive of VAZ 2110, VAZ 2111, VAZ 2112
The free play of the brake pedal when the engine is not running should be 3-5 mm.
The adjustment is carried out by moving the brake light switch 7 (Fig. 6-11) with nut 6 released. Install the switch so that its buffer rests against the pedal stop, and the free play of the pedal is 3-5 mm. In this switch position, tighten nut 6. fig. 6-11. Brake drive: 1 — master cylinder; 2 - tank; 3 - vacuum booster; 4 — brake pedal bracket; 5 — brake light switch buffer; 6 — brake light mounting nut; 7 — brake light switch; 8 - brake pedal WARNING Adjust the free play of the brake pedal when the engine of the VAZ 2110, VAZ 2111, VAZ 2112 is not running. If the brake light switch is too close to the pedal, it does not return to its original position.
In this case, valve 21 (see Fig. 6-2), pressing against body 24, separates cavities A and B, which opens air access to chamber B, and the wheels are incompletely released when the pedal is released. If moving the brake light switch cannot eliminate the incomplete release of the brake mechanisms, then disconnect the brake master cylinder from the vacuum booster and check the protrusion of the adjusting bolt 4 relative to the mounting plane of the master cylinder flange (size 1.25-0.2 mm). This size can be set by holding the end of the rod with a special key, and with another key, tightening or unscrewing bolt 4.
Adjusting the parking brake system of VAZ 2110, VAZ 2111, VAZ 2112
If the parking brake system does not hold the VAZ 2110 - 2112 car on a slope of 25% when moving the lever 2-8 teeth of the sector, adjust the system in the following order: loosen the lock nut 7 (see Fig. 6-9) of the tensioner and tighten the adjusting nut 6. tension the cable;
check the full stroke of lever 2, which should be 2-4 teeth per sector, then tighten the locknut. After performing several brakes, make sure that the stroke of the lever has not changed and that the wheels rotate freely, without sticking, when lever 2 is completely lowered. Fig. 6-9. Parking brake system drive: 1 — lever fixation button; 2 — parking brake drive lever; 3 — protective cover; 4 - traction; 5 — cable equalizer; 6 — adjusting nut; 7 - lock nut; 8 - cable; 9 - cable sheath Checking the functionality of the pressure regulator on cars of the VAZ 2110 family
Checking the brake pressure regulator of VAZ 2114, VAZ 2115, VAZ 2113
/ / / / / We bleed the brakes of the Lada 2113 ourselves, check the brakes of the Lada 2115, the hydraulic brakes of the VAZ 2113, VAZ 2115, VAZ 2114.
Place the Lada Samara 2 car on a lift or inspection ditch, clean the pressure regulator and its drive parts from dirt.
Pressure regulator VAZ 2114: 1 – pressure regulator body; 2 – piston; 3 – protective cap; 4, 8 – retaining rings; 5 – piston sleeve; 6 – piston spring; 7 – body bushing; 9, 22 – support washers; 10 – sealing rings of the pusher; 11 – support plate; 12 – pusher bushing spring; 13 – valve seat sealing ring; 14 – valve seat; 15 – sealing gasket; 16 – plug; 17 – valve spring; 18 – valve; 19 – pusher bushing; 20 – pusher; 21 – piston head seal; 23 – piston rod seal; 24 – plug; A, D - chambers connected to the main cylinder; B, C - chambers connected to the wheel cylinders of the rear brakes; K, M, N - gaps
Pressure regulator drive VAZ 2115: 1 – pressure regulator; 2, 16 – pressure regulator mounting bolts; 3 – bracket for the pressure regulator drive lever; 4 – pin; 5 – pressure regulator drive lever; 6 – axis of the pressure regulator drive lever; 7 – lever spring; 8 – body bracket; 9 – pressure regulator mounting bracket; 10 – elastic lever of the pressure regulator drive; 11 – earring; 12 – earring bracket; 13 – washer; 14 – retaining ring; 15 – bracket pin; A, B, C - holes
By external inspection, make sure that the pressure regulator of the Lada Samara 2 and its drive parts are not damaged, there is no leakage of brake fluid, plug 24 is recessed into the housing hole by 1–2 mm, there is no play in the connection of the earring 11 with the elastic lever 10 and the pin 15 of the bracket. Ask an assistant to press the brake pedal of the VAZ 2114, VAZ 2115, VAZ 2113. At the same time, piston 2 should move out of the body by 1.6–2.4 mm, compressing the leaf spring 7 until it stops against lever 5. Lever 5, overcoming the force with side of the elastic lever 10, will rotate relative to pin 4. Non-compliance with the listed requirements, lack of piston stroke, as well as its insufficient or excessive stroke indicate a malfunction of the regulator or its drive. In this case, repair or replace the pressure regulator, and after installing it, adjust its drive (see subsection “Adjusting the VAZ 2113 pressure regulator drive”).
- —
Checking pipelines and connections of the brake system of VAZ 2114, VAZ 2115, VAZ 2113
—
—
—
—
—
—
Replacing brake fluid
Replacing brake fluid VAZ 2114, VAZ 2115, VAZ 2113
Operation and repair of the brake system of the Lada 2113. Checking the regulator, cylinder, brake booster of the Lada 2114. Maintenance of the front and rear brake mechanisms of the Lada 2115.
Checking and adjusting brakes. Part 2
Rice. 6-11. Brake drive: 1
- main cylinder; 2 - tank; 3 — vacuum booster, 4 — brake pedal bracket; 5 — brake light switch buffer; 6 — brake light mounting nut; 7 — brake light switch; 8 — brake pedal
The brake pedal should “go forward” after starting the engine.
If the brake pedal does not “go forward”, check the fastening of the hose tip, the condition and fastening of the tip flange in the booster, the hose to the tip and the fitting of the engine intake pipe, since loosening the fastening or their damage sharply reduces the vacuum in cavity A and the efficiency of the booster.
Adjusting the brake drive
The free play of the brake pedal when the engine is not running should be 3-5 mm. The adjustment is carried out by moving the brake light switch 7 (Fig. 6-11) with nut 6 released. Install the switch so that its buffer rests against the pedal stop, and the free play of the pedal is 3-5 mm. In this position of the switch, tighten nut 6.
Adjust the brake pedal free play when the engine is not running.
If the brake light switch is too close to the pedal, it will not return to its original position. In this case, valve 21 (see Fig. 6-2), pressing against body 24, separates cavities A and B, which opens air access to chamber B, and the wheels are incompletely released when the pedal is released.
If moving the brake light switch cannot eliminate the incomplete release of the brake mechanisms, then disconnect the brake master cylinder from the vacuum booster and check the protrusion of the adjusting bolt 4 relative to the mounting plane of the master cylinder flange (size 1.25-o.g mm). This size can be set
holding the end of the rod with a special wrench, and using another wrench to tighten or unscrew bolt 4.
Adjusting the parking brake system
If the parking brake system does not hold the vehicle on a 25% grade when moving the lever 2-8 teeth of the sector, adjust the system in the following order:
— loosen the lock nut 7 (see Fig. 6-9) of the tension device and tighten the cable by tightening the adjusting nut 6;
— check the full stroke of lever 2, which should be 2-4 teeth per sector, then tighten the locknut.
After performing several brakes, make sure that the stroke of the lever has not changed and the wheels rotate freely, without sticking when lever 2 is completely lowered.
Checking the functionality of the pressure regulator on the car
Place the car on a lift or inspection ditch, clean the pressure regulator and its drive parts from dirt.
By external inspection, make sure that the pressure regulator and its drive parts are free of damage,
there is a leak of brake fluid, plug 24 (see Fig. 6-4) is recessed into the housing hole by 1-2 mm, there is no play in the connection of the earring 11 (see Fig. 6-3) with the elastic lever 10 and pin 15 of the bracket.
Have an assistant press the brake pedal. In this case, piston 2 (see Fig. 6-4) should extend from the body by 1.6-2.4 mm, compressing leaf spring 7 (see Fig. 6-3) until it stops against lever 5. Lever 5, overcoming the force from the elastic lever 10, it will rotate relative to the pin 4.
Non-compliance with the listed requirements, lack of piston stroke, as well as its insufficient or excessive stroke indicates a malfunction of the regulator or its drive. In this case, repair or replace the pressure regulator, and after installing it, adjust its drive (see chapter “Checking and adjusting the pressure regulator drive”).
Removing air from the hydraulic drive
Bleeding the brakes is necessary to remove air from the hydraulic drive, which significantly reduces the effectiveness of the service brake system. Air can enter the hydraulic drive due to depressurization of the system during repair or replacement of individual components, as well as when replacing brake fluid. The presence of air in the brake drive is indicated by increased travel of the brake pedal and its “softness”.
Before removing air from the brake system, make sure that all brake drive units and their connections are tight, clean the cover and the surface around the reservoir cover, fill the reservoir with Rosa fluid up to the “MAX” mark with the cover removed. Then thoroughly clean the bleeder fittings and remove their protective caps.
It is not recommended to use fluid drained from the system to fill the reservoir, as it is saturated with air, has a lot of moisture and may be contaminated.
Air from the system is removed first from one circuit, then from the other, starting with the rear brake wheel cylinders.
Place a rubber hose 2 onto the head of fitting 1 (Fig. 6-12) to drain the liquid, and lower its free end into a transparent container 3, partially filled with liquid.
By sharply pressing the brake pedal 3-5 times at intervals of 2-3 s, turn it off
Examination
The operation of the VAZ-2109, 2110 and other AvtoVAZ models is checked on the move, in closed areas. To do this, accelerate the car to a speed of 40 km/h and sharply press the brake. The rear wheels should lock 1/2 second later than the front wheels.
The wheels are monitored by an assistant located outside the car. If wheel locking occurs noticeably later or does not occur at all, and also if the rear axle is locked simultaneously with the front, the sorcerer adjustment procedure is repeated.
To increase the response time of the rear brakes, the gap between the adjuster and the bracket is increased; to shorten it, it is reduced accordingly.
What else is worth reading
Vacuum brake booster
Anti-lock braking system abs
Replacing brake pads VAZ 2110
Braking system on a classic
Why does the battery boil?
Brake pressure regulator: replacement and adjustment
One of the reasons for a vehicle to pull or skid to the side when braking is a malfunction of the brake pressure regulator (also called the “sorcerer”). The most common causes of pressure regulator malfunction are brake fluid leakage, air in the brake system, damage to the rubber seal, damage to the rubber hose. In some cases, pumping air from the brake system, replacing the seal or hose will help, however, in most cases the problem can only be solved by replacement.
You can replace the sorcerer in the car yourself; for this you need a household set of tools - a wrench and pliers. The brake system of the Zhiguli is one of the most primitive in the world, and even if the driver has never done this before, then if you follow the instructions, he will have a minimum of problems during replacement (if any).
Problems and their solutions
There are several common problems associated with brakes on a VAZ 2110 car. The reasons for their occurrence may be different, but the solution is always the same - timely and high-quality repairs.
- The brakes have completely lost their effectiveness, pressing the pedal does not cause any reaction. In such a situation, it is categorically impossible to drive anywhere under your own power, even if we are talking about a trip to a service station? How do you brake? About a wall or pillar? Call a tow truck and start repairs. In some situations, the problem can be solved on the spot, but these are temporary measures.
- During braking, strong vibrations are observed, most often in the steering column. At the same time, when you press the pedal, it is difficult to hold the steering wheel in your hands. There may be several reasons for this:
- If you have non-ventilated discs installed, similar situations may arise during rain or when braking through a puddle. Such devices do not like moisture, so to get rid of vibrations, replace the disks with ventilated ones;
- Another cause of vibrations is faulty drums. If there are dark spots on the working surface of the drums, the unit wears unevenly. Immediate repair or complete replacement of mechanisms is required;
- Be sure to check for signs of deformation on the front brake discs. They often cause vibrations.
How to replace the brake pressure regulator in a VAZ 2110?
1. The first thing to do is to release the regulator drive lever; to do this, lift the bracket up. If necessary, use a screwdriver to loosen the earring bracket. All manipulations are performed with a key of 10.
2. After disconnecting the lever, carefully remove the earring bracket.
3. Prepare a container; it needs to be placed under the junction of the regulator with the pipes; brake fluid will flow out of it. We disconnect the four tubes by unscrewing the fastening nuts. We wait until the liquid drains. We plug the holes in the tubes; this can be done, for example, with caps on the cylinder bleeder valves. It is recommended to mark the tubes so that during further installation you will not confuse them.
Device Description
The design and principle of operation of this element are quite simple. At the moment when the rear part of the car body rises and the distance between the axle and the body increases, a special lever is activated, which is connected in a “sorcerer”. This lever lowers the piston, which closes the brake fluid channel, and accordingly the pressure on the rear pads decreases. The wheels do not stop rotating and, accordingly, do not skid.
The idea itself is quite clever, but, as often happens, in practice it raises doubts. After all, if when braking the brake pedal is pressed with great force, then the front wheels go into skid and the car still begins to skid. Quite often, when observing a traffic accident, you will notice that the cars with the “sorcerer” are turned backwards. Is this related to this miracle detail, which in its essence should prevent this skidding?
Adjusting the brake pressure regulator (sorcerer)
1. Place the car on the inspection ditch and press the rear part of the car several times (with a force of about 40–50 kgf) to set the rear suspension to the middle position.
2. Loosen the front bolt securing the regulator to the bracket.
3. Using the wire as a feeler gauge, adjust the bracket so that the gap between the drive lever and the lever spring is 2.0–2.1 mm.
4. To do this, move the drive lever by the protrusion. In this position, tighten the bolt.
5. If the pressure regulator is correctly adjusted, when braking from a speed of about 40 km/h on a horizontal section of the road with a hard surface, the front wheels should lock slightly earlier than the rear (this can be determined by an observer outside the car). Otherwise, increase the gap (if the rear wheels lock earlier than the front ones) or decrease it (if the rear wheels lock much later than the front ones). After this, check the adjustment again by braking and repeat if necessary.
Welcome! Have you heard anywhere about such a thing called “Rear Brake Pressure Regulator”? It is also called in abbreviated form simply “Brake Pressure Regulator”! But this is not his last name, since he has another name that is much more common and which came to him from the people, and it simply sounds like “Sorcerer”.
If you have heard about it, then today you will find out information for yourself after studying it, in the future you will no longer have questions about this regulator, and if you do, then ask them in the comments and we will be happy to answer them !
Note! We will talk about pressure regulators only using the example of VAZ cars!
Summary:
Where is the brake pressure regulator on a VAZ?
On many VAZ cars, the sorcerer is located mainly in the rear of the car, but so that you understand immediately and in the future you do not have questions about this, we note that on VAZ cars with the ABS system the sorcerer is not installed.
If we take cars of modern production, such as: “Priora”, “Kalina”, “Granta” as well as “VAZ 2108-VAZ 2115” and other modern cars, then on them the sorcerer is mainly located on the left side, the detailed location of the sorcerer is indicated in the photo below:
If you take cars of the classic family, people also call them “Classics”, then on them the sorcerer is located in the right rear part of the car body, see the photo below for more details:
Note! The location of the sorcerer is indicated by the number “1”!
When do you need to change the brake pressure regulator on a VAZ?
Usually, when it fails, the car begins to pull to the side when braking sharply. But with a working regulator, this is no longer observed and the car slows down exactly along its trajectory.
But even with a working regulator, the car can go into a skid during sharp braking, and why you ask! Yes, because in some cases, for the regulator to work properly, it simply needs to be adjusted.
Note! The regulator will need to be adjusted under the following circumstances: Firstly, if the car's shock absorbers or springs were replaced with new ones, and also if the rear suspension beam was changed or simply removed. Simply put, it is subject to adjustment for any significant changes in the vehicle's ground clearance!
How does the brake pressure regulator work when braking a car?
In simple words: When you press the brake pedal sharply, the rear of the car rises and the front lowers, and in connection with this the sorcerer begins its work. After the sorcerer has started working, he thereby prevents the rear wheels of the car from immediately starting to brake after pressing the pedal, but why is this necessary?
The whole point is that if the rear wheels of the car start to brake at the same time as the front wheels, then there will be a very high probability that the car will skid. And if the rear wheels of the car work with a slight delay, then in such a situation there will be much less chance that the car will skid.
Note! You can also study the sorcerer’s work in more detail in the video clip that you will find at the very bottom of the article!
In heavy words: When a car brakes, in the rear part of the car the distance between the bottom and the rear axle of the car increases. While the distance increases, the lever from the bridge releases the piston that is located in the sorcerer and thereby this piston blocks the access of brake fluid to the rear wheels. What will happen if access to brake fluid to the rear wheels is blocked? Everything is simple, the wheels will not block but will continue to spin.
Note! But in the regulator itself there is also a small spring, thanks to which the piston does not block all the brake fluid, but only part of it, and in connection with this, the rear wheels of the car will still slow down, but will not be completely blocked!
How does the brake force regulator - sorcerer - work?
What is the "Sorcerer" for? This is a rather mysterious detail and no one has found a clear answer to this question. Perhaps this is why he was colloquially called a “sorcerer”, because he works magically. At its core, this part performs a similar function to the anti-lock braking system, preventing the wheels of the rear axle from locking during emergency braking. Its operation directly depends on the position of the rear axle relative to the car body: when braking sharply, the car nose-dives, and the rear part of the body rises, after which the “witchcraft” begins - the brake force regulator partially blocks the flow of fluid, and the rear wheels do not lock.
Of course, in ideal conditions (dry asphalt, straight road, working brake system and chassis), the brake force regulator does its job perfectly. But such conditions do not always occur.