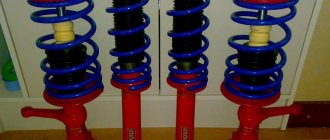
Rear shock absorber strut VAZ 2109
To ensure a comfortable and safe ride in a VAZ 2109, shock absorber struts play an important role. But over time, their technical characteristics deteriorate, or even the suspensions become unusable. You can notice the malfunction of components by the following signs:
- Manufacturing defects.
- The occurrence of a dull knock on the car body of the shock absorber supports, which appears when the car is moving on an uneven road, over bumps.
- The appearance of an unpleasant squeak when starting or stopping the car.
You can determine whether the VAZ 2109 strut needs to be repaired by leaks of shock-absorbing fluid; the strut becomes wet and dirty. The need to replace shock absorbers may be indicated by the car swaying, like on a swing, although the road is smooth. Most often, repairing the strut does not give the desired effect; after a short period of time it will make itself felt, which will force the owner of the VAZ 2109 to replace the strut with a new one. The article suggests that you learn about repairing racks with your own hands. Nowadays they are often made in one-piece structures. Therefore, you need to carefully inspect the products before starting repairs.
Advice: You need to know that sometimes repairing a unit is impractical and ineffective, and sometimes, after repair, you can create an emergency situation on the road.
Do-it-yourself repair of VAZ 2109 racks
Maintaining the struts of your “nine” in working condition will not only allow you to enjoy a comfortable ride, but also prevent serious accidents. You can repair faulty struts on the VAZ 2109 model yourself, to do this, read our instructions. So, to repair the front struts, first of all, they must be removed and cleaned from contamination. Secure the strut spring with a special tie, preventing its pressure on the support cups, then remove the nut of the upper strut mounting unit. Remove the limiting assembly of the upper support, the support itself and its bearing.
Remove the upper cup and spring assembly. Check the condition of the swing arm, lower cup, housing and bracket assembly. If damage is found, replace these entire units. Place the shock absorber in a vertical position, then lower and raise the rod assembly until it stops. If there are signs of knocking, dips or jamming, the shock absorber part must be replaced completely. Using a chisel, remove the compression damper support assembly, using a wrench, unscrew the nut securing the strut body. Remove the nut, remove the rod and working cylinder part, pour out the liquid and the prepared container from the shock absorber .
The liquid can then be reused. Clean the inside of the shock absorber housing, place an oil or gas cartridge in the housing. Reassemble the strut in the reverse order
During assembly, replace faulty parts, be careful when installing the spring in a compressed position
Please note that unconditional replacement of components and parts on the front pillar of the “nine” model is necessary if they have the following faults:
The housing must be replaced if it is not elastic enough, has cracks or holes, or separation of the metal reinforcement from the rubber is observed. The upper support assembly must be replaced if the bearing is moving along the axis inside the housing, the bearing is seized, or lubricant leaks are visible from under the protective rings. Also It is necessary to replace the mounting bolts when fixing damage to the threads.
To repair the rear struts on the “nine”:
Place the gearshift lever in 1st gear, place shoes under the front axle, lift the rear of the car and secure it with supports, remove the rear strut. Remove the buffer and boot from the spring, replace them if there is a malfunction. Wash and fix the shock absorber assembly in a vice. Check the working stroke shock absorber If any malfunctions are found, replace it. Check the condition of the silent block of the lower mounting unit, cushions, boot, buffer, gasket, spring. Pull out the shock-absorbing rod, remove the fixing nut, remove the cylinder, drain the liquid. Remove the compression valve casing. Fix the rod in a vice, remove the nut , piston, valve, bushing, oil seal and its holder. Check the parts, if necessary, replace them with new ones, reassemble.
What is needed to pump racks correctly
Any shock absorbers need to be pumped:
- front and rear,
- new and contract,
- one- and two-pipe,
- collapsible and non-collapsible.
The pumping process is not difficult. No special tools required. Just gloves will be enough to protect your hands from injuries and dirt. First, you should familiarize yourself with the general rules for its implementation:
- after completing the procedure, until the very moment of installation in its place, it is necessary to keep the part vertically - otherwise air may again get into it;
- It is important to consider the need to drain oil from some shock absorbers.
Shock absorbers can be either single- or double-tube, and there are also struts with a remote chamber.
Draining can be done in different ways:
- by sinking the piston into the lower component of the part (there should be an undercompression of approximately 3 cm);
- through a groove designed for this purpose - it is usually present in the upper part of the part.
Why do you need to bleed the shock absorber before installation?
Do-it-yourself upholstery of car seats, step-by-step instructions
As you know, the roads in Russia are of rather poor quality. Shock absorbers in cars on such roads do not last long. And over the entire life of the car, the owner changes the shock absorbers several times. You won't be able to drive for long on a damaged shock absorber. This not only causes discomfort during driving and strong body motion, but also other suspension components fail faster in the future. Accordingly, every motorist needs to replace shock absorbers at least once every two years. Every new shock absorber needs bleeding before installation. This procedure is necessary to bring the shock absorber into working condition. Bleeding the shock absorber allows you to achieve the following results:
— Remove any remaining air or oil from the shock absorber inner sleeve; if this is not done, the shock absorber assembly will fail in a short period of time;
— Identify in advance defects and possible malfunctions in the new shock absorber, which may result in jamming of the valve block.
Suspension repair specialists recommend bleeding a new shock absorber three times before installation. They claim that a one-time pumping will be insufficient and ineffective.
If a new shock absorber that has not been pumped is installed in the suspension of a car, after some time during operation we may hear extraneous knocking noises, which will indicate a malfunction and significant problems in the shock absorber itself.
For young motorists, we inform you that only twin-tube shock absorbers require mandatory bleeding. The new monotube shock absorber does not need to be pumped before installation. The design of the monotube shock absorber prevents oil from entering the area filled with high pressure gas. Accordingly, air cannot accumulate in the shock absorber. The monotube shock absorber has a separating sealed piston.
Accidentally bleeding a monotube shock absorber before installation will not harm it in any way. Accordingly, if you, as a young car enthusiast, cannot distinguish a single-tube shock absorber from a double-tube one, then it would be better to check the shock absorber before installation in order to avoid possible malfunctions during the next operation. Experts recommend that all young motorists pump any shock absorbers before installation.
Every new shock absorber needs bleeding before installation. This procedure is necessary to bring the shock absorber into working condition.
Step-by-step operations for bleeding other types of shock absorbers
- Install the shock absorber with the rod down. The rod must be pulled out all the way.
- Smoothly move the rod so that its working surface is at a distance of no more than 3 cm from the top cut.
- Fix the position of the rod for a few seconds.
- Return the product to the “rod up” position and hold in this position for at least 5 seconds.
- Smoothly pull the rod out until it stops.
- Fix the shock absorber in this state for about 3 seconds.
- Turning the shock absorber upside down with the rod, repeat all procedures 2-3 times.
- Control operation: with intermittent, sharp movements, move the rod from top to bottom and back several times. The rod of a well-pumped shock absorber should move smoothly.
Check with removal
DIY car body repair
Dismantling will help you find out exactly which of the four shock absorbers is faulty. The removed element is installed vertically relative to the ground. How to check rear shock absorbers? Its lower bracket is fixed with feet. Hands take hold of the upper rod and pull it out, then press down. A working shock absorber has good resistance force. If the rod moves with one hand and not under tension, it means the element is faulty. There is not enough working fluid in it, or there is air inside (does not touch gas-filled elements). How to check front shock absorbers and struts? Diagnosis is made in the same way. These elements are arranged in the same way, therefore, if the rod moves freely, such a mechanism must be replaced.
How to work with gas oil
Help: The spelling “gas-oil” is erroneous. That’s right: “gas-oil.”
Gas-oil shock absorbers must also be pumped before installation, whether new or used.
Procedure:
- The stand must be turned into a vertical position with the cylinder facing up.
- It is necessary to compress the shock absorber and hold it in this position for several seconds.
Hold the shock absorber in the lowered position for several seconds - Next, the shock absorber turns over, but must be in a compressed position.
- The cylinder is pulled out very slowly to its original position.
Smoothly pull the cylinder up - The procedure should be performed 3-4 times at short time intervals - no more than a few seconds.
After bleeding, do not turn the shock absorber over, otherwise you will need to perform the procedure again. If you hear a slight slurping sound when you press the body, don’t worry. This is not a malfunction.
Easy rack repair
Do-it-yourself flocking of the car interior, step-by-step instructions
There is another type of repair. I conventionally called it “easy” - why? You just don’t need any skills or equipment, a standard hacksaw, a few drills and keys are enough.
YES, and it can be done by a person who has no experience at all in such repairs.
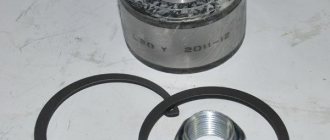
WHAT'S THE POINT? The stand is drilled, the oil is drained, the upper part is cut, and the insides are thrown out. The repair cartridge (aka shock absorber) is inserted into the old housing, secured, and EVERYTHING! Moreover, the price of such repairs is only 1400 - 1500 rubles.
Ask - “what kind of repair cartridge is this?” As I already wrote above, this is a ready-made shock absorber strut, just without fasteners, which goes inside the old body and is fixed there (it will be very detailed in the video below)
Currently, the Russian company RUSAM (an abbreviation for “Russian shock absorbers”) is developing such repair kits. It costs, as I wrote above, about 1,400 rubles, well, maybe a little more.
PROS: You don’t need almost any skills or equipment, “picking” or grinding through old internals, looking for bypass valve seals, etc. YES and the price is reasonable.
Thus, the front two shock absorbers (if they are restored) will cost only 2800 rubles (and if you buy new ones, in the store, the price tag is about 3000 - 3500 for one, that is, a pair is about 7000), I’m talking about our VAZs now.
MINUS: The company works only with our domestic cars, these are VAZ, GAZ, UAZ. No foreign cars yet! I would really like to. AND ALSO, the repair stand is slightly smaller in diameter, there are assumptions that it may boil during intense driving.
As you can see, repairing shock absorber struts is possible, which method is up to YOU to decide, of course. Some don’t bother at all and say “that it’s all bullshit”, of course there is some truth in their words, a solid, new part is of course better! However, it is only better when it is made with high quality.
Now let's watch a useful video.
This is where I end, I think my materials were useful to you. SINCERELY YOURS - AUTOBLOGGER
How to change the rod, valves, how to adjust the stiffness of shock absorbers.
Another problem is a violation of the integrity of the rod, seals, and valves inside the strut. But of course, stores already have a set of spare parts for this unit. And an experienced driver is not in a hurry to take old parts to a landfill; he repairs them. At least some useful details can be extracted.
Replacing a strut or shock absorber from a work point of view is not a very expensive event, even on fairly expensive cars, because it is a simple matter. But when it comes to the cost of a part, the overall repair begins to take on new colors, and the more expensive the car, the darker the shades. Take, for example, luxury crossovers - MB GL500 or BMW X5, for which the cost of one electronically controlled shock absorber strut can reach 1,500 euros. The price for work simply pales against this background. And remembering the main rule of the pendant - if you change it on the left, replace it on the right - you can get an instantly formed gray strand. Today we'll talk about the possibility of getting by with less blood and gray hair - shock absorber repair and why it is sometimes better than new "originals".
Of course, a sharp-tongued reader will say: someone who buys a car for several million can easily spend a hundred or two on racks. This is, of course, true, but only at first glance. Firstly, consider the quality of the road surface, which is far from desired, and imagine how quickly new shock absorbers installed on a car weighing more than 2.5 tons will die. Secondly, one should not discount the fact that people driving a GL500 have the ability to calculate expenses. And at the end of the virtual tour, imagine that you, the owner of the X5, are told: “Repairing one shock absorber will cost you 350 euros.” Almost 5 times cheaper! And what will be your decision after this?
Is pumping necessary?
The main disadvantage of gas workers is their repairs. Gas equipment is traditionally complex. Repair requires going to a car service station. Do-it-yourself repairs will take a lot of time and effort. If you install a gas twin-tube shock absorber right away, it will be able to withstand light weight. The unit is also ineffective at serious height differences. The gas will lose the ability to slow down the piston, which leads to inevitable collapse and rapid failure of the entire system. To resolve the issue, it is necessary to pump the shock absorber. This is what is called moving the device to the working position. The procedure must be followed to prevent operational failures. One of the most common reasons is the occurrence of extraneous noise during operation due to air bubbles getting inside.
Replacement procedure
For such work you need the following devices and tools:
- screwdriver set;
- a set of keys;
- jack;
- container for draining shock-absorbing fluid.
The procedure is as follows:
- at the gearbox, switch the lever to first speed;
- lift the rear of the car with a jack (both wheels must be in the air);
- provide reliable support;
- take away the jack;
- dismantle the old racks.
If you need to completely replace them, then the disassembly process ends.
When you need to repair any individual element, you should also perform the following steps:
- remove the anthers, bushings and buffer;
- make sure that there are no noticeable flaws;
- wash the shock absorber (it is its contamination that most often leads to breakdown);
- check the rear silent blocks;
- assemble the stand and install it in place.
It is very difficult for one person to complete all the actions on his own, so it is worth asking a friend for help.
In particular, your partner will have to direct the rod into the glass. Further:
- install the spring;
- pull out the shock absorber rod completely;
- put on the lower ear and clamp everything with a bolt as tightly as possible.
Replacing front shock absorbers on a VAZ Classic
Structurally, the front suspension of VAZ cars belonging to the “Classic” (VAZ-2101-2107) is the same, the sequence of work on replacing shock absorbers for these cars is identical, so let’s consider it using the example of the VAZ-2107.
The replacement work is not that complicated, so you can do it yourself. At the same time, you don’t need so many tools:
- Special key for holding the shock absorber rod;
- Open-end and socket wrenches 17;
- Open-end or socket wrench 13;
- WD-40.
Naturally, before starting work you need to stock up on new front suspension shock absorbers. It is better to drive the car into a pit or overpass.
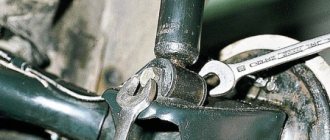
First, the upper shock absorber mount becomes loose. To do this, you need to open the hood and find technological holes in the wings that provide access to the shock absorber rod mounting nut.
Before loosening, you need to wipe the nut from dust and treat it with WD-40.
To unscrew the nut, you will need to hold the shock absorber rod, for which you will need a special wrench with a small slot for its upper edges.
In the absence of such a wrench, you can use a regular open-end wrench size 6.
But there is a small nuance in this - over time, the fit of the nut becomes so tight that in order to hold the rod, it may be necessary to extend the arm of the wrench with a piece of pipe that holds the rod.
And since the open-end wrench is quite small, a significant force can simply break it. Therefore, it is better to use a special key, which will be more difficult to break.
So, while holding the rod, use a 17mm wrench to unscrew the nut of the upper shock absorber mounting as shown above.
After this, the spring washer installed under the nut is removed, as well as the pillow washer and the upper pillow itself.
Next you need to move under the car. The shock absorber at the bottom is attached to the lower arm using a bracket.
To disconnect it from the lever, you need to unscrew the two bolts securing the bracket. To do this, you will need a 13mm wrench; to make work easier, it is better to treat the joint with WD-40.
After unscrewing these bolts, you can pull the shock absorber down along with the bracket. Then the bracket is disconnected from the removed shock absorber.
To do this, you need to use two 17mm wrenches, an open-end and a socket.
Don't forget to remove the bottom cushion.
Before installing a new shock absorber, a bracket is attached to it, using new rubber elements - silent blocks.
First you need to secure the shock absorber to the top. To do this, the rod is completely pulled out, a new lower cushion must be put on it, after which it is inserted into the upper hole.
At the top, to prevent the rod from falling out of the hole, it must be secured with a nut, not forgetting to first install the top cushion, its washer and spring washer. In this case, there is no need to tighten the nut; the main thing is to prevent the stem from falling out.
Then you need to screw the shock absorber bracket to the lower arm, the bolts should be tightened completely.
Then the upper nut is tightened, which requires holding the rod back with a wrench.
The front shock absorber is replaced in the same way on the other side.
If the work was carried out on a lift or the car was jacked up for ease of work, the fastening bolts must be tightened with the car lowered so that the suspension is under the load of the weight of the car.
Carrying out dismantling work
To repair or restore the shock absorber struts, you need to remove them from the car. Traditionally, this does not cause difficulties, but in rare cases it is necessary to resort to extreme measures, using gas cutters or grinders.
In less extreme situations, everything can be done with mechanical cleaning of all kinds of contaminants. In most cases, using WD-40 helps. After soaking for half an hour, you can start working.
There are some recommendations that will help you carry out work faster and safer:
- the side of the car where dismantling operations are expected is jacked up and also secured under the bottom and sills (for example, stumps) to protect against accidental shifting;
- comfortable access to the operation area will be provided after removing the wheel from this side;
- It is worth considering that the upper mounting point is located in the trunk or under the hood.
Motorists repairing front-wheel drive cars will have more work. This is due to the specifics of the design. The type of rack used by the automaker also influences the duration and complexity of the operations.
Considerable effort has to be expended when working with collapsible structures. To dismantle it, you have to unscrew the hub fastenings and remove the strut directly with the hub.
Non-separable units are easier to deal with. Before rebuilding the shock absorber, it must be removed. At the bottom it is placed in a cup in which fastening is carried out with one or a pair of bolts. Unscrewing one or two nuts is almost always enough to remove it from the top mount.
It is important to know that in front-wheel drive cars, the struts are most often removed along with the springs.
Checking the serviceability of shock absorbers
But before we describe the work process, we will consider ways to identify a shock absorber malfunction.
The first sign, as already indicated, is a knocking sound on one or both sides of the car when passing strong bumps.
A visual inspection will also help to identify the malfunction. Oil leaks can often be seen on the outside of the damaged element.
This indicates that the shock absorber has lost its seal and some of the oil is leaking out.
You can also assess the condition by rocking the body. To do this, you need to go to one of the front wheels and with both hands press firmly on the body to overcome the resistance of the springs.
You need to press several times to set the amplitude of oscillations as large as possible, and then suddenly stop swinging.
If the shock absorber is working properly, the body will immediately return to its original position, without any vibrations.
If there are vibrations, even minor ones, the shock absorber is faulty.
It is necessary to check by rocking on both sides of the car, since replacement must be done at least in pairs - two shock absorbers of the front suspension or rear suspension are changed at once. It's even better to change all the elements at once.
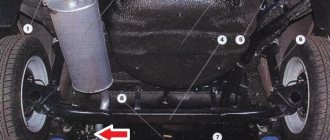
We will not consider replacing the rear shock absorbers for now; everything stated below will concern only the front suspension.
Maintenance and replacement of racks
The rear pillar of the VAZ 2110, which will be repaired, can be dismantled quite simply. This process requires strict execution of a certain sequence of actions and the availability of the necessary tools, including a special key. Replacing the rear struts of a VAZ 2110 begins with unloading the contents of the trunk.
To do this, you need to get rid of the seat belts and remove the fixation brackets. Using a special wrench, you need to unscrew the rack rod fastening. Now you can lift the car using a lift and remove the lower fasteners without any problems.
The procedure is completed by removing the stand from the mounting socket. You can carefully inspect the part and all its elements for damage and wear. Everything that needs to be changed must be changed. Not only the comfort of traveling by car, but also safety largely depends on this. After replacing all elements, you can begin assembly.
Installation of the rear strut of the VAZ 2110 begins with the shock absorber rod, which must be installed in the top position. Next, you need to tighten the beam; available levers can help with this. You need to insert the bottom fastener into the beam, after which you can install the fastener. Then everything is simple: install a pair of wheels and you can lower the car.
If there are no unforeseen situations, then the whole process will take a couple of hours of measured work. After replacing the strut, car control will improve significantly and it will become more “obedient”.
The frequency of inspection and replacement of shock absorbers is determined by the maintenance instructions. However, the state of domestic roads and neglect of vehicle loading standards lead to accelerated wear of these elements.
Why the suspension rattles and the car is poorly controlled: signs of wear
- The car bounces on uneven surfaces, body vibrations are not damped.
- Severe washboard road vibration.
- On bumps, the movement of the suspension is transmitted to the steering wheel.
- The braking distance is increased with a working brake system.
- When entering a turn at a safe speed, the car drifts or skids (depending on whether the front or rear struts are out of order).
- Characteristic knocking noises in the suspension when the stabilizer struts are in good working order. The part may also rattle.
- Unstable behavior of the car on a straight road.
DETAILS: How to check the starter solenoid relay for serviceability
In addition, the condition of the shock absorbers can be checked visually.
- Faulty struts have oil stains.
- When you press your body weight on the fender of the car and then release it, the suspension should make 1-2 oscillations. If more, the shock absorber is faulty.
When pressed, the body should not sway. Both racks or one of them may be faulty
Manufacturers
As you know, parts for VAZs are produced by many companies under contract. And although they seem to be the same, there is still a difference in quality and driving characteristics.
You can purchase simple oil shock absorbers from any manufacturer. As a rule, they do not differ much in quality. Gas-oil options are practically not produced by domestic manufacturers, so we have to look for options from foreign manufacturers. Most often you can find the following brands in stores:
- Kayaba
; - Sachs
; - Koni
.
It should be noted that these are not all manufacturers, but only those more widely represented on the market. If you find a product from other manufacturers, it is advisable to look for detailed information about them.
Conclusion
. The shock absorbers on the classic are quite reliable. Their replacement is required quite rarely, especially when driving on smooth roads. But you still need to know which shock absorbers are best installed on the VAZ 2107. After all, sooner or later there will be a need for replacement. You can notice the malfunction of this structural element by the smooth rocking of the car, even at low speeds.
In order for the VAZ “Seven” to be driven not only conveniently, but also safely, the condition of the suspension must be periodically monitored. An important element in its design are shock absorbers, which can be replaced by every owner of this car.
Troubleshooting and repair: what to do with springs, boot, etc.
We check all components for wear, mechanical damage, and nicks. We especially carefully inspect the polished surfaces of the inner wall of the cylinder and rod. It makes sense to replace rubber O-rings, seals, and gaskets in any case. Even if they do not show signs of wear, soft rubber loses its properties under the influence of oils. If you disassemble the shock absorber, spend a small amount on consumables.
Tip: When replacing parts, you can change the characteristics of the rack by installing aftermarket parts.
If you thoroughly wash all shock absorber components, consider half the work done. Fine particles of road dirt or wear products from metal parts interfere with the operation of the stem valves. Coked deposits should be removed using strong solvents.
Then check the remaining elements of the strut: spring, damping pad, shock absorber boot.
Not all parts can be repaired; some will have to be replaced with new ones.
Cracks and holes in rubber parts cannot be repaired, only replaced.
Below are more specific cases of repair of rack parts and options for its execution.
We pump original oil shock absorbers of Lada Priora
These bleeding methods are suitable for most shock absorber struts installed on domestic cars, including the VAZ 2107.
Doing the work manually is not easy, but it is possible
Please note that the front shock absorbers on the Priora are not replaceable and are not suitable for other models, especially the VAZ 2110, they have different springs
There are two methods of pumping, without turning over and with turning over the shock absorber strut.
But there are general recommendations that must be followed in all cases.
- When pumping, the shock absorber should be in a vertical position, and if tilted, then no more than a few seconds;
- Bleeding must be carried out immediately before installation on the car;
- Do not use a tool that can damage the product (gas wrench, hammer, pliers), hydraulics is a delicate matter, remember this;
- Do not allow the rod to rotate in the stand itself around its axis;
- Apply efforts smoothly, without jerking;
- An already pumped shock absorber must be in a vertical position at all times.
Method 1
Place the shock absorber strut on a level place with the lug facing down.
The task is to fully extend the rod when pumping at least 10 times and return it back, thereby ensuring that the liquid (oil) evenly fills the working space.
It is difficult to pull the rod out by hand, so they come up with different devices.
In our case, you can take a 30mm adjustable wrench with a hole in the handle whose diameter just allows you to use the tool as a lever.
Place the key on the rod so that the threads do not touch and take it to the break.
Do not sharply, using even force, pull it out until it stops.
We return it back smoothly, without any jerks.
The latter should go down easier than up, the ideal case is when the lowering occurs under its own weight. But if the rod does not fall without influence on it, this is not scary.
We repeat the steps cyclically at least 10 times, pay attention to possible jerks when retracting and pulling the stand, extraneous sounds and gurgling. Their presence is allowed at the beginning and middle of the procedure, but at the end of pumping they should not be present.
If necessary, increase cycles to 15 – 20 times
Their presence is allowed at the beginning and middle of the procedure, but at the end of pumping they should not be present. If necessary, increase cycles to 15–20 times.
The rear suspension struts on Priora are interchangeable; the rear strut from VAZ 2110, 2111, 2112, Lada Samara, Granta, Kalina will fit here.
Using the same wrench to 30 we pump up the rear shock absorber.
Please note that the rear strut does not come with a nut, which increases the likelihood of thread damage
Temporarily screw in any nut there or perform bleeding with extreme caution
Temporarily screw in any nut or bleed with extreme caution. Insert a rod (you can use a large screwdriver) into the lower part of the hole to hold the stand with your feet
Insert a rod (or a large screwdriver) into the hole at the bottom to hold the stand with your feet.
After pumping, the shock absorbers can be installed in the garage with your own hands, but since this is quite labor-intensive work, many people prefer to do it at a service station.
To prevent the devices from turning over to a horizontal position, they can be placed in factory boxes, twisting the latter with tape.
The oil shock absorber is pumped according to the following algorithm:
- The rack rod must be positioned so that it is extended to 75% of its length;
- Turn the shock absorber over with the rod down and rest the latter on the floor;
- Applying even force, press the rod until 4-6 cm remains to the rack body. Wait 5-6 seconds.
- Turn the device over, wait 5-6 seconds again, and pull the rod out to 75% of its length. Break – 2-3 seconds.
- Press the rod in again.
Carry out the operation 6 to 10 times, and on the third and sixth repetitions, try to move the rod with sudden efforts, which in any case should move smoothly. If not, the procedure continues.
Step-by-step operations when pumping a MacPherson strut (cartridge)
- Place the stand (cartridge) vertically with the stem up. The rod must be pulled out all the way.
- Without jerking, gently squeeze it so that the working surface does not reach the top edge by a few centimeters.
- Lock the rod in this position for a few seconds.
- Pull the rod out until it stops.
- Repeat these procedures 2-3 times.
- Control operation: with short, sharp movements of the rod, we move the shock absorber piston up and down and make sure that it moves smoothly.
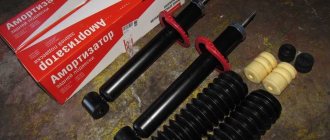
We replace shock absorber struts on VAZ 2108, 2109, 21099 cars
07/22/2012 VAZ 2108 (Lada Samara), VAZ 2109, VAZ 21099Shock absorber struts have a significant impact on the behavior of the car: smooth ride, stability and predictable behavior on the road - these are just a few of the tasks facing this suspension element. However, the struts require periodic replacement - like all parts of a car that is subject to operation.
If you ignore the replacement, then there will be “breakdowns” in the suspension, all sorts of unpleasant knocks and sounds while driving, as well as squeaks when starting and stopping the car. Usually, a “dead” strut reveals itself as oil smudges in the “glass” area - this is a sure sign that it’s time to retire.
Of course, someone is trying to “patch up” the rack, but, as a rule, such repairs do not last long, so it is still more advisable to fork out for a new one. This is what we will talk about in this article - about replacing the racks, and doing it yourself. So, what do we need for this: a jack; supports for the car - they can be either in the form of ordinary wooden wide blocks or in the form of special metal supports with a retractable rod; hammer, pliers, chisel; wheel wrench; ring wrenches, the size of which should be 13, 17, 19, 22, 24; special devices for compressing springs; special wrench for shock absorber rod; puller for steering rod; work rack with a vice; new cotter pins. Then, we put the car on a flat and hard surface, fix it with the parking brake, put wheel chocks under the wheels (as an alternative, you can use bricks, cobblestones and the like).
We use a wheel wrench to loosen the fixation of the front wheels of the car, lift the car using a jack onto a safe support and remove the wheel. We open the hood and fix it on the stop. And now, we proceed directly to the process of replacing the struts in the established order: 1) Remove the plastic cover from the support bearing; 2) Loosen the shock absorber rod nut using a special wrench; 3) Loosen it with a spanner, size 13 , three nuts that secure the rack to the car body; 4) Using pliers, unscrew the cotter pin on the steering rod, and use a spanner wrench. size 19, unscrew the nut and disconnect it from the rack using a puller; 5) If your goal is to repair the rack, then you need to do the following: take a chisel and hammer in your hands and with a short blow make a mark on the adjusting eccentric bolt and the rack - perform these operations will eliminate the need to do alignment - camber after repair;6) We remove the brake hose together with a seal from a special bracket;7) Using ring wrenches, sizes 17 and 19, respectively, we unscrew the nuts on the rack mounting bolts and remove them;8) We unscrew the top nuts that secure the strut to the body;9) We remove the strut down through the wheel arch, having previously moved the steering knuckle eyes down;10) Then, using special tools, we compress the spring and unscrew the support bearing fastening nut, also using a special wrench;11) We remove the springs and bearing. That's it - the rack has been removed. 12) Installation of the support bearing, spring, bolts, nuts and cotter pins on a new rack is possible only after troubleshooting them. The rack is assembled and installed in a similar, but reverse order. After the strut has been replaced, you need to perform a wheel alignment on a stand specially equipped for this. This was originally intended for the “ten”, but due to the similarity of many parts and the suspension design, it is also suitable for VAZ 2108, 2109, 21099...
Repair work with racks
Before disassembling the shock absorber yourself, we recommend studying the theory of the issue. It will help you avoid obvious mistakes and speed up the work process.
For disassembly, you will need some tools, for example, ties, with which you can compress the springs. They are made in the form of power studs with threads on both ends. In this case, on one side there is a left-hand thread, and on the other, a right-hand thread. The end is equipped with a hexagon.
Grips are screwed onto the ends to help effectively hold the coils for compression. The process requires a pair of these pullers to work with each spring. The convergence of the turns occurs after alternate rotation of the pins.
After the spring is tightened to the point of free movement in the rack, unscrew the nut located on top. Then we remove the support bearing and take out the spring.
Car mechanics often notice that the knocking noise occurs due to worn out rubber bumpers . Also, the cause of tight squeaky rotation is wear or breakage of the support bearing.
The collapsible design unwinds thanks to the use of a special key. If this is not available, then you have to use a metal rod and a heavy hammer. After we had to repair the shock absorber, we reassemble it in the reverse order of disassembly.
Only after the top nut has been tightened as much as possible should the spring be slowly released to working condition. In the process, it is necessary that the outer turns fit into the mounting holes, which help to avoid displacement. The next step is to mount the shock absorber in place, install the wheel and lower the car.
Why remove and disassemble a bicycle fork?
A bicycle fork, like all other components, may need to be replaced, repaired or serviced. Therefore, before proceeding with these procedures, we need to remove it from the bicycle, and in some cases, disassemble the shock absorber for spare parts. In what cases will we have to remove it? First of all, this is when replacing it with another. Secondly, it may be necessary to replace bearings and/or support cups, apply new lubricant, and there are also cases when it is necessary to align the steering tube or carry out other repair work.
It is most often necessary to disassemble a bicycle fork shock absorber to replace lubricant or worn components. For example, these could be oil seals (cuffs), etc.
How are gases pumped?
The algorithm for working with shock absorbers filled with special gas is as follows:
- The part is turned over with the rod towards the ground.
- After this, you need to smoothly compress and fix it for several seconds.
- After completing the procedure, you need to turn the part over; you must hold it there for no more than 6 seconds.
- The next stage is to extend the rod all the way;
- The final stage is turning the shock absorber over.
Differences in the principle of operation of hydraulic and gas shock absorbers.
If possible, it is worth familiarizing yourself in advance with the video recording of pumping parts of this design.
The easiest way to work with new racks on video
DIY shock absorber strut repair
Conditions for self-repair
The front shock absorber strut adopts a double-acting hydraulic shock absorber design. The rear strut is usually made in the form of a conventional two-pipe design.
This difference in the design of the struts is explained by the fact that the front struts have a certain influence on the handling of the car, and, consequently, on traffic safety. From here it is easy to conclude - if the shock absorber struts are in perfect order, then the movement of the car will be comfortable and safe.
We, caring and prudent car owners, carry out diagnostics of shock absorbers regularly, and it is very easy for us to detect their malfunction by characteristic oil leaks in the suspension area, and sometimes we hear a knocking sound from the shock absorbers while driving. And then we decide that the shock absorber struts need repair, or they need to be replaced with new ones. Some people go to a car service center for this, while others repair the shock absorber struts with their own hands (see the video “Do-it-yourself shock absorber strut repair” below).
How to repair shock absorber struts yourself?
In principle, this will not be particularly difficult, especially if the rack has a collapsible design. If the stand is not collapsible, then it’s better not to try to do anything yourself - anyway, you can’t do it without special equipment. Car repair shops, of course, undertake to repair non-dismountable racks, but at the same time, during the repair process, changes are inevitably made to the rack design. But what are the guarantees for such repairs? Therefore, it is necessary to evaluate in advance the feasibility of repairing non-collapsible racks - how profitable and safe is this?
Only rear-wheel drive cars, the so-called classics, are equipped with shock absorbers with collapsible struts. The shock absorber struts on other cars have a non-demountable design.
REPAIR RULES
– Shock absorbers are repaired or replaced only in pairs.
– For repairs you need: 1) a rack wrench - for cars with rear-wheel drive, 2) springs and ties - for cars with front-wheel drive.
– For repairs, you need to install “goats” under the car.
– It’s easy to remove the strut from a rear-wheel drive car, but to remove it from a front-wheel drive car, you need to compress the spring on both sides with ties equally hard. The compressed spring is installed on the new strut after visual inspection.
– Now we work with the strut: we remove it from the shock absorber, drain the oil, take out and throw away the old stuffing and put a new cartridge in its place, now we reassemble the place of the strut - we install the spring, then the support bearing, and, finally, we put the strut on the car.
– After self-repairing the shock absorber struts, it is necessary to adjust the wheel alignment.
– The rear shock absorber strut is repaired according to the same scheme, and only in pairs.
As you can see, repairing a shock absorber strut with your own hands is not particularly difficult.
Tips for using shock absorbers
1. Do not test shock absorbers for strength, avoid high speeds on bad roads.
2. Do not lift the suspension by installing spacers under the struts: the shock absorber rod will be forced to function in the movement zone and will very quickly become unusable.
3. In the cold season, shock absorbers, like rubber, need to be warmed up. This means that when you get into your car in the morning, start driving for about 5 minutes at low speed - this is necessary so that the oil, which has thickened overnight, warms up and does not damage the poppet valves. How to check shock absorbers? Which shock absorbers are better put on a car?
Video: Do-it-yourself repair of shock absorber struts
Replacement: when repairs cannot be made
Of course, it will be much cheaper to repair shock absorbers than to replace them, but sometimes you have to do that too. Again, you can carry out diagnostics and determine whether they can still last after repair. If you are not confident in your insight, then diagnostics can be carried out at a car service center. If you change shock absorbers, then this process should also be carried out only in pairs. To replace, you will need the same tools: a rack wrench for classics and ties with springs for front-wheel drive cars.
You should not test the strength of your shock absorbers on a bad road - this can keep them in good condition for a long time. High speed also negatively affects them, so if you drive, do it on a high-quality road surface. Lifting the suspension also harms the entire shock absorber system: the rod begins to function in the area of movement, and this entails rapid failure.
If replacing a shock absorber strut can be done with your own hands, then replacing the entire shock absorber is most often done at a car service center, because This is an extremely responsible undertaking. Finally, we would like to give a few recommendations for caring for new shock absorbers. The first step is to carry out anti-corrosion treatment on the underbody of the car. This will help cope with adverse weather conditions.
Means for treating cars against corrosion
Again, for our realities this is necessary, because... Bad weather lasts for about six months, and it is rare to notice drains on our roads. Therefore, when you drive through continuous puddles, it is simply necessary that the underbody of the car is protected from corrosion. In addition, when repairing shock absorbers, we recommend paying attention to the rear axle gearbox, as well as other elements of the vehicle’s suspension.
What is the difference between gas-oil products and oil products?
From the name itself it is already clear that their main difference is the working composition that is used inside the device.
In oil shock absorbers, the working space is filled with hydraulic oil.
The main disadvantage of these types of devices is aeration (oil foaming), which occurs as a result of changes in the physicochemical properties of the liquid when a piston acts on it in a small space.
This is manifested by a failure in the operation of the device and uncharacteristic sounds.
A partial reduction in aeration is achieved by replacing air with nitrogen gas; as a result, gas-oil analogues have appeared, which come in one or two pipes.
Single-pipe ones are often called gas ones, because there the oil and gas are separated by a movable jumper and do not mix.
Strong backpressure ensures gas pressure in the region of 10 - 30 atmospheres; there are also regulated analogues. Mainly installed on sports cars.
Twin-pipe gas-oil shock absorbers have less gas pressure - from 3 to 10 atmospheres.
But he won’t delve into the topic, because that’s not what you came here for. The shock absorber structure can be seen in the photo below.
Required Tools
- A compressor for supplying compressed air or a pump for servicing bicycle shock absorbers.
- Special fitting for injection of compressed air.
Attention! It is necessary to take care of safety. The work involves high pressure, so eye and hand protection is required.
Why do shock absorbers fail?
Now I won’t go into the structure of the rack, I’ll just say that it is a pneumatic - hydraulic system. It is designed to dampen vibrations from the springs, that is, to eliminate body sway.
Thus, with the help of oil seals, bypass valves, oil, cylinders inside and so on. The working rod extends and retracts very weakly. It takes a fair bit of effort.
BUT if the seal (usually located on top) leaks, the seal is lost. The oil and gas that were inside flows out (evaporates). There is nothing to brake the rod, it moves without effort - the rack begins to knock.
It is worth noting that the reason may also be in the rod; it was simply bent upon impact or the mirror began to corrode. All this again affects the oil seal, destroying it.
The internals fail, but very rarely, and most likely it will be a factory defect.
Shock absorber malfunctions
Any car malfunction always manifests itself in the form of extraneous noise, unusual behavior of the vehicle or other signs. Problems with shock absorbers also have certain symptoms, and if they are detected, you should not delay replacing the dampers.
Oil leakage
The most common sign that a shock absorber has become unusable is a fluid leak. Leaks on the body indicate a loss of seal in the oil reservoir. As a result, not only leaks occur, but also air leaks. In this case, the damper rod has free movement, i.e. it moves without any effort, and the part loses its functionality. If signs of smudges have just appeared on the shock absorber, it will serve a little longer, but you should not leave it without attention and it is better to replace it in the near future.
Body rocking
Since springs and shock absorbers work together to dampen vibrations that occur when driving over bumps, contact with the road may be lost if the damper fails. In this case, shaking increases, the body sways, and the level of comfort decreases. The car becomes rolly, and when it hits obstacles it sways for some time. The easiest way to check the shock absorbers of your “seven” is to press the wing, try to rock the body, and then release it. If the car continues to swing on the springs for some time, then this is a clear sign of a faulty damper.
Body roll
One symptom that indicates problems with the suspension shock absorbers is body roll when cornering. This behavior of the car negatively affects safety, since the quality of braking, as well as vehicle control, suffers. If liquid has leaked from the damper, it will be quite difficult to keep the car turning, which is especially dangerous in winter. When the mileage of the products in question is more than 60 thousand km, which also depends on the quality of the parts themselves and the operating conditions of the vehicle, handling may noticeably deteriorate. But since the process does not occur at one moment, but gradually, the driver practically does not notice this and rolls can be perceived as a normal phenomenon.
Suspension noise
Extraneous sounds in the suspension, uncharacteristic of its operation, indicate the need to check and service this mechanism. When dampers and their bushings wear out, the ability to effectively support the weight of the machine is lost. In addition, so-called shock absorber breakdowns often occur.
Uneven or increased tire wear
If it has been noticed that the tire tread has uneven wear or wears off too quickly, then this is a clear sign of problems with the suspension. With faulty shock absorbers, the wheel moves vertically with a much greater amplitude, which leads to uneven tire wear. When driving, extraneous noise appears on such wheels.
Plunging when braking
Among car owners there is such a thing as “the car bites.” If the dampers fail, the front of the car will dive during braking, and the rear will sag when accelerating. This is explained by the fact that parts that have become unusable do not cope with their function, that is, they do not support the weight of the machine.
Broken fastening
One of the infrequent breakdowns of the front shock absorbers is the breakage of the lower eye. The reasons for this phenomenon may be different:
- installation of low-quality parts;
- making changes to the standard suspension design.
Sometimes it happens that the fastening of the rod along with the glass breaks off. This phenomenon is accompanied by a knocking sound while driving. It is quite easy to identify a breakdown by opening the hood and looking at the place where the upper part of the shock absorber is attached.
The problem is resolved by welding. Some Zhiguli owners reinforce this part of the body with additional metal elements.
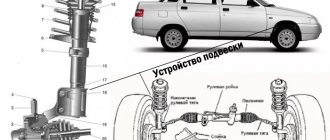
How VAZ 2110, 2111, 2112 shock absorbers are arranged - diagram
- Front suspension. It is a classic for front-wheel drive cars - MacPherson struts.
MacPherson strutsThe design has both advantages and disadvantages. The main advantage is fairly high levels of comfort and controllability at low production costs. In addition, MacPherson has a compact design, which makes it possible to reduce the size of the front part of passenger cars. The main feature is the absence of an upper suspension arm. The elastic element (spring) and the shock absorber are combined on one axis, which is rotary. The upper part of the strut rests on a reinforced bowl in the wing mudguard using a slewing bearing.
- The rear suspension is made in an “H” shaped pattern and is semi-independent. For compactness, shock absorbers are combined with springs on one axis. Good maintainability is ensured by the simplicity of the design and the ability to change the spring and shock absorber separately.
Schematic representation of a semi-dependent rack and its components
The design does not provide ideal handling of a sports car, but the low cost outweighs all possible disadvantages.