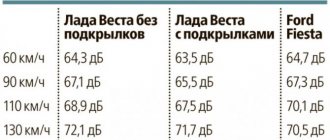
Do-it-yourself noise and vibration insulation of VAZ 2115
Sound insulation and vibration insulation of a car are very important for getting rid of acoustic discomfort. Constant noise, both airborne and structural, interferes with good acoustics, does not allow you to hear your interlocutor well, quickly tires you, that is, deprives the trip of any comfort. Noises penetrate the cabin from everywhere: through the doors, underbody, engine compartment, roof, trunk. Noise and vibration insulation not only absorb vibration and prevent outside noise from entering the car interior, but also act as insulation, preventing cold from penetrating inside and keeping heat out of the car. Even foreign cars, not to mention domestic cars, including VAZ, need sound insulation (or “Shumka”).
Soundproofing a VAZ 2115 with your own hands is a fairly simple procedure, for which you will need material, a spacious room, time and, of course, knowledge. It is best to completely soundproof the car, but if you decide to do only certain sections, the result will certainly make itself felt.
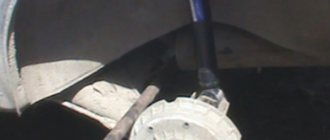
As a rule, the fight to reduce noise in the cabin begins with the doors. Next, the engine compartment is soundproofed to eliminate the noise of a running engine. Soundproofing the hood of the VAZ 2115 will enhance this effect and inside the cabin, the engine at idle speed will be completely silent. The most complete sound insulation is achieved by laying vibration and noise insulating materials on the bottom, wheel arches and trunk.
Today, manufacturers of not only budget cars for some reason ignore vibration and sound insulation of the roof. There are several simple tricks to check whether your car has sound insulation or vibration insulation in the ceiling.
Sound insulation of the interior of VAZ 2113, 2114, 2115
A lack of sound insulation can be recognized if a hum and rattling is heard from the ceiling while driving, or music is hard to hear during rain. In winter, if the snow on the roof of a running car melts, there is no sound insulation or does not provide the desired effect.
Soundproofing the ceiling is the simplest procedure, which is easiest to do yourself.
Before you start soundproofing your roof, you need to buy:
- vibroplast (3 sheets 2 mm thick, good quality, for example, Noico), splen (2 sheets 4 mm thick).
Acoustic shelf in the trunk
Option for an acoustic shelf in the trunk
As mentioned above, a shelf is also installed in the trunk. It may be a folding version, and on the sides there will be fixed shelves with speakers.
Basic moments
So:
- Installation of the shelf is carried out using self-tapping screws and corners.
- The process of installing the shelf is simple, especially on the VAZ 2112.
- The side panels can be left in the form of boxes, or you can remove the trim and make new ones (for example, like this).
Acoustic side shelf
- When installing fixed side shelves, you should ensure their rigidity and reliable fixation to the maximum extent possible.
- There are two ways to install speakers in side shelves: open installation, where the speakers are installed after installing the shelf, and hidden installation, where the speakers are installed in place beforehand.
Noise and vibration insulation for acoustics
On this passage, full of optimism, we end our article. More detailed instructions for making acoustic shelves with your own hands can be downloaded from the Internet. Guided in addition by video and photo materials, doing everything correctly will not be difficult. The price of a car that provides acoustic comfort by default increases significantly.
The work to replace the sound insulation of the VAZ 2115 ceiling takes place in several stages
Remove the trim, visors, handles, and lampshade in order to provide access to the iron base of the ceiling.
Degrease the ceiling with white spirit.
Proceed with vibration isolation, preferably with outside help, since it will not be very convenient to do it alone.
The process consists of cutting off the required piece of vibroplast and removing the protective film. Afterwards, the pieces of vibroplast are applied to the ceiling and carefully rolled out with a roller for more reliable gluing.
Apply splen on the layer of vibroplast, glue it and also roll it out with a roller. If everything is done carefully and thoughtfully, one sheet will be enough for the entire ceiling.
Then, upon completion of the vibration and noise insulation work, everything is assembled in the reverse order and secured in place.
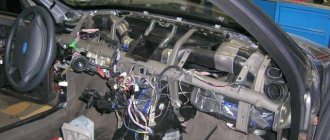
But soundproofing the floor of the VAZ 2115, in contrast to soundproofing the ceiling, is one of the most difficult procedures. Firstly, everything that is in the cabin must be dismantled, and secondly, there are a lot of different shaped elements for which it is necessary to prepare patterns for patterns.
Try to protect yourself from noise and you will certainly feel how much more comfortable it has become in your car. Quiet music, a calm conversation with your interlocutor will bring pleasure, and rain knocking on the roof will no longer irritate you while driving.
Other interesting materials:
Based on materials from the site: https://videovaz.ru
To save fuel, our readers use Artem Abramov’s method. After carefully studying it, we decided to offer this method to you too...
Sound insulation of car doors VAZ 2114, 2113 and 2115 plays an important role in increasing driving comfort. It allows you to solve the following problems:
- significantly reduce the level of noise entering the interior from the street;
- eliminate knocks and creaks produced by internal parts and parts of the door trim;
- improve the sound quality of music in the cabin, especially if the speakers are built into the doors.
Soundproofing the doors of VAZ 2114 , 2113 and 2015 can easily be done with your own hands. The materials used are relatively inexpensive and can be purchased at almost any auto store.
The recommended standard sound insulation of the front doors of VAZ 2114, 2115 and 2113, which, as practice has shown, gives a fairly good result, consists of the following steps:
Necessity of execution
Is the notorious sound insulation really necessary? Now let’s figure it out:
- In most domestic cars it is simply absent, and if present, it is only in places and the quality leaves much more to be desired
- There are rumors that there is a need for it only if you equip the car with speakers with a subwoofer (see Connection diagram for a subwoofer and speakers: its features), of course, the sound of music is significantly improved
- However, in addition to this, sounds, creaks and extraneous noises subside, which makes it possible to talk, and not yell, as before
- Today it is known that increased noise affects the nervous system and constricts blood vessels, causing stress on the heart and angina pectoris.
- And everyone wants comfort, like in the interior of an expensive foreign car.
- Therefore, my answer is unequivocal - of course it is necessary!
Do-it-yourself noise insulation of VAZ 2115
Removal of the casing and subsequent disassembly must be done extremely carefully. It is important to remember (or better yet, write down) the sequence of operations, the correspondence of the unscrewed bolts and screws to their holes. For convenience, you can lay out the parts on a large surface in order of disassembly. The door closing mechanism and the window lift do not need to be removed - they will not interfere with the work, but putting them back is quite difficult.
Cleaning the inside surface of the door. It is necessary to remove the factory sound insulation and other coatings that may peel off (anti-corrosion coating, etc.), but it is important not to scratch the paint. The surface of the metal must be thoroughly cleaned and degreased - for this it is recommended to use White Spirit solvent; the very bottom of the door does not need to be degreased.
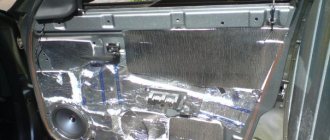
Sticker of the first layer of soundproofing material. The inner surface of the panel (the wall of the door facing outwards) is pasted over with vibration-damping material (self-adhesive Vibroplast Gold STP or its equivalent is recommended) - pieces are cut approximately in the shape of the contours to which they will be glued.
This work, of course, is not easy - you need to contrive to stick “Shumka” through the openings of the technological holes, which is quite inconvenient, especially in the far corners. To avoid cutting your hands, it is advisable to work with gloves, using available means for pressing the material to the surface - a rolling roller (where it can be reached), flat tools, wooden blocks, etc. Where it is impossible to glue whole pieces, you can glue individual pieces overlapping each other, you need to cover as much surface as possible. When sticking Vibroplast, it is important not to close the drainage and ventilation holes so that condensation does not accumulate inside the door. If a circle cut from Bitoplast is glued behind the speaker on top of Vibroplast, the sound quality will improve, since the speaker will not resonate with the door.
Elimination of knocking and creaking of parts of the internal “stuffing” of the door. It is advisable to wrap all kinds of wires, rods, etc., located inside the door body with Madeline so that they do not knock when shaking; we pay special attention to the places where they come into contact with the body - here they can be wound in two layers. It is also very useful to make a Madeleine gasket along the contour of the door where the trim is attached.
Vibration isolation of technological openings. Factory-made holes are sealed with the same Vibroplast (pieces in the shape of the holes with an allowance of material along the contour for gluing).
Then it is recommended to cover the metal surface of the door on the trim side with Accent sound absorber or at least Bitoplast 10 mm thick. You should try to cover this surface completely, bringing the wires out (if any) and leaving the speaker exposed. Before this stage, it is necessary to check the serviceability of the lock mechanisms and window regulators, tighten the fasteners and, where necessary, apply lubricant.
Soundproofing of the casing. To reduce vibration and sound resonance of the casing, it is recommended to stick pieces of a vibration damper on it (preferably Vibroplast Gold) - not necessarily on the entire surface, so as not to unnecessarily weigh down the door - it is enough at the joints of the casing parts and on wide, flat areas.
Door assembly. Assemble the door, observing the correct sequence of operations. When installing the casing, replace the pistons with new ones or fasten it with self-tapping screws, where possible.
Soundproofing of doors 2114, 2115 and 2113 (rear doors and doors without audio system speakers). The technology described above is recommended for soundproofing doors that have powerful speakers installed. For doors without speakers or with low-power speakers, this procedure can be significantly simplified - just stick a layer of Vibroplast onto the panel and door trim, and also wrap the sealant around the wires and rods inside the door body.
When installing sound insulation, it is not recommended to use heavy materials - they increase the load on hinges and locks, which can lead to their deformation and problems with closing doors in the future. To increase the effect of sound insulation, it is also recommended to improve the door sealing - update the door seals or replace them with higher quality analogues.
In conclusion, it should be noted that sound insulation of the doors of VAZ 2115, 2114 and 2113 will give the desired effect only with an integrated approach, that is, if other parts of the interior are modified accordingly: hood, roof, floor, trunk, etc., otherwise on its own this operation does not make sense.
How to pay TWICE LESS for GASOLINE
- Gasoline prices are rising every day, and the car's appetite is only increasing.
- You would be happy to cut costs, but is it possible to live without a car these days!?
But there is a completely simple way to reduce fuel consumption! Don't believe me? An auto mechanic with 15 years of experience also didn’t believe it until he tried it. And now he saves 35,000 rubles a year on gasoline! Read more about this at the link.
Preparation
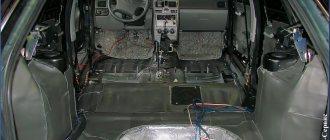
First of all, it is necessary to prepare the car interior for installing new sound insulation by dismantling all removable parts: seats, mats, panels. We carry out this procedure step by step:
- remove all seats:
— unscrew and remove the trim from the B pillar and door sills;
- remove the air ducts:
— carefully remove the carpet and coverings (we will need them later):
— remove the foam cushions to level the floor;
— remove the factory sound insulation:
After removing all removable parts from the interior, you must wash the floor thoroughly and thoroughly go over the metal with a degreaser.
It should be noted that in domestic cars, the drain holes at the bottom of the body are not sealed with plastic plugs, and water often enters the interior through them during bad weather. Therefore, before installing sound insulation, you should think about high-quality sealing of these holes.
Do-it-yourself noise insulation using the example of a VAZ 2114 - photo report
In order to make sound insulation for a VAZ 2114 you will need the following material:
- Vizomat MP (StP);
- Stroyizol SD 90;
- Splen 3004 (StP);
- Accent 15 LM KS (StP);
- Vibroplast Gold (StP);
- Adgilin.
Work tool:
- Ruler;
- Roulette;
- Square;
- Household hair dryer;
- Installation;
- Screwdriver Set;
- Awl;
- A set of keys;
- Scissors.
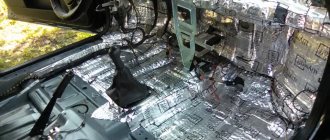
1. First of all, you need to remove everything from the interior that could get in the way - that is, everything, including upholstery, panels, etc., do everything as in the photo.
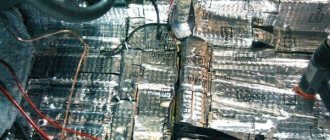
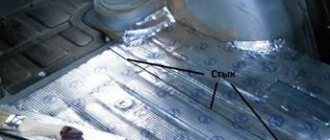
Using vibration-absorbing Vizomat MP, it is necessary to seal the entire surface of the trunk floor, see photo.
This is done in order to remove excess noise and vibration, as well as increase the rigidity of the structure. This causes a decrease in vibration levels and also shifts noise waves to the lower, low-audible frequency range. In addition, the material promotes heat retention and maintains the interior microclimate in the summer heat, keeping it cool longer than in conventional cars. To glue Vizomat MP you need a household hair dryer. Gluing occurs after the material softens and becomes soft and elastic. The adjustment of the material to the curves of the body should occur immediately, and quite quickly, but not at the expense of quality; if you delay, the material will “stiffen” and the fit will not be tight. Simply put, you will have to heat it again, in this case directly at the gluing site. In order to stick the material, you will need special rolling rollers; if you do everything yourself, the sound insulation of the car may not work or its quality will be very low.
It was not always possible to use large sheets for gluing, so I had to overlap them (15-20 mm). Remember that when gluing, you cannot seal technological holes, parts fastening elements, hatches, etc., that is, things that will need access after soundproofing.
Vibration insulation should be maximum, that is, cover the floor and ceiling with the obligatory entry under the dashboard. The sound insulation is glued on top of the vibration-proofing layer, and the end result is also good thermal insulation of the interior.
Let's summarize what the sound insulation of the VAZ 2114 gives us
1. The noise coupled with vibration isolation completely justified themselves, in addition, owners of not new cars will have the opportunity, in the literal sense, to get to know their car, or rather, its body better. As the work progressed, minor defects were discovered and eliminated: rust, anti-corrosive coating, etc.
2. Soundproofing is a very real undertaking that even the most “distant” car owners can do; there is no need for “super” skills, expensive tools or anything else, all you need is patience, desire and a lot of free time.
3. The maximum reduction in noise levels coming from outside has been achieved in the cabin. The ride has become more comfortable, the sound of the audio system has become much clearer, and now you don’t need to turn up the volume to maximum to hear words.
This material will be devoted to the topic of noise insulation, which is carried out inside the trunk and doors on a VAZ 2114 car. For the domestic “fourteenth” this is a useful measure that can significantly reduce the noise level inside the cabin, as well as in the luggage compartment. Consequently, sound insulation has a positive effect on the comfort of the driver and passengers of the car.
Photo of a door glued with Shumka on a VAZ 2114
Where to begin
You should start by choosing the scope of work:
- Completely soundproofing a car with your own hands in one step is difficult, financially expensive, and takes a lot of time - about a week
- Therefore, you can start gradually, in parts, with breaks.
- For the first training, choose the hood or trunk, then you can start processing the interior, again, you can do it in parts
- For example, first make noise on the floor, another time on the ceiling, on the third approach on the doors and finally on the dashboard
- The final step would be to treat the outer arches and the bottom of the car
After selecting the scope of work, select the necessary tool and place for the operation:
- If performing outdoors, as shown in many photo reports, it is better to have a fenced area, otherwise passers-by will steal tools and materials
- The set of tools is standard for any processing area - solvent or alcohol; cotton gloves; roulette; shoemaker's knife; ruler; scissors; clean rags; construction hair dryer; hard roller for rolling material; sets of keys and screwdrivers
Sound insulation of the hood
And so, let’s start with the easiest section, and at the same time practice:
- If you purchased sheet material, then you need cardboard to cut patterns from it
- Then, using these patterns, cut out the material, after which you can glue
Attention: The surfaces must first be washed and degreased, only then the material must be glued.
- The trunk lid is processed in the same way
They start with vibration isolation, it is glued in the space between the stiffeners
- If you purchased a ready-made kit for hood soundproofing, then all you have to do is stick them on
- Heat the vibration damper (it is the first layer) with a heat gun, apply it, and roll it with a roller to the treated area between the stiffening ribs
- Then noise insulation is applied, also known as thermal insulation (a foil layer is required)
- Adheres to the entire surface, including the ribs
- Standard Shumka can be glued with a third layer
Tip: When you don’t have a hair dryer at hand, you can warm up the engine, with the hood closed, the hood will become hot, you can apply vibrating material to it, be careful not to get burned.
Soundproofing doors
We start by applying vibration insulation to the panel
Doors
Sound insulation of doors has a direct impact on the level of comfort inside the VAZ 2114 car. If you carry out similar work, you will simultaneously solve several problems:
- Get rid of some of the noise that comes into the car from the outside;
- You will be able to eliminate squeaks and knocks that are typical for the VAZ 2114 due to the peculiarities of the skin and the location of internal parts;
- Improve the sound quality of your audio system. Sound insulation of VAZ 2114 doors is especially important if speakers are built into the doors.
As in the case of the trunk, door processing includes several stages:
- Disassembly. First, remove the door trim. Just do it carefully, be sure to write down or very carefully remember the dismantling sequence. This is the first and most important condition for successful reassembly.
- Surface cleaning. After removing the factory noise and other elements, clean and degrease the metal. Be careful with the paint and do not damage it with tools. The bottom of the doors does not need to be treated with degreasing compounds.
- Applying the first layer of sound insulation. To cover the walls that go outside, I use vibration damping material. The elements are cut along the contour of the compartments and glued. The work is quite difficult, since you need to manage to paste the surfaces through small holes. Wear gloves when performing noise to avoid injuring your hands on metal components. If you are gluing not a solid piece, but small pieces, do it overlapping.
- Fighting knocks and squeaks. Wrap wires, rods, and other parts that are possible using Madeline. This will avoid knocking noises when the car is shaking. Pay attention to the areas where the parts come into contact with the body. A double layer of material is allowed here. It would not be superfluous to make a continuous gasket of the same material along the entire contour of the doors where the trim is attached.
- Vibration isolation protection for technical holes. Technological holes should be treated with pieces of Vibroplast. A useful measure that gives good results in protecting against vibrations and their consequences for a comfortable ride.
- The metal surfaces of the door on the trim side are treated with Accent. This is a sound-absorbing material. If it is not there, use Bitoplast. Only the thickness of such material should not be more than 10 millimeters.
- Sheathing processing. To prevent the casing from resonating and vibrating, apply Vibroplast Gold vibration damping material to its surface. It is not necessary to cover the entire surface, since this will make the doors noticeably heavier. The most important thing is the joints of the sheathing elements and wide, even elements.
- Assembly. Before you begin assembly in accordance with your instructions, make sure that the window regulators and other elements located in the door are in good condition.
The best sound insulation is comprehensive. Therefore, it is still recommended to protect your VAZ 2114 from internal and external noise. Start small, gradually working on the roof, hood, fender liners and other elements. By doing this, you will be able to achieve amazing comfort and silence in the interior of your car.
Sources of noise and solutions
Before starting soundproofing work, it is important to determine the source of the noise. There are 3 of them in total:
- External - the sound of cars passing by, road stones and raindrops. Soundproofing of the ceiling, floor, doors and other body elements will be required.
- Internal - creaking of the steering column, rattling of the dashboard and door handles. Remedy: lubricate the working mechanisms, strengthen the dashboard fixing bolts.
- Technical - hum in the engine compartment, vibration and knocking of the driveshaft, creaking wheels. The solution comes down to repairing problem areas.
The second and third cases are associated with a malfunction of the working elements of the machine and require repair procedures. In the first case, you will need to soundproof the interior.
Messages 12
1 Topic by fade353 2015-04-24 14:27:53 (2015-04-24 14:35:17 edited by fade353)
- fade353
- Experienced
- Inactive
- Registration: 2014-07-16
- Messages: 404Thanks: 70
Topic: Resolved: How to remove the interior carpet of a VAZ 2110
I decided to install noise and vibration insulation.
1. How and where it is attached in the cabin (floor covering)
2. What will need to be removed/disassembled besides the visible elements (plastic sills, seats, floor tunnel, this is already clear, I mean that I can’t see with my eye when the interior is assembled).
3. I created a topic because I doubt how it is attached to the panel, under the center console (beard or whatever it is - where the radio is shorter).
4. In accordance with lada2111.rf/fight-s-shumom/61-sh... -pola.html, will I remove the covering WITHOUT removing the panel?
5. What about wires? pull it up or wall it up to the bottom?
I would be grateful for photos/videos and advice, thank you!
2 Reply from Anton 2015-04-24 14:36:15
- Anton
- Local
- Inactive
- Registration: 2014-02-20
- Messages: 2,207Thanks: 255
Re: Resolved: How to remove the interior carpet of a VAZ 2110
It seems like this article says that the panel needs to be removedlada2111.rf/fight-s-shumom/61-sh... -pola.html
3 Reply from Admin 2015-04-24 14:42:35
- Admin
- Administrator
- Inactive
- Registration: 2012-02-20
- Messages: 3,257Thanks: 623
Re: Resolved: How to remove the interior carpet of a VAZ 2110
In foreign cars, you don’t have to remove the panel to remove the carpet, you just move the front seat back and that’s it. on the VAZ everything is different, the carpet in front is fixed by the dashboard, like a central part. but you can do it easier, remove the carpet without removing the panels, simply cutting it off in the place where it does not give in and that’s all. I wouldn’t hide the wires under the vibroplast, it’s better to be above it, you never know..
Method 5. Exhaust system (from 1000 rubles)
Of course, lovers of silence will never experiment with direct-flow exhausts, spiders and other strongmen. But what to do if the catalytic converter fails? Simply knocking it out will not only cause the exhaust pipe to stink. The droning sound from an empty barrel will put pressure on your ears. The most correct solution is to install a repair catalytic converter. But if this is not possible, you should weld a flame arrester instead of a neutralizer, which effectively reduces noise.
Method 2. Seal doorways (600–1200 rubles)
Many inexpensive cars do not come from the factory with dual-circuit door seals. The problem is solved on each model individually. You can see how to do this on specialized forums for your car. But, in any case, it is most profitable to purchase seals on the world-famous Aliexpress trading platform. A set of seals for four doors will cost approximately 1,200 rubles. Buyers note a decrease in noise, but much depends on the car model, wear on its door hinges, as well as on standard seals.
A popular Z-shaped seal is used to eliminate gaps between the front fender and the door, between the doors themselves and between the rear fender and the door. Such seals for one car cost about 600 rubles.
And if the standard rubber seals of your car are worn out, then the first thing you should do is replace them, and then, perhaps, additional sound insulation will seem unnecessary.
Cost of services
Making false panels for the trunk
Decorative panels negotiable False panel for amplifier day 1500–3000 rub. False trunk floor panel day RUB 1,500–4,500. False trunk panel (side, back) day 1500–3500 rub. False panel for a processor 1,500–3,000 rubles per day. False panel for a subwoofer 1,500–3,000 rubles per day. False panel of the wing per day 1500–3000 rub. False panel above the spare tire RUR 1,500–4,500 per day. False condenser panel 1–3 h negotiable
Our other services
Production of transition frames for GU (radio tape recorder) from 500 rubles. Production of podiums for acoustics from an hour from 1000 rubles. Manufacturing of spacer rings 1–4 hours from 400 rub. Manufacturing of subwoofer housing 1–7 days from RUB 3,000. Manufacturing of the rear shelf 1–7 days from 1000 rub. Selection of audio system components 5 min – 1 hour free Adjustment of acoustics (during installation) free Audio preparation from an hour from 1000 rubles. Installation (installation) of component acoustics 2–6 hours from RUB 3,500. Installation (installation) of subwoofers 1–4 hours from 500 rub. Organization of linear RCA outputs from an hour from 1000 rubles. Installation of a sound amplifier from an hour from 1000 rubles. Installation (installation) of a CD/DVD/MD changer 2 hours from 2500 rub. Installation (installation) of the processor with configuration 4–6 hours 1500–4000 rub. Reinforcement of the trunk opening (with aluminum) 1-2 days 4000–8000 rub. Enlightening (alteration) of the seat back is negotiable Manufacturing of the lifting frame 1–3 days 5,000–12,000 rub. Disassembly and assembly of interior elements from 30 minutes from 300 rubles. Installation of cooling fan negotiable Installation of condenser (storage) 1 hour 600–1500 rub.
Method 3. Reduce noise from wheels (1000–6000 rubles)
If you have mud tires in summer or studded tires in winter, then there will be no silence in the car. If acoustic comfort is more important, reconsider your choice of tires. But, in any case, noise from pebbles or water from the road, as a rule, very actively makes its way into the interior of inexpensive cars. This can be prevented by soundproofing the wheel arches of the car. There are several ways.
If the car does not have fender liners at all, then you can use so-called liquid fender liners. In this case, a thick mastic is applied to the surface of the arches, which almost does not transmit sound to the metal of the arches. You can apply the drug yourself, especially if it is in an aerosol package. Treatment of four wheel arches will cost no more than 1,500 rubles.
Trunk trim
One of the last stages is the trunk trim. The material for the trim is usually chosen according to the taste of the car owner. However, the following materials are most often used for reupholstery:
According to most car enthusiasts, carpet is the most acceptable because it is cheap, durable, and also looks good.
The trunk can be reupholstered in several ways:
Using a furniture stapler. This method is a quick way to line the trunk. To cover it, you will need to stretch the fabric and secure it with staples on the back side of the part.
Using glue. For cladding using this method, it is advisable to use special furniture glue. To reupholster using this method, you need to apply glue to the structure and wait until it dries a little. Then you need to apply the material and level it using a rubber roller and spatula.
Regardless of whether glue or a furniture stapler is used, each part is sheathed individually.
Method 1. Get your car back to normal (free)
Any elements attached externally to the body increase air resistance and cause unnecessary noise. Therefore, never carry crossbars, a trunk, and especially a plastic roof box when they are not needed. This will return the car's aerodynamics to the level that the designers calculated and will reduce noise. All independently attached spoilers, wings and other aerodynamic elements will only increase air resistance and increase noise. If you bought a used car with door deflectors glued on, then either be prepared to listen to constant noise at high speeds, or remove them.
Method 6. Fighting internal noise (from 200 rubles)
The noise that occurs inside the cabin when the car is moving bothers even those who are indifferent to sound insulation problems. Crickets, squeaks, and crackling of the upholstery can bother anyone. There are many ways to fight. Sometimes it is enough to spray silicone grease into a suspicious place. There was good advice offered by our reader - insert a stretched model elastic band (Hungarian) into the narrow gaps and release the ends. The rubber will expand in the gap and eliminate the play that causes squeaks or knocks.
Of course, our Chinese friends offer solutions. There are many options - from tape that covers the gap between the instrument panel and the windshield, to decorative strips inserted into all visible cracks of the instrument panel. In addition to changing the appearance of the interior, such soft strips eliminate contact between plastic elements and eliminate squeaking.
For lovers of silence, we have shown the main directions in the fight against noise. The maximum effect will be achieved by a set of measures taken. Share your experiences with noise in the comments below.
Source
We bring the trunk to the button
There are three ways to make the VAZ 2114 trunk lock open with a button:
- Connect the electric trunk drive to the system instead of some kind of door.
- Replace the VAZ 2114 trunk lock with a similar one from the VAZ 2110, then also connect it to the door system.
- Buy a kit for electric trunk drive, include it in the electric drive system, and display the controller (button) on the panel.
Only the third option is ideal: firstly, it does not disrupt the integral system of electric drives of the car, and secondly, it is very easy to do it yourself, you only need a little skill and desire, and everything else can be looked at on YouTube.
Hello all friends!
Well, after purchasing the candy bar, we started installing it, and there was not enough space on the back of the VAZ 2114 to install the candy bar; it fit right in and the back wouldn’t close. Well, it was decided to make a raised floor for the amplifier and monica.
what you will need: 10mm plywood had to be taken 1.5m by 1.5m, they don’t sell less 2 sheets for 750 rubles = 1500 rubles Wood screws 50 rubles Studs 2 pcs 40 rubles Angles 4 pcs 40 rubles Rail 50 by 50mm 6m 260 rubles Screwdriver Jigsaw Solid cardboard for drawing in the trunk.
Stage 2: cut out the loblik according to the drawings from the first sheet of plywood, then try on how it fits in the trunk. Stage 3: put the first sheet of plywood on the second, draw the drawings with a pencil. Then we cut it out. Stage 4: we cut out the slats to the required dimensions, taking into account ventilation for the amplifiers and holes for the wires.
Stage 7: take the hinges, try them on, taking into account that the hinges do not interfere with the installation of the floor, and screw the hinges into the plywood and slats, 3 screws each.
At this point the false floor is ready, if you are going to paint, glue self-adhesive suede or other materials, do this before screwing in the slats. Applying the desired material to a flat sheet of plywood will look more beautiful.
Next, we install and try on the false floor; if you are sure that the hinges will not interfere, it is advisable to screw in the hinges at the last moment in order to remove the top plywood cover and conveniently install the amplifiers and route the wires.
| Forum | Heading | date |
| About everything | Drawing on glass in a raised floor. | 21.07.2013 |
| crazy hands | The simplest raised floor in Lacetti | 28.09.2012 |
Installing the backlight
As a final step, you can install LED lighting, which will serve both its intended purpose and highlight the tuning of the trunk. In addition, an additional advantage is that the cost of such lighting is low.
It is recommended to connect the contacts using a simple scheme. In order for the lighting to illuminate the entire luggage compartment and at the same time look beautiful, it is recommended to install it in the corners of the transformed trunk. In addition, this allows you to easily fix the LED strip. However, if the owner’s knowledge of electronics is limited, then you can turn to a specialist who will quickly and for a pittance help you solve the problem.
Undoubtedly, the capacity is significantly reduced, however, in return, the owner of a VAZ car receives an original trunk, which you will not find on the average driver. But tuning also helps to improve sound insulation, which VAZ cars lack so much. In addition, the aesthetics and well-groomed appearance of a car can say a lot about the owner himself. However, whether to perform tuning or not is purely the choice of each car owner.
Soundproofing the trunk
The procedure must be done efficiently; in addition to the trunk itself, its lid in the VAZ 2114 must also be soundproofed and modified.
The following material is useful for work: Hermeton A15 - 1 sheet (for arches), Comfort 6 (better than 10, it is much denser) 4 sheets and 30 sheets of Shumoff M3 (Shumoff P4), and as a vibration damper you can use Shumoff M2.
The procedure is performed in the following order:
- The roof, floor, and trunk door of a VAZ 2114 are covered with a vibration damper, soundproofing material is glued on top, the most problematic areas can be covered with the more effective Shumoff M4, plastic parts can be glued with an anti-creaking agent like Bitlon 5. In addition to noise insulation, the vibration damper acts as thermal insulation.
- You need to glue Vizomat hot - heat it with a hairdryer and put it in place, then roll it out with a roller, remove the gaps and roll out the bubbles, if this is not done, the vibration isolation will not work or will not perform its function well.
It is better to use solid sheets, cutting them so as to leave an overlap of a centimeter and a half between the cut parts, then there will be no gaps.
With sound insulation, you can get rid of body flaws in the rear of the car, and, if necessary, weld it.