The vast majority of Lada Priora cars have an air recirculation button on the dashboard. On early models, this mode worked as part of the Halla climate system; later Panasonic air conditioners began to be installed on cars. Recirculation can work without an air conditioning system, but in this case its capabilities are somewhat limited, since in this case the car will no longer be able to work to lower the air temperature in the cabin.
Installation and troubleshooting of the interior air recirculation system of the Lada Priora.
What you need to know about the air recirculation system of the Lada Priora
The vast majority of Lada Priora cars have an air recirculation button on the dashboard.
On early models, this mode worked as part of the Halla climate system; later Panasonic air conditioners began to be installed on cars. Recirculation can work without an air conditioning system, but in this case its capabilities are somewhat limited, since in this case the car will no longer be able to work to lower the air temperature in the cabin. Installation and troubleshooting of the interior air recirculation system of the Lada Priora.
- Purpose of the air recirculation system
- Air recirculation in Priora: main faults
- The damper drive does not work
Interior ventilation of VAZ 2110, 2111, 2112
Interior air recirculation system of VAZ 2110
Reference information from the Operating Manual: To speed up the heating of the cabin and prevent the entry of outside air into the cabin (when crossing gas-filled, smoky, dusty sections of the road), an air recirculation system is used. When the recirculation button is pressed down (on the instrument panel), the electro-pneumatic valve opens, and under the influence of vacuum in the intake manifold, the recirculation system flap blocks the access of outside air to the car interior. Thus, the recirculation system can only operate when the engine is running. At the same time, if the fan is turned on, the air in the cabin continues to circulate, passing through the heater air ducts.
Air recirculation button
From the very moment I got into the cabin, this very button haunted me. I think many or some (of course, those who have a VAZ2110) have it, and even if they do, it works for only a very few, and for even fewer people it has any effect on the car. Finding out which category I belonged to, I realized that I belonged to the first. This is wrong, I decided, I will do it.
Many people before me found out at what period the air recirculation system (hereinafter referred to as ARR) on the VAZ2110 was introduced, installed completely (damper, pneumatic valve, electro-pneumatic valve, hoses, wiring, button), partially (some of the above, most often only the pneumatic valve and button), or was not mounted at all. My (our) situation was further complicated by the fact that we do not have an ordinary car. But let's not talk about that now.
Device
The system contains
:
- Air heating distributor assembly (left and right semi-casings, heated footwells and heated windows, movable damper drive lever (drive by gear motor, five fixed positions);
- Left and right ventilation air ducts connecting the side oval windows in the distributor semi-housings with the side deflectors (manufactured using blowing technology);
- Instrument panel trim (defroster) with guide vanes;
- Heating (blowing) nozzles for side windows (demister);
- Central and side ventilation deflectors;
- Leg heating air duct (front);
- Air ducts for heating the feet of rear passengers left and right.
- Spoiler.
How to change lubricant for a Priora engine
The procedure itself is not at all difficult, with a little experience. You will have to prepare oil, a new oil filter, and several clean rags in advance for taking measurements, wiping your hands, etc. Once you have found the drain tap, place any unnecessary container in this place so that the oil flows into it. After it leaves the system, remove the old filter and install a new one in its place.
If you plan to use flushing fluid, then now is the time to pour it into the system. The motor should be allowed to run for about a quarter of an hour, and then the flushing temporary lubricant should be removed. Now pour new oil through the neck. Naturally, every Priora owner should know how much lubrication his car’s engine requires. This volume is in the range of 3.2–3.4 liters, so you will have to purchase a 4-liter canister. But everything that remains can be used for topping up, since the oil will gradually leave the system one way or another.
How do you know that it is full and no longer requires lubrication - you ask? A completely logical question. To do this, let the engine run for a few minutes and turn it off. After it has cooled, remove the test dipstick from its socket and wipe it clean. Now measure how much oil is in the system. It is recommended to do the procedure a couple of times. It is correct when the lubricant level is between the minimum and maximum marks on the dipstick.
Fault diagnosis
If the device breaks down, experts recommend diagnostics in the following sequence:
- the ignition and engine are turned on;
- the maximum fan speed is set;
- the recirculation button is pressed;
- the valve-flap mechanism starts.
If the movement is uniform and if the damper stops at the end point, in the first 2-3 seconds, this indicates the serviceability of the complex.
But pops, uneven movement, and clicks indicate a malfunction.
To extend the service life of the complex, it is necessary to install a stabilizer. Due to the operation of the stabilizer, where the damper is located, the torque of the electric drive is reduced. To eliminate the possibility of damage to the damper for the time before purchasing a stabilizer, the damper is disconnected from the electric drive by a wire.
Advantages
The recirculation mode allows you to quickly reduce the temperature in the VAZ 2110, due to the coordinated operation of the mechanisms (valve-electric drive). This is realized through long-term air flow through the climate control complex, the temperature of which is much lower than outside the car.
Cooling in the VAZ model 2110 due to recirculation is economically beneficial, because energy consumption to start the compressor drive is less than when air is taken from outside.
Air conditioning in VAZ 2110
By activating recirculation, the possibility of pollen, unpleasant odors and gases entering the VAZ 2110 interior is eliminated.
The damper drive does not work
It is impossible to check whether the Priora recirculation valve is working (on cars with the Panasonic climate system) by viewing errors in the operation of the system - the corresponding codes are simply not provided. Therefore, it is necessary to perform the following actions in accordance with the algorithm described in the diagnostic card:
- use a multimeter to measure the voltage level between ground and contact No. 1 going to the mode switch,
- if the obtained value corresponds to the on-board network voltage, there is an open circuit in the recirculation switch section,
- otherwise, you need to measure the voltage between ground and contact No. 2 of the recirculation button when it is pressed,
- if the measured value is equal to the on-board network voltage, the switch itself is faulty, and then it must be replaced,
- otherwise, use a multimeter to measure the state of the recirculation key,
- if the value is equal to the on-board network voltage, there is an open circuit in the area between the mode activation key and the SAUKU heater controller,
- if not, proceed to measuring the voltage in the area between ground and contact No. 1 of the damper solenoid valve (the recirculation mode button must be pressed),
- if the obtained value corresponds to the on-board network voltage, there is a break in the electrical circuit in this area,
- otherwise, there will be an open circuit in the ground circuit of the damper drive valve.
The pinout of the Priora recirculation button is described in detail in the circuit diagram of the Panasonic climate control system. If the recirculation malfunction is caused not by an open circuit or a breakdown of the solenoid valve itself, but by a malfunction of the damper, replacing it can be quite difficult for an unprepared car owner.
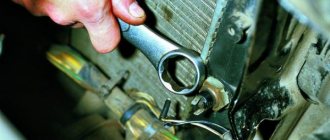
If you go to a car service center, it will cost a pretty penny (about 10 thousand rubles), since the technicians will tell you that you need to remove the entire stove, drain the antifreeze, and also remove freon from the air conditioning system. You can do this yourself, and without draining the antifreeze and pumping out the refrigerant. Therefore, it makes sense to describe the procedure for replacing the vacuum drive if the Priora interior air recirculation damper does not work:
- To begin with, you will need an L-shaped screwdriver - it is not sold in stores, but it is not difficult to make by bending any existing one made of a fairly soft metal. We use it to unscrew the bottom screw, which is located very inconveniently - there is a hole there large enough to stick your hand through and perform the necessary manipulations,
- the top screw is hidden behind the plastic of the stove body - it needs to be drilled exactly opposite the screw,
- disconnect the damper rod, for which you need to pull it to the left with a little effort,
- now the drive is free, all that remains is to pull it out (pull it a little to the left and press in the direction of the engine compartment - it should fall down), you need to pull it out carefully, since it can cling to surrounding parts,
- the procedure for inserting a new vacuum drive is also quite tedious - first we try to insert the valve into its normal place,
- the second step is to get the drive tube into the hole located in the lower part of the heater,
- put the hose on the valve itself,
- we tighten the screws in the reverse order (you will have to tinker with the bottom one, so you don’t have to tighten it - the valve will be held quite securely even without the bottom screw).
Afterword.
Sea trials were successful. The air recirculation system is actively and quite often used by me. When warming up the interior in winter, on dusty/dirty/smoky sections of the road, when there is a smelly anti-freeze. It also (I recently discovered) successfully helps disperse snow that gets into the air intake.
PS All these “why is this necessary..., nonsense..., well, you should also...” are not accepted. Information and other people's experience are given to us equally; we only decide whether to use them or not.
Issue price: 300 ₽
If you find an error, please select a piece of text and press Ctrl+Enter.
How to disarm the electrical package unit of LADA PRIORA
What to do if Priora is not removed from the standard alarm!
The hazard warning light blinks, the car does not respond to the ignition key buttons. As a rule, several units are involved here that are synchronized with each other.
- Ignition
- Radio channel module (Located in the driver's door)
- Electrical package block (Comfort block)
- Engine ECU
New blocks come with non-activated codes inside and can be installed on any car without problems, but once you register (train) the keys, a special code is written into all these blocks, which is synchronized with each other and serves as a standard alarm system. (Immobilizer) As soon as you turn the ignition key, within five seconds there is a poll between the key and the units, if the code matches everywhere, then the engine ECU gives permission to start, if the code of at least one device is not recognized, the engine ECU is blocked and the car does not start.
Training a working key is done using a special red training key. I will not describe the procedure for training keys; there is plenty of information on the Internet. In fact, the main key is a red training key; it stores a code that, after training, is written into the working key and other blocks.
I'll try to explain in more detail how it all works:
- The radio channel code that we use to open doors using the key's remote control buttons is written into the driver's door module, where the power window buttons are located. If you replace the comfort unit or engine ECU, the buttons on the key will still work.
- The IMMO (Immobilizer) code has a connection only with the ignition key, the electrical package unit and the ECU unit. If you disconnect the driver's door module, the car will still start.
How to determine whether the keys are trained or not:
- The IMMO lamp on the instrument panel goes out after 5 seconds - the keys are trained.
- The IMMO lamp goes out after 30 seconds - the keys are not trained. (The car will start with any blank)
Options for disabling IMMO:
Write an untrained eeprom dump to the engine ECU. All functions will remain working as normal, key buttons, etc., only the car will start with any blank.
If the vehicle cannot be disarmed using the remote control:
- Here the situation is a little more complicated, this is why this article was written. Suddenly, for some reason, the car remained on guard, the hazard lights blink, the car beeps, etc. Of course, you will open the car mechanically using the keyhole in the door, but at the same time constantly The hazard warning lights blink and the comfort functions do not work, and the car does not start. The reason could be a breakdown of the remote control key or the driver's door module. However, the electrical package unit remained armed.
- There are two ways to disarm the electrical package unit: 1) Install the driver's door module from another car and open it remotely from the key of the same car. In this way, you can disarm the comfort unit. 2) Disassemble the electrical package unit and use the programmer to clean the M95080 memory chip.
Comfort unit, disarming. This instruction applies only to unlocking the electrical package unit. If you need to unblock the engine starting, it is enough to write an unlearned eprom dump into the engine ECU.
We disassemble the block and find the memory chip eeprm M95080. It is enough to insert this chip into the programmer and completely clean it, or replace it with a new one if there is no programmer. When re-learning the keys, all the necessary data will be written into it again.
After cleaning the microcircuit, the electrical package unit will disarm.
A few more photos on the topic and video.
Pinout of the comfort block for connection on the table.
Electric package controller connection diagram.
How to change the odometer, speedometer, diagram. – car diagram – DIY car crafts
Direct fuel injection systems on domestic cars have made it possible to use fuel efficiently, while increasing engine power. Recently, there has been a great demand in the automotive market for devices that generate electronic odometers. Who benefits from increasing the mileage in their car?
The answer to this question is obvious. Drivers of government and official (corporate) cars thus have the opportunity to write off gasoline. And today he is worth his weight in gold.
Previously, mechanical odometers were installed on older car models, and kilometers could only be added mechanically. Over time, an electronic odometer was invented, and skilled radio electronics specialists from various car depots came up with a simple and effective way to wind up the odometer. For this process, you need to connect a wire from the additional terminal of the generator to the dashboard, where the odometer itself is located.
But electronics engineers have developed new odometers that are very difficult to hack. And when one day in the garage they connected the odometer in the manner described above, the radio technician discovered that the car would not start. The suffering driver, who lost additional income, was sent to look for other ways to resolve this issue.
The story began with Gazelles and Sobols with installed 405 engines, which consumed a lot of fuel. It was these engines that began to stall when craftsmen tried to increase the odometer. The method for effectively hacking a device is very simple. You need to connect the Combiloader PAK to the ECU (electronic control unit) of the car, from which a special serial engine control program is read.
Then open the CTPro program and in the menu from the listed configuration, uncheck the box next to the speed sensor. According to this algorithm, an already modified engine control program is written to the ECU with minor changes.
After these steps, you can call a good friend of an auto electrician, who will connect the wire from the generator to the instrument panel odometer, and the process will go faster, you yourself will be able to cover the required number of kilometers. But this method is already a thing of the past. Today the world is saturated with advanced gadgets and all kinds of electronics.
Using the volumetric installation method, a simple generator is made, which consists of three radio elements (see electrical diagram).
Toggle switch S1 is needed to switch the electrical signal going to the instrument panel, either from our generator or from a standard speed sensor. Our generator receives voltage from the “plus” of the ignition switch. This allows you to accumulate mileage without starting the car (you just need to turn on the ignition). You can also put the circuit into operation while the car is moving.
An automotive electrician will definitely recommend that you solder another resistor into the circuit in series with the trimmer. This is necessary so that when the control is directed to the extreme left position of its slider, the process of generation failure does not occur.
Also, the circuit must contain a protective diode to protect the electrical circuit from polarity reversal. The values of the resistor and capacitor indicated in the diagram are quite suitable for generating rectangular pulses with an amplitude of 12V, in the range of low and high frequencies (from 180 Hz to 1.5 kHz). These characteristics more than cover the needs of this device on different cars.
New Lada: Winter, frost. Let's share our observations. | Lada Xray Club :: Forum Lada X Ray, Xray Cross
To quickly change the frequency range, the capacitor must be replaced. As the capacitor capacity decreases, the frequency increases and vice versa.
The following circuit, with the same principle of operation of the generator, is built on a 555 chip (1006VI1).
It should be remembered that all variants of the circuits given in this article were developed for a 24V voltage in a KAMAZ truck.
The figure shows a generator circuit for 176(561)LA7 or HEF4011.
The table describes cars with modified odometers.
| car model | Production year | Brief description of installation |
| Gazelle | 2002 | Instrument cluster, connector X311 contact “green wire” - DC signal. Yellow wire - ignition. Black wire - ground. |
| KIA Magentis Hyindai Sonata | 2004 | Conventional three-wire speed sensor, view from the contact side, large connector, speed sensor present |
| Hyundai Elantra | 2004 | The instrument cluster consists of three connectors: large – yellow, large – white, small – old. The figure shows a large connector (DS wire), viewed from the contact side, the wire is gray with a brown stripe. |
| Forg Tourneo Connect, Mondeo | 2003 | The speed sensor is a regular three-wire one, the signal goes to the ECU, the signal is received from the ECU via a digital bus and transmitted to the control panel. I had to cut the white wire with the blue stripe, the contact number on the ECU is 3 |
| VOLVO S70 | 1997 | There is no speed sensor; the speed signal comes from the ABS system. The ABS sensor is a 6-volt, sinusoidal current sensor. The device receives voltage from a stabilizer with an output voltage of 6 V, type KR142EN5B. At the output we get 6-volt rectangular pulses, which the device calmly “digested”. On the panel, connector A is on the right. 3 contact - blue wire - speed input signal 15 contact - brown wire - ground 18 contact - blue with a red stripe - ignition. |
| Toyota Camry | 2003 | Instrument cluster, 35 pins, wire with ABS and speed information. There are numberings on the wires |
| Mitsubishi – Pangero diesel | 2005 | There are three connectors connected to the panel - one black, located first to the left of the driver's door, and two white. On the black connector, the one on the far right is yellow-white with a silver ring, connected to the DC output. Any winding device has an open collector output, you still need to install a switch. |
| Renault KANGOO | At the back of the dashboard there are two connectors of 15 contacts, 6:2 are used - lilac10 - brown (1)11 - green (1)12 - yellow13 - brown (2)15 - green (2)Coding goes from left to right: from the center of the panel (gray connector) to the edge. We are interested in the 13th – brown (2) – responsible for the speedometer readings and odometer count. I supplied a rectangle of ~500 hertz, a duty cycle of 50%, a classic generator circuit on the 561 series, it turns at 200 | |
| Mazda Tribute (aka Ford Maverick, Escape), American. | Connected to the DS - two-wire, located on the automatic transmission closer to the engine panel. It moves calmly at a speed of 250 km/h, then stalls. The check does not light up. The generator is ordinary, only you need to place a capacitor (0.1 µF, ceramic) in the gap at the output of the speed signal, | |
| Kamaz | ||
| MAZ | Attention! 5V (middle top contact) comes out of the device! Protect from short circuits when applying voltage. Swings up to 5 kHz. | |
| UAZ Patriot | ||
| UAZ Hunter | ||
| Renault Logan" | 7 – black, ground 10 – yellow: 15 ignition switch terminal 22 – green: speed sensor | |
| HYUNDAI Santa Fe | 2007 |
Before you begin making some changes to your car's electronics, you need to complete all of the following points. Our task is to detect the necessary wiring through which the instrument panel odometer receives digital information about the car's mileage. The following describes the procedure step by step:
1)——- Inspect the gearbox, rear axle, front-wheel drive (if the car is front-wheel drive) in order to detect the speed sensor.
2)——– If you find something similar on the speed sensor, but are not sure that this is it, then you need to carry out tests. To do this, you need to remove the connector from it and drive several kilometers. You should notice that the speedometer or odometer stops working. If this does not happen, then it means that you did not turn off the vehicle speed sensor, but something else.
3) ——— In this case, if you find a three-wire speed sensor, then you must measure the voltage at its connector to determine the signal wire. Next, this signal wire needs to be called on the dashboard. A winder will need to be connected to the end of this wire. To do this, you need to hang up the drive wheels of the car and make them spin, at the same time monitoring the signals passing to the dashboard using an oscilloscope.
4) ——— If in the first point the speed sensor could not be detected, then the odometer probably receives a speed signal from the ABS. In this case, the only option is to search for the signal output on the instrument panel using an oscilloscope.
If you have detailed information materials and electrical diagrams on hand for the car model that you are going to do “chip tuning”, then the task becomes quite simplified. It must be remembered that each car from different manufacturers is individual. You are completely personally responsible for your actions. Therefore, before you start connecting the selected wires, you need to double-check everything several times.
This brief review of odometer winding highlights the general principles for solving the task assigned to us. The specific implementation, on a specific car of a particular model, may differ greatly in favor of complication. If you have already had experience with another type of car that is not yet on our list, send information to us and we will be happy to add to our table.
Some subtleties on creating an odometer winder on Ford Mondeo and Ford Focus 2006 cars, as well as Toyota Camry.
These car models use signals coming from the ABS as a vehicle speed signal. The type of sensor used on these cars is current, which means a change in current in the circuit when the wheel rotates. Changes occur in the range of 7 – 14 mA. If we connect an oscilloscope in parallel to the sensor, then when the wheel rotates we will get a meander with a swing of approximately 0.5 V, with standard values of 12 V. Below is a diagram that completely simulates the operation of such a sensor.
On Ford Mondeo and Ford Focus models, we can determine the positive wire using a voltage tester by removing the connector and working with the wire with the ignition on. In this example, we used the effect of complete (manual) recommitment. To wind the odometer, you need to open the hood, then remove the plug from the connector, and connect the winder in its place.
We turn on the ignition of the car and carry out the necessary winding. After completing the necessary actions, we connect plugs to the connectors, which restore the factory connection of the ABS control unit with the sensors. All these wires could be connected to a relay, but as a result of our actions a lot of extra wires would appear. When testing and operating our system for winding up the odometer, you should use two driving wheels, because when one wheel is working, the speed indicator will not exceed 30 km per hour.
New Lada: Review from the owner of the 2021 LADA (VAZ) Granta (I Restyling): 1.6 AT (98 hp) | Auto RU
The TOYOTA CAMRY car model, produced in 2006, has an instrument panel called “optitron” and has neon backlighting. The engine capacity is 3.5 liters, the gearbox is automatic, the speed signal coming to the odometer is taken from the ABS and has the form of a sinusoid with an amplitude of 1V, with a frequency directly proportional to the rotation speed. This car uses an inductive type of ABS system sensor.
The electrical circuit that we need to change the odometer must be built using the KT3102 transistor. A resistive divider operates on the amplitude of the output signal, thereby reducing it. A capacitor with a capacity of 0.1 µF to 0.47 µF removes the DC component of the signal.
Let us remind you that it is not recommended to interfere with the operation of the ABS system, but if you do make decisions, then you must fully understand the consequences and, in accordance with this, carry out the work at the proper quality level.
Description of the electrical package control unit
The electrical package controller in Priora is a device used to control the functionality of the vehicle. This unit is responsible for the operation of turn signals, power windows, control panel lighting, dimensions, fog lights, interior lighting, and rear window heating system. This device also ensures the normal operation of the reversing lights. The fact that the car is equipped with this device makes it even more practical.
Priorovsky electrical package control controller
Location
The control device on the Priora is located above the electronic engine control unit, at the bottom of the center console, in the middle. In this case, the device is connected using two connectors - power and information. The power output is used to supply voltage to the control unit, and the information output is used to perform the functions of the device. It should also be noted that the control unit is protected from external influences of dirt and moisture.
Fuse
A fuse is an electrical switching device designed to protect electrical circuits by breaking the circuit due to its destruction or shutting down when a current flowing through it exceeds the permissible values.
Fuses come in several types and are used in all electrical circuits to protect vehicles from short circuits (short circuits). They are classified according to the rated current of the fuse link.
The fuse link is the part of the fuse that is destroyed by electrical current.
The rated current is the current of the fuse at which the fuse-link will operate indefinitely and will not be subject to destruction.
Operating principle of the fuse
When using a fuse in an electrical circuit, the operating current passing through the fuse does not exceed its rated current - this is its normal operation. But as soon as a current appears in the electrical circuit that exceeds the safe permissible values in this circuit, regulated by the fuse, the fuse-link, under the influence of a current exceeding the rated current of the insert, begins to melt and collapse as a result of which the electrical circuit breaks.
You can restore the electrical circuit by replacing the fuse, but only after the culprit for the increased current in this electrical circuit has been found. Otherwise, the new fuse will also blow.
Purpose of the air recirculation system
How is the recirculation mode useful? Firstly, it ensures a much faster establishment of the optimal temperature inside the car, especially after the car has been parked for a long time. This is achieved due to the fact that the intake of external air stops. Consequently, only the air that circulates through the heating or air conditioning system is involved in the blowing process. Accordingly, it does not cool in winter and does not heat up in summer due to mixing with the external flow, that is, its temperature almost immediately becomes optimal.
Secondly, if it is necessary to cool the cabin in the hot season, the energy consumption for operating the evaporator in recirculation mode becomes half as much as when using the oncoming external flow.
Thirdly, the mode for blocking the air intake from outside is very useful in cases where conditions outside are far from ideal in terms of the presence of various contaminants and unpleasant odors in the air. Such factors, for example, could be:
- driving on country roads with no hard surface - on such roads in the summer there is a column of dust, and any oncoming car threatens to turn the air in the cabin, even with the windows completely closed, into a dense suspension, which becomes impossible to breathe,
- driving in a traffic jam, when the virtual absence of dynamics and dense traffic lead to multiple concentrations of exhaust gases freely penetrating into the cabin,
- driving past sources of unpleasant odors - for example, a cow barn, pig farm, poultry farm, landfill or industrial complex with specific odors,
- movement in long tunnels in conditions of traffic jam speed, when stagnation phenomena greatly increase the concentration of exhaust,
- if foul-smelling or polluted outside air has already leaked into the cabin, and it’s still a long way from leaving for a clean zone, turning on internal recirculation will also be useful - the bad air is usually cleared quite quickly.
Note that, despite such useful features of the Priora’s air recirculation mode, its use should not be long-term, since there is no air exchange. This leads to a decrease in the amount of oxygen and a corresponding increase in the concentration of carbon dioxide. The latter, as is known, has a suffocating effect on the body, causing drowsiness in the driver and passengers. Therefore, long driving (more than 15 minutes) in this mode is not recommended, since it has a bad effect on people’s well-being.
The second negative point is that if you breathe the same air for a long time, it becomes saturated with moisture, which is abundantly present in a person’s exhalation. And if, in addition to the driver, there are also passengers in the car, an increase in air humidity leads to rapid fogging of the windows, which even the turned on air conditioner cannot cope with. From a physics point of view, fogging is the result of exceeding the concentration of moisture in the air, the so-called “dew point,” especially in the area of the windshield, which always has a temperature lower than in the cabin. For this reason, climate systems in the “defrost” mode (defrosting the windows) automatically block the recirculation of cabin air.
Improving interior ventilation - logbook GAZ 31 Serg Edition 2003 on DRIVE2
After I made the interior noise and installed the ceiling from 31105, I began to notice that the doors did not close well... there was a weak air flow from the stove, which resulted in poor heating and cooling of the interior... And the worst thing was that the windows constantly fogged up... as soon as more than 1 person sat in the car... So I’m driving in a fog... and the stove doesn’t have enough power to blow through the windows.
The rear passengers constantly whined that they were cold in winter and hot in summer...
After googling)))) I came to the conclusion that having filled up all the holes in the cabin, I got VERY excited.
In the Volga, the interior ventilation is carried out from the stove through the perforated ceiling and then through the racks to the street.
I decided to solve the ventilation problems comprehensively. I need to buy:
small ventilation grilles with a diameter of approximately 60mm are ordinary grilles from a hardware store
Large ventilation grilles with a diameter of 100 mm
Ventilation valve for Lada Kalina
ventilation grille from Priora
The first task is to organize the exit of air from the cabin. Having removed the rear covers, I cut off the Shumka from all the ventilation holes, which I sealed with Shumka www.drive2.ru/l/288230376152334645/#post. Then I cut ventilation grilles from the Priora into the linings.
I also placed a stop under the pad so that there was space between the stand and the pad... for air to pass through.
When I made myself an acoustic shelf www.drive2.ru/l/288230376152342159/#post I made cutouts there for the speakers... but I still haven’t taken up acoustics... there are no speakers at the back. Therefore, I decided to put small grilles in exactly the place of the speakers. And when I get ready to install the acoustics, I will cut ventilation holes along the rear window directly into the trunk.
Structurally, standard ventilation holes go into the trunk and only then into the pillars.
The second task is to organize the exhaust of air outside the body. Having done all the previous things, the effect was already there... the windows began to sweat much less... and the air flow from the stove increased significantly, but still I thought that the holes in the pillars were too small. Therefore, it was decided to install additional ventilation valves from the viburnum directly under the rear bumper.
we cut in the left valve
we cut in the right valve
just in case, seal the edges with polyurethane sealant
Total: With the windows and doors closed and the standard ventilation in the racks open and the heater fan turned on at full power, we have this valve position
We insert large ventilation grilles into the plastic panel that covers the rear trunk panel.
Results1. The doors began to close very easily.2. Now there is no need to slam the trunk.3. The air flow from the stove increased almost 2 times4. The windows stopped sweating... turning on the fan to 1 notch prevents fogging completely.5. The interior warms up faster and more evenly (rear passengers no longer complain that they are cold)
6. The air conditioner began to work normally, it cools much better (I think that summer will confirm the first spring tests)
For those who like to tape up everything they can in the cabin, this modification is simply a must. I even met those who weld the rear struts)))))
Sometimes only the fixed triangle on the rear doors fogs up. On this topic, there is an idea to make ventilation grilles along the glass... so that the air passing along the glass will blow through the glass and dry the doors a little... But these are still plans.
Device principle
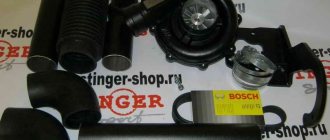
Next, let’s look at the Panasonic air conditioner circuit, which consists of the following components:
- The compressor is a single-pass rotary with three blades. This element builds up the required pressure and maintains the circulation of the refrigerant. The compressor is located under the generator.
- A condenser is a heat exchanger that provides cooling to a gaseous refrigerant by turning it into a liquid state. This mechanism is located on the radiator frame.
- The evaporator is also a heat exchanger; its purpose is to cool and dry the air before it enters the cabin. This device is located in the heater housing.
- The receiver has the shape of a metal cylinder, which is connected to the capacitor. This mechanism ensures the accumulation of liquid refrigerant and separation of moisture and debris. There is a filter drier inside the receiver.
- Pipelines.
Which oil to choose and what volume to fill
Motor oil should be selected based on the vehicle's operating conditions, age and mileage. Over the years, Lada Priora was produced with different engines:
- since 2007 they installed 126 engine 1.6 liter, 16 liter, 106 hp.
- since 2011 they have installed 116 1.6 liter, 16 liter, 98 hp.
- since 2013 they have installed 127 1.6 liter, 16 liter, 106 hp.
Suitable oils for these engines have the following viscosities:
5W-30, operating temperature from minus 25-30°С to plus 20-25°С
5W-40, operating temperature from minus 25-30°С to plus 35-40°С
10W-40, operating temperature from minus 20-25°С to plus 35-40°С
15W-40, operating temperature from minus 10-15°C to plus 35-40°C
It is not necessary to purchase expensive oil; you can buy both oil from domestic manufacturers, recommended by AvtoVAZ, and imported oils.
Adjusting the heater damper
Sometimes the reason that the car interior remains cold is that the heater damper does not open, despite the fact that the gear motor is trying to turn it to the desired position. In most cases, the damper regulator, which is responsible for setting it to the desired position, is to blame.
This is possible on the heater dampers both with and without air conditioning due to a clogged cabin filter, which needs to be changed in a timely manner. Dust and leaves prevent the damper mechanism from opening normally.
Another reason is that the thin plastic of the damper simply warps at high temperatures in the heating line, and it stops reaching the desired position. As a result, the stove does not switch to different modes or the flows are distributed unevenly. Most often, the damper regulator remains in the “in the face” position, but the glass does not blow.
If the damper does not switch, you can remove the panel between the driver and passenger seats; it is located directly behind the central heater grilles. Sometimes you just need to change the seal to which it is pressed, or remove debris that has accumulated in it. After this, you need to check the heater damper in operation and you can assemble the panel.
If there are problems with the damper switching mechanism, you need to remove the plastic on the dashboard near the driver’s right foot. If the plastic damper is deformed, it can be replaced, but it is better to do this under warranty. In this case, repair of the stove damper on Priora is limited to treating the mechanism with VD aerosol lubricant. This can be done blindly, without removing the remaining parts of the dashboard, by feeling the switching mechanism with your hand.
After this, the damper is adjusted by simply switching it to different positions and controlling the movement with your hand under the plastic. In the vast majority of cases, this is enough for the stove to work normally again. After this, install the plastic dashboard in place and secure it with self-tapping screws.
Video: Priora stove. Diagnosis of heater malfunction
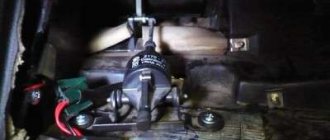
Where is it located and how is it removed?
VAZ designers placed the DTVS module in a very original way.
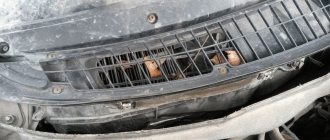
It is located in the plastic housing of the interior lighting unit. Directly under the rearview mirror. Under two backlights for the driver and passenger, you can see the air intake holes for supply to the combustion engine. The module is dismantled quite simply. First, the rearview mirror is removed.
After this, two bolts are opened that secure the light module to the body and upholstery. They are simply unscrewed with a screwdriver or hexagon, depending on the type of bolts. When this unit begins to separate, it becomes possible to disconnect the wire connectors from the Priora interior air temperature sensor and directly from the backlight unit.
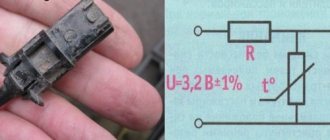
The DFA itself is a plastic box secured to the module body with two screws. And a wiring harness with a connector coming out of it. By unscrewing these bolts, you can freely separate the diesel fuel assembly.
And when the node is removed, various actions can be carried out with it. But most often, this is simply cleaning and lubricating the fan. Or replacing one of the nodes.
Although practice shows that most often drivers prefer, without bothering too much, to simply replace the complete combustion engine assembly. It’s really simpler, since its cost is not so high. Around 400-500 rubles.
And installing a new one according to the description above, proceeding in the reverse order, is generally not difficult.
And you can watch a short video on this issue:
There is no need to explain why you need air conditioning in a car - the heat sometimes reaches about 0 and above, and even more in the car interior. This is very uncomfortable and even dangerous for the driver and passengers - you can get heatstroke. Open windows are not an option. The noise of the street will accompany you all the way. And this is of little use if the air is very hot.
Car air conditioning is no longer a new product - it can be ordered when purchasing any new car, even a domestic one. For most of them, air conditioning is already offered as standard.
And if there is no air conditioning, if desired, you can even install it on a VAZ “classic” - there are now enough specialists and equipment. However, in recent years, instead of air conditioning, more and more car buyers are ordering climate control in Priora.
How does the Priora climate control differ from a conventional air conditioner? If you have a simple air conditioner in your car, then you have to do everything manually - turn the air cooling on and off, adjust the temperature, strength and direction of the air flow.
This is certainly better than frying in a frying pan, but still not very convenient. You have to constantly be distracted from the controls in order to adjust the climate in the cabin so that everyone is comfortable - or ask passengers to adjust something.
If your Lada Priora car has climate control installed instead of an air conditioner, then, of course, you can be envied. The driver only sets the air temperature with the regulator - the climate control system does the rest. It monitors the current thermometer readings in the cabin and, in accordance with this, changes the ratio of hot and cold air flows, as well as the strength of the flows supplied to the cabin.
Climate control on Priora can be two-, three-, or even four-zone. In this case, the driver and passengers can each set the temperature in their own part of the cabin, independently of each other (or with a certain maximum difference).
Such systems, however, are not always effective - it depends, first of all, on whether the manufacturer has saved on the number of fans, air tunnels and other parts of the climate system.
As for the main malfunctions, everything is quite interesting. An ordinary air conditioner is a fairly simple thing; repair and maintenance are not particularly difficult (among the main faults are rupture of tubes, breakdown of the compressor and evaporator, insufficient level of freon in the system).
Climate control on the Lada Priora is a much more complex device, and therefore mechanics have to rack their brains over its malfunctions much more.
On a Lada Priora car, the climate control is single-zone, but still, it includes, in addition to the usual components of the air conditioner, many control modules (especially an expensive part), sensors, sensors, cables, electric motors, resistors, printed circuit boards and other things. When replaced, these parts can cost a pretty penny!
Source
Operating principle of the air conditioner
In a sealed air conditioning system, a refrigerant, freon, continuously circulates, which is mixed with a special lubricant that is resistant to freezing. A compressor is responsible for moving freon through the system, which builds up pressure in the heat pipes. After turning on the air conditioner, freon ends up in the heat exchanger located under the dashboard of the car. The internal structure of this device resembles a honeycomb. Once there, the refrigerant begins to take heat from the hot interior. At the same time, it quickly heats up and turns from a liquid into steam. Since the compressor continuously pumps up pressure in the system, the steam goes into the blown radiator, where it cools, again becoming a liquid, which again ends up in the heat exchanger.
Is it possible to install air conditioning on a Priora?
The Priora initially provides the design possibility of installing an air conditioner. A car owner who decides to install this device on his car will not have to make any modifications. All the necessary holes and buttons are already on the dashboard, and space for heat pipes and electrical wiring is also provided. Thus, installing an air conditioner on a Lada Priora is completely legal, and government officials will not have any questions for the driver.
Changing the oil
This procedure is not particularly difficult; you do not need to use any professional tools or equipment, and it can take one hour to complete. Just remember the need to use high-quality consumable parts and lubricating fluids, which will eliminate any difficulties in the future with the operation of the car.
Tools used
To perform this work you will need a filter, engine oil, a clean rag, a container with a volume of at least 4 liters, a wrench for removing the oil filter, a 17 wrench.
If you are unable to unscrew the filter manually, you can pierce its housing with a screwdriver and use it as a lever, thus removing the filter element. If you use a screwdriver to remove the filter, then you need to pierce its housing at the very bottom. This will prevent damage to the fitting.
Step-by-step instruction
Changing the engine oil must be done on a hot engine. To do this, you should either drive the car first, or start the engine and let the engine run for about 10 minutes. Warm oil will flow out easily through the lower hole, and you can almost completely drain it from the crankcase of the power unit. To perform such service work, the vehicle must be driven onto a lift or inspection pit. Open the hood and unscrew the oil filler plug. You can easily unscrew this plug by hand. Next, we go down under the car and remove the existing engine protection. We place a plastic container with a volume of at least 4 liters under the engine crankcase. We find the drain plug located on the engine crankcase, and then carefully loosen the tightening with a 17 key. When unscrewing the plug, act as carefully as possible, as you can get burned by hot oil. We unscrew it completely and wait for the oil to completely drain out. This usually takes about half an hour. If the car has a good mileage and the oil has not been changed for a long time, you can perform an engine flush. Why is a special washing composition used? It is poured into the engine after twisting the drain plug. We start the engine and let it run for about 15 minutes. After this, drain the washing liquid and change the filter. Replacing the oil filter is not particularly difficult. It is mounted on a thread and you only need to unscrew it, carefully draining the old oil
Fill the new filter element halfway with fresh auto lubricant and carefully screw it onto the mounting thread. Please note the presence of a rubberized gasket, which is responsible for sealing such a connection. The filter must be tightened by hand three quarters of a turn from the point of contact between the cylinder block flange and the ring. Next, pour approximately 3 liters of auto lubricant into the engine and check the level using a dipstick. The level should be in the middle between the minimum and maximum risk. Then close the oil filler neck, start the engine, and let it idle for several minutes. After this, we turn off the engine and wait for it to cool, check the oil level with a dipstick and, if necessary, add about 500 milliliters more
This completes all service work.
The level should be in the middle between the minimum and maximum risk. Then close the oil filler neck, start the engine, and let it idle for several minutes. After this, we turn off the engine and wait for it to cool, check the oil level with a dipstick and, if necessary, add about 500 milliliters more. This completes all service work.
Principle of operation
First of all, you need to understand the principle of operation of the Priora heating system. The SAUO unit, which controls the heater, receives appropriate instructions from the temperature sensor located in the car's interior lamp. After that, it compares these readings with the temperature set by the driver.
If this difference is significant, the ACS sends a control pulse to the heater micromotor reducer, which controls the rotation of the damper. The direction and power of the flow of air supplied from the heater radiator to the passenger compartment depends on the magnitude of this rotation.
Signs of malfunction
If the air distribution damper does not work, this can lead to the following malfunctions in models without air conditioning:
- Only hot or cold air enters the car interior (regardless of the position of the heater control knobs);
- Instead of hot air, cold air enters the cabin.
In cars with Panasonic air conditioning, these cases are compounded by improper distribution of cooled air flows.
Failure of the distributor to take the desired position may be due to:
- with loosening of its fastenings and the gear motor drive;
- its deformation from hot air or breakage;
- adhesion to sealant residues.
In these cases, the Priora stove damper is blocked in one position. At the same time, clicks of the rotating mechanism are heard inside the car (the gearmotor that controls its position is knocking).
Lada Priora heater damper: how to remove and check. To repair, check and replace it, you will have to remove the plastic panel - the torpedo.
How to get to this mechanism without such difficulties? You can try to change the position of the regulator with a long screwdriver through the air duct grilles.
Some car enthusiasts, in order to avoid deformation, replace the standard one with a metal or wooden one.
In one of the issues of the automobile magazine "Behind the Wheel" it was proposed to replace the electronic control of the damper position with a simpler one - mechanical. As in old VAZ car models, its rotation can be adjusted using a system of levers and cables. It's not as convenient, but it's much more reliable.