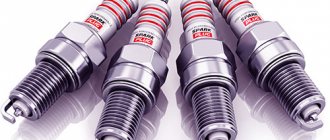
Hi all! For the second year now, the heater motor on my Kalina has been beeping frequently. If before this happened quite rarely, now for the second day in a row the fan practically does not stop. I decided that there was nowhere to delay and this morning I stopped by BB with a new engine, the price of which is 1,400 rubles. I took the Luzar company, since it was the one that was praised by the majority of potassium growers.
So, the first thing I did was remove the front passenger seat by unscrewing the 4 bolts that secure them, which resulted in much more free space.
Then we open the glove compartment, take out all the things from there, and unsnap the “curtain” mounting plate, then unscrew all the screws that are visible in the photo below:
Then unscrew one screw on the left side:
And another one on the right side. After this, you need to unscrew three more screws in the upper part of the glove box lid:
In general, next we remove the side trim of the passenger compartment pillar, as shown in the photo below:
After this, unscrew the screws from below using a short screwdriver or a bit and a ratchet:
Now we lift the upper black cover and unscrew the two nuts under it using an extension, a socket and a ratchet, as well as two self-tapping screws (shown by arrows):
Next, slightly lift the side air duct and unscrew the bolt:
So, we still have to deal with the lower bolts, two on the left and one on the right:
After performing all these manipulations, it seems that nothing will interfere anymore and now you can move the right side of the instrument panel to the side, and then put something under it to fix it in this position:
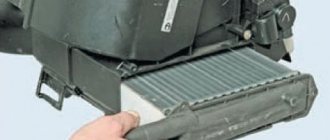
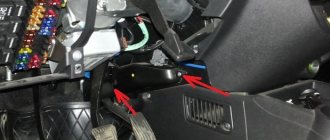
The photo above does not show an ideal option, and in my case I had to move it back a little more so that I could pull out the stove fan. Then you can crawl up from below with your hands and disconnect the power plug from the heater motor, after first bending the block clamp:
Next, unscrew the three screws that secure the heater fan to the housing:
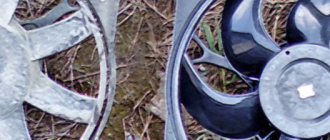
And after that we try to pull the motor out, if you manage to do this. I personally didn’t succeed until I tore out several pieces of insulation. As a result, after an hour of effort, we finally managed to pull the motor out, resulting in the following picture:
Then we put the new fan in its place without any problems! In fact, this is true - installation compared to removal is just idleness! In total, the whole job took me 3 hours.
The new motor works at least twice as well, and now blows better at first speed than before at second! It is not noisy, although the sound is not much different from the standard one.
In general, if you have any questions, ask, I will try to answer. If I messed something up in the description, please correct me, as I was in a hurry and might not have mentioned something!
— We unscrew one screw at the bottom of the panel, to the right of the shelf under the glove compartment — We unscrew two screws at the beard — We remove the front pillar trim, prying it up with a screwdriver, it is attached to 3 pistons. — We unscrew the screw securing the trim (jabot) under the windshield and slightly pulling it up a little, we gain access to the screw holding the ventilation nozzles. We turn it away. — Open the glove compartment and unscrew the bottom screw of the ventilation nozzles and the two screws on the left. To pull out the ventilation nozzles, the upper pipes on the right are screwed together with a self-tapping screw, unscrew and remove the nozzles.
Place the L-shaped plate under the plate securing the dermantine and pull it towards you, unclick the latches. Each plate has 5 latches - After removing the dermantine, unscrew 3 screws on top and 4 on the bottom. Although the top 3 can’t be unscrewed.
We pull back the dashboard. We unscrew the three screws of the heater motor after first removing the connection connector and pulling off the cooling hose.
I read here that in order to pull out the heater motor, some people cut the insulation, which makes it difficult to pull out the motor. No need to suffer, unscrew the threshold at the door,
five self-tapping screws and bend the carpet with insulation to the left, freeing everything behind the motor, then bending the dashboard, pull it out.
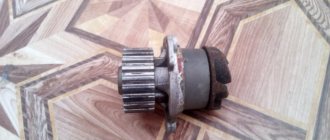
Now let's start resuscitating the heater motor.
When I removed the motor, it hardly rotated by hand.
I was surprised how it started at all, if it barely turns by hand.
Remove the impeller lock, having first marked the position of the impeller relative to the shaft, remove the impeller.
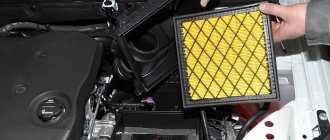
How to remove the air filter housing on Kalina
- To begin with, to make it more convenient to remove the fan, you will need to unscrew and remove the entire air filter with the housing. To do this, first of all unscrew the two housing mounting bolts, as shown in the photo below:
- Then, you can immediately disconnect the expander hose, which is attached to a small plastic latch; it is very convenient to do this with pliers:
- Now disconnect the plug from the mass air flow sensor by pressing its lock from below. You also need to disconnect the plug from the canister purge valve, which is located on the air filter housing. The photo below shows everything perfectly:
- After this, you need to unscrew the clamp of the injector pipe, which is connected to the mass flow sensor and remove the pipe, moving it a little to the side:
- Next, remove the cover from the housing by unscrewing 4 bolts:
- Now we remove the adsorber from the body, which you simply need to pull up and remove it from its seat, since it is not attached to anything else:
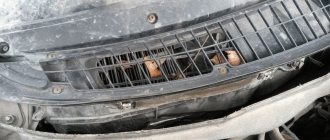
- And unscrew the air intake nut, which is located at the very top near the radiator:
- After this, you can carefully remove the filter housing, first removing the third rubber pad, which is located closer to the battery. And now everything is ready to remove and replace the radiator cooling fan on our Kalina.
Features of refilling the climate system
The tasks of the air conditioner include regulating temperature, cleanliness and circulation of air masses. Many of the devices under consideration have filters and fans of a similar design, but refrigeration units are different everywhere. The optimal unit is considered to be the one used in modern household refrigerators - a steam compressor.
- compression into a gaseous state;
- condensation due to heat removal;
- evaporation as a result of a decrease in pressure when heat is supplied.
There is no cooling in the air conditioning system, but heat is removed from the fresh air masses entering the car. As refrigerant is drawn into the compressor (low pressure), the liquid is compressed and heated. Freon is pumped into the circuit and then enters the condenser.
Car cooling radiator
The compressed gas in this phase gives up its heat to the air flow, which passes under the influence of natural pressure during the movement of the vehicle and the fan. The freon then condenses, turning into a liquid state.
To operate the compressor, the power of the main engine of the vehicle is required. In many Lada Kalina models with an engine capacity of less than 1.6 liters, air conditioning is not turned on in the summer. If the motor is larger, then the device in question is used. You can feel that the engine is not “pulling” at the moment of a sharp increase in speed.
In such a situation, the car responds more slowly to the driver's commands, and fuel consumption increases. The engine cools less efficiently and heats up more at idle. The heat exchanger radiator, which is installed under the hood, heats the engine, taking away some of its power. If the system has minor problems related to engine cooling, it is better not to install air conditioning on Kalina.
If the air conditioner begins to cool poorly, the car owner will need to take certain measures. Checking the unit begins with inspecting the tubes through which freon moves. Experts recommend making sure the connections are tight. Kalina's air conditioner may not cool well due to depressurization. In this case, freon leaks through existing cracks and microcracks.
New Lada: Pros, cons and problems of Lada Kalina 2 (VAZ 2192/2194)
Removing and installing the Kalina radiator fan
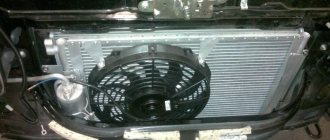
- Now you need to unscrew the two nuts with a 10mm wrench, securing the fan housing on the right side in the direction of travel of the car. And then two bolts with a size 8 key, on the left side of the case:
- Then disconnect the power plugs from the fan motor and case:
- And immediately after this, you can remove the fan assembly with the housing, first move it a little to the left, and slightly bend the pipe, take it out:
If it is necessary to replace the radiator fan, we install everything in the reverse order, having previously purchased a new part. Removing the fan motor is quite simple, just unscrew the 3 bolts of the motor with a 10mm wrench and remove it. On the reverse side the motor is attached to a metal latch.
We perform the installation in reverse order, and do not forget to reconnect all sensors and plugs.
Source
Kalina. Evaporator freezing.
Kalina. Evaporator freezing.
Post by AlexeyRus » 03 Jun 2013, 14:17
Re: Kalina. Evaporator freezing.
Post by rower » 03 Jun 2013, 21:17
Re: Kalina. Evaporator freezing.
Post by AlexeyRus » Jun 03, 2013, 10:15 pm
Re: Kalina. Evaporator freezing.
Post by AlexeyRus » Jun 03, 2013, 10:17 pm
Re: Kalina. Evaporator freezing.
Post by VIK » 04 Jun 2013, 14:57
At high fan speed, the indicator shows 8.0 degrees (at +25 outside)
A temperature delta of 17*C seems to be a good indicator.
2000-2500 - about 17 and less than 1.0
Try adding 100g. freon, so that on the low side the pressure tends to 2bar. in order to increase boiling T* and prevent freezing of the evaporator ..)
Components of the system
The system consists of the following components:
- a heater that increases the air temperature;
- an air conditioner designed to reduce air temperature and humidity;
- control unit necessary to achieve the desired temperature in the interior of the Lada Kalina car.
The last element includes relays, switches and other parts. The air conditioner fan is equipped with an operating mode switch. To increase the intensity of the supply of air masses into the cabin when driving, the switch handle is set to any mode of operation of the device. For this, an appropriate scheme is used.
The control unit contains a temperature regulator for the air masses supplied to the cabin. To change this indicator, you will need to rotate the relay handle. The electrical circuit of the control unit includes 2 parts.
- The blue scale corresponds to the supply of maximum cooled air masses.
- The red scale indicates the supply of heated air.
The air conditioner radiator, the design features of the system in question and its circuit provide a mode for automatically maintaining the required temperature in the vehicle. With the help of various relays installed in the push-button switch block, air is supplied to various parts of the machine.
Air conditioner components
The electric motor and impeller are the main elements of the air conditioner. Their task is to create air mass flows. Air conditioning fans are:
- axial or axial;
- centrifugal or radial.
The ventilation device can rotate to the right or left. An axial fan is a propeller with an electric motor. Its electrical circuit is simple, so if necessary, it can be easily changed with your own hands. An important point in this matter is the direction of the blades. If they are curved back, then the air conditioner significantly saves energy. Otherwise, the device in question works to reduce noise by reducing the rotation speed.
Climate system on the car
From a design point of view, the air conditioner includes the following elements:
- an outdoor unit compressor designed to compress the refrigerant and move it;
- an electronic unit responsible for the operation of the device;
- fan;
- a condenser that cools and condenses freon;
- fans;
- filters.
The air conditioner moves air from outside to inside the cabin. The principle of its operation is simple. Freon, evaporating, helps collect heat and transfers it to the block. The air conditioning compressor absorbs heat, which compresses the next unit. With the help of an impeller this process occurs faster.
Rules for operating the system
An important element of the system is the recirculation control lever. To enable this mode, you will need to move the lever to the extreme right position. In this case, outside air will not enter the cabin, and the air conditioning fan will ensure the movement of air masses in the vehicle. This mode is necessary when the interior quickly overheats in winter, when there is gas and dust.
When driving the car, you cannot turn on the recirculation mode for a long time, otherwise the windows will fog up. To cool the air that enters the car, you will need to turn on the air conditioning. It may not start if the relay is in the "O" position (A/C fan off).
To ensure interior ventilation, install a relay for the heating and ventilation control unit:
- relay 2 turns to the position responsible for ensuring the minimum temperature;
- Relay 4 is installed opposite the pictogram;
- set the required air mass supply speed;
- if the windshield fogs up, the relay is placed opposite the pictogram.
The electrical diagram of the ventilation system will help you quickly and correctly perform the above procedure. To prevent the windows from fogging, you will need to turn the relay to the middle position. The regulator handle is installed opposite the pictogram. The switch is moved to position “2”. Now you need to press the corresponding key.
The air conditioning circuit will help cool the air in the cabin of the Lada Kalina. To do this, you will need to move the relay to position “1”, “2”, “3” or “4”. The handle is installed opposite the pictogram. The air conditioner is turned off. If this device is turned on while the engine is running under severe conditions, the engine may overheat, so it is recommended to constantly monitor the temperature.
How to fill it yourself?
Before you start refueling, you need to get rid of moisture and air using a vacuum pump.
1. Vacuum pump removing air
2. Filling structure assembly
3. Injecting refrigerant into the system
For Lada Kalina, it is recommended to purchase freon R-134a. For refueling, use a special refueling kit, which has two hoses and a ball valve.
Filling the climate system with freon consists of the following sequence of actions:
- The car needs to be put on the handbrake and put in neutral.
- Before connecting the filling kit hose to the low pressure port, it must be cleaned of dirt.
- When the hose is connected, you need to start the engine.
- The second hose should be connected to the freon cylinder.
- During refilling, you need to press the gas pedal so that the refrigerant is evenly distributed throughout the air conditioning system. Cooled air should enter the cabin.
- When refueling is complete, remove the hose from the low pressure port and screw on the cap.
This completes freon charging. Now you need to turn on the car air conditioner and check how it works.
Loading …
Repair work
Often the air conditioning fan does not work due to problems with the motor. Repair work involves replacing the electric motor of the climate control device. This will require flushing the entire system. The engine fails for the following reasons:
- overload of the internal or external unit;
- voltage drop;
- leakage of freon from the system;
- overheating of climate control equipment.
If the compressor overheats, the motor can quickly fail. The presence of burnt oil indicates the need to flush the entire transport system of 2 units.
An axial fan with high performance and low weight can be installed on the Lada Kalina with your own hands. A similar device is installed on Priora and BMW E39. This unit is used for better heat exchange between the condenser and the external environment. The air conditioner radiator has great power, and the fan helps to quickly cool the air masses.
If the capacitor is overheated, the overspeed relay is automatically turned on. The device in question has a flat shape and several blades. The efficiency of operation depends on the speed of their rotation.
The advantages of a fan for Lada Kalina include:
- versatility of the device in terms of air flow and current strength;
- efficiency and compactness;
- reliability and wear resistance;
- low price.
Return to contents
Causes of ventilation breakdowns
The fan allows you to create a forced air flow to cool the air conditioning system. The operational life of the unit depends on the quality of the equipment and the speed of rotation of its blades. If the technical specifications do not meet certain requirements, repair work is carried out. In some cases, the air conditioner radiator is replaced. In this case, you will need a diagram of the air conditioning and heating system of the Lada Kalina.
Heating system diagram
If the fan does not start, you need to find out the reason for the lack of cooling. It may be associated with a failed unit located in front of the radiator or under the dashboard. In the first case, the device has 2 rotation speeds. Speed 1 is characterized by outboard temperature, and speed 2 is characterized by high temperature.
Possible causes of the malfunction.
- Failures in the resistance block. To check it, you will need to turn on the power to the unit, bypassing the unit. If a zero result is obtained, the device is replaced or the winding is repaired.
- The speed relay regulator has failed. It must be dismantled and replaced with a new one.
The Lada Kalina has a resistance unit with 2 speeds. Using a special command, the 1st speed is activated. The temperature sensor and pressure sensor are responsible for turning on the 2nd speed. If the fan does not start immediately at speed 2, you need to check the relay regulator installed in the compartment with the motor of the unit in question. The relay and regulator are repaired or replaced with new ones.