Using it instead of an outlet, you can connect various useful devices and devices to the car's power supply. You can comfortably spend time in the cabin of your Lada Priora, relaxing on a massage cape and drinking coffee brewed in a portable car coffee maker.
But sometimes little troubles happen: when you connect your favorite gadget to the cigarette lighter socket, you see that it does not work. In this case, an inexperienced car enthusiast may panic, not suspecting that a blown cigarette lighter fuse is most often to blame. Changing it is quite simple, but first let's figure out where the Priora's cigarette lighter fuse is located.
What fuses ensure the operation of the cigarette lighter?
In a Lada Priora car, the cigarette lighter fuse is installed in the mounting block. To find it, the driver sitting behind the wheel inside the car just needs to look down and to the left.
The unit is mounted at the bottom of the instrument panel, on the left side of the steering wheel, and is covered with a protective cover. Below it is the entire mounting block of this car. In its lower part there are two rows of fuses. The location for installing the cigarette lighter fuse is located in the top row, farthest to the right. It is marked F13 and is designed for a current of 15A.
In addition, in Priora cars, the cigarette lighter fuse is also located in the main fuse box. This element is responsible for the cooling system fan, but it also ensures the operation of the cigarette lighter. Its marking here is F3, the current limit is 60A.
The cigarette lighter fuse on a Priora has to be replaced quite often. The reason for this is incorrect use of the cigarette lighter itself. Many drivers are not interested in car repairs and are not electricians. Some people just don't have time. Therefore, they don’t even think about the fact that the cigarette lighter may have current and power limitations. Many of us plug an electrical device that is too powerful into a socket, or, using a splitter, several at once.
How to remove and replace it yourself?
If everything is clear with the location of the blocks and the diagrams, then we will consider the procedure for dismantling the links. If you are sure that certain components of the electrical wiring have failed as a result of a burnt-out part (for example, one responsible for the light on the dashboard), then the unit needs to be opened, and the burnt-out devices removed and replaced.
In the event that the performance of the Lada Priora devices is not related to the failure of the fuses, then it may be advisable to carry out a continuity test of all components of the circuit according to the diagram. After all, the cause of the breakdown can be both breaks in the electrical wiring and short circuits. Next, you will learn how to remove and change fuses on the Lada Priora on your own.
- From the very beginning you need to prepare your Lada for repairs. It is necessary to remove the negative terminal of the battery and turn off the ignition.
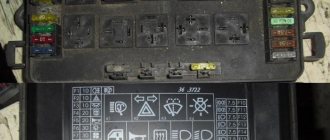
- Depending on where the blown fuses are located, you will need to open the corresponding box. As stated earlier, it can be installed in the engine compartment or under the steering wheel. Press out the latches that secure its protective pad. After removing the cover, you can see a diagram on the back of it. According to this diagram, the parts responsible for the functioning of certain devices are marked. Use it to determine the location of the breakdown.
- Pull back the trim that hides the block. This may require a screwdriver.
Installing a new fuse
Removed protective cover
- The assignment table will help identify a burnt-out PP.
- When the search for the burnt link in the Frets block is completed, take the tweezers, which are used to dismantle the links. As a rule, a failed link can be seen by a burnt thread that passes through its body. However, if there are no obvious damages on it, this does not mean that the part is intact and working.
Failed link
- Now install a new PCB in place of the failed one. Please take into account the fact that the ratings of the replaced devices must match, i.e. if the link is marked 15 amperes, then it needs to be replaced with a similar one.
- If it is necessary to replace the relay, the replacement operation is carried out in a similar way. But you don’t need tweezers for this - you can dismantle the relay with your hands. Having done this, close the plastic cover of the power supply and do not forget to throw back the negative terminal of the battery.
When the procedure is completed, turn on the ignition and check those devices whose sensors have been replaced. If the problem remains, then perhaps it is not related to the performance of the links. There is probably a break in the electrical wiring circuit that needs to be repaired by connecting the wires.
What devices can be connected to the cigarette lighter?
Knowing the current rating for which the Prior's cigarette lighter fuse is designed, you can calculate what power devices can be used. To do this, we multiply the current strength of 15 A by the rated voltage in the cigarette lighter - 12 V.
We find that the power of the connected devices should not exceed 180 W. And the list of devices is very wide, because technological progress does not stand still, making the life of the driver and his passengers much more comfortable. Here are some of them:
New devices appear every year. You must be very careful when connecting them to the cigarette lighter. Heavy load can lead to short circuit and fire.
Removing the cigarette lighter
To diagnose the Priora cigarette lighter, it must be dismantled. Removal must be done with the fuse removed, so as not to cause an accidental short circuit during operation. We remove fuse F13 from the mounting block and get to work.
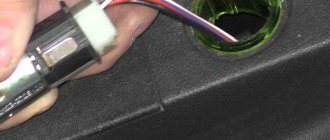
- Insert a small flat-head screwdriver into the hole on the cigarette lighter and lightly press on the plastic retainer, as shown in the picture. Then turn the metal part of the cigarette lighter counterclockwise.
- We take out the metal part up and disconnect the connector.
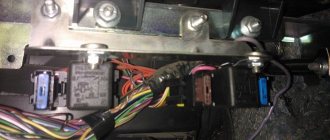
- Use your finger to pry up the green outline of the cigarette lighter illumination and remove it as shown in the picture.
- We perform assembly in reverse order.
How does the fuse work for the Priora cigarette lighter?
The cigarette lighter fuses are made in the form of fusible elements. They are designed to open the electrical circuit in case of excess power or short circuit, and protect other machine systems.
Structurally, such a fuse is made in the form of a plastic case with a special thread or plate that conducts electric current. The body itself is a system for fastening a fusible plate (thread) to the contacts of a block connected to the main electrical circuit of the Priora. In addition, Priora fuses are usually installed in a protective housing.
Instructions for changing the cigarette lighter bulb
This breakdown is also one of the most common. Replacing the cigarette lighter bulb yourself is not difficult. It is enough to follow the instructions.
- Open the hood and disconnect the battery terminal.
- Use a thin screwdriver to pry up the green plastic latch and turn the metal cup, pulling it out.
- The burnt out lamp is inside a plastic part.
- Disconnect the connector from the contacts.
- Now you can change the light bulb with a working part.
- We reassemble in reverse order.
How to change the cigarette lighter fuse
Knowing where the cigarette lighter fuse is located on the Priora, you can replace it without any problems. Service in auto repair shops is now quite expensive, so let’s figure out how you can do it yourself.
The most important condition is that you cannot install any home-made devices, such as, for example, wire or a paper clip, instead of the fuse. In addition, it is better to use domestically produced protective elements and not buy Chinese analogues, as they are of low quality. None of this is safe and can even lead to a fire.
Replacing the Priora cigarette lighter fuse is not very difficult. To do this, there is no need to dismantle its seat or the block itself. It is enough to simply replace the faulty element with a new one. However, you still need to understand the algorithm, as there are some peculiarities.
Possible causes of failure
There are quite a few reasons why the cigarette lighter on a Priora may not work, but most often they are of the same type and are associated with improper use of this part or due to its aging.
- Contamination of the contacts inside the cigarette lighter, which makes it impossible to conduct current through them. This problem occurs quite often if the cigarette lighter is used as intended. Remaining ash gets inside the cigarette lighter and contaminates it.
- The cigarette lighter connector, which is connected to it from below, is also susceptible to damage. When using powerful accessories, the contacts may burn.
- The cigarette lighter fuse is one of the most common problems with a non-working cigarette lighter. Fuse blowing occurs due to a possible short circuit or the use of powerful car accessories.
- A malfunction of the cigarette lighter illumination does not lead to its failure, but still, when something in the car does not work, it is not good and requires repair.
The problems that happen with the cigarette lighter are clear, now you need to figure out how to solve them and fix the cigarette lighter.
Algorithm for replacing the cigarette lighter fuse in the Priora mounting block
1. It is necessary to prepare for any work with the machine. In this case, you will need to turn off the ignition and also disconnect the battery power. To do this, you need to remove the negative terminal from it.
2. The protective cover of the mounting block, which is located below the steering wheel, on the right side, is secured with three locks. To remove it, they must be unscrewed by turning 90 degrees.
3. Remove the holders so as not to lose them in the future. Now pry the cover out of the engagement at the bottom of the block and carefully remove it.
4. Find in the mounting block of the Priora car the fuse for the cigarette lighter, which is located in the top row of fuses, the farthest one on the right. However, still make sure of its location by using the back of the mounting block cover. The marking number of the cigarette lighter fuse is F13.
5. To remove the faulty element, there are special tweezers in the unit body (marked 1 and 2). Remove the burnt part from the installation socket, gently squeezing it with tweezers. Most likely, you will see melting or thread breakage. However, this is not necessary. A burnt-out element may not have visible damage.
6. Install the new part into the socket. Make sure that the element's current rating matches the vehicle's circuit diagram and is 15 A.
7. Close the mounting block with a protective casing, installing the holders back, and secure with clamps.
8. Connect the battery.
Step by step replacement
1. Take out the cigarette lighter cylinder.
2. Using a flat-head screwdriver, pry up and remove the metal core of the cigarette lighter. It is best to do this from the inside so as not to damage the plastic.
If it doesn't come out, there may be clips on the inside of the core. They are most often metal. The photo below shows the location of the metal clips. Using a flathead screwdriver, you can bend them and remove the core.
If you are changing the cigarette lighter assembly, I think there is no risk of damaging something on it.
3. Remove the plastic bezel that is illuminated. This can be done using a flat-head screwdriver.
If your bezel backlight works and the bezel itself is not damaged, then you do not need to change it. Simply disconnect the non-working cigarette lighter core, connect a new one and put everything back together.
Power to the cigarette lighter comes through the terminal block. This means it is not difficult to replace it.
4. The backlight bulb is assembled with a plastic rim. To replace the light bulb, remove the small plastic cover.
Next, insert a flat-head screwdriver as shown below and pull the edge toward you. There is a small groove on the body and the light bulb is held in place by it. I think everything will be clear from the photo below, but if you have any difficulties, watch the video tutorial.
5. Remove the lamp from the socket and install a new one. The light bulb simply pulls out towards itself.
6. Install the socket with the new lamp into the rim. Be sure to align the grooves so that the cartridge snaps into place.
7. Install the small plastic cover.
8. Put the rim in place. There is a groove in the floor tunnel and a corresponding groove on the rim body. When installed, they must match and the light bulb must face backwards.
9. Change the cigarette lighter core and install it with the metal contact back until it clicks.
When installing, the contact should be backwards, just like the light bulb. Power is supplied to the backlight through this contact.
10. Install the cigarette lighter cylinder.
After reassembly, we connect the battery terminals and check the operation.
Algorithm for replacing the cigarette lighter fuse in the Priora engine compartment
1. Turn off the ignition and disconnect the battery.
2. The main fuse box is located next to the battery. Find, checking the diagram, the element marked F3.
3. Remove the faulty fuse in the same way as the previous algorithm. Install a new element with a current rating of 60 A.
4. Connect the battery.
Enjoy life and take advantage of new technological advances. But do it wisely by choosing the right devices that suit your Lada Priora car.
before–>
Lada Priora is a general designation for a family of cars produced with sedan, hatchback, station wagon and coupe bodies. The lead car of the family was the VAZ-2170 . Years of production: 2007, 2008, 2009, 2010, 2011, 2012, 2013, 2014, 2015, 2016, 2022 and 2022. During this time, Priora underwent one minor update and a deep restyling ( Priora 2 ). In this material you will find a description of the fuse and relay blocks of the Lada Priora with diagrams and photographs. Let's highlight the fuse responsible for the cigarette lighter.
p, blockquote1,0,0,0,0–>p, blockquote2,0,0,0,0–>
The design of the blocks and the purpose of the elements in them may differ from those presented and depend on the year of manufacture and the level of equipment of your car (norm, standard, luxury, luxury plus).
p, blockquote3,0,0,0,0–>
Let's take a closer look at the design and purpose of each Priora fuse box
Fuse assembly diagram
The third block is the mounting block, located on the left side of the instrument panel. In addition to the main components, this set contains installations for climate control in the vehicle interior, as well as for the ignition system and an element responsible for the electric fuel pump. When creating group components, a specific metal or an alloy of several materials is used. The main parts are located at the base of the group and have the form of connections with contacts. The contact group is separately connected to the vehicle network. The fuses themselves are located in a special protective case made of glass. The modern VAZ contains several mounting blocks. The light fuse has the simplest device and can be easily identified in the electrical circuit of Lada consumers
In the event of any malfunction of the electrical circuit, this component must be paid attention to first. In order to save some amount of wiring, thereby increasing the safety of the vehicle, circuit components are placed in different places and installed in groups (blocks)
Mounting block diagram
Diagram of the central fuse group of the Priora
The fuse box in question is located under the hood. The unit is fixed near the battery. The Priora central unit combines five important fuses and basic devices responsible for the correct operation of vehicle consumers. The average rating of these elements is in the range from 30 to 50 A. The components of the central block are marked from the left side to the right side of the block shell. The main fuse box is located in the engine compartment and contains protected devices that are combined in a common circuit. The chain components themselves are responsible for maintaining uninterrupted power supply to the vehicle consumers and constant voltage in the circuit. The central unit operates regardless of the position of the key in the ignition switch. The consumers of this circuit are: interior lighting, cigarette lighter, brake light, horn, control controller for the electronic and security system of the vehicle.
Circuit breakers
Diagram of an additional fuse box for Priora
An additional fuse box is located in the Priora's cabin near the driver's seat. This block contains printed circuit boards, which largely distinguishes the additional system. This set is responsible for the proper operation of the car dashboard elements. The diagram will help you understand the order of fuses and their connection to a specific vehicle device. Electrical circuit elements often fail due to increased loads or other reasons. If an element of the electrical circuit burns out and does not perform its function, it is necessary to replace it with a similar one.
https://youtube.com/watch?v=czK4o5FGcNQ%3F
The Priora electrical circuit will help diagnose the car and identify the cause of the electrical malfunction. Often the cause of improper operation of an electrical consumer is a damaged or blown fuse.
With basic electrician skills and the appropriate instructions, you can easily restore the functionality of your car's electrical system.
Happy renovation!
Lada Priora manual
h23,0,0,0,0–>
You can find out more information about the repair and maintenance of the Lada Priora in the manual; the download will begin after selecting the desired year of manufacture: “link“.
p, blockquote33,0,0,0,0–>
We have also prepared a video on this publication on our channel. Watch and subscribe.
p, blockquote34,0,0,0,0–>
p, blockquote35,0,0,0,0–> p, blockquote36,0,0,0,1–>
If you know how to make the material better or have any questions, write everything in the comments.
after–>
Car : Lada Priora. Asks : Sergey Postnov. The essence of the question : where is the cigarette lighter fuse located on the Priora?
Yesterday the recorder did not turn on. But the radar detector works, I have it directly connected. I thought that the cigarette lighter fuse had blown, because when I inserted the plug into the socket, there was a small spark. I was even very scared. But the fuse is intact, what should I do? Is there another fuse somewhere that controls this circuit?
In general, it’s annoying that the cigarette lighter doesn’t turn off when the ignition is turned off, does that happen to everyone?
The cigarette lighter fuse is indicated by an arrow. 15 amps in drain.
Common faults
Like any other electromechanical device, the Priora cigarette lighter tends to break. Sometimes this can be caused by design defects, sometimes by malfunctions in the machine's on-board circuit, and sometimes by the fault of the user himself. Common cigarette lighter malfunctions include:
- sinking of those same bimetallic “ears”;
- burnout of the spiral;
- broken contact in the connector;
- fuse blown.
Malfunctions can also include the burnout of a backlight lamp, however, this is more related to a decrease in the level of comfort than to serious breakdowns. In addition, it does not in any way affect the operation of the device itself and can be easily eliminated by replacing the lamp.
The sinking of the lugs is characterized by the lack of fixation of the cartridge in the pressed position. It can be caused either by the low quality of the metal from which they are made, i.e. defect, or high intensity or long period of use of the cigarette lighter.
The problem is solved by bending the “ears” inward using a thin screwdriver, naturally after de-energizing the on-board circuit. If after a short period of use the problem occurs again, it is better to replace the cigarette lighter.
When the spiral burns out, the cartridge is fixed when pressed, but does not heat up. The fault is diagnosed by ringing it using a car tester. It is not recommended to restore the spiral, as this may lead to a decrease in its resistance, which will make unwanted adjustments to the operation of the on-board circuit. In this case, the cigarette lighter also needs to be replaced.
Contact failure can be easily determined by removing the tunnel lining and checking the condition of the connector. This malfunction is not critical and can be fixed independently in a few minutes.
But as for the fuse, it makes sense to consider this malfunction separately, since its malfunction is most often caused by the human factor.
Location of the cigarette lighter fuse on Lada Priora
The cigarette lighter fuse on the Lada Priora is located in a specialized mounting block. It is located under the dashboard, to the left of the steering wheel . It is covered with a special protective cover. The factory marking of the fuse is F 13 .
The fastenings of the mounting block cover are marked with arrows.
A fuse with a current strength of 15 amperes . When replacing it, similar elements of domestic production should be used. The use of homemade devices that can lead to short circuits is strictly prohibited. It is also undesirable to purchase low-quality Chinese analogues.
Replacement algorithm
- Turn off the ignition.
- Remove the negative terminal by disconnecting the battery ( MANDATORY ).
- We turn the fasteners holding the cover of the mounting block by hand.
Cover fastening close up. - And remove the cover.
Gently pull down with your hand, the lid is held in the grooves. - Find the required fuse. To avoid confusion, pay attention to the markings. As mentioned above, we are interested in socket F13 .
Marked with an arrow. - two tweezers in the block body . We take one of them, grab the fuse and carefully remove it.
- Most often, a visual inspection of the element reveals melting or broken thread.
In some cases there is no external damage. This fuse is still working, but needs to be replaced. It's dangerous to drive with this. - Install the new element and close the lid.
Fuse under the hood
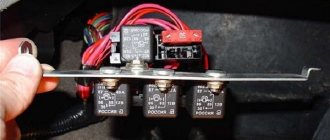
If replacing the fuse in the mounting block does not help, then you need to check the fuse under the hood. It is located in the main block . To access it you need to open the hood.
The main fuse box is located next to the battery. It is marked with an arrow.
- Open the hood and remove the negative terminal.
The negative terminal is marked with a circle. - Remove the block cover.
Removing the cover. - We change the fuse.
The fuse is marked with an arrow.
Here you need to find the element labeled F3 . First of all, it is responsible for the operation of the cooling system fan, but indirectly relates to the cigarette lighter. Rating - 60 amperes .
To replace the fuse in the main unit, we also disconnect the battery ( MANDATORY ).
Reasons for failure
Fuse failure is a fairly common failure . Its main cause is incorrect use of the cigarette lighter. The fact is that most car owners do not think about current and power restrictions.
Therefore, it is not advisable to charge several gadgets at the same time through an adapter or connect too powerful devices to the connector.
Possible malfunctions and their elimination
Possible cigarette lighter failures that a driver can identify include:
- fuse blown;
- faulty cigarette lighter contacts;
- backlight burnout.
Repair of the cigarette lighter, depending on the malfunction, can be achieved without removing it or after removing it from the installation socket. If the cause of the breakdown lies in a faulty fuse, then the question of how to change it is easily resolved. The Priora cigarette lighter fuse is located in the installation block in place F13. The rated current for it is 13 amperes.
Before replacing the Priora fuse, to ensure safety, you should disconnect the negative terminal of the battery. After this, open the lid and use the marks on it to find the position with the desired designation. If you cannot pull out the fuse manually, you should use a special key.
If it is necessary to replace the fuse itself or repair its contacts, the fuse and housing will need to be dismantled. Please note that disassembling the central tunnel is not required. When answering the question of how to remove the cigarette lighter on a Priora, you need to know the order of operations:
- for work, use a thin flat screwdriver; it is inserted into a plastic green clamp, which at the same time indicates the backlight;
- rotate the metal cigarette lighter sleeve;
- You can remove the cigarette lighter from the socket, and then separate the green plastic and wiring from it.
After the cigarette lighter has been removed, repairs or replacement of parts are performed, and installation is carried out in the reverse order.
To replace a burnt-out lamp, you will need to remove the cigarette lighter socket. To this end:
- press out the special filter lock, and the assembly is pulled out;
- dismantle the lamp socket and replace it;
- Install the cartridge in the reverse order.
Cigarette lighter replacement surgery is not that uncommon. However, if regular burnout occurs without significant loads (with each use), then you should contact electrical specialists to determine the cause. A possible short circuit can lead to a variety of consequences, even fire, if the problem turns out to be serious.
Often the fuse blows when connecting more powerful consumers, for example, such as a portable car compressor. This is due to the duration of its use, which can significantly heat the wiring. As practice shows, the simultaneous use of several consumers leads to the same problem. Therefore, some owners go for additional wiring and equip a standard place for a separate cigarette lighter.
This is especially convenient to do in the trunk of a car or for a row of rear seats. It should be noted that each installed connector is additionally equipped with a fuse.
Does it work all the time or not?
Yes, on the Lada Priora the cigarette lighter works constantly, regardless of whether the ignition is on or not.
If the cigarette lighter does not work on your Priora, first of all you need to examine the elements of the electrical circuit. The primary cause is knocking out fuses that burn when there is a short circuit. In this case, it needs to be replaced. However, in order to carry out the necessary work, you first need to know where this element is located. Today we’ll talk about which fuse goes to the cigarette lighter of the Lada Priora and how to find out about its malfunction.
Serial number and part numbers
Before you begin repairing the cigarette lighter and disassembling the central tunnel, you need to buy a suitable spare part. There are different device options for the Lada Priora on sale, both original and not. Cigarette lighters from the AvtoVAZ factory have article number 21230-3725010-00.
When purchasing, you need to pay attention to the cost of the spare part. A cigarette lighter price that is too low indicates the use of low-quality materials. Such a part may burn out within several weeks after replacement. In addition, the item must be well packaged and have a certificate of conformity.
Where is he located
AvtoVAZ installs uniform fuses for cigarette lighters in Prioras, regardless of generation and configuration. Whether it is a basic configuration or a luxury one, the same part is always installed, and it is located in the same place. To find out the location, you will need the electrical circuit diagram found in the owner's manual. Finding the required element in it will not be difficult: No. in the circuit is F13, current strength is 15A. It is located in the fuse and relay box. Finding it is not so difficult:
- Look under the dashboard on the driver's side.
- Find a niche covered with a special lid.
- Twist three locks.
- Remove the cover.
And here in front of you are several fuses that are responsible for various components of the car. We find the one we need and dismantle it, after which we need to check it. Next, let's talk about how to do this.
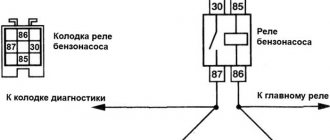
Connection diagram and node fuse
If the last problem occurs, you need to get to the shield located behind the front panel. Next, remove the plastic cover, gaining access to the fuse box itself. It is necessary to change the element numbered F13 - it is responsible for the cigarette lighter circuit.
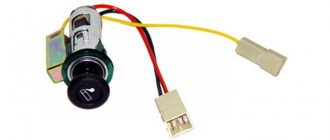
Before doing this, you should pull out the connector going to the socket itself. To get to it, you will need to remove the decorative plastic from the front of the central tunnel. The connection diagram, as well as the pinout of the cigarette lighter and fuse are shown in the photo.
Checking the fuse
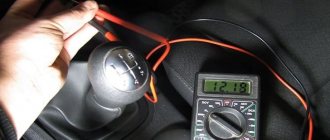
The primary method is visual inspection. It is enough just to dismantle the part and inspect it for the integrity of the wire. If it is damaged, then a malfunction has been detected, but if not, but you still suspect the fuse, you need to arm yourself with a multimeter. You can test an element in two ways:
- resistance measurement. If you have removed the fuse, visually inspected it, but did not find a problem, you can immediately measure the resistance. We enable the corresponding option on the multimeter and take measurements at the terminals. If the device does not respond and there are zeros on the screen, then the part is faulty;
- voltage measurement. It is necessary to select the appropriate option on the device, turn on the cigarette lighter circuit and measure the voltage at the outputs. If the indicators are zero, it means the part needs to be replaced.
Thus, there is absolutely nothing complicated in checking the cigarette lighter. If you are convinced that the element has failed, you need to install a new one and test the operation of the node again. If the new part burns out, you will have to examine the circuit in more detail. There is probably some serious damage somewhere that is causing the short to occur. If you cannot understand the cause yourself, be sure to contact specialists who will conduct a detailed diagnosis of the unit.
Sources used:
- https://priorapro.ru/elektrooborudovanie/gde-naxoditsya-predoxranitel-prikurivatelya-priora.html
- https://vsepredohraniteli.ru/lada/priora.html
- https://carfrance.ru/predohranitel-prikurivatel-na-lada-priora/
- https://ladaautos.ru/lada-priora/gde-naxoditsya-i-kak-proverit-predoxranitel-na-prikurivatel-lada-priora.html
The cigarette lighter light does not light up
This reason occurs due to the burnout of the backlight lamp or its poor contact with the cigarette lighter body. To check, you need to remove the cigarette lighter and inspect the lamp. If the lamp is intact and has no signs of damage, most likely it does not work due to poor contact.
To ensure reliable contact, it is necessary to bend two contacts on the lamp socket and clean them with sandpaper. It is also a good idea to clean off carbon deposits, if there is any, on the outside of the cigarette lighter, where the lamp contacts come into contact with the cigarette lighter body.
LADA PRIORA 21723
Electrical connection diagrams for Lada Priora 21723
Instrument Cluster - Connections
Assignment of contacts of the instrument cluster block
1 To the electric power steering 2 To the hazard warning lamp 3 To the emergency oil pressure sensor 4 To the parking brake switch 5 To the immobilizer control unit 6 To the airbag control unit 7 To the exterior lighting switch 8 To the turn signal switch (starboard side) 9 To the indicator switch turn (left side) 10 To the fuel injection system control unit 11 To the front passenger airbag deactivation sensor 12 To the seat belt sensor not fastened 13 To the control unit of the electronic brake force distributor 14 To the “RESET” button on the steering column switch (-) 15 To the level sensor brake fluid 16 To the control sensor of the anti-lock braking system 17 To the high beam switch 18 To the instrument cluster lighting switch 19 Housing 20 To terminal “30” of the battery 21 To terminal “15” of the ignition switch 22 To the fuel consumption sensor 23 To the function switching mode key trip computer in a ring forward and changing the minutes (-) 24 To the mode key for switching the functions of the trip computer in a ring back and setting the clock (-) 25 To the outside temperature sensor (-) 26 To the outside temperature sensor (+) 27 To the fuel level sensor 28 To the speed sensor 29 To the coolant temperature sensor 30 Low-voltage tachometer input 31 Diagnostics during production of the instrument cluster 32 To the “L” terminal of the generator relay regulator
List of elements of the electrical connection diagram of the rear wiring harness of LADA PRIORA
1 – rear wiring harness block to the instrument panel wiring harness block; 2 – rear wiring harness block to additional wiring harness block 2 (left rear door); 3 – rear wiring harness block to side door wiring harness block (right front door); 4 – left side direction indicator; 5 – electrical package controller; 6 – right side direction indicator; 7 – interior lighting unit; 8 – handbrake warning lamp switch; 9 – left lamp; 10 – right lamp; 11 – interior air temperature sensor; 12 – interior lamp switch in the driver’s door pillar; 13 – switch for the interior lighting in the pillar of the right front door; 14 – switch for the interior lighting in the pillar of the right rear door; 15 – interior light switch in the left rear door pillar; 16 – block of the rear wiring harness to the block of the wiring harness of the side doors 2 (left front door); 17 – block of the rear wiring harness to the block of the additional wiring harness (right rear door); 18 – blocks of the rear wiring harness to the rear right loudspeaker; 19 – blocks of the rear wiring harness to the rear left loudspeaker; 20 – cigarette lighter; 21 – electric fuel pump module; 22, 23 – rear wiring harness blocks to instrument panel wiring harness blocks 2,3; 24 – trunk lighting; 25 – additional brake signal; 26 – trunk lock drive switch; 27 – interior lamp; 28 – rear wiring harness block to the front wiring harness block; 29 – left rear speed sensor; 30 – right rear speed sensor; 31 – sensor for automatic glass cleaning system (rain sensor); 32 – rain sensor sensitivity regulator; 33 – rear wiring harness block to instrument panel wiring harness block 4; 34 – block of the rear wiring harness to the block of the wiring harness of the parking system sensors; 35 – alarm unit for safe parking system; 36 – driver’s seat belt pretensioner; 37 – passenger seat belt pretensioner; 38 – rear wiring harness block to side door wiring harness block 3 (right front door); 39 – airbag control unit; 40 – parking system control unit; 41 – block of the rear wiring harness to the block of the rear additional wiring harness (tailgate); 42 – rear wiring harness block to rear additional wiring harness block 2 (tailgate); 43 – left seat heater; 44 – switch for electric seat heaters; 45 – right seat heater. 46 – rear wiring harness block to the parking system switch.