In order not to close the contacts during manipulations with electrical wiring, you must first disconnect the “minus” terminal from the battery. As soon as the car is completely de-energized, you are allowed to start working. There are two ways to replace the cigarette lighter on a Priora. The first method is recommended by the manufacturer, and it is in the instructions for the car. It involves removing the tunnel cover and includes the following procedure:
- remove the gearbox cover and lever first;
having pressed the six latches, remove the plug, which is located under the handbrake;
However, there is one nuance that the manufacturer did not mention in the instructions. The fact is that without dismantling the seats, the tunnel cover cannot be removed. Therefore, the seats are removed and four bolts are unscrewed. The first is to disconnect the trunk opening button chip, the second is to disconnect the cigarette lighter itself, slightly lifting the panel. By pressing the latches, remove the glass, replace it with a new one and reassemble in the reverse order.
The method proposed by the manufacturer for replacing the cigarette lighter on a Priora is quite labor-intensive and time-consuming. There is a faster and easier way. All manipulations will take no more than 15 minutes.
For the second method, you will need a flat-head screwdriver, which must be inserted inside the cigarette lighter glass. Then, with the tip, press the green plastic lock and twist the sleeve in any direction. By gently pulling it towards you, remove it from the groove and separate it from the wires and plastic attachment. Repair or replace with a new one, and then reassemble in the reverse order.
Reasons why the cigarette lighter does not work on Lada Priora
Over time, the unit may break and require repair. Why does the part fail? Among the common reasons why the Lada Priora cigarette lighter does not work.
- Burnt out heating element. If you often have to connect high-voltage devices to the connector, such as a wheel compressor, the element itself can quickly fail and the fuse will trip.
- Light bulb broken. There is a light around the hole that may stop working.
- Oxidation or poor contact of the cigarette lighter. Over time, contact may be lost between the antennae of the part and the socket itself, as a result of which the element fails. To check this, you need to remove the fuse and then inspect it for oxides. Additionally, you should tighten the fastening antennae. The fuse is put in place.
- The cigarette lighter connection wires have fallen off. Refers to “age-related diseases”. For inspection, you will need to remove the VAZ Priora cigarette lighter from its socket without touching the fuse. In the event of a malfunction, it is necessary to solder the fallen wires.
- Inept tuning is also a cause of failure. Some owners buy low-quality splitters and load them to full capacity. This leads to increased load on the fuses. Promotes accelerated wear of the generator.
- Blown fuse. A breakdown may occur due to a short circuit. To identify this fuse malfunction, you should connect the lamp to the connector. Then turn on the ignition. If it does not light up, then the reason is the fuse. The protective element needs to be replaced.
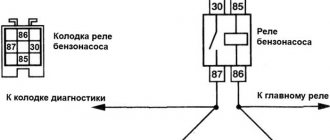
Connection diagram and node fuse
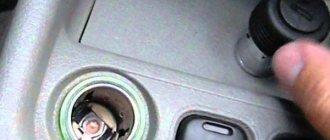
If the last problem occurs, you need to get to the shield located behind the front panel. Next, remove the plastic cover, gaining access to the fuse box itself. It is necessary to change the element numbered F13 - it is responsible for the cigarette lighter circuit.
Before doing this, you should pull out the connector going to the socket itself. To get to it, you will need to remove the decorative plastic from the front of the central tunnel. The connection diagram, as well as the pinout of the cigarette lighter and fuse are shown in the photo.
Serial number and part numbers
Before you begin repairing the cigarette lighter and disassembling the central tunnel, you need to buy a suitable spare part. There are different device options for the Lada Priora on sale, both original and not. Cigarette lighters from the AvtoVAZ factory have article number 21230-3725010-00.
When purchasing, you need to pay attention to the cost of the spare part. A cigarette lighter price that is too low indicates the use of low-quality materials.
Such a part may burn out within several weeks after replacement. In addition, the item must be well packaged and have a certificate of conformity.
Common causes of problems
The parts that are used most often are the first to become unusable. Such elements include the cigarette lighter, since you often have to connect various devices and devices to it. The most common breakdowns are:
- Heater combustion. This happens when high-voltage devices and tools are frequently connected, for example, a compressor for inflating tires.
- LED bulb burnout.
- Contacts are dirty or oxidized. The connection between the antennae and the cigarette lighter is lost as a result of the formation of oxide on them. This happens often with copper elements.
- Fallen wires. An age-related “disease” of almost all cars.
- Fuse blown. Occurs as a result of a voltage surge or short circuit. To resuscitate the element, you will need to simply replace the Priora cigarette lighter fuse on the common unit. It is marked F13.
These problems are the simplest, and solving them will require no more than half an hour of personal time.
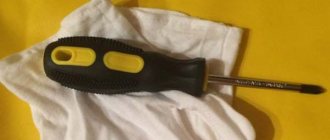
Required Tools
Before dismantling the cigarette lighter on a VAZ 2110, repairing it or installing a new device, or replacing a fuse, you will need to stock up on suitable devices. To work you will need:
- Phillips and standard screwdriver;
- protective gloves.
To fix a broken cigarette lighter or fuse, the following will be useful:
- multitester;
- blowtorch with solder;
- heat shrink tubes, electrical tape;
- wire cutters;
- needle file
Dismantling the tunnel on a VAZ-2110
To remove the tunnel you will need:
- Remove the facings by unscrewing two bolts on each.
Use a Phillips screwdriver to unscrew the screws and remove the tunnel lining.
On the right side we find and disconnect the pads.
Remove the cover under the handbrake.
Remove the cover by prying it with a flat screwdriver in four places.
Removing the cigarette lighter
To remove the cigarette lighter itself you will need:
- Pull the cigarette lighter out of the socket by squeezing the connectors.
Remove the lamp screen by squeezing its claws.
Installing the cigarette lighter is carried out in the reverse order.
When installing a new cigarette lighter, observe the polarity of the terminals.
Quick method
If you look at this procedure as it is described in the User's Guide, the work will seem complicated. That is why for many it is a problem how to remove the cigarette lighter from its socket without removing the tunnel itself. There is little space for such manipulation and there is no access to the cigarette lighter from different sides. But there are certain points that will help you cope with the task.
You should insert your finger into the cigarette lighter socket and pry off the cigarette lighter itself with a screwdriver. If you manage to remove the cigarette lighter from its socket, then it can be changed. Installation is also carried out in reverse order.
If the cigarette lighter socket is hanging into the hole, you may be able to remove it without dismantling the tunnel.
Also, when removing the tunnel, you can make a small hole in it, which will help you remove the cigarette lighter easily next time.
Video with important moments
Below are videos that will help you figure out how to replace the cigarette lighter on a car with a Europanel.
Guys, tell me how to safely remove the cigarette lighter and change the backlight there, otherwise it’s stopped burning?
Comments 21
Using a thin screwdriver, I first bent the metal a little from the inside on both sides where the latches are because the latches there, although plastic, are not spring-loaded. then straightened it back
You pick up the plastic with a screwdriver and snap it off on both sides like a nail puller. Under the armrest you unhook the wire fastening so that it does not interfere with pulling it out. then you pull out the metal part from the light green plastic and the plastic will already come out
I didn’t see how and in what way it was removed, a good friend of mine, an electrician, took it off and installed a new cigarette lighter in 2 minutes. So try it - you only need a screwdriver (straight) and that’s it.
+1, Why take everything off!
helped with advice, thank you) the backlight also died (today I was tormented, I was steaming. I decided to tighten all the screws from the tunnel, tried to pull it out - no! I didn’t remove the seats because I’m too lazy. I’ll try to pull it out like that =
this week I removed my cigarette lighter like this... first I used thin tweezers to pry it off by the green plastic backlight, and when it came out about a centimeter, I couldn’t reach it any further... I suffered for a minute. 15...I realized that this plastic reflector or whatever it is is attached to the cigarette lighter shaft itself with latches...you can see rectangular holes in the shaft...I bent it a little near one and took the shaft itself out of the reflector...then I pulled the reflector out of the tunnel on which there was a light bulb...just above it twist in different directions to find a place to pull it out... there should also be some kind of small protection on the light bulb... when I pulled it out, it fell into the tunnel...
How to remove the cigarette lighter on a Lada Priora yourself
If you use the cigarette lighter too often, it will quickly break. Today, the cigarette lighter socket is used to connect to the power source of a navigator, video recorder, etc. Mobile gadgets are also often charged through it. This is why the cigarette lighter and the compartment for its fastening quickly break down. Before you dismantle the old one and install the new one, you need to find out exactly the cause of the breakdown. As a rule, they are like this:
- faulty contacts;
- backlight burnout;
- fuse blown.
If we talk about replacing the cigarette lighter, then we must take into account that the tunnel is removed first. If there are no tools nearby, you will have to remove the seat.
However, not everyone knows that it is often possible to dismantle the cigarette lighter without all these complex operations. There is an easier way. Let's consider it.
Read more about how to remove the cigarette lighter
First you need to remove the terminals from the battery. Only when the machine is de-energized can dismantling begin. To perform the operation, you will need a flathead screwdriver and a metal sleeve. Further work is performed in the following sequence:
- First, a screwdriver is inserted into the hole in the cigarette lighter.
- Next, removing the metal glass, pull it towards you.
- Then you need to pull out the cigarette lighter, separating the green plastic and wiring.
- After this, you need to repair the cigarette lighter, and if this fails, then purchase a new one and install it in the same order.
After removing the cigarette lighter, you should make sure that it is faulty. Perhaps it just needs to be taken in for repairs. To change a light bulb, you must remove the socket. By pressing the filter lock, you need to completely remove the entire structure. Then the burnt out light bulb is taken out and a new one is installed in its place. Everything is put together in reverse order. In general, replacing the cigarette lighter is not difficult if you act consistently and according to the instructions. If your lamps regularly burn out, causing your cigarette lighter to work intermittently, then you need to sort out the wiring system. But this work cannot be done on your own. You will need to contact a service station.
Block in the engine compartment
The power fuse box is located in the engine compartment under the hood, near the left strut support. To get to it, you need to open the lid by prying the latch.
1 (30 A) - engine control system circuit . If there are problems with the electronic control unit, short circuits or other malfunctions, this fuse may blow out.
2 (30 A) - vehicle on-board circuit . 3 (40 A) - vehicle on-board circuit .
4 (60 A) - generator circuit.
5 (50 A) - electric power steering circuit.
6 (60 A) - generator circuit.
In case of any problems, it is important not to panic, to think soberly and logically. The most important thing is to diagnose and establish the cause of the breakdown. If you don’t have enough experience or nerves, it’s easier to sign up at the nearest car service center if it has a competent electrician.
I hope this article will help you deal with electrical problems and quickly fix any Priora malfunctions. If you have any experience or information, please leave a comment below, useful information will be added to the article.
Greetings. We will replace the cigarette lighter for the Lada Priora.
We will replace the cigarette lighter assembly and also replace the backlight bulb. To replace it, the floor tunnel is usually removed, we will show you how to do without it.
Tools:
- small flathead screwdriver
Relay and fuse blocks
The VAZ-2170 has three relay and fuse blocks:
- main block;
- mounting block;
- additional mounting block.
Luxury "Priors" with air conditioning have another additional block in which relays and fuses are located that are responsible for the operation of climate control equipment.
Main power fuse block
The main unit is located in the engine compartment of the car next to the battery and expansion tank. It is protected from above by a removable plastic casing. The main unit contains only six fuses that are responsible for the operation of the main (power) electrical circuits of the car.
| Fuse designation | Rated current, A | Case color | Electrical circuit |
| F-1 | 30 | Green | Electronic motor controller |
| F-2 | 60 | Blue | Ignition switch relay, power window control module, rear window defroster, radiator fan |
| F-3 | 60 | Blue | Signal, ignition switch, cigarette lighter, hazard warning lights, brake light unit, radiator fan circuit, interior lighting |
| F-4 | 60 | Blue | Electric generator |
| F-5 | 50 | Red | Electric power steering (EPS) |
| F-6 | 60 | Blue | Electric generator circuit |
To replace the fuses in the main unit, you need to disconnect the ground on the battery, remove the cover and replace the faulty part. VAZ-2170 mounting block
Relays and fuses in the cabin
The mounting block is located in the car interior under the dashboard on its left side. It is protected by a removable plastic panel attached to the “torpedo” using three latches. To remove the panel you need to turn each of these latches 900 degrees. After this, the panel will be completely removed.
The location, number, and markings of relays and fuses in the Priora mounting blocks may differ depending on the type of vehicle equipment.
| Relay designation | Purpose |
| In the “Norma” package | |
| K-1 | Radiator fan |
| K-2 | Rear window defroster |
| K-3 | Starter |
| K-4 | Additional relay |
| K-5 | Socket for backup relay |
| K-6 | Windshield wiper and washer motors |
| K-7 | High beam lamps |
| K-8 | Signal |
| K-9 | Alarm |
| K-10, K-11, K-12 | Sockets for backup relays |
| Available in “Lux” and “Lux Plus” configurations | |
| K-1 | Headlight and low beam lamps |
| K-2 | Rear window defroster |
| K-3 | Starter |
| K-4 | Additional relay |
| K-5 | Reserve socket |
| K-6 | Wiper mode switching module |
| K-7 | High beam lamps |
| K-8 | Signal |
| K-9 | Anti-theft alarm (sound signal) |
| K-10 | Fog lamps |
| K-11 | Seat heaters |
| K-12 | Relay for wiper operation mode |
Fuse box in the passenger compartment of VAZ-2170, -2171, -2172
The fuse box in Priora is located at the bottom of the dashboard, on the left side of the steering wheel. To get to it, you need to open the cover, which is held on by three latches. Rotate each locking knob 90 degrees and pull the lid down and it will snap open.
Fuses in the interior mounting block
F1 (25 A) - radiator cooling fan. If your fan does not work, check its motor by applying 12 V directly to it from the battery. If the engine is working properly, then most likely the problem is in the wiring or connectors. Check the serviceability of relay K1.
The fan in the Priora usually turns on at a temperature of 105-110 degrees. Do not allow the engine to overheat, watch the arrow of the temperature sensor.
If the fan runs constantly and does not turn off, check the coolant temperature sensor located on the thermostat. If you remove the connector from the working sensor, the fan should turn on. Check the wiring to this temperature sensor, as well as the contacts of relay K1, move this relay, clean the contacts. If this is the case, replace it with a new relay.
F3 (10 A) - high beam, right headlight. F4 (10 A) - high beam, left headlight. If the headlights do not shine on high beam, check the K7 relay and the headlight bulbs. The steering column switch, wiring or connectors may also be faulty.
F5 (10 A) - sound signal.
If the signal does not work when you press the steering wheel button, check relay K8. The signal itself is located under the radiator grille; you can get to it by removing the plastic casing from above. Check it by connecting the voltage to 12 V. If it doesn’t work, try turning the adjusting screw, or replace it with a new one.
F6 (7.5 A) - low beam, left headlight. F7 (7.5 A) - low beam, right headlight. When replacing lamps, be careful; there are separate lamps for the low and high beams, so they can be easily confused. It is better not to install lamps in high-power headlights; the reflectors may melt and the desired effect will not be achieved. Most low beam headlight problems that cannot be corrected by conventional means can be related to the light control module (LCM). The low beam relay is only available in cars equipped with a light sensor, it is located in the place of relay K1; on most cars this relay is not in the mounting block; the low beam circuit goes through the MUS block. It happens that the tracks in the block burn out; if there are problems, it is better to replace it with a new one. If the windshield wipers turn on spontaneously when the low beam is not working correctly, the problem is most likely in the windshield wiper control unit, located in the center of the dashboard, the topmost block, next to the radio, is best reached from the glove compartment, or by hand through the removed console covers at the feet.
F8 (10 A) - alarm signal. If the alarm does not work, also check relay K9.
F9 (25 A) - stove fan.
If your stove does not work in any mode, the problem may be with the stove speed controller or with the engine. Check the stove motor by applying 12 V voltage directly to it. If it does not work, remove it, open the cover and check the condition of the brushes. If the stove does not work only in the first modes, but works in the last mode, most likely you need to replace the heater resistance, located under the hood on the fan scroll.
The price of these resistors is about 200 rubles. Also check that the filter and all pipes are clean and that air flows normally into the stove. If the stove fan squeaks or turns with difficulty, try lubricating it. If the stove turns on and off, check the connectors and contacts in them, they could have melted or oxidized, in this case, replace the connector.
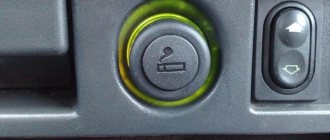
Device and how it works
The Lada Priora cigarette lighter is located in a standard place for domestic cars (VAZ, etc.) - in the central tunnel of the floor covering near the parking brake handle. The location in a visible place ensures ease of use of the device and accessibility of connecting wires from different devices. For comfortable use, the device is complemented by a backlight that turns on in the dark. The Priora 1 and 2 cigarette lighter designs differ in configuration and design, because... The nest is more compact than other VAZ models.
The design solution and operating principle of the cigarette lighter are standard. The cigarette lighter consists of a socket (a hollow cylinder made of alloy) and a metal socket. The cartridge is supplemented with a button, after pressing which the plus is connected to the minus by means of a spiral. The Priora brand cigarette lighter does not have a relay. The relay functions are performed using bimetallic elements built into the inner surface of the cartridge. After heating, the elements unclench, the spring presses on the cartridge, placing it in its original position.
Additional mounting block Priora
- F1 (15 A) – main relay and starter interlock circuit fuse;
- F2 (7.5 A) – fuse for the power supply circuit of the ECU (controller);
- F3 (15 A) – Priora fuel pump fuse;
- K1 – main relay;
- K2 is the place where the Priora fuel pump relay is located.
Attention!
The relay and fuse diagram may differ depending on the configuration and production date of the vehicle. Current diagrams of the mounting block are presented in the operating manual for the date of manufacture of the vehicle (download from the official website).
Let us remind you that on our website you can find detailed instructions for repairing the Lada Priora with your own hands.
Cigarette lighter
The domestic auto industry is in no hurry to replace the cigarette lighter with sockets, so all our cars are equipped with its classic version. Lada Priora is no exception. Here it is located in a place of honor - the central floor tunnel, next to the parking brake handle.
This arrangement of the device was not chosen by chance. It is always in sight, you can reach it with your right hand without bending, it does not interfere, and it is impossible for your pant leg to get caught on it. For greater convenience, it is also equipped with a backlight, which makes it easier to find in the dark.
It is worth noting that the Priora’s cigarette lighter differs from previous models not only in location, but also in configuration: its socket is somewhat smaller than that of other VAZs.
Design and operating principle
The Priora's cigarette lighter is no different from the cigarette lighters of other cars. Structurally, it consists of a socket (a hollow metal cylinder) and a metal cartridge with a nichrome spiral inside.
The cartridge is equipped with a plastic button, when pressed, the “plus” is connected to ground through the spiral. The principle of heating the coil here is exactly the same as in an electric stove or iron, but unlike the latter, the Priora cigarette lighter does not have a thermal relay. Its task is performed by bimetallic “ears” inside the cartridge, which, when heated, expand, and the spring ejects the cartridge, setting it to its initial position.
Malfunctions
Like any other electromechanical device, the Priora cigarette lighter tends to break. Sometimes this can be caused by design defects, sometimes by malfunctions in the machine's on-board circuit, and sometimes by the fault of the user himself. Common cigarette lighter malfunctions include:
- sinking of those same bimetallic “ears”;
- burnout of the spiral;
- broken contact in the connector;
- fuse blown.
Malfunctions can also include the burnout of a backlight lamp, however, this is more related to a decrease in the level of comfort than to serious breakdowns. In addition, it does not in any way affect the operation of the device itself and can be easily eliminated by replacing the lamp.
The sinking of the lugs is characterized by the lack of fixation of the cartridge in the pressed position. It can be caused either by the low quality of the metal from which they are made, i.e. defect, or high intensity or long period of use of the cigarette lighter.
The problem is solved by bending the “ears” inward using a thin screwdriver, naturally after de-energizing the on-board circuit. If after a short period of use the problem occurs again, it is better to replace the cigarette lighter.
When the spiral burns out, the cartridge is fixed when pressed, but does not heat up. The fault is diagnosed by ringing it using a car tester. It is not recommended to restore the spiral, as this may lead to a decrease in its resistance, which will make unwanted adjustments to the operation of the on-board circuit. In this case, the cigarette lighter also needs to be replaced.
Contact failure can be easily determined by removing the tunnel lining and checking the condition of the connector. This malfunction is not critical and can be fixed independently in a few minutes.
But as for the fuse, it makes sense to consider this malfunction separately, since its malfunction is most often caused by the human factor.
Replacing the cigarette lighter and its backlight
The cigarette lighter itself is not difficult to replace, you just need to pry the antenna inside the cigarette lighter with a screwdriver and pull out the inner part, and then we take out the plastic itself with the lamp, prying it with a thin screwdriver on both sides and pressing on the antenna. In principle, if you have already purchased a new cigarette lighter, you can simply look at how it works and everything will become clear.
Disadvantages [ edit | edit code]
The cigarette lighter is not a reliable electrical connection. Its design itself did not provide for long-term and reliable switching of high currents. Reliable fixation of the consumer plug in the cigarette lighter socket can be ensured by an increased number of clamping tabs, but so far there is no uniform standard for such a connection. In practice, non-standard forks have only a spring-loaded central contact and two mass clamping pads. In the socket, the central contact area can be located deep, or maybe close. The grooves for the presser feet (even if they are present) may not be located where they are located on the fork. The cross-section of the contacts themselves is not enough to switch large currents. Due to various vibrations and shocks while driving, reliable contact between the plug and the cigarette lighter socket is lost, the connection sparks, and the possibility of a short circuit cannot be ruled out. In addition, a modern car uses a large number of connected devices simultaneously: navigators, video recorders, chargers for small batteries, televisions, walkie-talkies. For this purpose, various tees and splitters are used, which by themselves cannot add reliability. The impossibility of a sudden transition to a connection with greater reliability is explained by the fact that the cigarette lighter in the form in which it is now is a de facto standard in cars and its trouble-free operation can be guaranteed only when used for its intended purpose - to heat up the spiral insert.
When using a car, many car owners simply do not think about the fire safety of the car. Whereas car fires due to problems with wiring, a faulty battery and the use of low-quality electrical appliances are observed all the time. How to avoid burning your car when using the cigarette lighter connector to power various car accessories.
If 20-30 years ago we used the cigarette lighter socket exclusively for its intended purpose, today this connector is indispensable for receiving electricity from the on-board network. However, the use of low-quality wires, adapters and all kinds of plugs leads to short circuits, which can damage the cigarette lighter itself, and in extreme cases, contribute to a fire in the car.
Cigarette lighter repair: how to remove the device from a Priora
To replace an element you need:
- set of screwdrivers: Phillips, flat;
- tweezers;
- blowtorch, coupled with solder;
- protective gloves.
Step-by-step instructions will help you remove and change the cigarette lighter on your Lada Priora yourself. The procedure is as follows.
- Open the hood and remove the negative terminal of the battery. After this, the contacts will not close, which will avoid short circuits.
- Now you should dismantle the two sides of the decorative plastic in front of the tunnel. Fastenings - near the floor.
- Disconnect the contact chip, remove the Priora cigarette lighter. Next, replace with the working element.
- Remove the gearshift lever housing by disconnecting all fasteners.
- Unscrew the front/rear screws securing the central tunnel and remove it, gaining access to the socket.
- Pull out the metal cup by pressing the latches.
- Remove and replace the cigarette lighter with a working part.
- Solder the old wires to the new element.
- Assembly is carried out in the reverse order to that described.
Replacing a device without removing the front panel
There is a way to quickly carry out the repair procedure, avoiding disassembly. Dismantling from the Priora without removing the panel is carried out as follows.
- Disconnect the battery terminal.
- Using a small screwdriver, bend the metal a little on both sides where the plastic latches are.
- We pull the metal cartridge, removing it from its seat.
- We disconnect the plastic chip located at the end of the element.
- Next is replacing the part with a new one and the installation procedure.
Instructions for changing the cigarette lighter bulb
This breakdown is also one of the most common. Replacing the cigarette lighter bulb yourself is not difficult. It is enough to follow the instructions.
- Open the hood and disconnect the battery terminal.
- Use a thin screwdriver to pry up the green plastic latch and turn the metal cup, pulling it out.
- The burnt out lamp is inside a plastic part.
- Disconnect the connector from the contacts.
- Now you can change the light bulb with a working part.
- We reassemble in reverse order.
Serial number and part numbers
Before you begin repairing the cigarette lighter and disassembling the central tunnel, you need to buy a suitable spare part. There are different device options for the Lada Priora on sale, both original and not. Cigarette lighters from the AvtoVAZ factory have article number 21230-3725010-00.
When purchasing, you need to pay attention to the cost of the spare part. A cigarette lighter price that is too low indicates the use of low-quality materials. Such a part may burn out within several weeks after replacement. In addition, the item must be well packaged and have a certificate of conformity.
How to remove the cigarette lighter?
According to the instructions described in the Lada Priora repair and operation book, the cigarette lighter is replaced after removing the tunnel. And if you don’t have the necessary tools at hand, you’ll have to remove the seat. But there is a more simplified option, which few car owners know about. How to change the cigarette lighter on a Priora without dismantling the floor of the car?
Before any manipulations performed on the car, especially if they have to do with wiring, it is necessary to remove the terminals from the battery. Only after the car is de-energized can you begin to work.
To remove it, you will need to use a small flat-head screwdriver that is inserted into the hole inside the cigarette lighter. You need to press the screwdriver onto the latch (green) and turn the metal sleeve. Carefully remove the metal cigarette lighter cup by pulling it towards you. Once removed, the green plastic and wiring are separated from the cigarette lighter. Next, repairs are made, and then everything is put back together in reverse order.
If the cause of the breakdown is a burnt-out light bulb, it is necessary to dismantle the socket. When you press the filter lock, the entire structure is pulled out, after which the burnt out light bulb is removed and replaced with a new one. They assemble everything the same way, but in reverse order.
Replacing a cigarette lighter is not a complicated operation, and it is worth learning how to do it yourself. However, regular burnout indicates a problem with the wiring system, especially if it occurs without excessive loads. This fact cannot be ignored, since a short circuit can lead to serious consequences.
Constant burnout can provoke overheating of the wiring due to prolonged use of powerful energy consumers, such as, for example, a compressor. Therefore, if there is a need to simultaneously use several devices, it is recommended to make additional cigarette lighter sockets, each of which has its own separate fuse.
Replacing the cigarette lighter and backlight
Once the metal core is pulled out, it will all look something like this.
The plastic edging, which is green in the top photo, remains in the floor tunnel, and we do not touch it for now. Next, disconnect the power plug from the Priora cigarette lighter module by first pressing the connector latch:
And by pulling to the side, we remove the block from the connector, as shown in the photo below.
If necessary, replace this part with a new one, installing everything in the reverse order. This socket has a catalog number that is identified as Sherole Niva, but there is nothing to worry about, since these models have some interchangeable parts.
If you need to fix a problem with the backlight, then we’ll talk about it below.
Replacing the cigarette lighter lamp on a Priora
Also, using a thin screwdriver, pry up the green plastic insert and carefully remove it from the hole in the floor tunnel.
As a result, we get the following picture.
To remove and change the backlight bulb, you just need to remove the black cover, and under it there is already the lamp itself, inserted together with the “socket” into the cigarette lighter housing. And to get it out of there, just pry it slightly with a screwdriver so that the latch does not interfere with removal.
The light bulb itself is also easy to change - just slightly pull it to the side, removing it from the “socket”.
Installation occurs in the reverse order of removal and no difficulties should arise as a result of this repair. If someone found the photo report not entirely clear and legible, then everything will be presented below in a more convenient form.
Video on replacing the cigarette lighter and its backlight lamp on a Priora
This review was specially prepared for the site https://priora-remont.ru and embedded from my YouTube channel.
You can buy a new cigarette lighter assembly for a Priora at a price of 400 rubles. Of course, the new model part is more expensive than the old ones, but there is no escape from this. If you have any questions after reading this article or video, you can write your questions and suggestions in the comments below.
Leave a reply Cancel reply
You must be logged in to post a comment.
What is a cigarette lighter for?
A cigarette lighter can be used not only for lighting cigarettes, but also for more useful actions. You can connect a lot of different equipment to the cigarette lighter socket, which, of course, has a voltage of no higher than 12V.
What can be connected to the cigarette lighter:
- Charger for phone, laptop or tablet;
- Automobile compressor;
- DVR, radar detector;
- Car refrigerator;
- Car vacuum cleaner, etc.;
Currently, there are a huge number of car accessories powered by a cigarette lighter; such a connection has made it possible to use these devices with ease.
What devices can be connected to the cigarette lighter?
Knowing the current rating for which the Prior's cigarette lighter fuse is designed, you can calculate what power devices can be used. To do this, we multiply the current strength of 15 A by the rated voltage in the cigarette lighter - 12 V.
We find that the power of the connected devices should not exceed 180 W. And the list of devices is very wide, because technological progress does not stand still, making the life of the driver and his passengers much more comfortable. Here are some of them:
• Compressor; • Air purifier and ionizer; • Electric kettle or boiler; • Fridge; • Massage cape or pillow; • Navigator, video recorder, etc.; • Heater on the seat; • Lamp or lantern; • Fan; • Vacuum cleaner; • Splitter.
New devices appear every year. You must be very careful when connecting them to the cigarette lighter. Heavy load can lead to short circuit and fire.
Cigarette lighter fuse. Where is?
The fuse is responsible for protecting the circuit from short circuit or overload, therefore, if a problem occurs in the cigarette lighter, its fuse blows first. The Priora cigarette lighter fuse is located in the mounting block and is numbered F13 and has a rated current of 15A. If the cigarette lighter breaks, you first need to check its integrity.
If the fuse is intact, proceed to further actions.
What fuses determine the operation of the cigarette lighter in Priora
First question: where is it located? When considering a specific car, and in our case it is the Lada Priora, you can safely look for the cigarette lighter fuse we need and will certainly find it in the specialized mounting block, which is where it is installed. When the car owner is sitting in the car, all he needs at this moment is to look down to his left.
The so-called mounting block is located at the bottom of the dashboard, to the left of the steering wheel and is covered with a special protective cover. Just under this cover you will find the entire Priora mounting block with fuses. At the bottom of the block there are 2 rows with all kinds of fuses. The cigarette lighter fuse “settled” in the top row, and its place is on the far right. Factory marking of fuse socket F13. Also an important question: what fuse does it come with? In this case, the current should be 15 amperes.
In all Lada Priora models from the Russian Federation, without exception, the cigarette lighter fuse we are currently considering is also present in the main unit. This element is primarily responsible for the fan located in the cooling system, but also ensures the operation of the cigarette lighter. In the main unit under the hood, its factory marking is F3, and the current limit is 60 amperes, respectively.
It has been verified experimentally that on the Priora, which is popular in the Russian Federation, the safety element we need has to be replaced quite often. The main reason for this problem is that the cigarette lighter is often used incorrectly. Most car owners do not think about the fact that the cigarette lighter is necessarily limited in power and current. You cannot connect a fairly powerful device to the connector; it is also undesirable to use a device that distributes charge to several devices or gadgets. You need to purchase reliable fuses, and high-quality wires for your car will also help keep the overall wiring of the car in proper condition.
How does a cigarette lighter work?
The cigarette lighter is made in the form of a cylinder into which the heating element or plug of a car accessory is placed. The power supply in it has a constant voltage of 12V, which is protected by a fuse. The cigarette lighter has “+” and “-” through which current flows when a load is connected. The backlight is also powered from the cigarette lighter, which also operates at 12V.
The standard cigarette lighter socket has the form of a cylinder, inside of which there is a nichrome filament, which subsequently heats up to a high temperature.