Every car owner wants his car not to fail at critical moments, to cause a minimum of problems and bring maximum benefit. But this directly depends on how the owner cares for, monitors, and repairs his car on time.
One of the most important components affecting safety is the steering. VAZ 2114 owners do not have to repair steering racks very often, since these units have a fairly long service life. But a number of factors and time lead to the fact that you have to pay direct attention to the helmsmen, diagnose the problem in a timely manner and promptly fix it.
Today we’ll talk about how to repair this unit yourself, as well as what measures will bring your slightly worn steering rack back to life.
Symptoms of a problem
To understand that the racks require repair, you need to monitor the behavior of the car and know the characteristic signs of a malfunction of this element.
Is it possible to determine whether the unit requires a complete replacement, or can you get by with simple repairs? We will tell you about this in the table below.
| Sign | Necessary actions |
| When turning the steering wheel, a knock is heard and play occurs | If the situation occurs while the car is moving, it is enough to carry out repair measures, use a repair kit |
| Knocking and play occurs when the steering wheel is turned when the car is stationary | This is clear evidence of the critical state of reiki. The problem can only be solved by completely replacing it. |
Conclusions and recommendations for repairs
Particular attention should be paid to the condition of the support bushing and the worm gear mechanism. Damage to the anthers causes excessive corrosion of the rack, destruction of the gear teeth, destruction of the locking spring and clogging of all parts with dirt.
The parts need to be washed, bearing play checked, and cleaned. Also generously lubricate all mating surfaces. The rack stop and retaining ring must be replaced, as the parts most susceptible to friction and wear.
Tightening and adjustment
As the practice and experience of VAZ 2114 owners shows, if problems arise with the racks, they can most often be repaired. The only condition is that you have an inspection hole at your disposal.
Full analysis
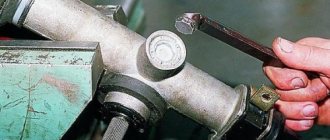
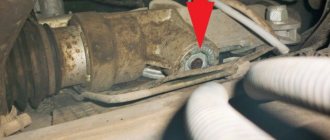
The first step is to tighten the rack. But how is this done? To do this, simply tighten the adjusting bolt. Adjustment is made with a 17 mm key.
After tightening the bolt, take your car out for a few kilometers to check whether the knocking or play remains. If these symptoms of the problem disappear after you have tightened and adjusted the steering rack, the repair can be considered complete.
But this doesn't always happen. The knock may remain, but the play may go away, or vice versa. In any case, if at least one sign still remains, you will have to begin a full-fledged repair with your own hands. Now you can find a number of useful videos that describe in detail the procedure for repairing this unit. Take a look, it will be useful for you.
Steering system diagnostics
Suppose you notice an uncharacteristic rattling sound in your car when driving? How do you still understand that it is time to repair the rack? There are not so many diagnostic methods; they are extremely simple and do not require any special sophistication from you:
- 1. Check the steering mechanism at the point where the steering shaft and rack combine. If it gives in to force and a characteristic knock is heard, most likely the problem is the lack of lubrication of the needle bearing;
- 2. The presence of play due to a worn bushing or a banal insufficient tightening of the main components can be concluded by grasping the joint of the steering rod under the hood of your car.
If we have already decided on the need to restore the rack, it’s time to decide on the method of repairing it.
It’s worth immediately making a reservation about repairing the steering rack from a VAZ 2110 with your own hands - the process is very labor-intensive, nervous and thankless. It is recommended to decide what is easier for you: perhaps spend the whole day doing hard and painstaking work, buy a new rail, or pay about 3,000 rubles. for repairs at a service center?
In defense of do-it-yourself repairs, we note that only you yourself are capable of performing the work with due seriousness and responsibility, dictated by the love for your own car. Repairing the VAZ steering rack on your own will be much cheaper, but it is advisable to enlist the help of a friend when reinstalling the rack and pinion mechanism in its place under the hood - doing this alone is absolutely impractical.
Necessary tools and spare parts for self-repair:
Steering rack repair kit for VAZ 2112
The cheapest repair kit for repairing the steering rack from a VAZ 2110 with your own hands will cost around 200-250 rubles. A more complete and universal set of spare parts will cost us about 500 rubles. It is also recommended to definitely replace the central corrugation (its price is approximately 250 rubles).
In total, it turns out to be at least 500 rubles. At the same time, buying a completely new rack and pinion mechanism will cost about 1,100 rubles. The tools we will definitely need are:
- special key 2110, which is a hollow octagon;
- wrench with long handle and octagonal socket 15 mm;
- ratchet with 10 and 13 mm heads;
- a set of metalwork tools;
- mount;
- jack.
And the following materials:
- penetrating lubricant for rusted bolts or kerosene (in the second case you will also need a syringe);
- diesel fuel, gasoline or other means for washing parts;
- Litol-24 lubricant, ideally FIOL.
Price issue
A new rail will cost you about 3 thousand rubles. The cost of service stations for replacing slats costs about 2 thousand rubles. That is, in total you will have to spend 5 thousand rubles if you entrust the work to the masters.
Repair kit
However, the rack is not difficult to repair. Most VAZ 2114 owners perform this event with their own hands. Plus a decent saving of money.
We repair it ourselves
To get started, you will need a set of tools and repair kits.
Replacement kit
Be sure to include the following in your list of tools and materials:
- Repair kit for one of three configurations (more about them below);
- Bearings;
- Lubrication;
- Set of keys and screwdrivers.
Selecting a repair kit
Spare parts
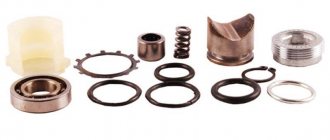
As for repair kits, the standard minimum set includes four elements:
- Washers;
- Nuts;
- Bearings;
- Bushings made of fluoroplastic.
But is it enough for your specific steering rack situation? Let's try to understand the purpose and configuration of each of the three types of repair kits.
- The cheapest repair kit, the contents of which you are already familiar with, allows you to solve the most minor problems that have arisen with your slats.
- The middle kit additionally includes other bearings and shafts. Designed for more serious repair work.
- The most expensive repair kit may consist of whole new slats, that is, it involves not a repair, but a simple replacement of units.
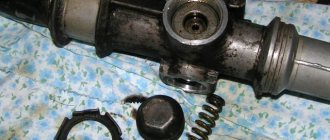
Repair
To perform the repair, you will still have to disassemble the steering wheel. You can see detailed instructions in the material on replacing the steering rack.
Replacement process
Let's move on directly to the repair procedure.
- Remove the rail from its seat.
- Remove the thrust nut with a 17mm hexagon.
- Remove the thrust nut, remove the retaining ring, spring, and rack stop.
- First, the gear shaft boot is removed, after which you can easily get to the locking ring.
- Remove the nut that holds the gear bearing in place. Be prepared for the fact that it will be quite difficult to unscrew it; use some force. This is fine. It's worse if it practically doesn't hold on.
- The drive gear shaft is pressed out.
- The rail is removed from the housing.
- Next, remove the support sleeve, lubricate it and put it in place. It may take some effort to push it back.
- Replace all bearings present in the assembly. Some are difficult to extract, while others are almost impossible. But it needs to be done. If you cannot remove it at all, then cut the bearing with a chisel and remove it with pliers.
- Examine the condition of all surfaces, parts, and assemblies for any defects or damage.
- If you notice faulty elements, replace them using a repair kit.
- The design will have quite a lot of moving elements. Each of them must be lubricated with high-quality lubricant. Litol will perform well here.
- Reassemble by following the reverse disassembly sequence.
- You will definitely need help for reassembly. Therefore, agree in advance with a friend or someone else who can help you in this matter.
- Place the repaired rail in place and attach its fasteners.
- A rack is inserted into the spitz. This is where you will need an assistant. It is almost impossible to do this yourself.
- Use a chisel to loosen the clamps.
- Tighten all mounting bolts in place.
After assembling the unit, be sure to check it in action. Please note that after this you cannot operate the car in the previous mode. First, be sure to stop by a car service center where an alignment will be performed. Only after this can the repair of the unit be considered complete.
If you notice typical signs of a rack malfunction, do not delay repairing or replacing it. This can lead to tragic consequences when, at the most inopportune moment, the steering wheel stops responding to your efforts and you lose control of the situation. This is not an attempt to scare you, but a simple fact of life.
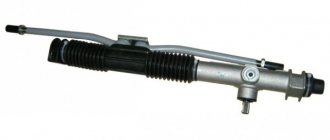
The steering rack in front-wheel drive cars is fully responsible for the functionality of the entire steering mechanism. The VAZ 2109 also belongs to this category of car. If it fails, appropriate action should be taken immediately.
The occurrence of signs of malfunction does not always indicate the need to completely replace the unit. Sometimes it is enough to repair the rack using a special repair kit.
Is it possible to adjust the steering rack with your own hands? Tightening technology
Hello, dear car owners! From time to time, a feeling of “white” envy suddenly creeps in when in the manuals of foreign automakers we read the words that the service life of the worm on another rack in the control rack of a car is designed for 14-15 years.
It’s designed and... that’s essentially how it is: the control rack doesn’t burn out. Than, subject to certain conditions, such as: recommended maintenance periods for the control rack, use of recommended and high-quality oils, and operation of the vehicle on appropriate roads.
When the first two points are completely achievable for strangers to the owner of the car, then the third, as annoying as it may sound, remains a fairy-tale dream for us. Therefore, now we will look at the question of what it really is, how to tighten the control rack in makeshift conditions.
Signs of breakdown
By means of steering racks, rotational movements from the steering wheel through a rack and pinion mechanism are transmitted to the rotary levers, which turn the front wheels with rods.
If you find one of the symptoms listed below on your car, be sure to conduct a full diagnosis of the condition of the unit, and then repair it.
Signs of a faulty steering rack include:
- A grinding noise is observed in the rack area when the steering wheel is rotated;
- The steering wheel periodically sticks;
- Lubricant begins to leak from the seals;
- The steering wheel has noticeable play.
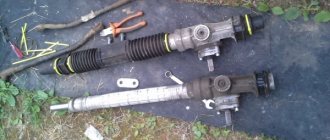
Dismantling
You will not be able to assess the current condition of the steering rack unless you dismantle the device.
There is no optimal way to dismantle the steering rack, since the process in any case involves quite labor-intensive, time-consuming work that involves disassembling many components.
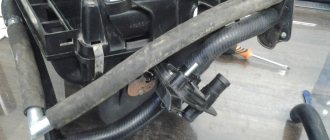
- Suspend the front of the car with a jack to be able to remove the front wheels. Be sure to carefully consider safety measures, install wheel chocks and boots so that the machine does not move while the rack is being repaired.
- Disconnect the gas adsorber, disconnect the wires and take them to the side. This will give you full access to the steering rack.
- Unscrew the bolt from the spline connection. Before doing this, be sure to align the wheels using the steering wheel. The bolt is located near the pedals. To dismantle the fasteners, use a cardan head or a simple spanner.
- Clean the tie rod mounting nuts from accumulated dirt, then undo them using pliers. Unscrew the nuts using a spanner.
- Using a special puller, the rods are disconnected.
- Next, unscrew the rods from the steering rack housing. However, experts recommend dismantling the crankcase with the rods together, since in a vice the removal process is much easier.
- Once you have the rack free, remove it from under the car through the wheel arch. Clean, rinse and clamp in a regular vice.
Now you have a choice - completely replace the steering rack or try to repair it. The second option will take more time, but will save an impressive amount of money.
Repair
The first thing you will need to carry out your own repairs is a repair kit. They are available at almost any auto parts store. However, we strongly recommend that you buy only high-quality kits so that the result of your DIY repair lasts as long as possible.
What you need for work
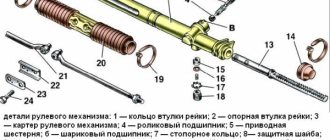
The proposed kits are incomplete and complete. You will definitely need the following kit components:
- Needle bearing;
- A pair of rubber seals for the bushing;
- Support sleeve made of plastic;
- Set of gaskets;
- Spring;
- Retaining rings;
- Support bearing;
- Drive gear;
- Boot cover;
- Rail;
- Set of ties for the boot.
Repair kit
Now that the kit is ready, the tools are available, and there is also enough free time, you can get to work.
- First, remove the boot, end caps and stops. As you disassemble elements, even the smallest and insignificant at first glance, be sure to evaluate their current condition. If necessary, all worn-out elements will be replaced with new ones taken from the repair kit.
- Using an octagon, unscrew the screw plugs, which will allow you to remove the springs, retaining rings, and thrust bushings.
- Remove the bearing and check if it has any play. The repair kit includes a new bearing, so if the old component is in satisfactory condition, it is better to replace it immediately. It’s not for nothing that you took on such a complex process to get everything done 50%.
- Remove and inspect the drive gear. Next, you can completely remove the rail itself.
- Be sure to replace the support shaft bushing, not forgetting about the rubber bands. They are also included in the kit.
- Take your time to remove the rubber bands from the sleeve. First, insert the element into the crankcase, after which you can cut off the elastic with scissors or a sharp knife.
- The most difficult step is replacing the needle bearing. To remove it, you will need a special key. But you can do without it. In this case, arm yourself with a 1.5 mm drill bit and a drill. Using a drill, make a hole in such a way as to loosen the end of the bearing. Use a punch to knock out the old bearing from the crankcase.
- Before installing the new needle bearing, be sure to thoroughly clean the steering rack housing of accumulated debris and steel shavings from drilling.
- The hole made cannot be left. To eliminate it, you can mix metal filings with superglue. This mixture will harden quickly and give an excellent result.
- Lubricate literally everything that can be lubricated in the steering rack assembly. Experts advise using Litol 24 or other lubricants of similar quality. It wouldn't hurt to lubricate the CV joints.
- Reassemble the unit by following the reverse sequence of dismantling.
Direct implementation
- First, we disassemble everything, wash it and begin cutting fragments of the required length. A PVC pipe with a diameter of 5 cm will act as a cracker; we will cut it and lay it in four layers. The length of the improvised bushings is 24 cm, so you don’t need to adjust anything, everything is tested from personal experience :).
- In the center of the pipe, it is necessary to remove a strip about 3.5 cm wide. This is necessary so that during installation the cracker can shrink to the shape of the rail.
- When the first fragment is cut out, you can begin installation. We carefully squeeze the cracker and push it inside so that nothing sticks out or sticks out anywhere, since during operation this can create a lot of problems.
4. Cut out the second cracker in the same way. The only nuance, and it needs to be taken into account, is that each new plastic element will shrink more, so the strip that we cut in the center should be wider than the previous one. After cutting, install the second fragment in place. If necessary, carefully trim everything using a sharp knife.
The 3rd and 4th crackers are manufactured and installed in the same way. You should get something similar to the one in the photo. Another important point is to make sure that the edges of the pipe do not protrude into the working window of the rack and do not interfere with the free movement of the steering rods and shaft.
When you install the last fragment, the free play between the housing and the shaft will become exactly what we need, as they say, snugly. For better results, add the required amount of graphite lubricant, change faulty parts (oil seals, tips, etc.), if necessary, and then reassemble in the reverse order.
- I personally and many who repeated this experiment are happy with the result! I hope you will also be able to remove the steering rack knock, and you will not regret the work done. Thank you for reading to the end. I would be grateful if you share this article with your loved ones on social networks using the special buttons located below. Good luck to everyone and see you again at VAZ Repair. Bye!
How to determine that the rack needs to be replaced on a VAZ 2114
So there are several ways. The very first and simplest is to rotate the steering wheel. You just need to tug it from side to side. Ideally, the wheels should respond to the slightest rotation. In fact, many even new slats are not capable of this. That's the quality of the parts, you just have to live with it. Steering rack wear does not appear in any way in the form of knocks or vibrations, contrary to popular belief. If while driving the bumps are reflected into the steering wheel, most likely the steering tip needs to be replaced.
The second method is more accurate and complex at the same time. To carry out this check, it is necessary to jack up the front wheels one by one, and then swing them across the rotation in a horizontal plane. If there is a slight play, then it is somewhere in the steering, but not necessarily in the rack. There is no way to explain this; such a diagnosis can only be made by a specialist.
Before changing the rack, you can try tightening it. Thus, the gaps in the column are reduced. The main thing is not to overtighten, otherwise the steering wheel may jam. To tighten the steering rack on a VAZ 2114, you need a special multi-faceted wrench; it can be found in any auto store.
Video: replacing the rack on a VAZ 2114
We will answer your questions
Good afternoon. Yes, we can repair it within one day.
No, this shouldn't happen. Regarding self-repair of such important mechanisms, we are always against it. Not only because they are interested in providing services, but also because then we will have to correct your mistakes during independent repairs, and this is much more difficult. When there is a knock in the rack, in order to determine the cause, you must initially completely disassemble it. Only knowing how the mechanism should be designed can you notice its malfunction. Not everyone, even the most experienced driver, is sufficiently knowledgeable about the internal structure of the rack.
We have not yet learned how to conduct remote diagnostics. This can indicate either the situation you first voiced or signal a serious breakdown. In a car service center, in case of temporary wear, you may be offered a rack restoration procedure. In this case, the mechanism is disassembled, and all obsolete parts are replaced with completely new ones. If repairs are necessary, the technician will disassemble the rack and decide what and how to change or repair.
Since you come into contact with its work directly while driving a car, it will not be too difficult to detect a breakdown. If not during the next diagnostic, then while driving the car, you will notice noises or knocking, play in the rack. This serves as a direct signal to visit a car service center.
No, depending on the design of the mechanism, the racks can be electrical, hydraulic or mechanical. In each individual case, the master must understand the mechanism and carry out the repair procedure in accordance with its structure.
Yes, this is a very important component of the car. Scientifically, it is called hydraulic power steering, and its purpose is already clear from the term itself. The rack helps you turn the steering wheel
It is also an important part of the hydraulic system. Now the second part of the answer: do you think that you will be able to drive your car normally if you cannot turn and brake normally? The question of the importance of a working steering rack should not even arise