Intake manifold removal process
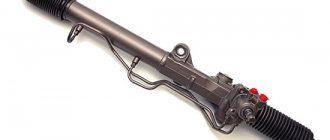
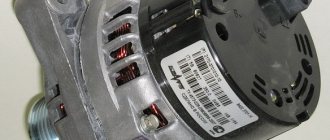
General view of the intake manifold
Dismantling the intake manifold is carried out with the car cooled down for safety reasons. So, this operation can take about an hour and will require some knowledge of the car’s design, namely the injection system. So, let's consider the sequence of actions for dismantling the unit:
- We dismantle the throttle. To do this, it is not necessary to disconnect all the pipes and pipes; it is enough to disconnect the unit from the manifold and move it to the side. Of course, at the same time, it is still recommended to remove the throttle valve completely for cleaning.
Location of the throttle valve on a VAZ-2112 - photo of an editorial car
Removed the wires and coil
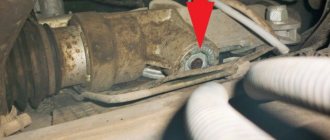
Unscrew the clamp and disconnect the vacuum brake booster tube
Using a Phillips screwdriver, unscrew the oil level indicator guide tube
Unscrew the ignition coils and receiver
Unscrew the bolts securing the manifold to the block head
Pull the collector towards you and dismantle it
It is worth noting that installation of the intake manifold is carried out in the reverse order and does not require any additions or changes.
Video
Video
This video shows how to repair the steering mechanism on Kalina.
Knock in Kalina steering rack. How to remove.
Installation of Kalina steering rack.
Repair of the steering column gearbox and the RR itself on Priora, Kalina, Grant.
How to install a steering rack from Kalina 2 to Kalina 1.
Steering rack for Lada Kalina Sport with a gear ratio of 3.1 instead of 4.02.
Do-it-yourself repair of the steering rack, but not Kalina, but Daevoo Sens / Daewoo Sens.
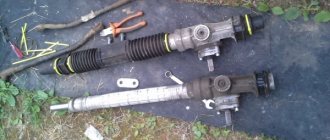
Kalina control rack - VAZ 11183 Kalina rack repair
Have you ever had a chance to monitor knocks and noises from the side? Probably it happened. They changed the control tips, changed the ball tips, even changed the springs with support bearings, but does the knocking continue? It's time to tug, make sure there is free play and start sorting out the rack. In this article I will talk about repairing the VAZ 11183 rack, but the development is identical to all other VAZ front-wheel drive racks.
The most interesting thing is that these motherfuckers from AvtoVAZ do not fundamentally change anything except the gearbox housing, I bought a repair kit 2110-2112, the rack is listed in catalogs as 2110, but the splined part is longer than 2110, and the gearbox is slightly different, so just change Unfortunately, 11183 for 2110 will not work, although 2110 costs 2500 in my town, and 11183 5500 costs 6000 rubles. The difference per pocket is very noticeable.
Well, it doesn’t fit and doesn’t fit, so we give the engineers a hard time and start disassembling it. Unfortunately, there won’t be a photo for the article, because I was up to my elbows in mud and didn’t want to wash myself for the sake of pictures, but I’ll try to describe everything carefully.
Removing the steering mechanism.
1. For convenience of work in the future, and so as not to climb into the interior with stains, unscrew the bolt securing the splined connection from inside the cabin (you will see it near the floor of the control shaft).
2. We lift the car on a lift, throw it down, and knock out the control tips from the steering knuckles.
Intake manifold removal process
Dismantling the intake manifold is carried out with the car cooled down for safety reasons. So, this operation can take about an hour and will require some knowledge of the car’s design, namely the injection system. So, let's consider the sequence of actions for dismantling the unit:
- We dismantle the throttle. To do this, it is not necessary to disconnect all the pipes and pipes; it is enough to disconnect the unit from the manifold and move it to the side. Of course, at the same time, it is still recommended to remove the throttle valve completely for cleaning.
- Disconnect the throttle cable from the intake manifold.
- Disconnect the wires from the ignition coils. This is easy to do; you just need to disconnect the connectors.
- Disconnect the camshaft position sensor wires.
- Disconnect the wiring harness from the absorber purge valve.
- Disconnect the brake booster hose from the intake manifold.
- Unscrew the clamp and disconnect the crankcase ventilation pipe.
- Unscrew the self-tapping screw securing the guide tube of the oil level indicator.
- We take out the dipstick along with the guide tube.
- Using a socket or a 10mm wrench, unscrew the nuts securing the intake module and the ignition coils of cylinders 1, 2 and 3.
- We dismantle the ignition coils of cylinders 1, 2 and 3.
- Now, you can unscrew the direct fastenings of the intake manifold to the cylinder head.
- Move forward and remove the manifold.
It is worth noting that installation of the intake manifold is carried out in the reverse order and does not require any additions or changes.
Video
Airbag installation
Installation is carried out in reverse order. While working, stay outside the pillow deployment area. When you first turn on the ignition, stand outside the vehicle and turn on the ignition with your hand under the steering column.
Have you experienced a knocking sound in your steering? Let's solve this problem together.
Good day! Status: Verified
Story
: (Can be skipped). The steering rack was repaired, with removal and partial disassembly (without removing the steering tips, or as they are called “steering rods”). So, after installing the rack back, in order to get the bolt into the slots of the steering wheel with the rack, I had to turn the latter by 30 degrees, which ultimately resulted in an uneven position of the steering wheel.
In fact:
The steering wheel is not level relative to the level position of the wheels. Correction options:1.
Rearranging the steering rack by pulling out the steering wheel mounting with the steering rack from the splines. (I advise you to do this only if you need to re-assemble the rail). Time costs: 2 days .2.
Perform wheel alignment and tell people to set the steering wheel straight. Cost: 1 hour.
1000 rubles 3. Turn the steering wheel 30 degrees.
Costs: 1 hour, +1 neighbor.
I made decision No. 3 and after that go to the alignment. Does anyone think he did the right thing? I’ll add that the car was re-shoeed with summer wheels that were balanced.
Tools:
socket wrench (head) “24”, screwdriver with a flat blade, hex key “5”. Work:
Using the instructions “Removing and installing the steering wheel of Lada Priora, VAZ 2170, VAZ 2171, VAZ 2172” we do this:
1. Take a screwdriver with a 5 mm hex head. We insert it into the hole in the airbag mounting in the steering wheel. Unscrew the 2 bolts (They cannot be removed from the passes).
2. As soon as the bolts are unscrewed, the cushion will move slightly relative to the steering wheel.
3. Carefully turn the pillow sideways. Inspect the connector fastening.
4. Pry up the green clamp of the control wire block (which is in the center).5. Now we pull out the entire connector from the mounting groove.6. The pillow is removed and put aside.
conclusions
Dismantling the intake manifold of a 16-valve VAZ-2112 is quite easy and simple. Of course, it’s worth understanding at least a little about the design of the main power unit, but if desired, any car enthusiast can remove this unit.
If you find an error, please select a piece of text and press Ctrl+Enter.
We recommend reading:
Similar articles
Similar articles
Privacy Overview
This website uses cookies to improve your experience while you navigate through the website. Out of these cookies, the cookies that are categorized as necessary are stored on your browser as they are as essential for the working of basic functionalities of the website. We also use third-party cookies that help us analyze and understand how you use this website. These cookies will be stored in your browser only with your consent. You also have the option to opt-out of these cookies. But opting out of some of these cookies may have an effect on your browsing experience.
Necessary cookies are absolutely essential for the website to function properly. This category only includes cookies that ensures basic functionalities and security features of the website. These cookies do not store any personal information.
Tips for use
A complete replacement and repair is a series of actions, for the implementation of which you need to have not only special knowledge, but also a considerable amount of free time, so if the car owner does not have either the first or the second, it is preferable to go to the nearest service station.
It is better to entrust steering rack repair to service station specialists
At the same time, in order not to become their regular guest, you should know some secrets for operating the steering rack, which can significantly extend its service life.
- We strongly do not recommend “jumping” your car on curbs, or driving at high speed on rails, since each such trip causes cracks to appear on the rack itself, as well as deformation of the shaft that is part of the steering mechanism.
- It is not recommended to frequently turn the steering wheel all the way. Of course, in this case it will be very difficult to demonstrate your maneuvering capabilities, but this will significantly increase the life of one of the most important parts of the machine.
- Carefully monitor the condition of the protective anthers, which must maintain their tightness. Replacing anthers is several times cheaper than replacing the entire rack.
- It is also worth monitoring the level and condition of the hydraulic fluid, since its decrease or change in color is associated with problems in the vehicle’s hydraulic system, which can result in rack failure.
From time to time you need to undergo a full maintenance, which will allow you to eliminate faults in advance, which can cause irreversible consequences, injury to yourself, your loved ones and other road users. And also, if problems are detected in the operation of the car, it is better not to take risks and go to the nearest car service center as quickly as possible.
Intake manifold removal process
Dismantling the intake manifold is carried out with the car cooled down for safety reasons. So, this operation can take about an hour and will require some knowledge of the car’s design, namely the injection system. So, let's consider the sequence of actions for dismantling the unit:
- We dismantle the throttle. To do this, it is not necessary to disconnect all the pipes and pipes; it is enough to disconnect the unit from the manifold and move it to the side. Of course, at the same time, it is still recommended to remove the throttle valve completely for cleaning.
- Disconnect the throttle cable from the intake manifold.
- Disconnect the wires from the ignition coils. This is easy to do; you just need to disconnect the connectors.
- Disconnect the camshaft position sensor wires.
- Disconnect the wiring harness from the absorber purge valve.
- Disconnect the brake booster hose from the intake manifold.
- Unscrew the clamp and disconnect the crankcase ventilation pipe.
- Unscrew the self-tapping screw securing the guide tube of the oil level indicator.
- We take out the dipstick along with the guide tube.
- Using a socket or a 10mm wrench, unscrew the nuts securing the intake module and the ignition coils of cylinders 1, 2 and 3.
- We dismantle the ignition coils of cylinders 1, 2 and 3.
- Now, you can unscrew the direct fastenings of the intake manifold to the cylinder head.
- Move forward and remove the manifold.
It is worth noting that installation of the intake manifold is carried out in the reverse order and does not require any additions or changes.
Video
When tightening doesn’t help and the mechanism needs to be changed
It’s worth thinking about replacing the rack when tightening it does not in any way affect the car’s behavior on the road, and also does not help get rid of the unpleasant knocking noise. A failed steering rack will cause significant play in the steering wheel. Moreover, it may begin to jam (this happens extremely rarely, but similar cases are known). If the rack begins to jam, then it is better to stop using the car, as this can lead to the most dire consequences.
You cannot do without a replacement even if after tightening it you managed to get rid of knocks and vibrations, but they reappeared later.
Intake manifold removal process
General view of the intake manifold. Dismantling of the intake manifold is carried out when the car has cooled down for safety reasons. So, this operation can take about an hour and will require some knowledge of the car’s design, namely the injection system. So, let's consider the sequence of actions for dismantling the unit:
- We dismantle the throttle. To do this, it is not necessary to disconnect all the pipes and pipes; it is enough to disconnect the unit from the manifold and move it to the side. Of course, at the same time, it is still recommended to remove the throttle valve completely for cleaning.
Location of the throttle valve on a VAZ-2112 - photo of an editorial car
- Disconnect the throttle cable from the intake manifold.
- Disconnect the wires from the ignition coils. This is easy to do; you just need to disconnect the connectors.
- Disconnect the camshaft position sensor wires.
- Disconnect the wiring harness from the absorber purge valve.
- Disconnect the brake booster hose from the intake manifold.
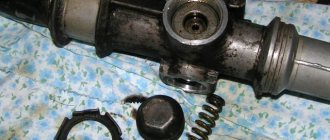
Unscrew the clamp and disconnect the vacuum brake booster tube - Unscrew the clamp and disconnect the crankcase ventilation pipe. Unscrew the clamp of the crankcase ventilation tube. After unscrewing the clamp, pull the tube out of its seat.
- Unscrew the self-tapping screw securing the guide tube of the oil level indicator.
Using a Phillips screwdriver, unscrew the oil level indicator guide tube - We take out the dipstick along with the guide tube.
- Using a socket or a 10mm wrench, unscrew the nuts securing the intake module and the ignition coils of cylinders 1, 2 and 3.
Unscrew the ignition coils and receiver - We dismantle the ignition coils of cylinders 1, 2 and 3.
- Now, you can unscrew the direct fastenings of the intake manifold to the cylinder head.
Unscrew the bolts securing the manifold to the block headMove forward and remove the manifold.
Pull the collector towards you and dismantle it
It is worth noting that installation of the intake manifold is carried out in the reverse order and does not require any additions or changes.
Complex car radio malfunctions
In this article we will try to answer the questions:
What is a complex fault?
How can error codes help when repairing car radios?
In the practice of repairing car radios, there are often cases when, in order to restore the operation of the car radio, it is necessary to find and eliminate not one specific malfunction, but several. It’s good if the breakdowns are not related to each other or relate to different electronic components of the car radio (for example: no sound - the amplifier chip is faulty; no disk reading - the laser reader lens is dirty).
What if both faults are in the CD drive? With such malfunctions, the process of diagnosis and repair becomes difficult, since, having eliminated one malfunction, we are immediately faced with the manifestation of another. Such a malfunction with several causes can be called complex.
Let's look at troubleshooting a complex problem using the example of repairing a Pioneer DEH-P3500MP car CD receiver. This is a case from real repair practice and its consideration will be useful for those who are interested in the topic of repairing car radios with their own hands.
The Pioneer car radio came to the repair table due to the lack of reading from the CD.
Upon external inspection, it was noticed that when the disk eject button is pressed, the process of ejecting the disk occurs slowly. The car radio was also heavily soiled with dust.
It is no secret that when heavily soiled, the optics are the first to suffer - the surface of the laser reader lens becomes covered with fine dust and this prevents the laser beam from focusing on the surface of the CD. In this case, there may be failures during playback (the sound “hiccups”), failures during the initial loading of the disc (“NO DISK”, “Error”), a long search for a recording when switching to another song. Do not forget that the cause of such a malfunction can be not only contamination of the optics, but also degradation of the laser diode in the optical unit.
For car radios, if any malfunctions occur, an error code appears on the display. Knowing the decoding of the error code, you can more quickly find the faulty unit and not waste time on diagnostics. So, for example, on the Pioneer DEH-P3500MP car radio in question, when turning on and loading a disc, the message “ERROR-11” appeared on the display. At the same time, spinning of the disk was observed - which means the spindle motor is in order.
ERROR-11
If you refer to the service documentation for this car radio model, the code “ERROR-11” stands for: – No beam focusing. Well, everything is quite simple here, as already mentioned, the violation of the focusing of the beam is associated with contamination of the car radio with dust.
In this case, it may be necessary to completely clean all mechanical parts of the car radio and its housing. Cleaning the laser reader lens is made more difficult by the fact that it is necessary to disassemble the CD mechanism and remove the laser reader from it. Read about how to disassemble the CD mechanism here and here (another type of drive).
After the laser unit is cleaned of dust, the operation of the car radio can be completely restored. But we are considering a complex malfunction.
Upon further testing the operation of the car radio on several MP3 discs, it turned out that when switching several songs forward or backward, a failure occurs. After a long and unsuccessful search for the desired track, the ominous inscription “ERROR-30” appeared on the car radio display.
What are cylinder head and valves? How are they connected?
So, valves in a car are an element of the cylinder head (cylinder head). It is this part that is responsible for the processes of fuel combustion in the engine and the removal of exhaust gases (see figure). Its components include:
- Cover to protect against mechanical damage.
- In the front part of the block there is a camshaft drive and a chain tensioner.
- Combustion chambers.
- Threaded holes for injectors and spark plugs.
- Holes for mounting inlet and outlet manifolds.
Rubber gasket that performs the sealing function. It is located in the place where the cover is attached.
At the top of the cylinder head there are also other parts, for example, camshafts, support washers, etc. The gas distribution mechanism (timing) is also located here.
Non-removable parts of the cylinder head include valve seats, which serve to ensure the tightness of the timing belt. Fixed parts also include valve guides.
A typical problem faced by VAZ 2112 car drivers is the need to replace valves. The reasons for the breakdown can be different; they often fail due to overheating of the car engine. To avoid this, experts recommend that while driving you periodically pay attention to such points as:
- Presence of knocking noise while the engine is running.
- Stopping the engine when starting the car.
- Reducing compression in cylinders.
The presence of any of these symptoms may indicate a valve malfunction.
Of course, the best solution in such a situation is to contact a service center. However, a difficult financial situation or lack of time often does not allow resorting to the services of professionals. Then you can try to fix the problem yourself.
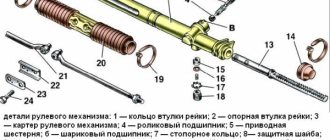
Steering rack device VAZ 2109
Steering rack device VAZ 2109
| 1 | tie rod end |
| 2 | ball joint tip |
| 3 | swing arm |
| 4 | lock-nut |
| 5 | traction |
| 6 | inner tie rod ends |
| 7 | bolts securing steering rods to rack |
| 8 | inner tie rod ends |
| 9 | steering gear bracket |
| 10 | steering gear support |
| 11 | protective case |
| 12 | connecting plate |
| 13 | locking plate |
| 14 | rubber-metal hinge |
| 15 | damping ring |
| 16 | rack support bushing |
| 17 | rail |
| 18 | steering gear housing |
| 19 | coupling pinch bolt |
| 20 | bottom flange of flexible coupling |
| 21 | upper part of the casing |
| 22 | damper |
| 23 | steering wheel |
| 24 | ball bearing |
| 25 | steering shaft |
| 26 | lower part of the casing |
| 27 | steering shaft mounting bracket |
| 28 | protective cap |
| 29 | roller bearing |
| 30 | drive gear |
| 31 | ball bearing |
| 32 | retaining ring |
| 33 | protective washer |
| 34 | sealing ring |
| 35 | bearing nut |
| 36 | anther |
| 37 | stop seal ring |
| 38 | stop nut retaining ring |
| 39 | rack stop |
| 40 | spring |
| 41 | stop nut |
| 42 | ball joint pin |
| 43 | protective cap |
| 44 | ball pin insert |
| A | mark on the boot |
| B | mark on the steering gear housing |
| C | ball joint surface |
| D | swing arm surface |
So, the VAZ 2109 has a fairly simple steering rack. It consists of a number of specific elements - these are:
- gear racks with 2 threaded holes - for securing internal end rods,
- support rings designed to ensure smooth sliding,
- drive gear with splined shaft,
- stop mechanism (adjusts the desired gap of the gear pair),
- a crankcase that combines all the parts and secures these parts to the car body,
- some elements designed to protect the unit in question from dirt and dust.
VAZ 2112 engine breakdowns and repairs
To solve the problem of preserving valves from deformation when the timing belt breaks, you can install pistons from a 124 engine, but in this case several horsepower is lost. Therefore, when using a belt drive, as the instructions indicate, you need to periodically listen to the sound that the drive makes. So:
Repair of valves for VAZ 2112 cars
First of all, it is necessary to disassemble the valve block of the VAZ 2112 engine:
- All parts that are attached to the cylinder head are removed: timing belt, pulleys, thermostat, rollers, intake manifold, exhaust pipe, all wires are disconnected.
- The valve cover is disconnected.
- A brush is put on the drill and the cylinders are wiped clean from carbon deposits until they shine, for which you need to turn the crankshaft twice.
- Using a special device that clamps the spring, the valves are loosened and removed with tweezers.
- Diamond chips are applied to the edge of the valve, as shown in the photo.
Applying diamond chips to the valve
- A rubber pipe is placed on the end of the guide valve and the valve is turned with both hands. Grinding must be carried out until a ring-shaped uniform mark is formed on the seat and valve plate.
Tip: To increase friction, the valve needs to be pulled down a little.
- Carefully remove any remaining lapping paste from the seat and valve.
Valve after lapping
- The valve is installed in place.
- If grinding does not help, the gap does not decrease, the valve must be replaced.
- Assembly is performed in reverse order.
Advantages of the VAZ 2112 with 16 engine valves
By installing 16 valves in the cylinder head, record engine power is achieved, whether it is turbocharged or naturally aspirated. So:
- to an increase in power. So the 8 valve VAZ 2112 engine with a volume of 1500 cc. centimeters has 77 horsepower, and the 16 valve engine in the VAZ 2112, which has the same volume, produces up to 90 horsepower.
- Changing the shape of the combustion chamber makes it possible to increase the knock resistance of the engine with 16 valves. This indicator is important, especially when low quality fuel is used.
- In such devices, the engine cooling system works better, which increases the reliability and durability of the unit.
- During the layout, the intake and exhaust tracts are spaced in different directions from the head on a VAZ 2112 with a 16 valve engine. This makes it easier to install the correct intake and exhaust manifolds.
Eight-valve engine tuning
To increase the power of an 8-valve engine, it can be equipped with a 16-valve cylinder head. To do this, the 8-valve engine of a VAZ 2112 is disassembled and parts are replaced:
- The bolts that attract the head to the cylinder block are changed; they differ from the 16-valve device in diameter and length. When installing the cylinder block and head from different engines, modified bolts are required. In this case, the bolts are used with a diameter similar to that of an 8-valve engine and a length similar to that of a 16-valve engine.
- To install a 16-valve head, you need to drill holes for installing bolts.
- The head gasket is also being finalized, its holes are also drilled out.
- Installing modified bolts increases engine reliability.
- Before installing the cylinder head, the cylinder block itself is assembled.
- The pistons of 16 and 8 valves are different. Therefore they need to be replaced.
- If the car is equipped with old connecting rods used on the VAZ 2108, then they need to be replaced with others from the VAZ 2110. This is due to the fact that the piston pin is pressed into the old connecting rods, and 16-valve pistons can only be mounted in a new type connecting rod.
- After assembling the motor, it is necessary to modify the wiring. This is due to the displacement of some sensors, which leads to lengthening of the wires for them.
Tip: To avoid additional expenses associated with replacing the engine control unit, you need to leave the old ignition module and connect it via high-voltage wires to the spark plugs.
- The last operation is to configure the VAZ 2112 16 valve engine control unit using a special program.
Tip: To increase power, you can install tuning of the exhaust manifold; its price is much lower than that of a standard 16-valve manifold with a catalyst.
This is how the VAZ 2112 engine turns out to have 16 valves. 8 valves are replaced by 16, which increases the power and reliability of the car.
Tuning a 16 valve engine
- The simplest and most standard way to increase the power of a VAZ 2112 engine is to replace the camshafts with STI-1 (standard receiver).
- Installation of a light ShPG from a 126 engine.
- Replacing the throttle valve to a diameter of 54 - 56 millimeters.
After such changes, the output power is 120 hp. Increase power to 150 hp. possible by:
- Installations of wide-phase camshafts.
- Using lightweight T-valves.
- Performing modifications to the cylinder head intake manifold.
To obtain increased power, you can install a compressor.
Installing a compressor on a VAZ 2112
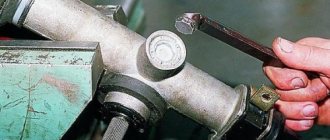
Assembly
Assembly is performed in the reverse order of disassembly. Before installation, all parts should be lubricated with the oil used in power steering. This is done to avoid scuffing during assembly and adjustment.
PTFE parts should be handled carefully; they are fragile and will burst from impact or excessive load. A socket head and an extension to it will help to carefully press in the bushings.
When inserting a gear rod, it must be centered according to the marks made before disassembly. After this, attach the drive shaft. Insert the pressure sleeve and washers behind it, tighten the adjusting nut to the required number of turns.
Manually turn the mechanism in both directions until it stops (twisting by the drive shaft). The rod should move without difficulty, this means that the assembly is done correctly. After this, the locknut is tightened. Tighten the mechanism rods and install the anthers.
Recommendations
Comments 81
Just like I bought a used car (2009) with power steering, the rack was knocking, a familiar master did something with it, charged 1,500 rubles for the work, but the knocking stopped. Then, a year later, on coarse gravel, a beating in the steering wheel began, I thought that the rack had really outlived its usefulness, but I tightened the steering cross and everything became as good as it had ever been.
Didn't the shaman give away the secret? After sprinting and splashing out the liquid, the knocking seems to have decreased, maybe it’s really the liquid
Honestly, no, he didn’t say, although I asked, the answer was not clear, apparently he replaced some crap, I don’t know, I won’t lie, but he drained the fluid and poured in a new one.
Didn't the shaman give away the secret? After sprinting and splashing out the liquid, the knocking seems to have decreased, maybe it’s really the liquid
The knocking may also be due to the crosspiece of the steering shaft, try tightening it
Perhaps, thanks! I'll probably try to revive this system. If the knocking doesn't go away, I'll throw it away.
I also thought about the same option, but as soon as I tightened the crosspiece, all the desire disappeared, even if the steering wheel rolls away, it would be better to fix it with a repair kit and I will continue driving. But I don’t see any point in doing such drastic alterations, you won’t drive this car all your life, well, 2-3 years, then sale, and with it a lot of wasted time and money.
You can’t make plans for 2-3 years in our country... so I try to maintain the car as if it will last my whole life. If the knock can be overcome without major damage, then of course there is no point in changing everything, I agree
Guys, change the oil, fill up with Pentosin! It helped me, I suffered myself
If it weren’t for the knocking rack, there wouldn’t even be a question of pentosyn!
if you are thinking of throwing it away, start with a tightening, it may help, but a terrible whistle appears if the system is not pumped. It all depends on finances; you can drive without an amplifier; it’s not fatal
Without any effort, I don’t think my wife will appreciate it, she travels often
Damn, I’m suffering from the same problem... I want to change it to an EUR and install a Conder... The rack is tired of knocking... I get a squealing sound when I turn the steering wheel all the way...
There’s so much hassle with Conder... I’ll never sign up again...
I agree, given the issue with the amplifier, the AC is more serious
There’s so much hassle with Conder... I’ll never sign up again...
Yes, the guys install here without any problems...it seems like you installed it yourself too.
I installed it... I can tell you if anything... but if someone else asks, I won’t take it... just like with pneumatic...
Damn, I’m suffering from the same problem... I want to change it to an EUR and install a Conder... The rack is tired of knocking... I get a squealing sound when I turn the steering wheel all the way...
I'm still leaning towards Euro
I changed the steering wheel to the power steering... everything worked the first time... you will need to buy a rack, the power steering itself, the drive shaft (it is longer than with the steering wheel)... and the wiring... if you ask me anything.
Thank you! Those. you can act with confidence. Generator bracket, belt others will be
Get another plug for the EUR. And a couple of contacts will need to be added to the tidy... but I still have the belt because... installed the air conditioner. You do everything according to schemes on the Internet...
What needs to be soldered in the device?
No! There, just in the connector itself, which is inserted into the tidy, you need to add a couple of pins (females).
This is how connecting the EUR will work, right? And you don’t have to touch the tidy
In general, yes... + you need good power with a power supply, it seems at 40A. from the battery. Near it there is a box with wires, you hook the wire there to the EUR
Yep, okay, thanks! I think I’ll clarify something else if I get around to it
I don't have a guru, I just installed the EUR. No problem. The rake is about 3-4 tyrov, but I have a new one, it’s been running for three years. So, it’s like... There’s a lot to change for you on the EUR. But the EUR is many times better than the power steering.
The EUR itself, the rack and wires, everything seems to be
Promval. Generator 115 A costs?
I don’t even know, I haven’t climbed there yet. Need 115?
EXTREMELY desirable. I didn't have 80a. I set it to 115 with priors.
from the factory 80A, EUR, air conditioning... AvtoVAZ without a head, I can’t drive with air conditioning, there’s not enough generator power, the car doesn’t drive, the car is late 2010.
Well, I ran into this problem. I have the eleventh. 80a native gene. There weren’t really any amplifiers for the sub or any other consumers. All this was taxied by 80a, well, the three-level pH was still standing. Then I set the EUR and that’s it, drawdowns began. He began to suck. I tried to modify the gene to 90a, but it didn’t help. I installed 115 with priors from disassembly of the gene. Everything became great. It’s not so much a matter of power or current, but rather a matter of the design of the pH of new generators. I now have an EUR and two amps in the system, the gene copes, 14.2 - 14.4 is stable. Well, sometimes you put the sub all the way down, and it might drop to 13.9)).
The question is, what brand of gene? It’s not visible there by chance, right now I’m thinking about buying a 115A because mine is completely dying, I don’t want to be stupid in the winter
Anyway, in my opinion they don’t install others from the factory, well, except for rare exceptions with Boches. I have both my own Kzate and this one, the factory Kzate was removed from the Priora.
Everywhere I see some kind of startvolt or something, China in a word. I found an AvtoVAZ generator in the BBC, but it’s from Pramo at 115A, so I’m sitting here looking for it in the disassembly, but it’s still deaf.
I don’t know anything about start volts. Pramo, this is a company that also supplies all sorts of spare parts to the assembly line, but I haven’t seen generators on new cars, so I won’t say anything either. But I can give one useful piece of advice. Whichever generator you choose, take a look and see if there are diode bridges and regulators for sale for it. So as not to buy a disposable unit.
Thanks, I've already thought about this
from the factory 80A, EUR, air conditioning... AvtoVAZ without a head, I can’t drive with air conditioning, there’s not enough generator power, the car doesn’t drive, the car is late 2010.
What are swirl flaps used for?
As you know, it is not the fuel itself that burns in the cylinder, nor the air. The air-fuel mixture is burning. And the more homogeneous this mixture is, the better it burns, the higher the efficiency and economy of the engine. Accordingly, the question arises: what is the best way to mix this very fuel in the cylinder? Nozzles that supply fuel not with one large and thick stream, but even with a dozen small streams protrude from one side. And on the other side we have air supplied. And if this air is applied with force, and even at a tricky angle, you get a whirlwind. Which will mix everything perfectly and burn just as well.
But then the engineers faced a question: if they make the hole for the air supply narrow, then at low speeds the vortices will be excellent. But when the speed increases, too much air deficiency will form and too much energy will be spent on its supply. If you make the hole wide enough to operate at medium and high speeds, then there will be no swirl at low speeds, and the engine efficiency will again decrease.
Therefore, for optimal engine operation in all modes, the air supply was divided into 2 parts. In one part there are no dampers, and it is always freely blown, while the second part has the same damper that is completely closed at low revs and opens wider the higher the revs.
The figure shows a diagram of the operation of swirl flaps at low speeds. Air is supplied through only one channel. The second channel is completely closed.
As the engine speed increases and the engine requires more air, the second damper gradually opens slightly, controlling the strength of the air flow. A fully open throttle at high speeds is shown in the figure below:
The position of the swirl flaps is controlled by an integrated sensor and a corresponding drive that changes the angle of inclination of these flaps.
Main signs of pollution
While driving a car, various gases, traces of oil and dust particles enter the outer and inner walls of the throttle valve, which the air filter is not able to retain. This can cause deposits on the walls of the damper and lead to disruption of the normal functioning of this element of the intake system.
Typical signs of a clogged throttle body are:
- Difficulties in engine operation at idle, when it stalls or the speed fluctuates.
- Unstable starting of the internal combustion engine when it starts with difficulty.
- The appearance of car jerking at a speed of less than 20 km/h when pressing the accelerator pedal.
- Noticeable increase in fuel consumption.
The main causes of damper contamination include:
- Poor quality gasoline. This factor is considered the most common cause of contamination that requires cleaning the throttle valve. The reason for the low quality of fuel may be various impurities and additives added to increase the octane number of gasoline and ultimately precipitate. These contaminants enter the throttle and turn into carbon deposits, which interfere with the operation of the unit.
- Microparticles of motor oil that enter the assembly structure through the ventilation system, as well as dust particles that penetrate from the atmosphere into the air duct. These elements mix with each other and interfere with the normal movement of the valve, and ultimately disrupt the operation of the engine as a whole.
- A clogged fuel filter causes throttle contamination due to untimely replacement of this element. Once dirt elements from the filter element get onto the damper, it can no longer move as intended during the production of the car. Accordingly, when the damper is opened slightly, a small amount of air enters, which is why the fuel does not even ignite.
- Excessive air dust also often causes throttle contamination. Dust can enter the damper through a damaged air filter or faulty air duct, thereby interfering with its normal operation.
Problems in the operation of the hydraulic booster
All breakdowns of the Priora power steering, as well as the causes and methods of eliminating them, are listed in the table:
Malfunction
Remedy
| When turning the steering wheel, you feel a kickback (shocks in the opposite direction) | Worn or loose pump drive belt | Replacing or adjusting belt tension |
| It takes a lot of effort to turn the steering wheel. | The pump belt is worn or loose. Low fluid level in the reservoir. The fluid reservoir filter is clogged. Low pump pressure or air lock in the system. Insufficient engine idle speed. | Adjust or replace the drive belt. Add liquid to the reservoir. Replace or clean the filter. Replace the pump. Remove the air lock. Adjust idle speed. |
| More effort is required to rotate the steering wheel in the middle position | Pump or steering mechanism faulty | Check, repair or replace the pump. Find and fix the steering mechanism problem |
| More effort is required to turn the steering wheel to one side | The pump has failed | Pump repair or replacement |
| Steering is unclear | There is not enough fluid in the reservoir or it is leaking. Air in the power steering system. Resource development. | Add fluid and fix leaks if any. Remove the air lock. Check steering components and replace if necessary. Replace tires. |
| It takes a lot of physical effort to quickly turn the steering wheel | The belt tension has weakened. Air in the system. The pump is faulty. Failure of parts of the steering mechanism. Floating idle speed. | Pull the belt. Remove the air lock. Replace the pump if it cannot be repaired. Check and eliminate faulty parts of the steering mechanism. Adjust idle speed. |
| Noise during power steering operation | There is not enough liquid in the tank. The liquid is discharged through the safety valve (a whistle is heard when the steering wheel is turned to the extreme position). | Add fluid and fix the leak. Remove the air lock. Check the pump pressure, repair or replace the part. |
| Steering wheel vibration | Airlock. The wheels are out of balance or the tires are damaged. | Remove air. Balance wheels or replace tires |
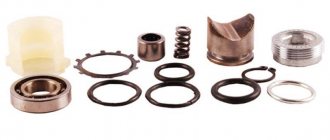
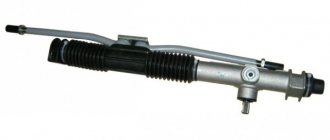
Repair kit
In a Priora with an EUR, a rack from Kalina was installed with catalog number 11183-3400010 20. Therefore, the repair kit must be purchased specifically from Kalina.
Steering rack number
The repair kit includes a large number of parts necessary for repairs.
The price of a new rack starts from 5,000 rubles and higher, depending on the manufacturer, but new does not mean good, and the cost of a repair kit varies from 500 to 1,000 rubles, which is almost 10 times cheaper than a new rack.
RESULT
Bottom line: to lower a car, it is best to use short-travel struts. Such racks are the most suitable option for everything in terms of price and quality.
It should be noted that with a measured lowering of -120 mm, it is necessary to saw the right spar. Due to the very low lowering, the right-hand drive wheel will touch the car body. The photo shows how the drive rests on the car body.
Also, when carrying out any actions, it is imperative to have the wheel geometry done at a service station upon completion of the repair.
We hope our article was useful to you.