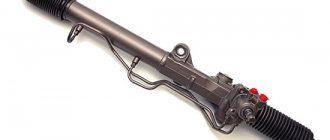
Steering mechanism of a VAZ 2112 car
An important part for controlling the movement of a car is the steering mechanism. Its main unit, the steering rack, transmits the force that the driver applies to the steering wheel through tips and rods to the steering levers, connected through axles to the steered wheels. How safe the vehicle will be on the roads depends on the good condition of all its elements. Therefore, it is very important to timely repair the VAZ steering rack. This article suggests that you familiarize yourself with the causes of malfunctions and how to fix them yourself.
Table of causes and corrections for VAZ 2112 steering rack faults
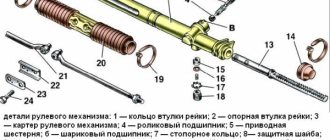
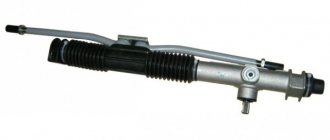
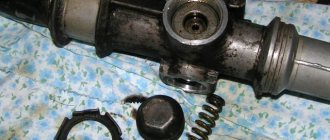
A drive gear meshes with the steering rack and is mounted in the crankcase on bearings.
A stop made of cermet, sealed in the crankcase with a special rubber ring, presses the rack against the gear with a spring. The locking ring prevents the nut from unscrewing. The assembly of the assembly is facilitated by marks located on the boot and the steering mechanism housing.
| Cause of breakdowns | Remedy |
| The free play on the steering wheel has increased | |
| The nuts securing the ball pins of the rods have become loose | The presence of a cotter pin is checked, the nuts are tightened and cotter pinned. |
| The clearance in the ball joints of the rods has increased | The rod ends are changed |
| The rubber-metal joints of the rods are worn out | New rods or rubber-metal joints are installed |
| There is a large gap between the nut and the rack stop | Worn parts are replaced and the steering mechanism is adjusted |
| Noise or knocking noise in the steering wheel | |
| The nuts of the ball joints of the rods are loose | Nuts are checked and tightened |
| There is a large gap between the nut and the rack stop | Worn parts are replaced, the steering mechanism is adjusted |
| The steering mechanism is loose | The nuts are tightened to fix the steering mechanism |
| The fixing bolt on the gear shaft of the lower flange of the elastic coupling has become loose | The bolt holding the lower flange of the coupling is tightened |
| Steering wheel turns hard | |
| Damaged upper suspension strut bearing | Replace the support assembly or bearing |
| Defective support sleeve or rack stop | New parts are installed, lubricant is added |
| The tire pressure on the front wheels has decreased | Normal pressure is established |
| Malfunctions in the parts of the ball joints of the rods | Damaged parts are replaced |
| Damage to elements of the telescopic suspension strut | Repairing or installing a new suspension strut |
| Damaged bearings on the upper steering column shaft | Bearings are changed |
| The column is not fixed in the desired position | |
| The adjustment lever pinch bolt turns | The lever with the adjusting sleeve is unscrewed from the bolt and the protrusion of the bolt is installed in the slot of the guide plate on the steering shaft bracket |
| The adjustment lever rests on the facing casing | The facing casing, lock washer, and lever are removed. The sleeve is tightened, the lever is put on in the desired position. The reliability of fixation and operability of the tensioning device is checked, the lock washer and the facing casing are installed |
Basic faults
- Most often, the rod, seals, and, less often, the slider wear out in the dozen. For this reason, knocking occurs in the suspension, which is transmitted to the steering wheel. Wear on ball joints can also result in knocking noises.
- It also happens that the unit begins to leak, if we talk about hydraulics. Leaks are indicated by oil stains that invariably remain on the asphalt after a long period of parking.
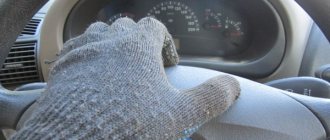
- Another most common malfunction is the so-called tight steering wheel. It also happens that the steering wheel turns only in one direction, this is a symptom of a serious defect in the component parts.
But why does the steering rack fail? As a rule, such problems come to reckless drivers, lovers of high speeds and bad roads.
Sharp braking, contact with holes and potholes, as well as wear on the boots and dirt getting into the system, all this will certainly lead to malfunctions that require serious repairs or complete replacement. These problems can be avoided by treating your car more carefully.
Do not drive it at all speeds and choose more comfortable roads, and, most importantly, under no circumstances leave the car in the cold with the wheels turned out: in this case, the hydraulics instantly fail.
The steering rack of the VAZ 2112 creaks - what to do?
Carrying out diagnostic work that will allow you to determine the causes of the squeak should begin with identifying the specific place from which the squeak is heard when turning the steering wheel. To do this, you need to put the car in a hole and ask someone to turn the steering wheel, while listening to sounds from under the car to determine the location of the squeak. Having decided which element is creaking, you can move on to repairs.
It is quite simple to determine the creaking of the steering column by the characteristic vibration, which will also occur when the steering wheel rotates. Most often, the steering column clutch squeaks, and this problem is typical for cars that were unsuccessfully restored after a serious accident. This problem, if the noise is not strong, does not affect the quality of the steering mechanism, so you can continue to operate the car.
The situation can only be corrected by replacing the steering column. Also, a squeak can be heard from the steering rack and column joint if they are poorly adjusted or there is severe wear. Depending on the car model, this problem can be solved in different ways. Most often it is possible to adjust the mechanism.
We repair it ourselves
If you have to repair the rail yourself, it is worth noting that this is a rather complex process that requires a certain skill and knowledge. Of course, DIY repairs will cost less . The work will also require the help of a partner.
Tools and consumables
Required:
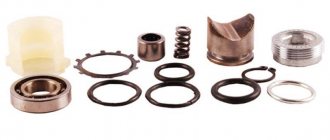
- Repair kit.
Steering rack repair kit - Octahedron.
- Head at "15".
- Jack.
- Mount.
- Head at “10” and “13”.
- Lubrication.
- Parts cleaner.
Dismantling the rack on a VAZ-2112
We have already written in more detail about replacing the steering rack on a VAZ-2112.
First, you will need to remove the battery, the platform under it and the air duct in the engine compartment. Next, you will need to unscrew the clamps that secure the rail to the body. The difficulty of this work is that if you unscrew it carelessly, you can damage the studs , which are quite difficult to replace.
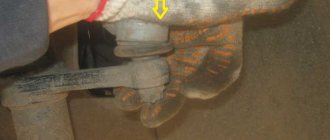
Removing the tie rod ends from the steering rack
After this, you should unscrew the bolts that hold the rod ends. Next, the flange bolt securing the rack is unscrewed. After this, you need to fold the rail away from the body. This will require a pry bar or crowbar. You can pull out the mechanism through the hole in the mudguard. A jack will be needed here.
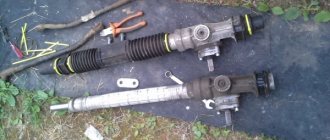
Steering rack VAZ 2112 how to disassemble and replace faulty parts
If you decide to repair the steering rack at a service station, expect that you will have to pay about 300 rubles for the simplest repair kit. A complete set, including bearings, will cost about 500-700 rubles. The entire filling, including the rail, will cost 1,500 rubles.
It is advisable to know the markings of the rack before purchasing a repair kit, since they may differ depending on the configuration and year of manufacture of the “tens”.
The cost of repair work, depending on the service station, will be 1000-1500 rubles. If you don’t want to overpay for the work, you can repair the rack yourself
- Remove the steering rack assembly.
- Cut the clamps securing the boot (cover) of the steering mechanism.
- Unscrew the thrust nut of the rack (octagonal special wrench 17), remove it from the body.
- Remove the rubber plug from it. Use a screwdriver to remove the retaining ring and spring.
- Lightly tap the steering housing on a wooden block to knock out the rack stop (piston) and remove it along with the seal.
- Remove the boot and drive gear seal (slotted screwdriver).
- Remove the lock washer (slotted screwdriver).
- Unscrew the nut securing the drive gear bearing (octagonal special wrench 24 with a central hole with a diameter of at least 18.5 mm).
- Remove the rack drive gear with bearing from the housing.
- Remove the rack from the housing.
- Pull the support sleeve out of the body by prying it with a slotted screwdriver.
- Remove the retaining ring from the drive gear shaft. Check the bearing for play. If there is one, use a bearing puller to remove the ball bearing from the shaft. Install a new one in its place in the same way.
- Remove the needle bearing from the housing by drilling two holes with a thin drill (2 mm) on the back of the housing and knocking it out using a thin rod. Seal the resulting holes with “cold welding” or “fast steel”. As a last resort, the bearing can be broken using a narrow chisel (not recommended!).
- Liberally lubricate the seat, install a new needle bearing into it, and press it into place by lightly tapping its housing.
- Install a new support sleeve from the repair kit, cut its rubber O-rings, and remove unnecessary fragments.
- Fill the inner surface of the rack body with special lubricant (Fiol-1 or equivalent).
- Insert the rail into the housing.
- Reinstall the drive gear and bearing. Secure it with a nut and install a retaining ring. Place a new boot on the gear shaft.
- Replace the new stop with the new seal. Secure it with a locking ring. Place a spring in its hole. Tighten the thrust nut.
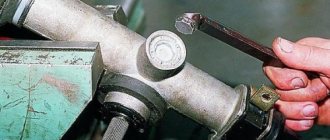
- Adjust the rack by first tightening the stop nut all the way and then loosening it 30 degrees. Plug the nut hole with a rubber plug.
- Place the boot on the rack body and secure it with clamps.
- Install the rebuilt structure on the car.
After assembly is complete, check for vertical play in the steering shaft. Drive carefully while assessing the steering's effectiveness. Pay attention to extraneous noise in the area of the rack. If everything is fine, go to a service station to adjust the wheel alignment.
Replacing the steering rack on a VAZ 2110, VAZ 2111, VAZ 2112
Welcome! The steering rack is responsible for turning the wheels of the car; inside the rack there are mechanisms that make it not so difficult to turn the wheels with the help of the steering wheel, but it is comparable to if you turned the wheels by hand; in addition to the steering rack, the steering rack is also responsible for the easy rotation of the wheels power steering, the power steering can be Electric or Hydraulic, on cars of the tenth family only power steering was practiced, on cars of Ukrainian assembly (Bogdan) an electric power steering was also installed, we should immediately note that removing the steering rack with a hydraulic power steering will be more difficult than without it, you will have to tinker a little, so immediately tune in to this and take into account the fact that a steering rack with power steering costs much more, in addition, when buying a new rack, try to take a new one assembled so that all the tips are there, and so on, if you do this and don’t save a little If you spend a little money, the installation will go much faster and you won’t even have to bother with the rack.
Note! To remove this part, stock up on: Blocks of wood, you will need to put the front part of the car on them and remove both wheels from the front, if you have a pair of jacks, then you can leave the car hanging on them, but it can simply fall off the jacks, all the keys that You also have a large flat-head screwdriver that will come in handy, as well as pliers and a mounting spatula with a hammer!
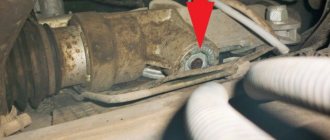
Where is the steering rack located? The rack is located on a shield that separates the engine compartment and the interior of the car, the rack is secured using two metal clamps that secure it on the sides, through a small hole in this shield, the rack goes into the passenger compartment where it connects to the steering shaft, you can understand everything schematically in more detail, You can look at the photo below, in which everything is indicated, but only that very shield (Partition) is not there, and the rail is indicated under the number 18.
When should you change your steering rack? A sign that the rack needs to be replaced is a characteristic knock that will still transfer to the steering wheel, as well as play in the steering wheel, if all these symptoms do not disappear by adjusting the steering rack (How to adjust the rack, read “in this article”), then In this case, the steering rack needs to be replaced.
Tools and materials for work:
- Socket head for fifteen, nineteen, twenty-four;
- Power driver;
- Two jacks;
- Ratchet driver;
- Wheel bolt wrench;
- Wheel chocks;
- Socket wrench for ten, thirteen;
- Pliers;
- Wire cutters;
- Extension;
- Hammer;
- Five hexagon;
- Steering wheel pin remover;
- Key for adjusting the steering rack;
- Wire brush;
- Rubber hammer;
- Mounting lever;
- Crosshead screwdriver;
- FIOL lubricant;
- Slotted screwdriver;
- Penetrating lubricant.
How to replace the steering rack on a VAZ 2110-VAZ 2112?
Note! Before buying a rack, you should know something, firstly, before you buy a new rack, look at the markings on the old one and buy according to it, racks are generally interchangeable, but to avoid problems, buy everything according to the index and by the way, if If you have power steering installed, then take the new rack from the power steering!
1. Before you start work, unscrew the wheels so that they are pointing towards the front, then hang the front part and remove both front wheels from the car, but before that, carefully secure your car so that it does not fall to the ground, but To do this, you will need to put it on the handbrake, put wheel chocks under the rear wheels just in case, and most importantly, the area on which you are going to do the work must be flat and must be asphalt, in case the car does fall, place the wheels under it in advance ( So that he falls on them).
2. Let's go to the salon, while there, you will have to use two keys (one bolt must be kept from turning) to unscrew the nut of the bolt that compresses the clamp clamp, with the help of which the propeller shaft is held on the splines of the steering rack, after the nut is unscrewed, and the bolt is removed (see small photo), insert a powerful screwdriver into the slot (where the bolt was, indicated by a blue arrow) and with its help, unclench the clamp so that the driveshaft can easily come off the steering rack splines.
3. Now, on both sides, pull out the steering tips from the holes into which they go, we will briefly explain how to pull out the tip using the example of the right side, in general, take pliers and use them to pull out the key (This is a kind of metal wire), as soon as it is pulled out, unscrew the nut and using a puller, press the tip out of the hole and that’s it, if you need pictures and you have no idea what a steering tip is, then in this case read the article: “Replacing steering tips”, it says everything in detail.
4. When both steering tips are removed from the holes, proceed to unscrewing the bolts that secure the rods themselves (the steering rods are located on these rods), they are directly screwed to the steering rack in the central part (To remove the bolts, pry up the locking plate with a screwdriver, it is not allows the bolts to unscrew spontaneously) by turning out one bolt at a time, completely remove the rods from the car (you need to pull them out through the wheel arches) and as you already noticed in the small photo, when removing the rod, the person still holds the connecting plate, do not lose this plate when turning out the last bolt , always hold this plate with your other hand.
Note! When the rods are removed, check their silent blocks (These are rubber bands, you will see them immediately, because the rod itself is metal and the rubber part is just silent blocks), their rubber should not be damaged, cracked or have signs of age, otherwise In this case, replace the silent blocks with new ones (see “Replacing silent blocks in rods”) and by the way, worn silent blocks can cause play in the steering, so keep this in mind!
5. And finally, unscrew two nuts on each side that secure the steering rack to the shield, remove the metal clamps and through the arch, remove the rack completely from the car, you can see all this in more detail by looking at the photos below:
Note! This is how absolutely all the racks that were installed on the VAZ 2110 family are removed, while the racks with the power steering are removed in a slightly different way, before starting work you will need to pump out the liquid from the tank with the power steering with a syringe, disconnect the hose from the tank and then put it in any bottle, not when starting the car, turn the steering wheel until all the fluid has drained from the hose, for more detailed instructions on how to remove the rack from the power steering, read the article: “Replacing the steering rack on a Lada Priora” and by the way, when reinstalling it, make sure that the steering rack is installed to the splines according to the marks (For more details about this, read the article: “Replacing the rack on Kalina 1”, point 1) If you need to change the EUR on a Priora?
VAZ 2112: DIY steering rack repair
Steering mechanism of a VAZ 2112 car
An important part for controlling the movement of a car is the steering mechanism. Its main unit, the steering rack, transmits the force that the driver applies to the steering wheel through tips and rods to the steering levers, connected through axles to the steered wheels.
How safe the vehicle will be on the roads depends on the good condition of all its elements. Therefore, it is very important to timely repair the VAZ steering rack.
This article suggests that you familiarize yourself with the causes of malfunctions and how to fix them yourself.
Results
As you can see, the work is quite simple and does not require special knowledge and skills. The main thing is to remember the instructions for carrying out the work and use them in the required sequence.
If you do this kind of work yourself once, then there will be no hassle with it in the future.
Home » Repair » VAZ 2110 – 2112 » One of the most important systems on which vehicle control directly depends is the steering mechanism. The steering mechanism has a complex structure, the main component of which is the steering rack.
It is she who transmits force from the steering wheel to the wheels and determines the movement of the car. Like the car itself, the steering rack has gone through a long path of development and modernization.
From simple to complex, from elementary to perfect, today this unit is an interconnected chain of levers, rods, tips, the coordinated work of which allows you to achieve ideal, comfortable driving.
But, like any mechanism, the steering rack is subject to wear, this problem especially applies to the tenth VAZ model. We’ll talk further about how to replace the steering rack on a 10 by yourself.
So, the steering rack is the power unit of the control mechanism, which transmits vibrations coming from the steering wheel to the drive wheels. Do not confuse the rack with the gearbox.
The rack includes the following parts:
- stock;
- slider;
- seal;
- tips;
- traction;
- turning levers;
- fasteners.
All elements are interconnected with each other, but if at least one of them goes out of working order, the entire mechanism stops working. It is unacceptable to drive with a faulty steering rack, since it determines the process of driving a car, and loss of control over it invariably leads to an accident. That is why it is important to identify faults in a timely manner and remove them.