It is important for every driver that the car obeys him well in any situation. One of the main systems of a car is the steering system.
Therefore, every breakdown of the steering system leads to a deterioration in driving quality, and possibly even to an accident.
It is for this reason that it is important to always monitor the condition of the steering system and promptly carry out its repair and maintenance. Today we will talk about the VAZ 2114, or more precisely about its steering rack.
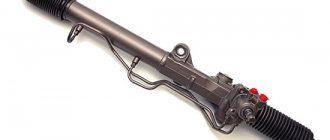
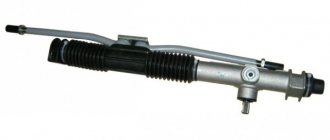
The steering rack itself is a long rod with attachments and two outgoing parts. The steering rack is responsible for the handling of the car and also for the safety of the driver, so if it breaks down, you should immediately begin repairs.
You can understand that the rack requires replacement by the following signs: when you turn the steering wheel, you hear a knock and play appears. In this case, the knocking sound most often appears only when driving; if it is heard when turning the steering wheel while parked, then the steering rack definitely requires immediate replacement - this means that the breakdown has started and the rack is in critical condition.
Malfunctions
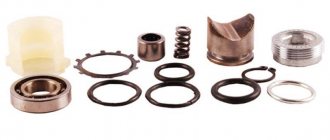
Often the rack does not require complete replacement. The fact is that when knocks and backlashes appear, it is often possible to make a fairly quick repair; all that is required is the presence of an inspection hole. To do the repair yourself, you need to purchase a repair kit for the steering rack, which is sold in three versions - from basic to advanced.
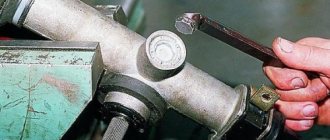
The very first step will be to tighten the steering rack. It is enough just to tighten the adjusting bolt using a 17mm wrench.
After this, it’s worth taking a test drive and checking whether there is any play or knocking left. If there is no more play or knocking, then you can finish working on the steering rack for now. If nothing has disappeared (or, for example, the play has disappeared, but the knock remains), then more extensive work will be required.
The part itself costs about three thousand rubles. On average, the salon will charge 1500-2000 rubles for its replacement. Thus, in general, the entire replacement will cost about 5 thousand rubles.
Lifting and adjustment
As the practice and experience of VAZ 2114 owners shows, in case of problems with the struts, they can most often be repaired. The only condition. the presence of an inspection hole at your disposal.
First step. tighten the rail. But how is this done? To do this, simply turn the adjusting bolt. Adjustment is carried out with a 17 mm key.
When tightening the bolt, go into the car and drive a few kilometers to see if there is any knocking or play. If these symptoms of the problem disappear after you have raised and adjusted the steering rack, the repair is complete.
But this doesn't always happen. The knock may remain and the game may disappear, or vice versa. In any case, if at least one sign remains, you will have to begin a full-fledged repair yourself. Now you can find a number of useful ones that detail the procedure for restoring this node. Listen, it will be useful for you.
DIY repair
First you need to stock up on the necessary set of tools:
- repair kit for the steering rack (as mentioned above, they are sold in three variations);
- bearings;
- lubricant;
- necessary keys and screwdrivers;
- We should talk separately about repair kits.
Minimum basic sets. Such sets usually have only 4 elements:
- bearings;
- nuts;
- washers;
- fluoroplastic bushings.
This set can only fix the simplest faults. Medium priced sets. Here, in addition to the things described above, there are shafts and other bearings. Expensive sets. There may already be entire slats here.
When purchasing, please note that you are purchasing a set specifically for your car (the brand is indicated on the package). Sometimes it happens that a car has a non-original rack, then it is necessary to purchase a repair kit for the car from which this rack was removed.
Actually, any repair must begin with disassembling the steering rack. Often the problem is just a small bearing, and the entire rack does not require replacement.
Work order
- Removing the steering rack
- Unscrew the thrust nut using a 17mm hexagon.
- Remove the thrust nut, retaining ring, rack stop and spring.
- Remove the drive gear shaft boot, and then the retaining ring.
- Unscrew the nut holding the steering gear bearing. It goes quite tight - this is normal.
- Press out the drive gear shaft.
- Remove the rail itself from the housing.
- Remove the support sleeve, then lubricate it and insert it into place (this will need to be done with force)
- Replace all bearings. Some will be difficult to get (very difficult), so you can simply chop them with a chisel and pull them out with tongs.
- Inspect all parts for defects, replace broken ones with new ones (from the repair kit), lubricate all moving parts.
- Reassemble the rail in reverse order.
- That's all, if you did everything correctly, then the rack works with a bang. All that remains is to put it in place.
Putting the rack in place
- First, you need to enlist the help of a partner; without him, you won’t be able to do everything quickly and accurately.
- We install the rail in the same place and attach the fasteners.
- With the help of a partner, we insert the rail into the spitz.
- To loosen the clamp, use a chisel.
- We tighten the mounting bolt.
That's all, now the rack is in place, then we put the wheels on, tighten the nuts and remove the car from the jack. Now you know everything you need to repair your steering rack in a timely manner. The main thing to remember is that you shouldn’t delay repairs.
The steering rack is the connecting link between the front wheel pair and the steering wheel of the car. The condition of this unit determines the ride quality and degree of controllability of the VAZ 2114. The service life of the steering rack is long, since there are quite a few parts in this unit. This material describes the main malfunctions of the mechanism, as well as methods for eliminating them. Due to its simple design, even a novice motorist can repair the rack.
Good to know! Despite the strength of this unit, steering racks in foreign cars (even budget ones) last longer, and their control is softer. The main difference is the hydraulic booster, which is not included in the design of VAZ 2114 cars.
Disassembly
If you decide to carry out maintenance yourself, then you should disassemble it in order:
- We cut off or bite through the plastic clamps that are located on the sides of the protective casing. We remove it and inspect it for breaks or cracks.
- The side protective caps are also attached to the clamps. We carry out a similar procedure and remove them.
- Unscrew the adjusting screw with a 17 octagonal wrench.
- Then we take out the sealing and retaining ring, the spring and the stop. We check the emphasis for scuffs and other damage, since its condition directly affects its performance.
- Now we need to remove the steering gear boot. It sits tightly on the body and does not have any special fastenings.
- We take out the lock washer and unscrew the bearing nut. Then remove the o-rings. After the steering shaft.
- We check the condition of the bearing. In case of wear, we knock it down using an extension or a gentle blow with a hammer. We press in the new bearing using a yew or a press.
- Then we check the condition of the needle bearing. We take it out with a screwdriver, carefully lifting it up.
- We take the rail itself out of the body. We clean off the old grease and inspect the condition.
- The last step is to remove the bushing. To do this, use a screwdriver to move it from its seat and after that it can be easily removed.
Main malfunctions and their symptoms
If the following symptoms occur, you should diagnose the steering rack:
- The steering wheel gets jammed while the car is moving, causing difficulties in steering – the steering shaft is damaged or displaced; among auto mechanics this phenomenon is called “biting”.
- A knocking sound appears in the chassis - this requires repair of the rack elements.
- The car pulling to the side, the car wobbling at high speed are signs of play in the steering mechanism. Because of this defect, it is impossible to perform a wheel alignment.
Depending on the degree of damage, the problem can be solved by repair (installation of a factory repair kit), replacement of the entire assembly, or adjustment. This material contains instructions for adjustment and repair.
Typical breakdowns
Torn steering rack boot
There are several most common reasons why the unit may need to be replaced:
- The rail has exhausted its service life;
- The vehicle is regularly driven on uneven roads;
- Having turned the steering wheel to its extreme position, sharp accelerations are often made;
- The presence of mechanical damage due to collisions with potholes, accidents, etc.
Drivers should pay attention to the behavior of their car, which itself may indicate that the steering is out of order. This may manifest itself as follows:
- The rack knocks when turning the steering wheel;
- The steering wheel jams and turns to the sides with some difficulty;
- There is knocking and vibration during travel;
- The play at the steering wheel has increased;
- The wheel alignment is disrupted. This can be determined by uneven wear of the rubber.
https://youtube.com/watch?v=vOAgjW9-EX4
Preparatory work
If you want to repair the steering rack yourself, then you should purchase the following spare parts:
- Tubes for rack.
- 2 tips - they already come with nuts.
- Repair kit.
- 2 silent blocks.
- Cover for the rack.
Repair requires replacement of the above parts even if only the tubes are damaged. The wear of elements must occur simultaneously, so it is not recommended to skimp on parts. You will also need bearing grease, clamps, White Spirit, and a can of WD-40. It is worth preparing rags in advance, as you will need a lot of them. As for tools, repairs require sets of wrenches, screwdrivers, socket heads, and wrench extensions. Special tools include special wrenches for the adjusting nut, as well as a puller for tips.
Advice! When the defects in the operation of the steering rack are minor (for example, knocking), then it is better to start with adjustment. If the adjustment does not help, then you should move on to diagnostics and repair.
Before starting repairs, it is recommended to carefully study the structure of the steering rack, which is described in detail in the VAZ 2114 operation and maintenance manual. You should first apply WD-40 to the four nuts that secure the steering rack to the car body. You also need to shed the only tightening nut and the threads of all the tips. After 3-4 hours the work must be repeated. Repairs can only begin the next day.
Necessary tool
For self-repair you will need the following tools:
- A set of spanners or sockets for faster removal of suspension parts;
- A prybar or special pullers for removing steering tips;
- Lubrication.
Replacing the VAZ 2114 rack is possible without a lift. It is enough to place logs under the front of the car or use a mini overpass. The presence of a hole simplifies the work, but for quick repairs, you can come up with other ways to hang the front of the car. To understand how to remove the steering column on a VAZ 2114, you should first study its location diagram, and then proceed to step-by-step disassembly and removal of the faulty unit.
Rail repair
Repairing the rack must begin with its adjustment. Most likely, after adjustment, all knocking will disappear. If it doesn't help, you'll have to disassemble it and change parts.
Adjustment
You can adjust the VAZ 2114 rack as follows: directly on the car or by removing it. The second method is needed after repairs. The car must be parked on a viewing hole; alternatively, a lift can be used. The adjustment is carried out as follows:
- The VAZ 2114 must be put on the parking brake, locking the rear wheels;
- Next, you should disconnect the negative terminal from the battery and lock the steering wheel;
- The manufacturer has provided a special adjusting nut with which you can quickly adjust the unit. This element is located on the mounting side of the part facing the car body;
- If adjustments are performed rarely, there will be a large layer of dirt on the adjusting nut - this must be removed with a cleaning agent. Adjustment is carried out using a special key.
If the adjustment is performed correctly, there should be no play when turning the rods. In the VAZ 2114 steering wheel itself, the play should be about 15 degrees. The steering wheel should rotate without snagging or additional effort. If the steering wheel returns to its original position on its own, then the adjustment has been completed correctly. The above work must be repeated after 500-800 kilometers.
Disassembly and replacement of parts
When all problematic fasteners are lubricated, you can begin work:
- The front part of the VAZ 2114 must be lifted and the wheels removed. After this, you will have access to the steering tips, which also need to be removed;
- Next, you need to move into the cabin and disconnect the steering shaft there. Now you need to unscrew the nuts securing it to the car body. After removing all fastening elements, the part should be moved to the side and pulled towards you;
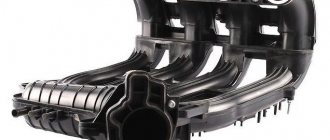
The steering mechanism is responsible for the ability to change direction while driving a VAZ 2114 car. This car uses a rack and pinion mechanism.
Steering diagram
The operating principle of this mechanism is reduced to converting the rotation of the gear associated with the drive into the transverse movement of a rack with a gear sector. The movement of this rack is then transmitted through steering rods to the suspension struts, which also act as steering knuckles.
These mechanisms have recently become very common due to their simplicity of design, and are used on many cars. The simplicity of the design ensures proper reliability, however, malfunctions with the steering mechanism occur quite often . Some of the faults can be eliminated by replacing worn components, but some faults lead to the need to replace the VAZ 2114 steering rack.
Description of the steering design
The steering is rack-and-pinion type, with a propeller shaft and a tilt-adjustable steering column.
The steering wheel is mounted on the splines of the steering shaft and secured with a self-locking nut.
The steering shaft is composite, consisting of an upper and intermediate shaft connected by a universal joint. The upper shaft rotates in two bearings pressed into the steering column tube. An ignition switch with an anti-theft device is installed on the top of the column pipe.
The steering column bracket is attached to the body with two bolts and two nuts. The bolts are special, with break-off heads. When these bolts are tightened, their heads break off.
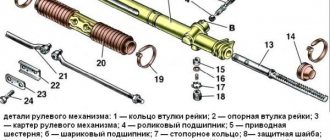
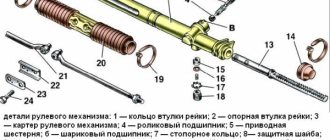
Steering:
1 - sealing ring; 2 — protective cover for the tie rod end; 3 - spring ring; 4 — ball pin; 5 — tie rod end; 6 — rod coupling with locknuts; 7 — steering rod; 8, 10 — steering gear mounting brackets; 9 — steering rod; 11 — right steering gear support; 12 — protective cover of the steering mechanism; 13 — steering mechanism; 14 - seal; 15 — protective cap; 16 — coupling bolt of the elastic coupling flange; 17 — coupling bolt of the steering column fixing mechanism; 18 — spacer sleeve; 19 — universal joint; 20 — upper steering shaft; 21 — steering wheel; 22 — steering wheel fastening nut; 23 — steering wheel pad; 24 — decorative insert of the lining; 25, 33 — steering shaft bearings; 26 — bracket for fastening the steering column to the body; 27 — retaining ring; 28 — steering column fixation lever; 29 — adjusting sleeve; 30 — washers; 31 — fixing plate; 32 — bolt with a tear-off head; 34 — intermediate steering shaft; 35 — rubber elastic coupling; 36 — left steering gear support
The bracket is pivotally connected to the steering column tube and is equipped with a steering column fixation mechanism. By moving the locking lever to the lower position, you can change the angle of the steering column. When the lever is raised, the column is fixed in the selected position.
The steering shaft is connected to the steering mechanism through a rubber elastic coupling.
The steering mechanism consists of a crankcase, a drive gear and a rack in gearing. The mechanism is secured to the partition of the engine compartment with two brackets on rubber supports. When the steering wheel is turned, rotation is transmitted through the upper and intermediate shafts of the steering column to the drive gear, which, when turning, moves the rack.
Steering rods are bolted to the steering rack, which consist of the rods themselves, tips and couplings with locknuts. At the inner ends of the steering rods there are eyes with rubber-metal bushings pressed into them. Ball pins are installed in the outer rod ends, with which the steering rods are connected to the swing arms of the front suspension struts. When the rack moves, the rods rotate the front suspension struts. The length of the tie rods can be adjusted by rotating the couplings and thereby changing the toe-in of the front wheels. The couplings are prevented from spontaneous rotation by locknuts on both sides.
Source
What could be causing the problem?
Let's look at each of the signs and what can cause them to appear. It should be noted that some problems, for example knocking, may not be related to the mechanism itself.
1. So, the free play on the steering wheel has increased, that is, it dangles more; the increased travel can additionally manifest itself in the appearance of a beating in the steering wheel when braking.
This problem may be associated with loosening of the ball pins to the stabilizer strut, increased clearance in the ball joints, or increased clearance between the rack and pinion.
- If play is detected in the steering wheel, first of all you should inspect the steering ball joints. It rarely happens, but it is possible that the nuts securing the tips have become loose and the pin has begun to come out of the seat, causing a significant gap to form at the mounting point. Fixing such a malfunction is simple, just tighten the nuts.
- Ball end wear is much more common, resulting in a gap between the pin and the body. This problem can be eliminated by changing the tips.
- Play in the steering wheel can be formed due to an increase in the gap between the rack and pinion. During the operation of this mechanism, these elements gradually wear out, and the gap between them increases. Repairing this problem comes down to an adjustment that just requires tightening the adjusting stop nut correctly.
2. A knock in this mechanism can be caused by play in the tips, an increased gap between the rack and gear, as well as loosening of the mechanism itself.
- As for the tips and rack clearance, the repair of the mechanism is indicated above, that is, just tighten the thrust nut and that’s it.
- Regarding the loosening of the fastening, it is enough just to tighten the nuts securing the clamps that hold the mechanism, and the problem will be solved.
3. Stiff rotation of the steering wheel can be due to damage to the support bearing of the shock absorber strut (the case when a problem with the suspension affects the steering mechanism), damage to the rack bushing, wedging of the steering tips, wedging of the steering gear bearings.
- In the case of a worn support bearing, the repair boils down to removing the support and replacing the bearing.
- If the reason for the tight rotation is the support bushing, then you need to put a new one in place of the damaged one, and lubricate the mechanism itself.
- If there are problems with the tips, they should be checked and replaced if necessary. The same applies to drive bearings.
Adjusting the wheel alignment with a caliper
It should be noted that after repairing many faults, adjustment of the wheel position (wheel alignment angles) will be required.
The nuances of replacing the assembly assembly
In the case of replacing the VAZ-2114 rack assembly with rods, we proceed somewhat differently.
There is no need to unscrew the rods from the rack during the work. But you will have to disconnect the tips from the stand. This operation will not be difficult if you have a puller.
If it is not available, you can use the folk method;
- Unbend and remove the stopper;
- Unscrew the tip nut;
- We take the pry bar and place it between the rod and the protrusion of the stand, to which the tip is attached;
- We use a pry bar to create a pressing force and at the same time apply sharp blows with a hammer to the protrusion (usually 2-3 blows are enough for the tip to “pop out”).
Next, we do everything identical to what was described: unscrew the fastening nuts and the fixing bolt on the column shaft. Afterwards all that remains is to remove the mechanism and replace it with a new one.
After replacement, it will be necessary to adjust the camber/toe angles of the VAZ-2114 steering, even if the rods were not removed. This operation will definitely not be superfluous.
What to do
All work with the steering mechanism can be done with your own hands; there is nothing particularly difficult about it. But after work, especially on the steering tips, the toe angles will need to be adjusted, which is best left to specialists.
If a malfunction occurs, you will first need to diagnose the mechanism to identify the unit that caused it. First, the condition of the tips is checked. To do this, they are removed from the support and checked manually. With a working tip, the finger moves in its body with effort, but it should not get wedged to any position; such a tip can be put in place and continue to look for faults. If it moves freely and there is some play, then it is replaced.
Next, the gap between the rack and gear is adjusted. For this, a special 6-sided key is used. With its help, the thrust nut is tightened until it stops, and then loosened by ¼ turn. After this, the nut is fixed using punching. If the adjustment is made correctly, and the condition of the rack is still satisfactory, then the knocking should disappear.
If the adjustment does not help, then most likely the wear of the main components is quite severe and a major overhaul of the mechanism is required with the replacement of the rack, which can also be done with your own hands.
Permissible backlash in cars
The traffic regulations stipulate normalized indicators of total play for various cars. In addition, this parameter should not exceed the figures specified in the documentation for the operation of the machine.
If there are no special recommendations in the manufacturer’s papers, the backlash should be as follows:
- For passenger cars, as well as bus and truck components made on their basis - 10;
- For buses - 20;
- For trucks - 25.
There are also separate recommendations for some models:
- For VAZ-2106, 2107, 2110, 21213 - 5;
- For Gazelle 3302 - 20 (passenger version) and 25 (truck).
POPULAR WITH READERS: Do-it-yourself power steering fluid replacement
What you need for repairs
Before starting repairs, purchase a repair kit. It can be small and include only bushings, oil seals, boots, etc. There is also a large repair kit, which also includes a rack. There are a lot of companies that produce such repair kits, so which one to choose is up to the owner to decide. But it’s better to choose a manufacturer who is an official supplier of spare parts to the car plant.
To make repairs, you won’t need much:
- Set of open-end wrenches;
- Screwdrivers;
- Rags;
- Lubrication;
- Repair kit;
How it's done
The sequence of actions is as follows:
- Place the car on a level surface and immobilize it;
- It is better to jack up the car on the left side;
- Using open-end wrenches, unscrew the bolts securing the steering rods to the rack, having first bent the fixing plate;
- In the cabin, under the steering column, unscrew the bolt securing it to the steering gear shaft;
- Unscrew the 4 nuts securing the mechanism, and then remove the fastening clamps;
Unscrew the rack bolts
After all work, the toe angle must be adjusted.
The work on restoring the steering mechanism is not particularly difficult, but some of the operations can cause a few inconveniences, but in general it is quite possible to do everything yourself. The longevity of the operation of this mechanism in the future will depend on which manufacturer of the repair kit you have chosen.
When driving a car, steering plays an important role. The mechanism ensures precise movement; a breakdown can result in serious trouble. In the device, the main role is played by the steering rack, which has a certain resource. The article will discuss how to repair a VAZ steering rack with your own hands. Car repair shops charge a lot of money for such work.
The rail is a kind of rod with attachments and 2 outgoing parts. You can understand that it is broken when you hear knocks from the front of the car when you turn the steering wheel. If a characteristic sound is heard while the car is stationary, the mechanism requires urgent replacement and it is dangerous to drive further.
We repair it ourselves
To get started, you will need a set of tools and repair kits.
Replacement kit
Be sure to include the following in your list of tools and materials:
- Repair kit for one of three configurations (more about them below);
- Bearings;
- Lubrication;
- Set of keys and screwdrivers.
Selecting a repair kit
Spare parts
As for repair kits, the standard minimum set includes four elements:
- Washers;
- Nuts;
- Bearings;
- Bushings made of fluoroplastic.
But is it enough for your specific steering rack situation? Let's try to understand the purpose and configuration of each of the three types of repair kits.
- The cheapest repair kit, the contents of which you are already familiar with, allows you to solve the most minor problems that have arisen with your slats.
- The middle kit additionally includes other bearings and shafts. Designed for more serious repair work.
- The most expensive repair kit may consist of whole new slats, that is, it involves not a repair, but a simple replacement of units.
When choosing a repair kit, it is important to make sure that it is suitable not just for repairing steering racks, but also for your specific VAZ 2114 car. Plus, it is important to know which rack is currently on the car. If this is not an original part, which happens quite often, then the repair kit for the “fourteenth” model will no longer be suitable. You need a kit that matches the vehicle the steering system part was taken from.
Steering rack diagnostics
The following factors will signal a part failure:
- The steering wheel has to be turned with more effort than before.
- When the wheels are pointing straight, there is play (free play) when turning the steering wheel.
- As mentioned above, knocking noises are heard from the front when cornering.
Such problems are not always associated with a broken rack. For a complete diagnosis, the part must be removed (the process will be described in more detail below).
After removal, the mechanism should be installed in the middle position (from the gear axis to the end of 87 mm). Afterwards you need to give a load of 500 N. Then the optimal distance is 84 mm.
The movement of the mechanism, measured through the relative movement of the pressure punch, is allowed no more than 0.12 mm.
Steering rack bulkhead
To rebuild the steering rack of VAZ models, you need to acquire the following parts:
- Bearings.
- Bushings.
- Washers.
- Nuts.
These elements can be bought as a set, it will be cheaper. If the shaft needs to be replaced, the cost will be higher. In order to qualitatively sort out the mechanism in question, it is additionally necessary to prepare lubricants FIOL-1 and UNIOL-1.
- Wash the inside of the crankcase.
- Lubricate the support sleeve and install.
- Replace the bearings (pre-lubricate) with new ones.
- Lubricate the teeth of the rack and worm with FIOL-1.
- Then treat the cavity above the drive gear bearing nut with another lubricant.
After these steps, you need to assemble the mechanism.
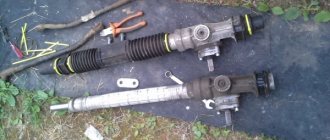
Removing the steering rack
In order to remove the rail, you must:
- raise the front and remove the wheels;
- unscrew and remove the steering ends;
- disconnect the steering shaft in the cabin;
- Unscrew the steering rack mount and move it to the side;
Disassembly
To disassemble the steering wheel, you will need “special keys” (they are also used for adjustment).
You need to start with the following:
- remove the tie rods (after marking or remembering the side);
- remove the rubber boot and rubber tip;
- unscrew the adjusting and thrust bushings and pull out the shafts;
- remove the plastic sleeve from inside the housing;
- clean the shafts, parts and housing from grease and dirt;
Repair
After disassembly and cleaning, it is necessary to “defect” the parts and determine the extent of replacement:
– the body is visually inspected. For chips, cracks, etc.;
– inspection of shafts for burrs, wear, scratches, etc.;
Once the defective parts are identified, assembly can begin:
– a new plastic bushing is pressed in;
– new bearings are pressed in;
– shafts are inserted and assembled;
– generously lubricated with suitable lubricant (litol, fiol, uniol)
– preliminary adjustment is made (the adjusting sleeve is tightened until it stops, then loosened until the shaft can be turned by hand);
– put on and secure the rubber boot (it is advisable to use a new one);
– install tie rods with ends without tightening them;
Repair of steering rack VAZ 2108, 2109 (Video):
Installation
When installing the steering rack, you must remember the following conditions:
- when installing the steering column, the steering wheel must be in the center and have an equal number of turns in one direction and the other (small deviations are allowed, they will be corrected at the wheel alignment stand);
- screw the rack to the body;
- insert and tighten the tie rod ends;
- put on the wheels and lower the car;
- stabilize the suspension and tighten the steering rods on the silent blocks;
Check and adjustment
After installation, the rail must be finally adjusted. There should be no vertical play in the steering rack when checking the steering rods. The play on the steering wheel should be within normal limits (approx. 15 degrees). The steering wheel should rotate easily, without biting, with an equal number of turns in both directions. When driving and turning, the steering wheel should return to its original position on its own, without driver assistance.
The next adjustment should be in the first 500 - 800 km, after repair.
Also, after repair, it is necessary to check and adjust the wheel alignment angles. PS If you were unable to repair the steering rack yourself, then contact a professional car service center for help.
Replacing the rack on a VAZ 2114 does not require special skills, just a certain dexterity, because many parts need to be unscrewed in very hard-to-reach places, where the presence of at least a ratchet is simply necessary.
The steering rack is a key element of the vehicle control system. Therefore, its serviceability is very important. If there is play in the steering rack, this affects the geometry of the wheels, which leads to unstable driving at high speed, as well as increased tire wear.
How to check tie rod ends?
Due to the location of the elements under study, access to the space under the vehicle should be provided. To do this, the car can be lifted on a lift or driven into a viewing hole. The main diagnostics consists of carrying out a visual inspection of the steering parts, during which the degree of wear of the tips can be determined. And for a more detailed identification of damage and their elimination, you will need the following set of tools:
- Jack.
- Set of open-end wrenches.
- Balloon wrench.
- Hammer.
- Torque wrench.
- Pliers.
- Special steering wheel end remover.
- Small mount.
- Iron brush.
So how do you check your tie rod ends? To do this, during the inspection process, you need to pay attention to the following points:
violation of the geometry of the tip body
It is extremely important that there is no mechanical damage on it that would interfere with the normal functioning of the part. As a result, wheel alignment settings may be lost.
Note that if you do not promptly replace a tip whose body is damaged, the part will still fail over time; the condition of the rubber boots, which perform the function of protecting the hinge mechanism from moisture and dirt. The presence of cracks on the surface of the seals is direct evidence of the penetration of small abrasive particles and moisture into the tip. In addition, through such cracks, lubricant is removed from the hinge. Such a malfunction can provoke a serious accident, since it negatively affects driving; backlash, which is the main prerequisite for the immediate replacement of steering tips. Since the part is a consumable element of the vehicle control system and must be replaced after approximately 45 thousand kilometers, such a measure should not alarm car owners.
Since the tip can fail at any time, you should learn to notice any change in driving, and, based on some indirect signs, understand which of the parts has exhausted its service life and needs to be replaced.
How to determine that the rack needs to be replaced on a VAZ 2114
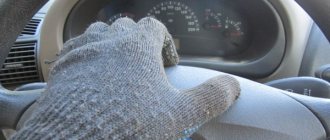
So there are several ways. The very first and simplest is to rotate the steering wheel. You just need to tug it from side to side. Ideally, the wheels should respond to the slightest rotation. In fact, many even new slats are not capable of this. That's the quality of the parts, you just have to live with it. Steering rack wear does not appear in any way in the form of knocks or vibrations, contrary to popular belief. If while driving the bumps are reflected into the steering wheel, most likely the steering tip needs to be replaced.
The second method is more accurate and complex at the same time. To carry out this check, it is necessary to jack up the front wheels one by one, and then swing them across the rotation in a horizontal plane. If there is a slight play, then it is somewhere in the steering, but not necessarily in the rack. There is no way to explain this; such a diagnosis can only be made by a specialist.
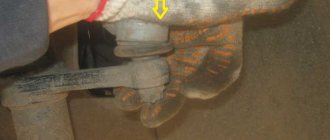
Before changing the rack, you can try tightening it. Thus, the gaps in the column are reduced. The main thing is not to overtighten, otherwise the steering wheel may jam. To tighten the steering rack on a VAZ 2114, you need a special multi-faceted wrench; it can be found in any auto store.
Replacing the steering rack on a VAZ 2114
Now let's proceed directly to the procedure. If the operation is not carried out on a lift, then you need to hang out the entire front part and use some kind of stands or pedestals. It is imperative that the car is stable.
Next, use a 22mm wrench to unscrew the steering ends, then knock down the bipod with a hammer. If you plan to install the tips in the old places, then under no circumstances should you use all kinds of pullers, because the fork will pull out the finger, and the thread puller will ruin the thread, you will have to either go through it with a hole saw or change the tip.
Now you need to unscrew the four nuts securing the rack to the body. This must be done from under the wheel arch, otherwise you won’t be able to reach it. It is advisable to use a ratchet with a long head of 13. After this, we crawl under the driver’s feet and unscrew the bolt of 13 from the steering shaft. To loosen the clamp, you can insert a sharp chisel and hit it with a hammer several times. At this time, it is advisable to pull the rack from the shaft; this can be done well using a crowbar.
The rack is installed in the reverse order. After replacement, it is imperative to adjust the wheel geometry, otherwise goodbye, tires.
Video: replacing the rack on a VAZ 2114