Print this article Font size 16
For some reason, many car owners believe that independently adjusting the steering rack on a VAZ 2110 is an impossible and impossible task. This opinion is erroneous, since it is not so difficult to do such work with your own hands. You don't have to be a professional.
If characteristic knocking of the steering rack was noticed on the “tens”, it is recommended to tighten it. Today we will tell you about two effective methods. Which one to choose is up to you to decide.
Tightening the rack with removal
Immediately arm yourself with a steering rack wrench specialized for the “ten”, and also get ready to remove the rods. From the tools, grab:
- Pliers;
- Mounting blade;
- Socket wrench 19;
- Hammer;
- Flat screwdriver;
- Set of heads - from 10 to 27.
Get started:
- Unscrew the nuts inside the passenger compartment and remove the fastening bolts of the lower universal joint to the steering rack gear shaft. To do this, you will need a 13mm socket. The bolt can turn, so hold it with an open-end wrench.
- In the engine compartment itself, remove the nut of the upper fastening of the rack boot.
- At the bottom of the car, remove two more nuts that secure the rack boot.
- Remove the boot.
- Raise the front of the car and remove the front wheels.
If you are going to remove the steering, but not dismantle the rods, follow these instructions:
- Remove the locking plate from the rod mount by prying it off with a screwdriver. Then unscrew the two bolts that secure the rods and rack;
- Using a 13mm socket, remove the nuts from the steering gear brackets connecting to the front panel;
- Move the rack forward a little to remove the gear shaft from the shield hole;
- Remove the rack together with the rods.
If you want to remove the steering rods, unscrew the rod end from the swing arm of the shock absorber struts. To do this you will have to do the following:
- Remove the cotter pin using pliers;
- Using a 19mm spanner, unscrew the ball pin fastening nut, but not all the way;
- Use a 17 socket to loosen the tension bolt of the rod end;
- Now press out the ball pin. To do this, insert a mounting blade between the swing arm and the tip. Press the tip away from the lever, and apply several blows with a hammer to the end of the rotary lever;
- Unscrew the ball stud nut completely;
- Remove the ball pin from the lever hole;
- Use a screwdriver to open the groove of the tie rod end;
- Remove the tip, holding the threaded adjusting sleeve with a 27mm wrench. Count the number of turns so that during reassembly you can tighten it by the same number of turns;
- On the tie rod, try to maintain the position of the threaded bushing. This way the toe angle of the wheels will remain as correct as possible.
Checking the steering play
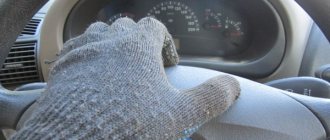
To perform a play test, place the front wheels of your vehicle in a straight-ahead (straight-ahead) position. Take a long-blade slotted screwdriver and tape it to the dashboard with the blade facing the steering wheel. Now carefully turn the steering wheel in one direction and the other until the wheels begin to turn. When the wheels begin to turn, use chalk or thread to mark the limits of its free play on the steering wheel rim. Measure the distance between the marks and determine the free play of the steering wheel, which should not exceed 15 mm. If the free play of the steering wheel exceeds 15 mm, you need to check the condition of the steering rack, tie rods and ends, front wheel hub bearings and strut swing arms. After this, sharply jerk the steering wheel from side to side at a small angle. Make sure there is no knocking noise in the steering column universal joints or steering gear. If necessary, tighten loose fasteners or replace faulty parts with new ones.
The process of adjusting the steering rack on a VAZ 2110
Now let's figure out how to adjust the steering rack on a VAZ 2110. To do this, you will need a vice in which the steering rack is clamped. Make it as motionless as possible by placing wooden blocks.
- Take the rack's whiskers with your hands and shake them to determine how much play there is.
- To remove this backlash, take a specialized wrench. They are sold in almost all spare parts stores specializing in VAZ.
- Insert the key and turn it counterclockwise about 10 or 15 degrees.
- Grab the rods again and pull.
- If the play remains after the operation, tighten the slats by the same number of degrees. This must be done until the backlash disappears completely.
Each individual car has its own specific performance, so there is no specific tightening torque. Try not to overtighten the rack, as this will make the process of turning the steering wheel much more difficult.
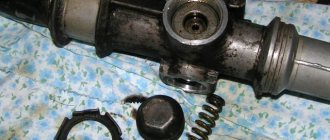
After tightening our today's hero, tighten the stop nut by bending the crankcase thread.
Stop nut
It is imperative to check the gap between the stop nut and the rack stop. Its maximum value can be no more than 0.2 mm.
Adjusting the steering rack without removing it
If you cannot decide how to tighten the steering rack on a VAZ 2110, we recommend that you familiarize yourself with the second option - without removing it.
For this method, arm yourself with a special wrench, which is made in the form of an octagon, 17 mm in size.
The steering wheel should be tightened to “tens” only in cases where knocking noises are observed during operation of the steering mechanism. It’s not worth it to just do work without a real need.
- Drive into the inspection hole or lift the car on a lift.
- Remove the engine guard, take a flathead screwdriver and hold a good light under the car.
- Locate the rear subframe at the rear of the steering rack. There the rack and shaft should intersect. The adjusting nut is located in that place. Do not confuse it with the adjusting nut plug. This is a common mistake made by beginners.
- If the steering gear was previously untouched, there will be a green plug on the nut. It functions as a stopper and is installed directly at the factory.
- Use a flathead screwdriver to remove the plug. It will probably break, but there's nothing wrong with that.
- After removing the stopper, pick up a specialized adjusting key and tighten it, moving clockwise. Do not press too hard. The degree of clamping directly depends on the strength of the knocks when moving.
- Turn the key 10 degrees, check the rack for play. If it is present, press more. It is not recommended to rotate more than 15 degrees at a time.
- Checking the degree of clamping is quite easy. Take the rack and turn it sharply in one direction or the other. If no extraneous noise is observed, the rail is tightened well.
- There is no point in trying to replace the stopper, even if you managed to keep it intact. It does not carry any benefit.
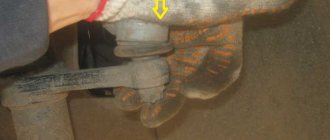
Photo report on steering rack tension
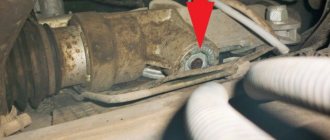
The first thing you need to do is crawl under the rail and insert the key from below so that it gets into this hole, which is clearly shown in the photo below:
Then you need to make at least 1/4 turn clockwise (taking into account that the nut is upside down).
If the knocking noise disappears when the car is moving, then the rack is sufficiently tightened.
From time to time it is necessary to repeat this procedure if rattling and knocking in the steering continues to occur. If even with maximum tightening of the adjusting nut the rack knocking does not disappear, then most likely it is necessary to either change the entire mechanism or repair it.
Welcome! The steering rack turns the front wheels, but there are cars on which the rear wheels turn depending on the direction of movement, but the rear wheels in this case act as steering wheels, it is impossible to turn the rear wheels alone on such cars, but we are not talking about that, about the rack Let’s say a few words, the rack itself lasts quite a long life, especially if you constantly drive the car on good roads where there are no bumps and the like, then in this case the rack even after 100 thousand km. it won’t deteriorate too much, but because of Russian roads, which in addition to the rack and the entire chassis are loosened, the rack will already make itself felt at 40-70 thousand km, the first time it will need to be tightened, then approaching 100-130 thousand km . it will remind you of itself again, pull it up again and you can ride, but there is a big But! If the steering wheel starts to turn very tightly after adjustment, then you will need to think about replacing the steering rack, otherwise it may simply jam and the car will lose control (You can find out how the rack is replaced in the article entitled: “Replacing the steering rack on the tenth family").
Note! The steering rack is adjusted using tools such as: Special. a key that is needed specifically for adjustment (you will find it in a car dealership), as well as a flat screwdriver (the thinner it is, the better, with the help of it you will need to remove the plug that closes the nut with which the steering rack is adjusted on the car), You can’t do the same without a light, and without a lift it will be a bit difficult, because it’s easiest to tighten the rack from the bottom of the car, since it’s not convenient to do it from the top if you’re the first to do this and don’t know where the steering rack adjusting nut is located!
Where is the steering rack adjusting nut located? It is easiest to see it from below, if this is not possible and you do all the work from the engine compartment of the car (from above), then you will either need to lower your head under the rail, or turn on the camera, remove everything that is below and use the video clip to find this nut, the main thing is not to confuse it with anything else, and by the way, if you haven’t climbed under the bottom of the rack for a long time, then everything will be dirty there, take this into account too, because when the rack below is in a clean state, this nut will be much easier to see than otherwise case and also, on new slats, if it has never been tightened before, this nut will be covered with a plastic plug, it is removed (pry off with a flat screwdriver or knife) and using a special one. key, after which the rack is adjusted.
When do you need to adjust the steering rack? This procedure is very, very useful, the more play there is in the rack, the faster all the mechanisms inside the rack break down (There are gears), and with the help of adjustment, this play can be removed (If the rack is still new) or at least made not so large, what it is, in order to understand whether there is play in the rack, you will need to open the hood and by first holding one adjusting rod with your hand (Pull) and holding the other steering rod with your hand (Pull), you will determine if the rack has play, and the symptoms will be the following: The appearance of play in the steering wheel and knocking on the steering wheel when hitting bumps with the front wheels, but this could be for one more reason, namely because of worn silent blocks of steering rods, the symptoms will be exactly the same (How to find out whether silent blocks are worn or not, You can, by unscrewing the bolts that secure the steering rods to the steering rack, for more details on how to do this, read the article: “Replacing silent blocks in steering rods on a VAZ”).
https://youtube.com/watch?v=7SApy6XYE-4
How to properly tighten the steering rack on a VAZ-2110
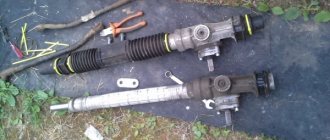
A steering rack is a device for mechanically transmitting force from the steering wheel of a vehicle to the steering mechanism of the front wheels.
Simply put, this is the traction that makes the wheels turn in accordance with the actions of the driver steering the car. When driving cars of the VAZ-2110-2112 family, owners of these products of the Russian automobile industry often encounter the appearance of some beats in the steering mechanism. Basically, such sound accompaniment occurs when driving along broken, crushed stone or dirt roads. Typically, the source of the knock is located under the steering wheel, and a clear feedback from this process is heard through the control itself. When driving on the roads of our country, the steering rack is subject to serious vibration effects.
If the driver hears characteristic sounds in the engine compartment - clanging, rattling, knocking - you need to tighten the steering rack using a special key. To access the required nut, it is not at all necessary to drive the car onto an overpass, pit, or use a lift. Let's look at how to tighten the steering rack on a VAZ-2110 correctly and without resorting to the help of a service station.
Removing the steering column
If after adjustment the problem with the rack does not disappear, you will have to disassemble and repair it. But to do this it needs to be removed. There are two methods of dismantling: with and without tie rods. The latter method is preferable as it requires much less time. Before removing the steering rack on a VAZ-2110, the front part of the car needs to be jacked up on both sides. This is necessary in order to unload the traction.
In the cabin, in the area of the pedal block, you need to unscrew the steering shaft cardan bolt. After this, we go to the engine compartment and unscrew the 2 bolts securing the rods, having previously bent the locking plate. Then you need to unscrew the 4 bolts securing the steering column to the car body. When this is done, remove the column and remove it through the opening of the left wheel arch.
Tools and procedure
The steering rack must be tightened using the following tools:
- 10mm socket wrench or ratchet head;
- wrench head 13 with extension and wrench;
- a universal key that can tighten all structures with the necessary force.
In normal cases, it is worth using old wrenches to unscrew the battery and gain access to the steering rack.
To get to this element of the car mechanism, you need to remove the battery and remove its fastening elements. The sequence for tightening the steering rack is as follows:
- dismantling the battery. The power wires are removed from the vehicle's power source, after which the bolts or screws securing the device are unscrewed and the battery is removed from the installation site;
- Removing the battery mounting structures. The platform or brackets on which the battery was previously held are also unscrewed and removed;
- removing the plug on the steering rack nut. By touch it is not difficult to find the desired nut, which may be covered with a rubber plug. After removing the plug, you should start tightening the nut.
The steering mechanism in the VAZ-2110 model is tightened counterclockwise in the following sequence:
- the nut is tightened counterclockwise until it stops, after which it is loosened a couple of notches - 24 degrees, which ensures minimal play (0.12 mm) between the nut and the rack;
- the play is checked - there should be no jamming or knocking between the rack and the nut;
- after this, the crankcase thread is cored or crushed (please note that the nut should not be damaged), and the fixation point is marked with paint to indicate in what position the nut should be in relation to the crankcase.
Correct adjustment of the steering column will help get rid of extraneous knocks, and the steering wheel should independently return to its original state after each turn. It is worth paying attention that excessive tightening of the steering rack nut can lead to the steering wheel biting in its extreme positions and the need to use some effort to continue to fully control the car.
Useful tips
Finally, here are some useful tips that will extend the life of the steering rack and other elements included in the control unit:
- At least once a quarter, check the condition of the steering at a service station or yourself.
- Pay attention to the condition of the steering column protective cover.
- Try to limit driving on uneven surfaces, especially at high speeds.
- Do not test the strength of the steering rack and the entire mechanism by moving away with the steering wheel turned all the way to the side.
- If play or other signs of steering rack malfunction are detected, repair or replace it.
The steering mechanism of dozens has undergone several ongoing improvements throughout the entire production period of the car, but in general, the steering system is not far removed in design from the VAZ 2108-09 design. Perhaps that is why almost everyone who operates a ten repairs and adjusts the steering rack with their own hands. There is nothing complicated about this and now we will see it.
Steering rack repair and inspection
If the steering rack had to be repaired for normal operation, it must be tightened in a vice.
The play is determined by the wobbling of the rack, and if a serious angle of rotation is detected, you should turn the nut to an angle of about 15 degrees and check the play again. This sequence of actions is repeated until the extra turn disappears. You need to check the effectiveness of repair work while driving the car. Typically, experiments are carried out at low speeds - about 40 km/h, when various beating and biting of the steering wheel can be clearly determined. As experienced motorists advise, you don’t need to immediately tighten the rack at a large angle - a quarter turn is enough to start with. If this does not help, then you should tighten the nut gradually by a small part of the circumference and check the engine operation again. Once the knocking noise under the hood disappears, the car can be operated without problems for several years.
How to adjust the steering rack on a VAZ-2110
When driving a domestic VAZ-2110, owners often encounter unpleasant knocking noises in the steering unit.
Mostly this type of sound occurs when the driver is driving on crushed stone, dirt or broken road surfaces. The source of the knock is usually located under the steering wheel, and the feedback of this action is clearly heard. It is worth noting that the steering rack is subject to significant vibration influences when moving on Russian roads. In a situation where the car owner notices characteristic clicks in the engine compartment (rattling, rattling), the steering rack will have to be slightly tightened using a special head. To get to the necessary nut, it is by no means necessary to fix the 2010 VAZ model on an inspection ditch/pit, or to look for a lift.
The steering rack of the VAZ 2112 creaks - what to do?
Carrying out diagnostic work that will allow you to determine the causes of the squeak should begin with identifying the specific place from which the squeak is heard when turning the steering wheel. To do this, you need to put the car in a hole and ask someone to turn the steering wheel, while listening to sounds from under the car to determine the location of the squeak. Having decided which element is creaking, you can move on to repairs.
It is quite simple to determine the creaking of the steering column by the characteristic vibration, which will also occur when the steering wheel rotates. Most often, the steering column clutch squeaks, and this problem is typical for cars that were unsuccessfully restored after a serious accident. This problem, if the noise is not strong, does not affect the quality of the steering mechanism, so you can continue to operate the car. The situation can only be corrected by replacing the steering column. Also, a squeak can be heard from the steering rack and column joint if they are poorly adjusted or there is severe wear. Depending on the car model, this problem can be solved in different ways. Most often it is possible to adjust the mechanism.
Adjusting the steering rack yourself
In order for the process to be completed clearly and correctly, immediately prepare the tool:
- 13 mm head (with knob and extension);
- socket, also known as socket, 10 mm wrench or ratchet head;
- universal key.
You can use old wrenches to unscrew the battery and create access to the rack. To get to this part, you need to remove the battery by removing its retaining elements.
Troubleshooting the steering rack
If you can’t do without repairing the rack, then you need to make an adjustment in a vice, that is, tighten it. The backlash itself is determined by the swaying of the rack. When you find a significant angle of rotation, you need to tighten the nut by 15 degrees, and then compare the backlash again. This sequence of actions should be repeated until you get rid of the extra turn.
You should check the productivity of the work performed while your VAZ-2110 is moving. Most experiments are carried out at low speed (about 40 km per hour), when it is best to identify various tapping and biting of the steering wheel.
Experienced motorists have proven that there is no point in turning the rack sharply at a significant angle. At first, a quarter rotation will be enough. When this does not help, then you will need to tighten the nut smoothly by a small fraction of the circumference, and then check the operation of the motor again. As soon as the knocking under the hood stops, you can operate your “ten” without problems for several years.
DIY replacement
To replace the unit, you need the following:
- a bottle of white spirit;
- three clamps measuring 200x4;
- soft cloth;
- Movil aerosol or equivalent;
- any lubricant for processing bearings, Mobile Griz, Feola, or any other good quality will do;
- WD-40 to unscrew rusty parts.
In addition, you will need spare parts, namely:
- tubes;
- - tips;
- silent blocks;
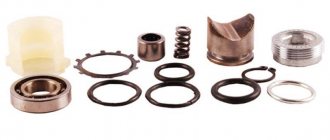
- rack repair kit;
- anther.
The tools you need to stock up on are:
- hammer;
- keys set to “22”, with an internal octagon;
- chisel;
- cardan;
- puller for dismantling tips.
Now let's get to work
- First of all, you need to treat all fasteners and parts with engine oil (WD-40) and leave for an hour and a half. Afterwards, repeat the treatment with engine oil and it’s better to start working in a day, otherwise it’s simply impossible to unscrew the stuck parts, you’ll either break the threads and damage important components, or you’ll break something for yourself. To avoid such trouble, it is better to do everything in order, without haste.
- When the oil saturates the fasteners, you can begin dismantling. We fix the car, put supports under the wheels. Don't forget about the handbrake and lock the steering wheel.
- Disconnect the power and remove the front wheels.
- Unscrew the nuts from the ends;
- Armed with a puller, we knock out the fingers from the rack arms. To prevent the puller from flying away, hold it with a key.
- Remove the clamp fasteners.
- Now we are carrying out dismantling work in the cabin itself: the bolt on the steering shaft is removed, it is located near the floor.
- After all these operations, we pull the rail towards ourselves. It is easier to dismantle if you pull it out with a rotating motion.
- After dismantling the rack, the control mechanism is pulled out through the resulting hole.
- If the rack cannot be repaired, it is replaced with a new one. Installation is carried out in the reverse order to dismantling.
Instructions for adjusting the rack
- Drive onto an overpass/pit or use a lift.
- Remove the engine protection, then use a flathead screwdriver. Don't forget to provide the car with good lighting.
- Find the rear component of the subframe, which is located behind the steering rack. At this point, the shaft and rack should alternate. There is also an adjusting nut there. The latter is similar to the plug of the adjusting nut, so it is important not to confuse it. This is a common mistake among beginners.
- If the steering gear was previously untouched, the nut will have a green plug. It functions as a stopper and is installed at the factory.
- Remove the plug with a flat screwdriver. It may break, but there is nothing terrible here.
- Take the adjusting key, having first removed the stopper, and tighten it in a clockwise direction. You cannot press it all the way. The degree of clamping directly affects the strength of knocks during movement.
- Turn the wrench 10 degrees and check the rack for play. It is worth pressing again if it is present. Rotating more than 15 degrees at a time is not recommended.
- Check the clamping level. You need to take the rail, turning it with a sharp movement in one direction and then the other. The rack is tightened efficiently, if no extraneous noise is observed.
- There is no point in putting the stopper in place. If you keep it safe, it is of no use.
The design and function of the steering rack in control
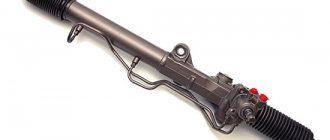
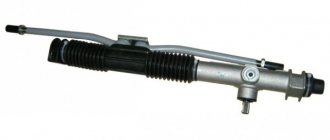
The lath looks like a steel blank.
On one side there are teeth that engage the drive gear. It is thanks to the latter that the steering wheel moves through the shaft and its cardan. In the “ten”, the rack is located in a column fixed on a partition in the middle of the engine compartment and passenger compartment. At the top there is fastening for 2 rods. They are combined with the shock absorber struts using tips and their fingers. Note. When the steering wheel is turned, its shaft rotates, transmitting forces through the cardan to the drive gear. The latter, together with the rods, moves the rack in the required direction. This simple method is used to control the car.
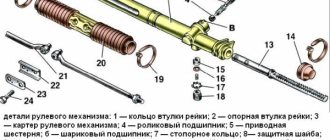
To ensure normal operation of the steering rack, other parts are included in the mechanism:
- column housing;
- 2 drive gear bearings (needle, ball);
- protective corrugation with clamps;
- fluoroplastic support sleeve;
- plugs;
- anthers;
- washers, etc.
Thus, a damaged steering rack has the following symptoms:
- tapping (crunching) in the area where the column is located (felt when turning the steering wheel at the beginning of movement or in place);
- tight rotation of the steering wheel (the steering wheel jams or bites);
- vibration of the steering shaft when driving on uneven surfaces;
- significant play in the steering wheel;
- uneven direction of travel of the front wheels.
If the steering control in a VAZ-2110 breaks down, there is no need to immediately contact a service station or purchase the entire unit. It is quite possible, if you have some skills, to adjust the rack in your garage. You will gain experience, raise your self-esteem and, of course, save money.
Alternator and power steering belt
Generator on a VAZ 2110 car with power steering
What, does the owner of a VAZ 21103 have a hydraulic booster? As you know, if a VAZ 2110 is equipped with power steering, which, it is worth noting, completely eliminates vibrations typical of front-wheel drive cars, replacing the alternator belt is carried out completely differently than is customary. As a rule, the alternator belt is replaced after 45-60 thousand kilometers, and cracks on it are a direct sign of replacement. A normal replacement of this part takes no more than 10 minutes, but on cars with power steering it takes more time, and the belt cannot be found in its usual place. In this place, if power steering is installed, the pump described above is placed. The generator itself is located higher.
The difficulty of replacement in this case is characterized by the fact that the belt rotates around the left motor support, which forces you to unscrew the support, lift the engine and only then remove the belt. Specificity is also observed in the case of alternator belt tension. In particular, the angle of the alternator pulley belt in the case of power steering is quite small and the usually accepted tension of 1 cm up and down does not work here. The belt begins to slip. This means that the power steering belt tension must be stronger.
As you can see, power steering also means unnecessary troubles associated with repairs. But if you learn to do everything yourself, problems can be avoided. In addition, you can save a lot on repairs, the price of which increases every time at the service station. The instructions presented above are an introductory version for owners of a VAZ 2110 with power steering. A complete step-by-step manual for replacing the power steering, repairing it, etc. can be found in other articles, through video or photo materials.
We install EUR and power steering on a VAZ 2110 on our own
Based on the year of manufacture, the “ten” can be equipped with a hydraulic booster (power steering), also called an electric power steering (EPS). They are appreciated by women; the second option is preferable, because it is easier and more comfortable to drive a car with a child. If your power steering has worn out differently and you just want to change it, then it is recommended to choose the power steering for the VAZ 2110 as a candidate.
This material contains two annotations:
Well before installation, you need to understand the structure of these units and also find out how they are different.