Lada Granta was originally created as an inexpensive car. Actually, that’s why it became one of the most popular cars on the roads. The manufacturer tried to introduce both proven and new elements into the design. But they have their drawbacks. The Lada Granta steering rack can present various surprises during operation. It is useful for the owner of a domestic car to understand the structure of many components.
When does the steering rack need to be tightened on a Priora?
The steering rack is a vulnerable point for the Lada Priora.
The first sign indicating the need to adjust the rack is the appearance of a knocking sound when driving over small uneven surfaces. The knocking will be felt especially clearly when driving on country roads. In this case, the driver will feel shocks and vibrations on the steering wheel, which will also be transmitted to the entire car body.
In addition, if the steering wheel adjustment nut is loosened when driving on the highway, the car will “float” a little, and additional steering will be required from the driver, which will also immediately become noticeable.
Experts also say that a tightening is necessary if the driver begins to notice the appearance of a clearly audible crunching sound in the area of the steering column, as well as an increase in the amplitude of the steering wheel rotation.
Signs of play in slats
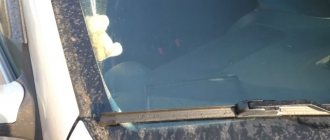
When driving over small irregularities such as a gravel road, shocks and knocks in the suspension are clearly audible and are transmitted to the steering wheel. These signs will not always refer to play in the rack. Similar impacts to the steering wheel can occur due to broken steering ends or a broken crosspiece of the steering mechanism. Before you begin repairing the rack, you must exclude the tips and steering cross from suspicion.
Signs:
- Impacts to the steering wheel when driving over bumps
- Creaking sound when turning the steering wheel
- Biting the steering wheel in different positions
- The steering wheel does not return to zero position
Checking for play
Checking for play is done by rocking the swing arms up and down. To do this, we find the steering rods under the hood and pull each of them up and down; there should be no play or knocking. If any, then the rack should be maintained.
What is the steering rack for front wheel drive cars?
In cars with front-wheel drive, there is no way to install the classic, long-proven front wheel steering control system. The transverse installation of the motor and power drives to the wheels will not allow this to be done. Therefore, the cumbersome system of levers was replaced by a steering rack. Its main task is to transfer force from the steering wheel to the steering arms.
Important! Most Priors are equipped with electric power steering (EPS) and not power steering. This is a feature of this model.
Lyrical digression
In Lada Kalina, the steering rack never makes a knock when we are talking about a new car. This is also true for the break-in period. Let's say in your case this is not done. Then, do not try to repair anything, but go straight to the dealer. According to reviews, the defect in question is covered under warranty, and most car dealers do this: the steering rack assembly is replaced with a new one.
This is what the replacement unit looks like, the rack assembly
There is a logic here. At the factory, adjustments are made correctly (this is true in 99.9% of cases). If a defect appears, the dealer replaces the assembly without expecting that adjustment will solve the problem. The owner does not need to hope for this either. The choice is yours.
How to replace the steering rack on a VAZ 2170-VAZ 2172?
1. Well, let's start, in order to remove the rack from the power steering, you need to do preparatory work, in which you will need to drain the fluid that is needed for the power steering, to carry out this work, pick up a syringe or a rubber bulb and use one of these tools , pump out all the fluid from the power steering reservoir (This reservoir is shown in the photo below), then disconnect the hose going to the pump from the reservoir and lower it into an empty container, and plug the hole in the reservoir with some kind of rag, as soon as this is done, get into the car , turn the key in the ignition so that the steering wheel is not blocked and rotate it from one end to the other until all the fluid has completely drained from the entire system.
2. Now you will have to disconnect the return hose from the fitting to which it is connected, this hose is secured by a clamp, you can disconnect it by loosening the clamp by the screw using a Phillips screwdriver, and when the hose is disconnected, plug the hole in it using a bolt of a suitable diameter and as quickly as possible and finally, unscrew the nut that secures the high-pressure hose (It is metal, see photo below) and disconnect it, then plug it with a wooden stick.
3. After the work done, you can assume that the fluid has been drained from the steering mechanism, then hang the front part from the car and proceed to remove the rack (Now it is removed in the same way as a rack without power steering or like a rack with an electric steering system, in more detail the removal process, read the article: “Replacing the steering rack on the tenth family”), and at the very end, using a hex key, unscrew all the pipes that are attached to the rack and disconnect them, plug the threaded holes with clean foam so that dirt does not fly into the pipes and pull out the rack through car wheel arch.
Additional video: Study the article on replacing the fluid in the power steering, there you can roughly understand, using the example of a VAZ 2110 car, how to drain all the fluid from the steering mechanism of a car.
X
Steering wheel tuning on Lada Granta
There are few options for upgrading the steering wheel on the Lada Granta. The most popular of them is installing a sports version. Such a steering wheel will not only make the interior more attractive, but will also increase the comfort of control, especially if it is selected correctly. You can install a multi-steering wheel, but only if the configuration is maximum, in other cases there will be nothing to control with its help.
The sports version must be injury-proof, that is, in the event of an accident it must be deformed without causing damage to the driver. Among the shortcomings, it can be noted that although there is an airbag in the standard steering wheel, the sports one does not have it. You can also modify the steering wheel by installing braid. More advanced ones install a heating thread under it.
To install the sports steering wheel, you will need to carry out the following operations.
- Align the front wheels straight (you can drive a little forward and back so that the trajectory is straight).
- Disconnect the battery terminals by de-energizing the vehicle's on-board network.
- The airbag control module must be disabled (if the Granta equipment is equipped with it). If you do not turn it off when removing the factory steering wheel, it may shoot out.
- Remove the steering wheel and install a horn on the adapter. The wiring must be stored in the adapter; to do this, carefully inspect all contacts.
- Connect the adapter to the shaft, but do not secure it with a nut.
- A sports steering wheel is installed on the adapter and secured with special screws.
You cannot throw away or sell the factory product; the sports version will raise questions when passing inspection.
Is it possible to tighten the steering rack on a Priora yourself?
Of course you can. In fact, this process will not take you much time. And it does not require any special expertise, so there is no need to go to the service center for this.
In order to tighten the steering rack on a Priora, you will need:
- this article is a guide;
- special key for adjusting the rack on 17>;
- inspection hole or overpass;
- flat blade screwdriver;
- key on 13.
It is recommended to perform this work with an assistant. Even a child or a girl can be used as it.
How to get to the adjusting nut:
- Disconnect the battery terminals and remove it.
- Using a 13mm , unscrew the bolt securing the battery stand and also remove it.
- From the inspection hole, look under the steering rack itself for the rubber plug of the adjustment mechanism. Pull it out with a flathead screwdriver.
Now you have access to a nut for adjusting the thermal clearance of the steering rack. Using a special key for adjusting the rack 17 , which can be purchased at any auto store, you need to tighten it so that the knocking noise disappears. In this case, you need to carefully monitor so that additional friction sounds do not appear and the steering does not become difficult to move. The nut should be tightened no more than 25-30o . Otherwise, when turning sharply, the steering wheel may “bite”. Therefore, ask an assistant to rotate the steering wheel, while you listen to the sounds from the steering rack. If the knocking noise disappears and no additional sounds appear, then the work is done correctly and you can install the rubber plug and battery in their places.
Making adjustments yourself
You can access the adjusting nut from the engine compartment, but to do this you will need to remove the battery, as well as the battery mounting pad. It is better to drive the car into a pit and then remove the crankcase protection (engine mudguard). If you look from under the bottom, the required element is immediately visible:
You need to turn this nut
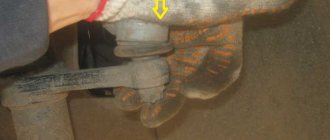
And when you open the hood, you can feel the nut, but not see it. Its location is marked in the figure:
To make adjustments, place the key here
Before adjustment, remove the rubber cap from the recess. Its appearance is shown in the photo:
Remove the cap and install the key
If it is not entirely clear what exactly needs to be done, it is better to contact the service. The key is installed in the recess and then rotated 10-15 degrees.
When looking at the rack from above, turning the key clockwise corresponds to unscrewing it. The handle of the key comes from the center of the car - which means tightening is being done. By the way, the latter is true provided that the handle faces forward.
When tightening doesn’t help and the mechanism needs to be changed
It’s worth thinking about replacing the rack when tightening it does not in any way affect the car’s behavior on the road, and also does not help get rid of the unpleasant knocking noise. A failed steering rack will cause significant play in the steering wheel. Moreover, it may begin to jam (this happens extremely rarely, but similar cases are known). If the rack begins to jam, then it is better to stop using the car, as this can lead to the most dire consequences.
You cannot do without a replacement even if after tightening it you managed to get rid of knocks and vibrations, but they reappeared later.
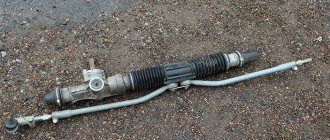
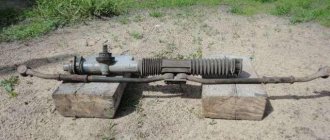
About the rake
The steering mechanism on Lada cars, starting with model 2108, has a steering rack. It is designed to move steering rods along a horizontal plane, which helps turn the car's wheels.
The design of the slats is quite simple and reliable, with the exception of one small drawback - a plastic bushing.
This bushing is made by the manufacturer from low-quality plastic, which soon leads to play in the rasp in it and the appearance of an unpleasant knock when moving on paving stones.
There is a rail between the engine and the passenger compartment, perpendicular to the exhaust manifold and attached with two brackets to the engine shield.
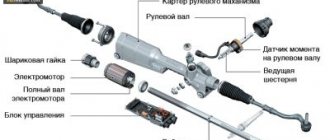
Design features of the steering control of the Lada Priora VAZ 2170
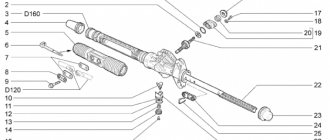
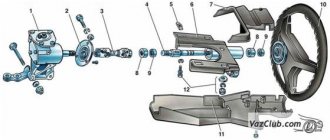
| On the Lada Priora VAZ 2170, the steering is injury-proof, with a rack and pinion steering mechanism, electric power steering, a steering column adjustable in height (tilt angle), and a damping element on the steering wheel. The steering mechanism, complete with tie rods, is attached in the engine compartment to the front panel of the body on two brackets using brackets 2 (Fig. 8.1). The mechanism is secured with nuts on welded bolts through rubber supports 6. In the housing 26 (Fig. 8.2) of the steering mechanism, a drive gear 8 is installed on ball and roller bearings, which meshes with the rack 9. The ball bearing of the gear and the separator 7 are pressed by a cover 5 assembled with an oil seal 4 and covered with anther 1. There are marks on the steering gear housing and on the boot for correct assembly of the steering mechanism. | The steering rack 9 is pressed against the teeth of the drive gear by a spring 15 through a metal-ceramic stop 18, sealed in the crankcase with a rubber ring 17. The spring is pressed by a nut 14 with a locking ring 16, which creates resistance to unscrewing the nut. A protective cap is put on the steering gear housing on the left side, and a pipe with a longitudinal groove is pressed on the right side, and a protective cap is also put on the pipe on the right side. The spacer bushings of the rubber-metal hinges of the inner tie rod ends 1 pass through the groove of the pipe and the holes in the protective cover (see Fig. 8.1). The steering rods are attached to the steering rack with bolts 20 (see Fig. 8.2), which pass through the connecting plates 22 and the spacer bushings of the rubber-metal hinges. The bolts are secured with a locking plate 21. | The steering drive on the Lada Priora VAZ 2170 car consists of two composite steering rods and rotary arms of telescopic struts of the front suspension. The length of each tie rod is adjusted by rod 5 (see Fig. 8.1), which is screwed into the inner 1 and outer 4 tips. Information about malfunctions in the operation of the electric power steering is provided by its electronic control unit when the ignition is turned on by flashing the warning light in the instrument cluster (malfunction light code) (see “Electromechanical power steering control unit (EPS)”). |
Steering of Lada Priora VAZ 2170 : 1 — inner tie rod ends; 2 — bracket for fastening the steering mechanism; 3 — steering rod joint nut; 4 — outer tie rod end; 5 — adjusting rod; 6 — steering gear support; 7 — steering mechanism; 8 — bracket for mounting the steering mechanism; 9 — coupling bolt; 10 - propeller shaft with hinge; 11 — electromechanical power steering; 12 — electronic control unit for electromechanical amplifier; 13 — steering column mounting nut; 14 — ignition switch; 15 — upper facing casing of the steering shaft; 16 - connector; 17 — steering column adjustment lever; 18 — steering wheel fastening nut; 19 — airbag; 20 — steering wheel; 21 — lower casing liner; 22 - sealing ring; 23 - fastening screw; 24 — lower casing of the steering shaft; 25 — element for fastening the engine shield; 26 - gasket; 27 - thrust plate; 28 — seal; 29 — spring ring; 30 — protective cover; 31 - sealing ring | Steering mechanism Lada Priora VAZ 2170 : 1 — boot; 2, 20 - bolts; 3 — washer; 4 - oil seal; 5 — crankcase cover; 6, 17 — sealing rings; 7 — separator assembly; 8 — drive gear with bearing assembly; 9 — steering rack; 10 — left protective cap; 11 — rod support; 12 — bracket; 13 - plug; 14 — stop nut; 15 — stop spring; 16 — retaining ring; 18 — rack stop; 19 — stop liner; 21 — locking plate; 22 — cover plate; 23 - clamp; 24 — protective cover; 25 — right protective cap; 26 — steering gear housing |
Preparatory actions, dismantling unnecessary parts
To remove the crankcase protection, you need to unscrew 4 screws located in one row near the bumper. Also, unscrew two screws having a standard size of M6x16. In some configurations, the protection consists of two parts, but in this case they are attached only with self-tapping screws. These words are illustrated by the following photo:
First, unscrew the “10” screws, and then the two “18” screws. In the second case, there will be more screws (eight).
Now let's look at how to remove the battery. First of all, disconnect its terminals. Then, you need to move the additional fuse box to the side. In general, actions are performed according to the photo:
Tips for use
A complete replacement and repair is a series of actions, for the implementation of which you need to have not only special knowledge, but also a considerable amount of free time, so if the car owner does not have either the first or the second, it is preferable to go to the nearest service station.
It is better to entrust steering rack repair to service station specialists
At the same time, in order not to become their regular guest, you should know some secrets for operating the steering rack, which can significantly extend its service life.
- We strongly do not recommend “jumping” your car on curbs, or driving at high speed on rails, since each such trip causes cracks to appear on the rack itself, as well as deformation of the shaft that is part of the steering mechanism.
- It is not recommended to frequently turn the steering wheel all the way. Of course, in this case it will be very difficult to demonstrate your maneuvering capabilities, but this will significantly increase the life of one of the most important parts of the machine.
- Carefully monitor the condition of the protective anthers, which must maintain their tightness. Replacing anthers is several times cheaper than replacing the entire rack.
- It is also worth monitoring the level and condition of the hydraulic fluid, since its decrease or change in color is associated with problems in the vehicle’s hydraulic system, which can result in rack failure.
From time to time you need to undergo a full maintenance, which will allow you to eliminate faults in advance, which can cause irreversible consequences, injury to yourself, your loved ones and other road users. And also, if problems are detected in the operation of the car, it is better not to take risks and go to the nearest car service center as quickly as possible.
Rack and pinion steering
- The steering column provides the ability to adjust the tilt of the steering wheel. And the steering wheel itself can be locked by installing an anti-rotation device connected to the ignition switch.
- The steering mechanism is of a rack and pinion type, where it is possible to change the gear ratio in different operating modes.
- The mechanism is mainly equipped with electric power steering.
- The electric amplifier is equipped with a unit that allows you to independently diagnose the technical condition of the device, and, if necessary, exclude the amplifier from operation.
Reliability of engagement of the gear pair on one side is ensured by a special gap set at the factory. On the other hand, the precision of engagement is maintained by a spring stop, which presses the rack itself against the gear teeth.
The above gap under normal conditions is 0.1 mm, but during operation it may be violated due to wear of individual parts. Thus, one of the main reasons why an extraneous knock appeared in the steering mechanism is a violation of the set gear clearance. It should be noted that there are other malfunctions that can lead to an unpleasant knocking sound in the car:
Replacing the Lada Priora steering rack with a short-throw one
The steering rack had been knocking since the purchase (42,000 km), but not much, they tightened it once, it got a little better, and then it started knocking again. Closer to winter, it was completely broken, in a mess, on the washboard it constantly played all sorts of different musical compositions. Rack 11183-3400010-10 (3.1 turns) assembled with tips original VAZ I immediately ordered a disc spring SS 20
I studied the issue of lubrication of the rack in advance, since I don’t trust the factory, but I want it to last as long as possible. At the factory they put RENOLIT JP 1619 in it, a German lubricant. Substitutes
· “KALIPSOL 4D”, Kalipsol, England;
· “KALIPSOL JP1619”, Kalipsol, England;
· “FIOL-1” TU38USSR201-247-80 Ukraine
I made more than 30 calls to car dealerships, lubricant and oil stores, only one store offered to order RENOLIT JP 1619, price 800 rubles and wait a month - no way!)) We’ve already heard about Fiol 1 in two or three stores, but didn’t sell it anywhere , I found Fiol 1 only on the display of an exhibition stand in the largest Oils and Lubricants store in my city. I bought an 800 gram jar for 100 rubles. It stood on the stand for more than 5 years, and the guaranteed shelf life was 5 years, but it was decided not to worry about it + a friend argued that 20-year-old solid oil is still used :-) And the Azmol plant, the Ukrainian one where Fiol 1 is produced, has closed back in 2013, I think this is the reason that it is not on sale. All lubricants released after this date are counterfeit.
And as soon as I had the rack, after about 30 minutes its long-awaited installation began) The plastic clamps were removed, a visual inspection showed that there was not much lubricant there, without washing, 80 grams of Fiol 1 lubricant was added, the clamps were replaced with worm-type metal ones, and the factory spring was replaced with spring SS20.
SS20 spring on the left, factory on the right
We unscrew the 2 hex bolts, change the spring and don’t forget to install the black boot exactly as it is in the photo!
The process of removing and installing the rack is incredibly simple! I think even schoolchildren can cope with it, although they are not stupid. The day before the process, all 4 bolts securing the rack to the engine shield and steering tips were doused 3 times with WD-40, after replacing the struts with SS20 Comfort, you can read it in the logbook. I really don’t like it when the nuts are hard to unscrew!
In short: We align the wheels so that they look straight (we count the rotations of the steering wheel), remove the driveshaft, first from the top of the steering column, then from the bottom, unscrew the 4 nuts holding the steering rack, you can really get to them all. And then, if the cardan has not been removed from the lower mount, then we move the rack away from the engine shield, a cardan appears under the hood and then we knock it out with a pry bar and a hammer, this is what happened to me.
After lunch on the new rack, do not forget to set the steering tips to the same size as the old rack and also measure its position exactly in the middle (1.55 turns) so that the wheels point forward. Everything is installed in reverse order. I had read a lot about broken heels, and I really didn’t want to repeat the fate of these people. Tighten without fanaticism, even though there are rubber dampers. If you don’t hold it, the rack will not fall off immediately, you will hear this beating in the first stages, and for a week after installation it is better to visually observe the nuts than to bother with welding a new stud. There was only one problem with the installation - in the upper mount of the cardan, it did not fit into the mount, it was carefully driven into it with a wrench.
That's all there is to the installation. Don't forget to go to the service station and at least do an alignment. The steering wheel was straight and I didn't have to turn it over. The two of us did it in about 5 hours, without time for a trip to get metal clamps
Conclusions and sensations: The steering wheel has become a little harder to turn, but I think this will go away when everything gets used to it. In the extreme positions of the steering wheel, the shocks have disappeared, now the steering wheel gently “damps” The steering has become sharper, but to be honest, I expected more, but it has become easier to go around potholes (this costs 800 rubles compared to a regular rack.) The unbearable knocking noise is gone, now you float in the mess like a ferry, it’s nice).
This not particularly difficult, but extremely important work is best carried out on a repair lift. As a last resort, on a wide inspection hole. But then the car must be positioned so that both wheels can be removed.
So, the car is installed according to the mentioned conditions. The wheels have been removed. We can begin. First of all, set the steering wheel of the Priora car to the position of driving straight ahead. That is, the wheels point straight ahead. After this, it is advisable to secure the steering wheel. Loosen the electric power steering mount. Remove the cardan connecting the EUR to the splined end of the steering shaft. And go under the car. There are two options. You can unscrew the lugs from the wheel. But most craftsmen prefer to unscrew the bolts securing the steering rods to the rack. The fact is that it is much easier to remove it this way.
This is done as follows: two 17 bots holding the pressure plate are unscrewed. First, 1 is turned out, and the second is weakened. The pull moves to the side. Then the second one is removed, along with the plate, and the other rod is moved back.
Now the fastenings of the steering rack itself are dismantled. These are semicircular brackets with rubber seals. They are mounted on threaded rods in the Priora body and tightened with nuts 13. It is most convenient to unscrew them with a head. After removing the nuts, the staples are removed. The device being removed is pushed slightly towards itself. This is necessary for the worm device to come out of the hole in the passenger compartment. Now you can remove the steering rack. For this purpose, a technological window is provided in the left wing of the Priora. You can carefully push the edge of the knot into it and pull it out. Either for further disassembly and repair, or simply for replacement with a new copy. As usual, the entire installation of the part is carried out strictly in the reverse order. But before you start, you need to meet several very important conditions!
Special attention! The new Priora steering rack must be strictly in the middle position before installation!
Well, the second point. The fact is that at the factory, no components of this mechanism, except the shaft bearing, are lubricated. It is imperative to remove the anthers and generously lubricate the internal parts of the mechanism with grease or lithol through the side plugs. Once these requirements have been met, you can begin traditional assembly in reverse order. When everything is assembled, turn on the ignition to activate the amplifier and check the control status.
Necessarily! Upon completion of work, carry out wheel alignment adjustment! And you can hit the road!
FakeHeader
Comments 24
The warranty no longer applies. For this reason, remove and disassemble. We did it the first time and made a mistake during installation. Then a familiar mechanic fixed everything without removing it. The steering wheel became better than the factory one, a little more informative. A caprolon bushing, a disc spring, and a small repair kit were installed. If it can be tightened, then it’s better to do it first. Some craftsmen lie, this is allowed from the factory. If the rack has never been tightened, then most likely it should be removed.
the bushing didn't help? Hm
It’s simple, the 2190 rack on the driver’s side of the body has ebbs with ears, for which the rack is screwed to the body, but the Kalinovsky rack does not have these ears, there the rack is pressed through a clamp to the engine shield.
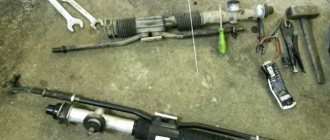
Steering rack removal and repair
Removal work must be carried out with the necessary tools. Such as:
- Ratchet;
- Head at “13”, “15”, “17”;
- Key to "14";
- Hexagon at "6";
- Screwdriver "-";
- Hammer;
- The beard is blunt;
- Wrench for tightening the steering rack;
- Steering wheel end remover;
- Mount;
- WD-40 lubricant;
- Lubricant "Litol - 24";
- Steering rack repair kit;
Steering wheel removal process
- We align the steering wheel exactly in the center.
- Raise the left side of the car with a jack
- We unscrew and unscrew the steering end nuts, then use a puller to squeeze them out of the strut bipod.
- We unscrew the steering cardan in the car with a head on “13”, and forget the screwdriver into the slot of the cardan without damaging the splines. This is necessary for its easy removal from the rack splines.
- Remove the steel washer retainer from the tie rod bolts and unscrew the left steering arm from the rack and pull it out into the left window of the tie rods
- Unscrew the steering rack mounting brackets with a head on “13”
- Using a pry bar, move the rack to the side and remove it into the left window of the steering rods
The withdrawal process is completed
The process of disassembling the rack
- We unscrew the steering rods with a head at “15”
- We remove the anthers by biting off the plastic clamps with side cutters. We pull out the central steering boot to the right side without damaging it.
- We remove the “binoculars” from the rasp.
- Place a mark as shown in the picture and unscrew the nut securing the rack pipe using a punch and a hammer
- We take out the pipe
- We unscrew the steering tightening nut using a special wrench (don’t be afraid to turn it very tightly), take out the rubber ring and the pressure piston.
- To remove the pressure piston, you need to hit the back of the rack and the piston will fall out.
- We take out the rasp
- We unscrew the two bolts with a hexagon “6” and carefully remove the “worm” cover without damaging the oil seal.
- We clamp the worm shaft into the yew through a block and remove it by hitting the body of the rack
- Next, remove the old plastic sleeve from the pipe using a screwdriver
The rail is disassembled, we proceed to the assembly process using new parts
Assembly
- We install rubber rings on the bushing and insert it into the rack pipe
- We wash the worm shaft from the old grease, lubricate it with new and insert it into place, put a plastic bearing on it.
- Place a disc spring into the worm cover, and then a thrust washer on top. Lubricate well and close the lid.
- We lubricate the rasp and insert it into the worm mechanism, and then insert the pipe into the mechanism body and tighten the nut, aligning the previously placed marks.
Centering the steering rack
When assembling the steering wheel, it is necessary to follow a certain rule, which in the future will not lead to the rearrangement of the steering wheel on the splines.
- When the rasp is placed in the rack body, it is necessary to set it to “zero”, that is, the position in which the steering wheel will stand exactly in the center. To do this, you need to measure 235 mm from the right end of the case and put a mark with a marker. This will be “zero”. Next, you need to align the center of the rasp with this mark. The center of the rasp will be the recess under. We combine this notch with the previously installed mark.
- It should also be noted that when combining these marks, the worm shaft should face the flat to the right side at an angle of 90 degrees to the rack body.
- To combine all these parameters, you need to rotate the worm shaft with a key at “14” until all the parameters are combined.
Attention: the rack pressure piston should not be installed when the marks are aligned.
After the marks have been set, we continue assembling
- We install the pressure piston with the cuff on it into the “worm” body. We insert the cuff into the body, then the pressure spring, the nut and tighten it with a little force.
1 - thrust nut, 2 - thrust piston, 3 - collar, 4 - needle bearing, 5 - left side of the rack housing.
- We insert the binoculars onto the rasp, put on the anthers and secure them with clamps
- Then we screw the right swing arm to the rack and install the rack in place.
- We carry out assembly in reverse order.
- It should be noted that the easiest way to install the steering universal joint is by removing it from the steering wheel. Using a key set to “13”, unscrew the nut and remove the bolt, and then the cardan itself.
When installing, make sure that the steering wheel is centered.
- After the rail is installed, it is necessary to tighten it. To do this, tighten the nut until it stops, and then loosen it 90 degrees.
The rack nut has a left-hand thread, but when it is installed on a car, the nut must be tightened counterclockwise. Because the nut is pointing up.
- When turning or turning, the steering wheel should return to the zero point on its own.
The steering rack repair process is complete.
Lift
If knocking is detected in the steering wheel, it can be tightened, but tightening will be effective only if there is knocking from the worm gear. If the knocking noise comes from a broken plastic bushing, then tightening is useless.
As is known from practice, the worm mechanism is quite reliable and is very rarely the culprit of knocking. Most often the bushing is to blame.
You can determine the culprit of the knock by pulling the steering rods one by one.
- If there is a knocking sound when applying forces to the right link, then the bushing is to blame.
- If there is a knocking sound when you apply force to the left linkage, then the worm gear is to blame.
In the first case, a lift is not advisable. Since the tightening nut only tightens the worm mechanism. To eliminate the knocking noise, it is necessary to remove the steering rack from the car and have it repaired.
Product delivery options
Note! Below are the shipping methods available specifically for this product. Payment options may vary depending on the shipping method. Detailed information can be found on the “Delivery and Payment” page.
Parcel by Russian Post
Available payment methods:
- Cash on delivery (payment upon receipt)
- Using cards Sberbank, VTB, Post Bank, Tinkoff
- Yandex money
- QIWI
- ROBOKASSA
Shipping throughout Russia. Delivery time is from 5 to 12 days.
Parcel by Russian Post 1st class
Available payment methods:
- Cash on delivery (payment upon receipt)
- Using cards Sberbank, VTB, Post Bank, Tinkoff
- Yandex money
- QIWI
- ROBOKASSA
Shipping throughout Russia. Delivery time is from 2 to 5 days. More expensive than regular delivery by Russian Post, approximately 50%. Parcel weight up to 2.5 kg
Express Parcel EMS
Available payment methods:
- Cash on delivery (payment upon receipt)
- Using cards Sberbank, VTB, Post Bank, Tinkoff
- Yandex money
- QIWI
- ROBOKASSA
Shipping throughout Russia. Delivery time is from 3 to 7 days. More expensive than regular delivery by Russian Post, approximately 100%.
Transport companies
Available payment methods:
- Using cards Sberbank, VTB, Post Bank, Tinkoff
- Yandex money
- QIWI
- ROBOKASSA
Delivery is possible to any locality where there is a representative office of the transport company. Delivery time is from 2 to 10 days. Sending large parcels is approximately 50% more profitable than by Russian Post.
Pickup from our warehouse
Available payment methods:
- Cash upon receipt
- Credit, installments
- Using cards Sberbank, VTB, Post Bank, Tinkoff
- Yandex money
- QIWI
- ROBOKASSA
Pickup times must coincide with store opening hours.
Source