The VAZ 2108 switch provides the formation of control pulses supplied to the ignition coil. This element of the vehicle's electrical equipment is an electronic device that ensures the normal functioning of the vehicle's contactless ignition system.
This component of the vehicle's electronic ignition system is surface mounted and is robust enough to withstand the high vibration and shock loads that may occur during vehicle operation. The device implements the maximum possible protection options for electronic components.
Automotive ignition system
Of course, in the VAZ-2109 car, and in other models as well, each system is very important, because it fulfills its main purpose, and failure of any system simply will not allow the car to perform its functions. Therefore, you need to monitor every system in your car, and, of course, the ignition system, without which the power unit will not be able to operate. Car owners should not consider the ignition system as a separate part, since it consists of several rather complex components, and one of the most important is the switch.
Quite often, car owners wonder: how can they check the VAZ-2109 switch and is it really possible to cope with this task on their own? We will try to understand these questions further.
What signs indicate a faulty switch?
The most obvious sign of a faulty switch is the loss of the so-called spark, as well as interruptions in the operation of the engine, for example, it may begin to have difficulty starting and quickly stall even after warming up.
It is not recommended to immediately change the switch due to loss of spark, since such a malfunction is sometimes caused by other automotive components that fail:
- Hall Sensor;
- timing belt rupture;
- poor contact in the distributor;
- ignition coil failure. If a malfunction is detected in this particular element, then, according to experts, the coil needs to be replaced rather than wasting time on repairing it.
If diagnostics of the components described above confirm their serviceability, you will have to begin checking a more complex device called a switch.
How is BSZ better than contact?
Having carefully read the previous section, you can see that the system uses an inductive non-contact Hall sensor. The advantage is obvious - there is no friction and commutation. For comparison, look at the contact system. In it, the breaker switches the voltage, the value of which is 12 Volts. Whatever one may say, the metal contacts are constantly in contact with each other, gradually wear out, and become covered with soot.
For these reasons, it is necessary to constantly monitor the breaker, adjust the gap, and carry out timely replacement. BSZ is devoid of these shortcomings, therefore, without third-party intervention, the system operates much longer. The Hall sensor fails very rarely, as does the switch. This increases the reliability of the system, but precautions must also be taken, in particular, the connection of the switch to the body must be as tight as possible to ensure effective heat exchange. In addition, BSZ allows you to improve engine performance, increase, albeit slightly, its power, along with increasing reliability.
Self-test of the switch
To check the operation of the switch yourself, you will need a set of regular car keys. The rated voltage is measured with a multimeter and a special light bulb, the value of which should be no more than 12 V.
It’s quite easy to independently check the functionality of the switch if you perform this step step by step:
- The battery must be disconnected from the power supply to prevent short-circuiting the wiring.
- Using a size 8 wrench, unscrew the fastener from the wire that goes to the ignition coil. Finding this wiring is quite simple by marking “K”.
- The disconnected wire must be connected to a control light and a clamp that has the same marking “K”.
- Next, you should connect this wire to the battery.
- After turning on the car starter, you need to observe the so-called behavior of the warning light. If the switch is working, the light will periodically turn on and off, and if it does not perform any actions, then the device can be considered incompetent and will need to be replaced.
At this point, the process of checking the switch is considered complete, and, as many can see, it is very simple and understandable. Therefore, you should not immediately turn to a service station for a solution to this issue and spend a rather impressive amount of money. First of all, you should try to test this device yourself, and if difficulties still arise, you can watch a training video on an Internet resource at any time, conducted by real masters of their craft.
If the VAZ-2109 car owner doubts the serviceability of the element, then it is best to check its operation at the test stand, which is provided at each service station. Using such a stand, not only the functionality of the switch is checked, but also the duration of the pulse generated by this device.
Instructions for display
There are several options for adjusting the ignition on a figure-eight engine, all of them are described in detail in this article. But now we would like to talk about how to set the ignition on a VAZ and how to check the set angle using a special device. Namely, we are talking about the emergency ignition module.
So, the ignition installation is carried out as follows:
- First of all, the connector should be removed from the switch.
- After this, the emergency ignition must be installed in the connector, the key must be turned, but the starter should not be rotated.
- Next, the hood opens, you need to align the crankshaft mark with the camshaft mark. Use the service book and follow the recommendations noted in it.
- There is a diode D on the emergency ignition, with its help the required angle is set, in particular, at the moment when the light comes on. The angle is set by rotating the camshaft, while the slider on the distributor cover must be directed towards the first cylinder.
Switch VAZ 2108, 2109, 21099
The contactless ignition system of VAZ 2108, 21081, 21083, 2109, 21091, 21093, 21099 cars uses an electronic switch.
Switch Purpose
The switch is designed to interrupt the electric current flowing through the primary winding of the ignition coil, according to a signal from the Hall sensor. The interruption results in a high voltage current flowing to the spark plugs.
In addition, the switch automatically regulates the period of current accumulation in the ignition coil depending on the crankshaft speed. It also turns off the current supply through the ignition coil when the engine is not running but the ignition is on.
Switch device
Inside the switch there are powerful transistors designed to interrupt the electrical current. As well as devices for automatic accumulation of current in the ignition coil and automatic locking of the transistor when the engine is stopped.
Operating principle of the switch
When the ignition system is operating, pulses from the Hall sensor installed in the distributor are sent to terminal “6” of the switch and then through it to the primary winding of the ignition coil. When the current in the primary winding of the ignition coil is interrupted, the magnetic field in it sharply contracts and induces an EMF of 22-25 kW, which gives a spark on the spark plugs sufficient to ignite the fuel mixture.
Switch connection diagram
Switch problems
Applicability of the switch on VAZ 2108, 2109, 21099 cars
In the contactless ignition system of VAZ 2108, 2109, 21099 cars, the following switches are used: 36.3734, 3620.3734, 76.3734, 133.3774-01, RT1903, PZE1022 and their analogues from different manufacturers.
Notes and additions
— When replacing or checking the switch, it is prohibited to disconnect the wire block from it with the ignition on, in order to avoid damage to its electronic filling.
Full scheme
Checking Japanese cars
1 – block headlight; 2 – gear motor for headlight cleaner*; 3 – engine compartment lamp switch; 4 – sound signal; 5 – electric motor of the engine cooling system fan; 6 – fan motor activation sensor; 7 – generator; 8 – solenoid valve for turning on the headlight washers*; 9 – solenoid valve for turning on the rear window washer* (not installed on the VAZ-21099); 10 – solenoid valve for turning on the windshield washer; 11 – electric motor for glass washer; 12 – oil pressure warning lamp sensor; 13 – carburetor solenoid valve; 14 – carburetor limit switch; 15 – spark plugs; 16 – plug socket for a portable lamp; 17 – engine compartment lamp; 18 – ignition distributor sensor; 19 – carburetor solenoid valve control unit; 20 – windshield wiper gearmotor; 21 – switch; 22 – ignition coil; 23 – starter; 24 – top dead center sensor of the 1st cylinder**; 25 – diagnostic block**; 26 – starter activation relay; 27 – coolant temperature indicator sensor; 28 – reverse light switch; 29 – battery; 30 – brake fluid level sensor; 31 – mounting block; 32 – parking brake warning lamp switch; 33 – brake light switch; 34 – glove box lighting lamp; 35 – heater fan electric motor; 36 – additional resistor of the heater electric motor; 37 – heater fan switch; 38 – backlight lamp for heater levers; 39 – cigarette lighter; 40 – rear window heating switch; 41 – rear fog light switch; 42 – fog light circuit fuse; 43 – alarm switch; 44 – external lighting switch; 45 – ignition relay; 46 – ignition switch; 47 – steering column switch; 48 – instrument lighting switch; 49 – side direction indicator; 50 – lamp switch on the front door pillar; 51 – lamp switch on the rear door pillar (not installed on VAZ-2108 and VAZ-21083); 52 – lampshade; 53 – sockets for connecting individual interior lighting to the lampshade; 54 – switch for the carburetor air damper warning lamp; 55 – turn signal indicator lamp; 56 – indicator lamp for external lighting; 57 – rear fog light indicator lamp; 58 – backup warning lamp; 59 – control lamp for high beam headlights; 60 – indicator lamp for heated rear window; 61 – speedometer; 62 – instrument cluster; 63 – instrument cluster lighting lamps; 64 – coolant temperature indicator; 65 – voltmeter; 66 – fuel level indicator with reserve indicator lamp; 67 – econometrician; 68 – “STOP” indicator lamp; 69 – battery charge indicator lamp; 70 – control lamp for the carburetor air damper; 71 – hazard warning lamp; 72 – brake fluid level warning lamp; 73 – parking brake warning lamp; 74 – oil pressure warning lamp; 75 – rear light; 76 – sensor for level indicator and fuel reserve; 77 – pads for connecting to the rear window heating element; 78 – license plate lights; 79 – rear window wiper gear motor* (not installed on VAZ-21099)
The order of conditional numbering of plugs in blocks:
a – mounting block, instrument cluster, ignition switch and windshield wiper (for blocks with a different number of plugs, the numbering order is similar); b – ignition distributor sensor; c – switch and carburetor solenoid valve control unit; d – headlight units, headlight and rear window cleaners; g – interior lighting lamp; e – fuel level sensor; d – rear lights (pin numbering in order from top to bottom)
* Installed on parts of manufactured cars. ** Not installed since 1995.
Replacing the ignition switch on a VAZ 2108, VAZ 2109, VAZ 21099
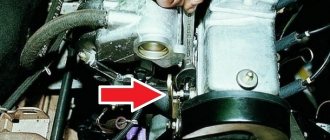
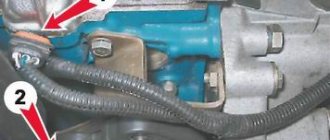
Where is the ignition system switch located? Its location is very simple, and all because it is located at the very top of the car engine, and it is very easy to get to. The switch is located near the vacuum booster, and it is attached to the car body with two nuts, so that you visually know its location, see the photo below:
When do you need to change the ignition system switch? If it fails, the engine may experience the following malfunctions:
- Firstly, the car’s engine may not operate steadily, both at idle and when driving the car.
- And secondly, very often there can be a loss of car throttle response; in other words, the car will drive worse.
How to replace the ignition system switch on a VAZ 2108-VAZ 21099?
Removal: 1) First remove the negative terminal from the battery. (You can read how to do this in the article: “Replacing the battery”, in the “first” paragraph)
2) Then disconnect the wire block from the switch by hand.
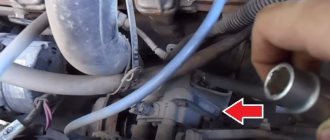
3) Next, use a wrench to unscrew the two side nuts that secure the switch to the car body.
Note! There will be a ground terminal under the left nut, so when the nut is unscrewed, disconnect this terminal from the switch!
4) And at the end of the operation, when the block is disconnected and the two side nuts are unscrewed, remove the switch from the car.
Installation: 1) First, install the new switch in its place, and then tighten the side nuts that secure it.
Note! Before you start screwing the left nut, install the ground terminal in the place where it will be screwed first, and only after that screw the left fastening nut!
2) Next, insert the wire block into the connector of the new switch.
3) And then, finally, install the “minus” terminal that you removed earlier on the battery.
Checking the ignition system switch for serviceability:
1) To do this, first disconnect terminal “K” from the ignition coil by unscrewing the nut that secures it with a wrench. (Be sure to read the “Important” paragraph at the end of the article).
2) Next, using a test lamp, which is designed for “12 Volts”, with a power of “3 W”, check the coil for serviceability for this:
- First, connect the previously disconnected terminal to the control lamp.
- And then connect the other contact that comes from the control lamp in place of the “K” terminals on the ignition coil.
- And then, turning the engine over with the starter, check whether the lamp lights up or not.
Note! If it does not light up, then replace the ignition coil with a new one!
Important! On the very first ignition coils, instead of the “K” marking, the “+” marking was drawn, and therefore, if this is the case on your coil, then in this case, disconnect the wire next to which the “+” marking is located and not “K”!
Setting up SZ
If you have a VAZ 2109 carburetor, you will have to adjust the ignition system from time to time. This procedure is not the simplest; it requires following clear instructions. The operating procedure is as follows:
- We take the manual for our “nine” in our hands, set the contact gaps in accordance with the recommended values. Typically this is 0.45 mm.
- The ignition timing is set using special equipment, we miss this point.
- We connect the high-voltage wires and begin adjusting the torque in the middle of the stroke.
- Install the spark plug in the first cylinder and turn on the ignition.
- Turn the pulley counterclockwise 45°.
- We connect the ground to the spark plug, turn the pulley gradually in a clockwise direction until a spark appears between the electrodes.
- We look at the marks of the cover and pulley. They must be on the same level.
- To ensure that the marks coincide, we turn the distributor in the desired direction.
- If the marks do not match, the ignition will either be late or turn on prematurely, which is unacceptable.
- We rotate the pulley and distributor until we get the desired result, after which the distributor will need to be tightened, and then turn the crankshaft two turns.
- Check the result: if everything works fine, we finish the adjustment.
- You need to warm up the engine, then drive at a speed of 40-50 km/h, switch to fourth gear and accelerate sharply. If there is a knock, the ignition worked prematurely, we adjust it again.
How to check a VAZ 2108-2109 switch
Warm Siberian greetings to everyone. I want to share with you that the switch is different from the switch. A new one, just from the store, may be worse in terms of parameters than the replaced old one, which was previously thrown into the trunk. I will also show how the switch is responsible for the power and duration of the spark.
After the release of my videos on YouTube on repairing, adjusting carburetors and diagnosing injection cars. I started getting a lot of questions. In order to communicate more closely with my subscribers and viewers, I began to conduct these streams. Subscribe. Press the bell. Ask your questions - I will be happy to answer them in more detail than in writing.
Sources
- drive2.ru/l/564176184837932184/
- vaz-russia.com/remont-vaz-2108/zamena-kommutatora-zazhiganiya-na-vaz-2108-vaz-2109-vaz-21099.html
- twokarburators.ru/kommutator-vaz-2108-2109-21099/
- ladaautos.ru/vaz-2109/kak-mozhno-proverit-kommutator-vaz-2109.html
