The oil pressure sensor is a monitoring element of the electrical systems of an internal combustion engine (ICE). One of the conditions for proper engine operation is sufficient oil pressure, which is created by the oil pump and measured by a pressure sensor. Its task is to convert mechanical pressure force into an electrical signal.
VAZ 2109 engine models vary depending on the year of manufacture. Their main difference is the fuel system, which involves a carburetor or injector. In this case, the device and installation location of the oil pressure sensor, as well as the methods for diagnosing it, are the same.
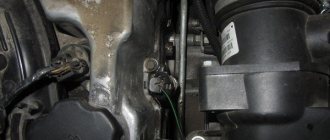
Where is the oil pressure sensor located?
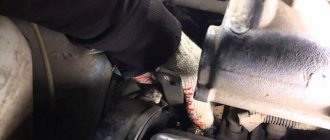
It is located just below the block head cover, see the photos below for more details:
Note! A protective cover is installed on top of the oil pressure sensor, which, unfortunately, is removed in the photo, so when you look for this sensor, look closely at its protective cover, and not at the sensor itself.
Electrical equipment 2108 oil
Electrical diagram of VAZ-2108, VAZ-21083, VAZ-2109, VAZ-21093 and VAZ-21099 cars of the “standard” version (with instrument panel -2108, with mounting block type 17.3722, years of manufacture 1988–1999)
Low oil pressure alarm
1 – block headlight; 2 – gear motor for headlight cleaner*; 3 – engine compartment lamp switch; 4 – sound signal; 5 – electric motor of the engine cooling system fan; 6 – fan motor activation sensor; 7 – generator; 8 – solenoid valve for turning on the headlight washers*; 9 – solenoid valve for turning on the rear window washer* (not installed on the VAZ-21099); 10 – solenoid valve for turning on the windshield washer; 11 – electric motor for glass washer; 12 – oil pressure warning lamp sensor; 13 – carburetor solenoid valve; 14 – carburetor limit switch; 15 – spark plugs; 16 – plug socket for a portable lamp; 17 – engine compartment lamp; 18 – ignition distributor sensor; 19 – carburetor solenoid valve control unit; 20 – windshield wiper gearmotor; 21 – switch; 22 – ignition coil; 23 – starter; 24 – top dead center sensor of the 1st cylinder**; 25 – diagnostic block**; 26 – starter activation relay; 27 – coolant temperature indicator sensor; 28 – reverse light switch; 29 – battery; 30 – brake fluid level sensor; 31 – mounting block; 32 – parking brake warning lamp switch; 33 – brake light switch; 34 – glove box lighting lamp; 35 – heater fan electric motor; 36 – additional resistor of the heater electric motor; 37 – heater fan switch; 38 – backlight lamp for heater levers; 39 – cigarette lighter; 40 – rear window heating switch; 41 – rear fog light switch; 42 – fog light circuit fuse; 43 – alarm switch; 44 – external lighting switch; 45 – ignition relay; 46 – ignition switch; 47 – steering column switch; 48 – instrument lighting switch; 49 – side direction indicator; 50 – lamp switch on the front door pillar; 51 – lamp switch on the rear door pillar (not installed on VAZ-2108 and VAZ-21083); 52 – lampshade; 53 – sockets for connecting individual interior lighting to the lampshade; 54 – switch for the carburetor air damper warning lamp; 55 – turn signal indicator lamp; 56 – indicator lamp for external lighting; 57 – rear fog light indicator lamp; 58 – backup warning lamp; 59 – control lamp for high beam headlights; 60 – indicator lamp for heated rear window; 61 – speedometer; 62 – instrument cluster; 63 – instrument cluster lighting lamps; 64 – coolant temperature indicator; 65 – voltmeter; 66 – fuel level indicator with reserve indicator lamp; 67 – econometrician; 68 – “STOP” indicator lamp; 69 – battery charge indicator lamp; 70 – control lamp for the carburetor air damper; 71 – hazard warning lamp; 72 – brake fluid level warning lamp; 73 – parking brake warning lamp; 74 – oil pressure warning lamp; 75 – rear light; 76 – sensor for level indicator and fuel reserve; 77 – pads for connecting to the rear window heating element; 78 – license plate lights; 79 – rear window wiper gear motor* (not installed on VAZ-21099)
When should you change the oil pressure sensor?
It must be replaced when worn out, this can be determined in the following ways:
1. The first signs of a sensor malfunction are the oil pressure lamp indicator lighting up on the instrument cluster.
Note! But here you need to be absolutely sure that everything is in order with the engine, otherwise, as happens, people first blame the sensor, and later they find out that they actually have a problem with the engine, so so that such questions do not arise, check carefully :
- The oil level in the engine, if the level is too low, then bring it to normal. (How to check the level and bring it to normal, see the article: “Changing the oil”)
- Further, the electrical wiring that is connected to the sensor may also be faulty.
- Also, the oil pressure lamp coming on can be caused by some kind of malfunction in the engine lubrication system.
2. If the oil pressure sensor is faulty, it may also be oily, so first of all, take a closer look to see if there are any oil particles on your sensor.
What to do if the sensor lights up
If the oil pressure light on the dashboard comes on and does not go away for a long time, it can be assumed that there are problems with the engine. Sometimes this may be due to a loose wire.
There are several main reasons why the warning light on your dashboard comes on. These include:
- installation of a low-quality oil filter. Low quality filters are not able to retain oil after the car is stopped. The solution is to replace the oil filter;
- insufficient oil level. In this case, it is necessary to add oil to the required level and find the cause of the leak;
- oil pump damage. It is recommended to have this problem repaired at a service station.
Thus, the oil pressure sensor on the VAZ-2109, despite its small size, plays a rather important role in ensuring the correct and stable operation of the car.
It requires constant monitoring and, if minimal signs of malfunction appear, mandatory replacement. This is the only way to extend the life of the engine of any car and avoid unnecessary financial costs that may arise due to sensor malfunctions.
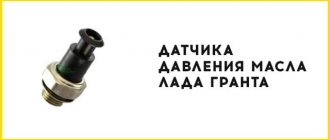
What functions does the sensor perform?
It is not uncommon for a lamp to light up on the panel of a VAZ 2109, which indicates that the oil pressure is too low or completely absent. At the same time, the inspection showed that there were no leaks anywhere.
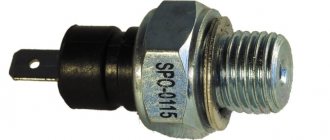
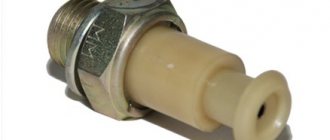
Appearance of the device
First of all, it is recommended to check the oil pressure sensor (OPS). Based on the analysis, we can conclude whether the controller is really to blame, or whether the cause should be looked for in other places.
How to check and replace an element
During long-term operation, the internal parts of the sensor wear out and periodically fail. The malfunction manifests itself in the form of false readings on the indicator scale or a constantly burning emergency lamp. Before drawing conclusions about power unit failures, it is highly advisable to check the functionality of the sensor.
If the control light comes on while the engine is running and the indicator drops to zero, your first action is to immediately turn off the engine and do not start it until the problem is discovered.
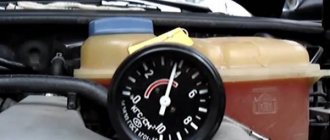
When the light comes on and goes out in a timely manner, and the needle does not deviate, you should check the serviceability of the oil sensor - the MM393A pressure meter. You will need a 19 mm open-end wrench and a pressure gauge with a scale of up to 10 Bar (1 MPa). A flexible pipe with a threaded tip M14 x 1.5 must be screwed to the pressure gauge.
Checking the oil pressure sensor VAZ 2109
The sensor has an elastic membrane that deforms when oil pressure is applied to it. The amount of membrane deflection is reported to the rheostat when the resistance changes. This change is recorded by the car's electronic system and reported to the pressure gauge. That, in turn, shows the corresponding data on the dashboard.
Brand new device
Today, VAZ 2109 owners use two main ways to check the functionality of the oil pressure sensor. Decide for yourself which one to use.
| Verification method | Your actions |
| First way |
|
| Second way | The second method is more detailed and allows you to find out not only whether everything is okay with the sensor. You need:
|
If after the second test method the LED goes out and the sensor turns out to be working, but the lamp on the dashboard still continues to light, the reason is different. She needs to be found. This is done like this:
- Gradually increase engine speed to reach 2000 units per minute;
- If the engine temperature is about 80 degrees and the pressure gauge shows less than 2 bar, the crankshaft bearing is worn out and requires replacement;
- If the pressure gauge shows more than 2 bar, the problem is not with the bearing. Let's move on;
- Increase the speed of the power unit. If the pressure gauge shows above 7 bar, the bypass valve has broken down. Its replacement is carried out together with the replacement of the oil pump cover.
Even if, after all the above operations, the light on the dashboard stubbornly refuses to go out, you will have to contact a car service center so that you can have a comprehensive diagnosis of the car’s condition.
Location
| Sensor | vendor code | Cost, in rubles |
| Oil pressure sensor analog MM120D | SOP20101O7 | 80 |
| Oil pressure sensor VAZ Samara | 33000 | 150 |
| Oil pressure sensor (BCG) | OS3518-BCG | 150 |
| Oil pressure sensor ERA | 11260 | 100 |
Device and connection diagram
The task of the membrane switch, made in the form of a nut with a terminal, is to promptly close the electrical circuit with the warning lamp when the lubricant pressure drops. The device consists of the following parts:
- metal body in the form of a hexagon;
- contact Group;
- pusher;
- measuring membrane.
The element is connected to the circuit according to the simplest circuit - in series with the indicator. The normal position of the contacts is “closed”, so after turning on the ignition the light comes on. When the engine is running, there is a pressure of oil flowing to the membrane through the tee. Under the pressure of the lubricant, the latter presses the pusher, which opens the contact group, as a result the indicator goes out.
When one of the malfunctions occurs in the engine, causing a decrease in the pressure of the liquid lubricant, the elastic membrane returns to its original position and the electrical circuit is closed. The driver immediately sees the problem by the flashing “control”.
The design of the second element, the “barrel” called MM393A, is somewhat more complicated. The main role here is also played by an elastic membrane connected to an actuator - a rheostat and a slider. The rheostat is a coil of high-resistance chromium-nickel wire, and the slider is a movable contact that moves along the turns.
The electrical circuit for connecting the sensor and pointer is similar to the first one - the rheostat and the device are in series in the circuit. The operating algorithm is as follows:
- When the driver turns on the ignition, on-board voltage is supplied to the circuit. The slider is in its extreme position, and the winding resistance is maximum. The instrument needle remains at zero.
- After starting the engine, oil appears in the channel, flowing through the tee into the “barrel” and pressing on the membrane. It stretches and uses a pusher to move the slider along the winding.
- The total resistance of the rheostat begins to decrease, the current in the circuit increases and causes the indicator arrow to deviate. The higher the lubricant pressure, the more the membrane stretches and the less resistance of the coil, and the device notes the increase in pressure.
The sensor reacts in the reverse order to a decrease in oil pressure. The force on the membrane decreases, it is thrown back and pulls the slider with it. He turns on new turns of the rheostat winding in the circuit, the resistance increases, and the instrument needle drops to zero.
Video: what pressure should a working device show?
Replacing the oil pressure sensor VAZ 2109
So, the check showed that the oil pressure sensor is the culprit and it needs to be replaced. There is definitely no need to go to a car repair shop for this. The work is easy to do with your own hands, even for beginners in the field of self-repair of a car. Especially when it comes to repairing a car like the VAZ 2109.
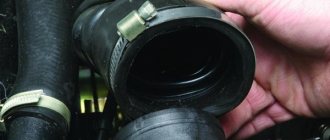
Dismantling works
To replace the sensor, you first need to remove it and install a new one in place of the old device. Step by step it looks like this.
- Disconnect the negative terminal from the battery. All work related to the electrical component of the car must begin with this step.
- Disconnect the power cable with protective cover from the sensor by hand. They are connected together, so there is no point in trying to disconnect the cover separately.
- Using a wrench, you must completely unscrew the oil pressure sensor from its mounting socket.
- Finally remove the regulator from its seat.
- Arm yourself with a new sensor, insert it into the appropriate socket. An aluminum O-ring should be included with the new device. Check this at time of purchase. You should not use the sealant from the old DDM.
- Screw the sensor until it stops using a wrench. A mistake many people make is to simply screw in the device by hand. This contact may not be sufficient, causing the oil pressure regulator to provide incorrect information.
- Return the wire combined with the protective cover of the sensor wiring to its place.
- Connect the negative terminal back to the battery and check to see if the light on the instrument panel stops lighting.
When changing the oil pressure sensor, it is strongly recommended to choose a new device whose markings correspond to the previously used regulator. Otherwise, it may simply not work or provide incorrect information.
Obviously, there is absolutely nothing complicated about replacing DDM. The greatest concern is the fact that replacing the DDM will not produce results and the check engine light will stubbornly continue to light on the dashboard. It cannot be ignored. It's better to contact a service station. Comprehensive diagnostics is an excellent solution, which at the same time will allow you to determine the presence of other faults in the systems of your VAZ 2109.
Pointer functions and operation
The purpose of the device, built into the dashboard to the left of the tachometer, is to display the engine oil pressure level, guided by the sensor. The principle of operation of the pointer resembles the operation of a conventional ammeter, which responds to changes in current strength in the circuit. When the mechanical rheostat inside the measuring element changes resistance, the current increases or decreases, deflecting the needle. The scale is graduated in pressure units corresponding to 1 Bar (1 kgf/cm2).
The device consists of the following main elements:
- round body;
- pointer mechanism with permanent magnet and windings;
- a control light connected to the corresponding sensor by a separate line;
- scale with backlight;
- compensation resistor;
- connecting wires with connector.
Zero readings of the device correspond to a circuit resistance of 320 Ohms. When it drops to 100-130 Ohms, the needle stays at 4 Bar, 60-80 Ohms - 6 Bar.
The Zhiguli engine lubrication pressure indicator is a fairly reliable element that breaks very rarely. If the arrow does not want to leave the zero mark, then the culprit is usually the sensor. When you doubt the functionality of the indicating device, check it using a simple method: measure the voltage at the connection contacts of the MM393A oil sensor with the engine running. If voltage is present and the needle is at zero, the device should be changed.
The VAZ 2106 oil pressure monitoring system with two sensors and a mechanical indicator is simple and reliable in operation. Despite the outdated design, car enthusiasts often buy and install these meters on other, more modern cars, equipped from the factory with only a control indicator. Examples are the updated VAZ Seven, Chevrolet Aveo and Niva.
Reasons for the indicator light and diagnostic methods
A sufficiently experienced car owner can independently diagnose or repair this system. Otherwise, it is recommended to contact a service center for help.
Sensor malfunction
To check the serviceability of the sensor, it is necessary to perform a number of operations:
- Turn the ignition key to the first position (turn on the ignition).
- Make sure the pressure indicator lights up.
- Open the engine compartment and disconnect the sensor wire.
- Make sure the indicator is not lit.
- Attach the bare end of the wire to ground, for example to the engine housing.
- The indicator on the dashboard should light up. If so, the wire is OK and the cause of the malfunction lies in the sensor.
The manufacturer does not recommend disassembling or repairing the sensor. It needs to be replaced.
Violation of the integrity of electrical wiring
Due to large temperature changes, ingress of fuels and lubricants, natural drying or mechanical damage in the engine compartment, electrical wiring is a vulnerable part of the vehicle's electrical systems.
Checking its integrity can be visual, by inspecting visible parts, or using a multimeter to check the conductivity and resistance of the wire.
This check is carried out strictly in accordance with the electrical diagram of the VAZ 2109 car.
Low engine oil level
During the operation of the vehicle, minor consumption of engine oil is allowed. Checking its level should be done using a special dipstick with the engine cold or not running for more than 10 minutes.
It is necessary to check its level using the dipstick and, if necessary, top up. The indicator is then rechecked with the engine running.
Low oil levels can also be caused by oil leaks.
Engine wear
Engine operation involves constantly rubbing metal surfaces. No matter how well they are lubricated, wear is inevitable.
In internal combustion engine elements such as the piston group and the timing mechanism (gas distribution mechanism), there are special oil channels. Through them, the most inaccessible rubbing surfaces are lubricated. Due to prolonged use of the vehicle and engine wear, the sealing of the channels is lost and the oil pressure drops. To eliminate this problem, you need to completely disassemble the internal combustion engine and overhaul it.
Pump fault
The oil pump is a device located at the bottom of the engine crankcase that is driven by a mechanical connection to the crankshaft gear. Due to its rotation, oil pressure is generated. The higher the engine speed, the higher the pressure level. Lack of maintenance and untimely replacement of technical fluids, as well as a long service life, can affect the quality of the pump.
To check it, a pressure gauge is used, which is screwed into the technical hole of the sensor.
When the engine is running at idle speed, the pressure should be ±1.5 atmospheres (kg/cm2), and when the speed increases - up to 5–6 atmospheres.
Location and appearance of the device
The sensor installed on classic VAZ 2106 models consists of the following parts:
- an element in the form of a round metal barrel with one terminal for connecting a wire (factory name - MM393A);
- the second part is a membrane switch in the form of a nut with a contact at the end (designation MM120);
- a steel tee into which the above parts are screwed;
- sealing bronze washers.
The large “barrel” MM393A is designed to measure pressure, the “nut” with the MM120 terminal fixes its absence, and the tee is a connecting element that is screwed into the engine. The location of the sensor is on the left wall of the cylinder block (if you look in the direction of movement of the car) under spark plug No. 4. Do not confuse the device with the temperature sensor installed higher in the cylinder head. Wires leading inside the cabin, to the dashboard, are connected to both contacts.
In later models of the “classic” VAZ 2107, the indicator arrow on the dashboard is missing, only a warning lamp is left. Therefore, a stripped-down version of the sensor is used without a tee and a large barrel.