02/04/2022 11,846 VAZ Kalina
Author: Ivan Baranov
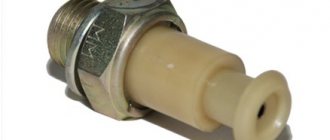
The Kalina oil pressure sensor is a fairly reliable device and rarely breaks down, but sometimes it fails. The article is dedicated to this device: what it is, where it is located, how to check its serviceability. Instructions for replacement are provided.
[Hide]
Location
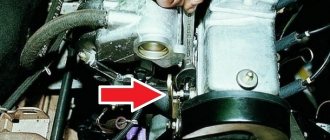
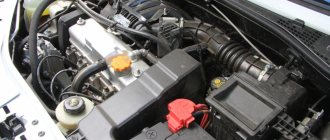
Where the oil pressure sensor is located depends on the number of cylinders. On 4-cylinder engines, the device is located on one side of the engine. This is a small plastic electrical connection that is secured to the motor with a screw. 6 cylinder engines have a device under the spark plug wires attached to one side of the valve cover.
Sensor cost
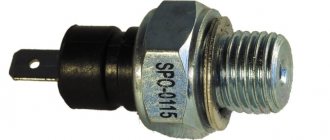
The Lada Kalina uses the original Lada oil pressure sensor 11183829010. Its price is about 180-250 rubles. Third-party manufacturers produce analogues of the native DDM. Among them there are very good options at an attractive price. The table below shows the best sensors from third-party brands that have performed well on the Lada Kalina.
Table - Recommended analogues of the original Lada Kalina crankshaft sensor
| Firm | Catalog number | Approximate cost, ruble |
| AMY | 6022.3829-01 | 80-140 |
| Autodevice | 1118-3829010 | 120-185 |
| Road map | 11183829010 | 75-100 |
| Bautler | BTL1118OPS | 130-150 |
| Baker | 11183829010 | 100-130 |
Exploitation
The oil pressure sensor on the viburnum is part of a system that monitors the pressure near the engine pump and filter. For this purpose, the engine block has a socket with a threaded connection through which the sensor is fixed. Electricity meters use a device in the motor block to create a variable resistance that will influence the amount of current through the metering circuit and sensor.
Pressure meters require a power source. The electrical diagram shows that power flows through the meter and back to ground through the sensor. The meter readings as a whole will depend on the resistance of the sensor, which, in turn, is determined by the pressure.
Features of choosing oil for Kalina
Castrol Edge - the choice of many drivers
We have more or less figured out the additives, but which oil is better to choose for your “swallow”? The choice of lubricant is one of the most difficult issues that should be treated with the utmost seriousness and care.
Some drivers prefer all-season oils; they can be easily refilled throughout the year. But professionals advise doing otherwise. The all-season option, of course, is good for its versatility, but it cannot cope with the loads that a hard-working motor is subjected to every day. Therefore, it is more correct to alternate summer and winter oils: in the warm season, pour in a thicker, more viscous one, and in cold weather, use a special mixture that will eliminate possible problems.
The qualification table will help you make the right choice when purchasing.
| Brand | Temperature |
| 0W | 30-40 degrees below zero |
| 5W | Up to 25 degrees below zero |
| 10W | 15-20 degrees below zero |
| 15W | From 10 degrees below zero |
| 20W | 5-7 degrees below zero |
| 25W | No more than 5 degrees below zero |
Based on the data in the qualification table, you can easily figure out which oil for Kalina you need to purchase.
Malfunctions and ways to eliminate them
The indicator can be activated when there is no pressure required to inject oil into the cylinders. Without the lubrication provided by oil, the cylinders may be damaged, requiring a new engine. The warning light may come on for a variety of reasons. First you need to determine whether this is a problem with the meter or something else.
Low pressure
Low pressure is the main reason the dashboard light comes on. The device determines whether oil is supplied in such quantity that it reaches all parts of the engine. If the pressure is insufficient, the friction of the parts rubbing against each other will cause heat and abrasion, damaging the engine. In this case, the device is not necessarily damaged; you should look for the cause of the low oil pressure.
Low level
Low oil level is not a common cause of sensor failure. With a small amount of lubrication, it is possible to circulate oil through the engine at sufficient pressure to activate the sensor. The reasons why the level is low are leaks in the distribution system, improper replacement of the drain plug or oil filter, and debris.
Faulty device
From time to time the unit may become clogged with contaminants, especially if the engine is not properly maintained. A clogged meter gives false readings, causing the warning light to come on.
How to independently replace the crankshaft sensor on a VAZ 2112 car
There are 3 ways to check for a faulty crankshaft sensor:
- measurement using an ohmmeter;
- checking the inductance value;
- using an oscilloscope.
Checking the crankshaft position sensor using an ohmmeter:
- For this test you need to purchase a multimeter.
- It must be placed in the resistance measurement position.
- Then measure the resistance level of the inductor: use the probes of the device to touch the coil terminals.
- Acceptable value is 500-700 Ohm.
- If the measurement results are within the specified range of values, then the crankshaft is normal.
Checking the crankshaft sensor using an inductance measurement:
- You need to get a megohmmeter and a network-type transformer. You also need to purchase an inductance meter and a voltmeter.
- Using a multimeter, measure the inductance.
- Normal values are 200-400 mH.
- Using a megohmmeter, measure the insulation resistance between the coil wires.
- The obtained data should not be lower than 0.5 Mohm.
- The coil is demagnetized using a network transformer.
- A deviation from the norm indicates that the crankshaft sensor needs to be replaced.
- Connect the probes to the wires that lead to the coil.
- Open the software for working with the oscilloscope.
- Pass a metal object in front of the DPKV.
- All data will be reflected on the screen.
To do this, you can use several methods. We will not consider all of them, but will devote time to only two, the most basic and most accurate methods. In any case, to perform diagnostics you need to dismantle the element to check its functionality. When dismantling the crank pulley position regulator, you should visually inspect it - perhaps the malfunctions will speak for themselves.
Often, a visual inspection makes it possible to identify certain damage to the element body, as well as the condition of the block itself and the contacts themselves. If the regulator is too dirty, it must be washed with alcohol, since its contacts must always be clean. If this diagnostic method does not help detect a breakdown, then you should check the sensor more carefully.
First way
Voltmeter for diagnostics
But before you start diagnosing the pulley position regulator, check the manual for your machine for the exact range of indicators for DPKV. The manufacturer indicates this nuance most accurately and you will need to navigate according to it. If the results obtained differ from those indicated in the instructions, then the DPKV must be replaced because it is faulty.
Second way
This method will allow you to more accurately determine the state of the component. To test your device you will need:
- digital voltmeter;
- megohmmeter;
- inductance measuring device;
- network transformer.
Megaohmmeter for device diagnostics
Required materials and tools:
- key to “10”;
- head, knob;
- rags;
- additional lighting as needed;
- new DPKV;
- flat head screwdriver.
Regulations:
- We place the car on the inspection channel, secure the wheels with wheel chocks, and squeeze the parking brake;
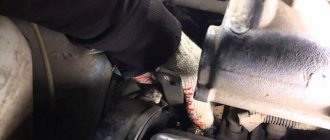
- from the end of the engine, in the area where the oil pump is located, use a screwdriver to pry up the block with terminals, remove it, and move it to the side;
- Unscrew the screw (to “10”) - the clamp from the sensor;
- remove the controller;
- We carry out troubleshooting of the seat, wipe it, clean it from residual dust and dirt;
- insert a new controller;
- screw it in and assemble the structure in reverse order.
DIY replacement completed.
Also check out
- Installation of new front struts on Lada Priora cars
- Checking the throttle position sensor (TPS) VAZ 2110
- Instructions for changing the oil in a VAZ 2108 box
- Remove the decorative engine cover.
Self-diagnosis and replacement of the oil pressure sensor Lada Kalina
- The Kalina oil pressure sensor is located on the back of the engine, it is installed on the right side of the cylinder head socket.
How to check and replace the oil pressure sensor Lada Kalina
- By pressing the pad clamps, it is necessary to disconnect the drive pad directly from the oil pressure sensor.
How to check and replace the oil pressure sensor Lada Kalina
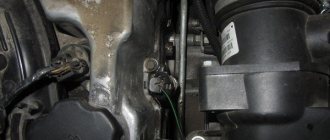
- Unscrew the sensor with a key to “21”.
Self-diagnosis and replacement of the oil pressure sensor Lada Kalina
- Prepare a new pressure sensor for installation and install it in the socket.
How to replace the Lada Kalina oil pressure sensor with your own hands
- Clamp everything, put the wire block in place, and install the cover. All that remains is to make sure that the problem has disappeared (the light should go out in a couple of seconds).
How to replace the Lada Kalina oil pressure sensor with your own hands
Similar articles:
- How to replace speed sensors on a VAZ 2110 with your own hands
- Checking the throttle position sensor (TPS) VAZ 2110
- Checking the coolant temperature sensor (DTOZH) VAZ 2114
- Oxygen sensor. Checking the VAZ lambda probe
Step-by-step verification
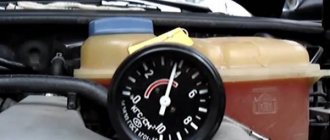
Pressure-related devices are checked using a special pressure gauge. The components must be installed in place of the DDM and the car engine must be started. If the pressure gauge displays 0.65 kgf/cm
2
at idle speed, we can safely say that the sensor is working normally and the pressure is within normal limits. If the device displays a reduced reading, you will have to replace the oil pressure sensor.
You can check the serviceability of the DDM in another way, that is, without the help of a pressure gauge. After all, it may happen that the indicator lights up while driving. In such circumstances, car owners need to do the following:
- Initially, the sensor is unscrewed from the “socket”;
- next you need to start spinning the starter without starting the engine;
- if oil begins to appear from the “socket” when the starter rotates, this factor will indicate a sensor malfunction.
Under no circumstances should you operate a car without replacing a faulty DDM. After all, all components in the car must work properly; this is important from a safety point of view.
This is interesting: Gates timing belt: how to distinguish a fake, reviews