Don't believe those who say that the brakes were invented by cowards. They were invented by very smart and long-lived people, and the vacuum brake booster was also invented by very lazy people. In order to check the need for VUT on your car, try stopping it by pressing the brake pedal with the engine off at low speed. Most likely, to come to a complete stop, you will have to press the brake pedal so hard that you will even need to sit up a little in your seat. Can you imagine if such a surprise awaits you during heavy traffic in a stream of cars, and even on a descent? Therefore, this issue simply needs to be taken seriously and with full responsibility for your own and others’ safety. So, let’s figure out how to repair a VUT and replace its components.
Malfunctions of the vacuum brake booster VAZ 2110
Devices from different manufacturers may vary in characteristics and quality, and the price of the VAZ 2110 vacuum amplifier may also vary. Since the functioning of its mechanism affects the operation of other parts and components, and above all the car engine, it is worth not saving and carefully monitoring its serviceability.
If there is a hissing sound from under the hood, a burnt smell of oil is felt in the cabin, and the brake works like a stopped car only after repeatedly pumping the brake pedal with your foot, then you should immediately contact a car service center for diagnostics and, if necessary, replacement of this device.
Table of dozens of faults in the vacuum brake booster and methods for eliminating them
| Signs | Diagnostics | Conclusion | Elimination method |
| Hissing when braking | The engine is running, press the brake pedal and at the same time detect a hissing sound in the pedal area | The integrity of the diaphragm is compromised | Diaphragm replacement, total VUT |
| Hissing when the engine is running | The engine is running and a hissing sound is heard in the engine compartment. The engine runs unstably; when you press the brake pedal, the speed increases slightly briefly | The integrity of the pipe connecting the VUT and the intake manifold is damaged | Search for air leaks, elimination, replacement of pipe |
| Soft “cotton” brake pedal | When you press the pedal, it steadily, non-stop “goes” to the floor. When braking there is no feeling of stable resistance to pressing force | Depressurization of the hydraulic system, air ingress | Searching for leaks, checking fluid levels, bleeding brakes. |
| The car does not “slow down” | When you press the pedal, the braking is delayed, the pedal travel is not enough to lock the wheels | Large free stroke of the rod | Adjust idle speed |
Articles
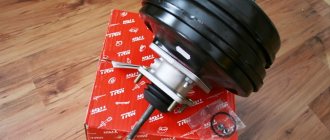
- 21100-3510010-00 — native VUT
A common replacement is AUTO TECHNOLOGIES AT 1001-010VB.
AUTO TECHNOLOGIES AT 1001-010VB
- TRIALLI VA 550
- DAAZ 21100-3510010-00
- DAAZ 2110.3510010
- FENOX VB10003C3
How to check the vacuum brake booster of a VAZ 2110
You can check the vacuum brake booster “tens” for proper operation yourself. To do this, press the brake pedal repeatedly with the engine off. This method checks the uniformity of pressure in the cavities. Everything is fine. Then, when you hold your foot on the brake pedal, the engine starts. If the pedal is moved forward simultaneously with the foot, then the amplifier is operational. Otherwise, you need to make sure that the problem is this and not a problem with the tip flange or its fastening.
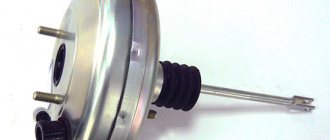
Vacuum brake booster VAZ 2110
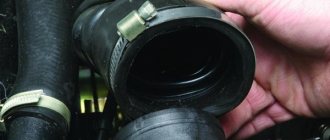
The pedal may still not function properly due to a faulty connection of the fitting on the engine exhaust pipe to the hose. This also has a detrimental effect on the performance of the braking system and its efficiency. when the valve body does not stick.
Its repair and replacement
p, blockquote 34,0,0,0,0 —>
In the event of a failure of the VUT, it is necessary to immediately take measures to restore its functionality.
p, blockquote 35,0,0,0,0 —>
You can replace the vacuum hose yourself. It is also possible to replace the vacuum pump in cars with diesel engines.
p, blockquote 36,0,0,0,0 —>
More complex repair work related to restoring the tightness of VUT chambers, the serviceability of the diaphragm, valves, and other structural elements is best entrusted to professionals at a certified service station. It should be remembered that serviceable brakes are the basis of safety; you should not skimp on this.
p, blockquote 37,0,0,0,0 —>
After repair, it is necessary to check the synchronization of wheel braking and diagnose the ABS and ESP systems. This should be done on special stands and appropriate diagnostic equipment.
p, blockquote 38,0,0,0,0 —>
p, blockquote 39,0,0,0,0 —>
In most cases, repairing a vacuum booster can cost much more than buying it or replacing a VUT with a used one in good condition. There is a reason to look for an amplifier at a disassembly site. Moreover, they are unified: one model can be used on different brands of cars.
p, blockquote 40,0,0,0,0 —>
Head unit in a car - what it is and how to choose it.
Video - replacing VUT on a GAZelle car:
p, blockquote 42,0,0,0,0 —> p, blockquote 43,0,0,0,1 —>
When to change the vacuum brake booster
If the brake booster fails, a hiss may appear when you press the brake pedal, and the speed may also go up and then down, in addition, the brake pedal will become difficult to press (This is equivalent to the fact that the car is turned off) basically this is there are all the symptoms that indicate that the vacuum booster has failed, it does not always happen that they all appear together in the car, but a couple of them will still appear when the vacuum booster becomes unusable (the main ones most likely, namely, tight brake pedal and floating speed).
By the way, the vacuum booster can be checked for serviceability as follows: With the engine off, press the brake pedal 5 times and when the last press is made, hold the pedal to the floor, immediately after which start the car, if the pedal falls a little, this will indicate that that the vacuum booster is fully operational!
Suction points
On the Priora there are several places for air leaks and during the inspection it is necessary to check each place in order to exclude it or, on the contrary, find it.
Once you have chosen a verification method that is convenient for you, from the ones indicated, you can begin searching for a place.
Clamps
Checking the connections of the clamps on the intake corrugation near the mass air flow sensor and the throttle valve, as well as the hoses connecting the receiver and the throttle body. The clamps must be well tightened, and the hoses that are clamped by them must not rotate on the fittings. It is recommended to replace bad clamps with new ones.
Corrugation and hoses
Checking the integrity of the corrugation itself and hoses. The corrugation should not have chips, cracks or tears; inspect it carefully and replace it with a new one if necessary. Hoses must not have cracks.
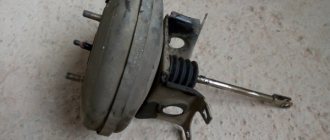
How to remove the vacuum brake booster of a VAZ 2110
We remove the vacuum booster and brake pedal assembly after removing the engine compartment upholstery, trim and windshield trim.
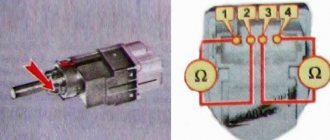
- Replacing the vacuum brake booster on a VAZ 2110. The reason for the replacement was that a hissing sound appeared when pressing the brake pedal, which could cause the engine to stall at any moment, the brake pedal became tight. To replace the vacuum booster, it is necessary to disassemble the rear wall of the engine compartment; remove the rubber seal (1), unscrew the upholstery (2) and remove the frill (3).
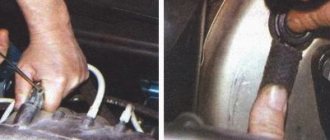
- Disconnect the block from the brake fluid level sensor, disconnect the hose from the vacuum booster, and unscrew the two nuts of the brake master cylinder.
- After that, carefully remove the main brake cylinder (without unscrewing the brake pipes) from the vacuum booster to a distance sufficient to remove the vacuum booster.
- Inside the car, under the dashboard (under the instrument panel), unscrew the four nuts and remove the wires from the frog. The most difficult thing in replacing the vacuum booster is unscrewing these four nuts, they are very inconveniently located.
- We remove the vacuum booster along with the pedal assembly.
- Remove the locking plate and push out the vacuum pusher mounting pin.
- Unscrew the vacuum booster from the pedal assembly.
- We install a new vacuum booster, pay attention to the correct installation, the pedal is at the bottom, and the hose fitting is at the top. Next we assemble in reverse order.
Cast iron brake drums
Needless to say, this metal is much stronger, but also many times heavier than its opponent. Some manufacturers sacrifice suspension lightweighting and still install cast iron on their cars.
There are a number of reasons for this, but as you probably guessed, they stem from the competitor’s disadvantages, let’s list:
- Durable. A very durable option in terms of wear and tear.
- The sticking is not so strong; in extreme cases, you can beat them off with a hammer; here you are unlikely to damage them.
- Do not deform from temperature loads.
That's all! Of course there are more disadvantages.
- It is much more difficult to cool down, because of this, braking efficiency decreases.
- Heavy. Create a large load on the vehicle axle.
- Prone to rust. You have to paint the outside, they don't look aesthetically pleasing.
By the way, here is a short video after painting such a drum.
Adjusting the rod of the vacuum brake booster VAZ 2110
To adjust the brake booster rod we will need: a 3 mm thick plate
Before starting work, you must: Disconnect the wire from the “—” terminal of the battery.
Carry out adjustments with the engine not running.
- The free play of the brake pedal is adjusted by moving the brake signal switch and, if adjusted correctly, should be 3–5 mm.
- With reduced free play of the brake pedal, the wheels may slow down, causing overheating of the brake mechanisms, as a result of which the car accelerates poorly.
- Increased pedal free play does not allow you to accurately calculate the braking force.
- Smoothly press the brake pedal with your hand until you feel resistance. In this position, insert a 3 mm thick plate between the switch buffer and the pedal bracket. If the plate does not fit between the bracket and the buffer or there is a large gap between them (more than 2 mm), adjust the free play of the brake pedal.
- Keeping the pedal pressed, loosen the two nuts securing the brake signal switch and, moving the switch, achieve the required free play of the pedal. After adjustment, the bracket should rest against the switch buffer (with the pedal released). While holding the switch in this position, tighten the fastening nuts. If you cannot adjust the free play of the pedal in this way, be sure to contact a specialist.
Diagnostics
To check your car for leaks, you can use the ELM327 scanner, you can read how to do this here. This scanner is capable of diagnosing your car and indicating whether it has this malfunction. But, checking with a scanner will not always be a reference, since the leak may be insignificant and the ECU simply may not notice it.
It is best to check the suction using the old proven method, or rather several, which are given below.
First way
It is necessary to unscrew the mass air flow sensor from the air filter housing. It is secured with two 10mm key bolts. We take out the mass air flow sensor and start the engine.
With the internal combustion engine running, we close the sensor hole with our hand or a bag, the car should stall and the intake corrugation should shrink. A vacuum is created in the engine, which, in the absence of air leaks, will persist for a long time and the corrugation will remain compressed.
If the corrugation on your car instantly expands or does not shrink at all, then this indicates the presence of suction.
Second way
To diagnose using this method, you will need a pump or compressor.
Here, just like in the first case, you need to unscrew the mass air flow sensor from the body and insert the bag between it. Then screw it back, thereby blocking air access to the engine.
On the receiver we find a fitting with a plug. We remove the plug and connect the pump there, pump up pressure into the receiver and listen to where the hissing will come from. To more accurately determine the location of the leak, you can use a soap solution with a spray bottle. We spray the areas of possible leakage with this solution and look for the appearance of bubbles.
Third way
This method is widely used at service stations. The search for suction is carried out using a smoke generator. This method is similar to the second, but instead of air, smoke is pumped into the receiver. If the engine has a choke, then smoke will flow out of this place.
Principle of operation
VUT, or as drivers say - vacuum cleaner, creates a vacuum, due to which additional force is created when the brake pedal is pressed. Thus, the vacuum booster ensures that when you press the pedal without applying much force, the brakes are applied quickly and effectively.
Vacuum brake booster
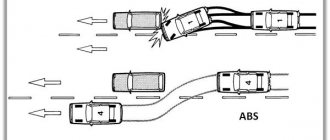
Such a system on the VAZ 2110 not only simplifies and speeds up wheel locking, but also contributes to less wear and tear on the vehicle and makes driving more comfortable. The “diagonal layout” of the vacuum brake, when the wheels are blocked due to two circuits (front right - rear left and front left - rear right) is designed so that even if one of the circuits fails, it is possible to brake quite effectively, and the car at the same time didn't skid.
Rear cylinder design
Replacing the rear brake cylinder of a VAZ 2109
In turn, the cylinder consists of:
Brake fluid reservoir. A special sensor regulates the liquid level;
- The housing in which the pistons and return springs are concentrated;
- Return springs, allowing the pistons to return to their original position after pressing the brake;
Replacing the rear brake cylinder on a VAZ 2109
- Sealing cuffs that create the correct pressure in the tank;
- Pistons with pushers;
- Differential pressure sensor.
How it all works
Replacing the rear brake cylinders of a VAZ 2109
As a rule, in normal condition and under optimal environmental conditions, the cylinder works like this:
To slow down, the driver needs to press the brake. After this, the force is transmitted along the rod to the piston. This rod moves forward, helping to close the compensation hole. Thus, the brake fluid pressure begins to increase.
causes
The most common problem that causes a yellow BMW PARK light is the parking brake actuator.
- Parking brake drive. The gear inside the parking brake actuator may break. A common problem on BMWs with electronic brakes that causes the yellow PARK light to stay.
- Software problem. BMW parking brake problems can in some cases be resolved by updating the software at the dealer.
- Loose connector. Check the connector on the parking brake module actuator. A corroded wire can cause intermittent parking brake errors.
- Weak battery. A weak battery may prevent the parking brake from releasing. Chances are you have other electrical problems if your BMW won't hold a charge. Follow this guide to learn how to replace your BMW battery.
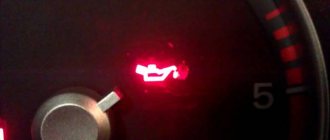
Why does the indicator ((!)) appear?
The brake system consists of a mechanical part (discs, pads, brake fluid, lines, etc., manual or electric parking brake) and an electronic part - a set of sensors and wiring.
Only on certain car models, signals from different sensors are indicated by the lighting of individual lamps, and then the letter ((P)) on the dashboard indicates that the handbrake is engaged, and the icon ((!)) indicates a malfunction of the main brake system.
Often, cars have only one warning lamp, which receives signals from the brake fluid level sensor, pad wear, brake light and handbrake.
Normally, the “Brake” or ((!)) indicator lights up before starting the engine, when the key is in the “On” position, and goes out immediately after the engine starts. And it appears on the dashboard subsequently only if the owner puts the Renault on the parking brake.
The process of removing the electric motor
Generally speaking, it is not difficult to get a stove motor and almost everyone can do it. However, the problem is that making withdrawals is very inconvenient and you have to do a lot of things blindly. If you decide to repair it yourself, then you need to be prepared for inconvenience. Removing the electric motor is carried out as follows:
- unscrew the bolt securing the glove compartment and remove it from its regular place;
- remove the fuse box, first removing its cover;
- disconnect the wire that connects to the recirculation damper;
- pull out the clip and remove the insulation;
- remove the damper from the mount and remove the old grease with a rag;
- disconnect the power wires of the electric motor;
- on the driver’s side there is a lock on the body that needs to be released by pressing it towards the center;
- turn the electric motor counterclockwise and pull it out to the right side;
- We remove the motor through the place where the fuse box was located and check its functionality.
After completing all the work, you need to put the working engine back in place, performing the steps in reverse order. Don't forget to use lubricant when installing the recirculation damper.
Which vacuum cleaner to buy
Brakes are the most important system in a car. Repairs should be approached responsibly. The vacuum booster is an expensive unit. Therefore, the owner may have the idea of buying a used spare part. In this case, you can really save money. But, the old vacuum seal can fail at any minute, which means the money was wasted. In addition, disassembling the VAZ 2110 and then replacing the vacuum seal may be in vain.
Consumer choice
| Lucas | 9.4% |
| Iruna | 2% |
| TorgMash | 53.3% |
| Technomaster | 0.8% |
| ProSport | 2% |
| Sport | 2% |
| AT, Czech Republic | 0.8% |
| Factory VUT | 23.1% |
| Another VUT | 5.5% |
| Axiom | 1.2% |
| The leader of this competition was TorgMash, with 53.3% of the votes cast for it. | |
How to repair or replace parts
Hisses when braking (with video example)
In the following video you can hear this characteristic sound:
By the way, according to the instructions, the standard “vacuum unit” of the VAZ-2110 cannot be repaired, only replaced, but we “do it ourselves.” And judging by the number of different instructions for self-repairing cars posted on the Internet, it can be argued that any domestic car enthusiast with more than five years of experience can safely be awarded the title of design engineer in absentia. Therefore, we will consider the repair procedure, especially since the difference in cost between the repair kit and the vacuum booster itself is disproportionately high.
In any case, first we will have to dismantle the VUT; for this we will need a minimum of available tools.
Functionality check
This instruction will be relevant when checking the vacuum booster on VAZ models from 2113 to 2115. So the technique is clearly universal.
- Press the brake pedal all the way to the floor about 4-5 times. In this case, the engine should not be started. Due to these presses, you will create equal pressure in two sections of your vacuum booster. The valve will report problems as soon as you start pressing the pedal. If you hear squeaks while pressing, this indicates a serious malfunction.
- Once the pressure is even, start the engine while keeping the brake pedal to the floor. If the brake booster system is working properly, then the pedal will rise by itself after the engine is started. If this does not happen, then you will definitely have to face repair work.
- If the check shows problems with the amplifier, do not forget to additionally check the quality of the hose fastening and the condition of the flange. When the mount is abnormal, this may result in the brake pedal not lifting.
Sometimes poorly fixed fasteners cause quite expensive and actually unnecessary repairs or replacement of the vacuum booster. Conduct a preliminary check so as not to complicate your life.
When to change the amplifier
Brakes are a whole system that consists of many elements. Each of them must function correctly and efficiently.
In addition to checking the vacuum booster itself, you should inspect the condition of the brake fluid pipes, make sure there are no brake fluid leaks, and look at the current condition of the brake pedal.
If no faults were found in the braking system, you can think in more detail about the issue of replacing the vacuum booster.
There is no point in repairing the element. It's easier to start replacing right away. The functionality of the car and the power that your engine is capable of producing depend on the quality and timeliness of the work performed. Lack of power negatively affects the speed and comfort of movement around the city and beyond.
Replacement
To replace a vacuum booster you will need a certain set of tools and materials. It includes:
- Screwdriver Set;
- Pliers;
- Socket wrench for 13 and 17 millimeters;
- Special wrench for brake pipes;
- New plugs;
- New fittings.
Replacement procedure
Let's get straight to work.
- Removing the vacuum booster can be difficult due to the brake cylinder. Therefore, we advise you to remove it first. Another option is to disconnect the pipes from the brake cylinder and move them to the side for a while. Here you decide for yourself what is more convenient for you.
- The cylinder is not the main problem. It is difficult to cope with the mounting of the vacuum booster. It's just not very convenient to do this. This is the design of the VAZ 2114.
- Start with the valve - remove the hose fasteners from it, remove the support bush, after which you can pull out the brake pin.
- Next, using a 13 mm wrench, all four fasteners of the vacuum booster are dismantled.
- After all the inconveniences of the work done, you can remove the element and get ready to install a new amplifier in its place.
- To do this, you will have to install a special mounting frame. The frame is tightened with a 17 mm wrench, after which the new component is installed inside the car.
- If you want to make your work as easy as possible, do not forget to first connect the brake pedal to the booster with your finger when reassembling it. After this, it is much easier to cope with putting the vacuum seal back into place.
When replacing the vacuum booster, be sure to change the old vacuum hose at the same time. This element is far from eternal, therefore, as it wears out, it will negatively affect the quality and efficiency of the new vacuum seal.
Dismantling
To replace the vacuum booster, the following actions are necessary:
- Remove the engine compartment trim;
- Remove the trim from the windshield;
- Unscrew the nuts securing the vacuum booster to the main cylinder with a 17mm wrench;
- Then carefully remove the master cylinder from the studs without damaging the tubes;
- Disconnect the hose from the vacuum tank;
- Disconnect the wiring from the brake light switch from the passenger compartment;
- Unscrew the brake pedal from the body (you will need a 13 key);
- Remove the vacuum brake booster;
- Disconnect the brake light button;
- Using a screwdriver, pry up the locking bracket and remove the pusher pin;
- Unscrew the two nuts securing the vacuum chamber to the bracket and disconnect it. Now it is possible to replace this device with a new one.
The vacuum seal is replaced in the reverse order. Then the brake light button is installed and the free play of the pedal is adjusted, which should be 3 - 5 mm.
Source
What is a "check"
Its image may differ in different brands of cars.
Yellow, on the dashboard
If in your car, after starting the engine, the “check engine” light continues to light or flashes, it means that the control unit has detected a malfunction. The malfunction is recorded in the form of OBD-2 standard error codes. The list of main codes and their decoding is at the end of the article.
decoding standard codes
In order to read the control unit memory error codes, you need to use a diagnostic scanner (a laptop with a diagnostic program and an adapter for communicating with the car); it is best to contact a specialized service for computer diagnostics. Some older cars, before 2002–2006, support self-diagnosis mode.
Self-diagnosis, the process of indicating errors in the form of two-digit codes by the engine control unit using a “check” lamp. We will consider this mode at the end of the article.
The check light does not go out or blinks
This indicates that the fault is currently present. Even if the motor works without changes, there is a high probability of its breakdown. For example, a misfire error on an 8-cylinder engine will not be externally noticeable. However, unburnt fuel will burn out in the catalyst, which will lead to its failure after 100–200 kilometers. You can drive with the check light on or flashing only to the place of repair (at your responsibility). If a red light comes on on the dashboard, take the tow truck to the service station; if it’s yellow, you can try, at your own risk, to drive to the service station yourself.
Malfunction conditions and possible causes
- - while driving, during acceleration (misfire due to spark plugs, injectors, fuel)
- – the check light blinks or lights up and the engine stalls, the car does not pull, jerks, the speed fluctuates (misfires due to spark plugs, injectors, fuel)
- — after refueling (poor quality fuel)
- — when the ignition is turned on (malfunction of engine control system sensors)
- — after washing the car, washing the engine, rain (poor contact in the engine wiring)
- — Check lights up on a cold engine/after warming up the engine (malfunction of oxygen sensors)
- - at high speeds, at idle speed (fuel, spark plugs, injectors)
- — after replacing spark plugs (plugs of the wrong type, damage during installation of spark plugs, high-voltage wires)
- — after replacing the air filter (intake leak, flow meter connector not connected)
- — after replacing the timing belt (incorrect installation according to the marks, sensor connectors are not connected)
- — after installing the LPG (incorrect installation, mismatch between the engine control units and the LPG)
- — after installing the alarm system (incorrect connection, the removed connectors were not put back on)
- — after replacing the fuel filter (filter of the wrong type, fuel system leakage)
- - the check light came on and fuel consumption increased (not all cylinders are working - misfire, engine temperature sensor, flow meter, oxygen sensors are faulty)
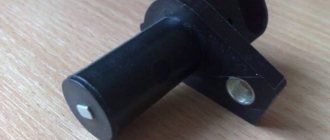
- — the lamp blinks or lights up and the engine does not start (diesel, gasoline) (the crankshaft and camshaft position sensor, fuel pressure in the rail and the injection pump metering valve in the diesel engine are faulty).
- — the light is on when rising (insufficient quantity or quality of fuel, contamination of the fuel filter, injectors)
- — after replacing the ignition module, ignition coil (incorrect connection, malfunction or incorrect installation of the module itself)
- — the check light comes on at sub-zero temperatures (poor contact in the electrical wiring, faulty motor temperature sensors)
- - when you press the accelerator (not enough fuel - dirty fuel filter, injectors, poor sparking - coil, spark plugs)
- - when the heater is turned on (uneven engine operation when the load increases - misfires due to spark plugs, injectors, fuel)
- — the lamp is on and the speedometer does not work (speed sensor and its wiring)
- — the check light may be on due to oil (due to insufficient oil pressure, the VVT clutch installed on the camshaft may not work correctly. It begins to work when oil is supplied to it from the internal combustion engine lubrication system; if the pressure is insufficient, the engine control unit detects a malfunction).
- - the check light is on because of gasoline - the most common malfunction. When the quality of the fuel is low, the ignition of the fuel-air mixture deteriorates, various malfunctions are recorded - misfires, incorrect readings of oxygen sensors and flow meter. If the fuel is of very low quality, the car will not start.
What should I do if the brake light on the instrument panel is on?
Checking the mechanical component
Self-diagnosis is a simple operation. It is divided into two components - mechanical and electrical. The first is very important, since it evaluates the condition of the brake system drive and determines its performance.
Checking the mechanical component is reduced to assessing the level of brake fluid in the reservoir and the condition of the drive lines and system components - the master brake cylinder and operating mechanisms.
The brake reservoir is located in the engine compartment, on the right near the rear panel of the engine compartment. It is not difficult to find it, since there are two wires going to the tank cap.
When checking, disconnect the wires and unscrew the cap to determine the brake fluid level. There are marks on the walls of the tank, by which you can understand how much liquid is left. A level above the middle between the marks is considered normal.
A drop below o indicates a fluid leak. Therefore, the next stage is checking the lines and brake mechanisms. To do this, inspect the wheels from the inside. If we find a fluid leak from the mechanisms, then we see smudges on the disks.
For an additional check, we start the car and press the brake pedal a couple of times, after which we roll the car back and inspect the surface of the ground for traces of leaking fluid, and check the fluid level. If it is detected, the brake line is damaged, and the amount of fluid will decrease.
If there is a brake fluid leak, the car cannot be used because the car does not have brakes. The best option in this case is to call a tow truck to deliver the car to the repair site. But if you have enough driving experience, then we get to the service station or garage on our own. Car brake systems usually have two circuits, and if the line of one of them is broken, the second continues to work. But due to the fact that the effectiveness of the brakes on a car with a damaged line is greatly reduced, you need to drive at low speed and with the hazard lights on.
Sometimes there is a problem with the warning light coming on when you press the brake pedal. The reason for this lies in two factors - low fluid level in the reservoir and worn disc brake pads. When braking, fluid flows into the working cylinders and the amount in the tank drops below a critical level, which is why the lamp lights up. This can be treated by installing new pads and adding fluid to the reservoir.
Electrical problems
If upon inspection it is revealed that the lines and working elements of the system are not leaking, then we look for the cause in the electrical component. And since it performs a signaling function, the operation of the car continues as usual. But you should not delay in identifying and eliminating the problem, since in this case the warning light will not work in case of a serious malfunction - a liquid leak.
And problems with the electrical part arise in:
- liquid level sensor;
- handbrake signal sensor;
- brake lamps;
- brake pad wear sensors.
The reason is also the wiring that leads to the listed elements.
A malfunction of the liquid level sensor occurs when the contacts to which the wiring is connected are oxidized and the float is broken down (if it is hollow). In the first case, contact between the sensor and the wiring is lost, which causes the lamp to light up. To eliminate this, we clean the connections. In the second case, a crack in the float causes it to fill with liquid, causing it to sink and close the contacts. In this case, you will have to replace the cap along with the tank and float.
It is easy to check the functionality of the handbrake sensor. But to do this, it must first be discovered. To check, put the car on the parking brake, then press on the protruding sensor rod, keeping an eye on the lamp. If it goes out when the rod is pressed, the reason does not lie in this sensor.
During the search process, we check the functionality of the brake lights. To do this, we ask the assistant to depress the gas pedal while we inspect the lights ourselves. A burnt-out lamp can easily cause the warning light to come on.
As for pad wear sensors, the reason usually lies not in them themselves, but in the thickness of the friction linings. We change the pads to solve the problem.
Finally, we note that these are the main reasons for the brake system warning light to come on. But in the process of searching for the cause, it will not be amiss to study the wiring diagram in order to understand what is included in the circuit and determine the range of elements that need to be checked.